
What Is a Raster or Bitmap Image?
A raster or bitmap image is a type of digital image that is made up of tiny square-shaped pixels. These pixels are arranged in a grid-like pattern, forming a matrix of colors that come together to create the image. Each pixel in a raster image contains specific color information, which gives the image its visual appearance.
Raster images are used to represent realistic images and are made up of a finite number of pixels. The quality and clarity of a raster image are determined by its resolution, which is measured in pixels per inch (PPI) or dots per inch (DPI). The higher the resolution, the more pixels are used to create the image, resulting in a sharper and more detailed representation.
One important aspect of raster images is that they are resolution-dependent. This means that the quality of the image can be impacted if the image is resized or stretched beyond its original dimensions. Enlarging a raster image can lead to pixelation, making the image appear blurry or distorted.
Raster images can be created using various digital devices, such as digital cameras or scanners, which capture the image as a grid of pixels. These images are then saved as bitmap files, commonly in formats such as JPEG, GIF, or PNG.
While raster images are widely used and supported by most digital devices and software, they also have some limitations. Since they are made up of individual pixels, raster images do not scale well and can result in large file sizes if not compressed effectively.
Despite their limitations, raster images are commonly used in various fields, including photography, web design, advertising, and digital art. They are especially useful in capturing and reproducing complex images with intricate details, such as photographs.
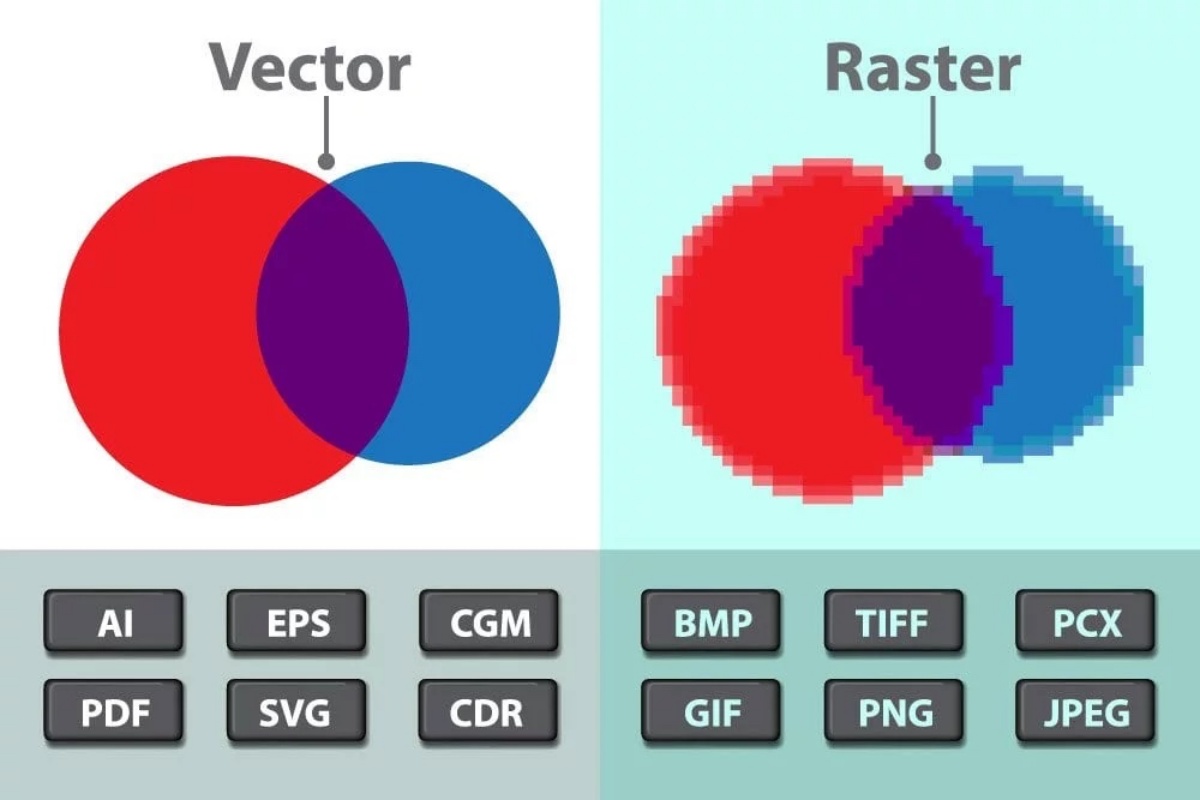
Understanding the differences between raster and vector images is essential, as each has its own strengths and weaknesses. While vector graphics are resolution-independent and perfect for creating logos and illustrations, raster images excel in representing realistic and detailed images.
Definition of Raster Image
A raster image, also known as a bitmap image, is a digital image file format that represents graphics or photographs as a grid of square-shaped pixels. Each pixel in the raster image contains specific color and brightness information, which collectively forms the visual representation of the image.
Unlike vector graphics, which use mathematical equations to create images, raster images are made up of a fixed number of pixels. The resolution of the image determines how many pixels are present, which affects the level of detail and clarity.
Raster images are commonly used to depict realistic and complex visuals such as photographs, digital paintings, and scanned images. The grid-like structure of pixels allows for the precise rendering of color variations and intricate details.
These images are designed using bitmap graphics editors, digital cameras, or scanners. Bitmap editors, like Adobe Photoshop, enable users to manipulate individual pixels, adjusting their colors, brightness, and other visual attributes. Digital cameras and scanners capture real-world scenes and objects as raster images by converting the light and colors detected into pixel data.
One drawback of raster images is that they can be resolution-dependent, meaning that their quality is affected by the number of pixels used to create the image. When a raster image is resized or scaled up, the pixels can become more visible, resulting in a loss of sharpness and detail known as pixelation.
Raster images are typically saved in file formats such as JPEG, PNG, or GIF. The choice of file format depends on factors such as the intended use of the image, the desired level of compression, and the required support for transparency or animation.
It is essential to consider the specific characteristics and limitations of raster images when working with them. Understanding how resolution affects image quality and the potential for pixelation can help ensure that raster images are optimized for their intended use, whether it’s for print, web, or other digital media.
How Raster Images Are Created
Raster images are created using various methods and devices to capture and digitize visual information. Here are some common ways in which raster images are created:
Digital Cameras: Digital cameras are widely used to create raster images. These cameras capture light and color information through a lens and convert it into a grid of pixels. The number of pixels captured depends on the camera’s sensor resolution, which influences the level of detail in the image.
Scanners: Scanners are devices that convert physical documents, prints, or images into raster images. When a document is scanned, the scanner captures the image as a grid of pixels, reproducing the colors and details of the original document.
Image Editing Software: Bitmap graphics editors, such as Adobe Photoshop, allow users to create and manipulate raster images. These software tools provide a wide range of features, such as selecting colors, adjusting brightness and contrast, and applying various filters and effects.
Drawing Tablets: Drawing tablets are used by artists and designers to create raster images digitally. These tablets have a specialized surface that allows users to draw or paint directly on them using a stylus. The tablet captures the movements and pressure applied by the artist, creating a raster image on the computer.
The process of creating a raster image involves capturing or creating an initial image and then saving it in a bitmap file format. This file format stores the pixel values and color information for each pixel of the image.
When saving a raster image, it’s important to consider the file format. Different formats have different characteristics and purposes. For example, JPEG files are commonly used for photographs due to their efficient compression, while PNG files are often used for images that require transparency.
Overall, the creation of raster images involves capturing or creating the image using digital devices or software and saving it in a bitmap file format. Understanding the various methods and tools available for creating raster images can help artists, photographers, and designers bring their visions to life.
Raster Image File Formats
When working with raster images, it is crucial to choose the appropriate file format for storing and sharing your images. Each raster image file format has its own characteristics, advantages, and best use cases. Here are some commonly used raster image file formats:
JPEG (Joint Photographic Experts Group): JPEG is one of the most widely used file formats for photographs and complex images. It uses lossy compression, meaning that it reduces the file size by discarding some image data. This compression leads to a decrease in image quality, but it makes JPEG files highly manageable, especially for online sharing and website display.
PNG (Portable Network Graphics): PNG files are commonly used for images that require transparency or a higher level of detail. Unlike JPEG, PNG uses lossless compression, which retains image quality without sacrificing file size. PNG is suitable for graphics, icons, and images with solid colors or sharp edges.
GIF (Graphics Interchange Format): GIF files are known for their support of animations and their limited color palette (256 colors). They use lossless compression, making them suitable for simple graphics, logos, and icons. GIFs are commonly used on the web for small, animated images.
BMP (Bitmap): BMP is a standard Windows bitmap file format that stores color data for each pixel in an image without any compression. BMP files are typically larger in size compared to other formats, making them less suitable for web usage. However, BMP files retain high image quality and are commonly used for printing and archival purposes.
TIFF (Tagged Image File Format): TIFF is a flexible raster image format commonly used for professional photography and graphic design. It supports lossless compression and stores a wide range of color depths, making it suitable for high-quality printing and maintaining image fidelity.
Choosing the right file format for your raster images depends on various factors, including the intended use, image complexity, file size considerations, and platform compatibility. It is essential to consider these factors to ensure that your images are well-suited for their intended purpose and provide the desired level of quality.
Moreover, it is worth noting that most image editing software and online platforms provide options for converting between different raster image formats. This flexibility allows users to optimize their images for specific contexts or to accommodate compatibility requirements.
By understanding the characteristics and purposes of different raster image file formats, you can make informed decisions regarding the storage, sharing, and usage of your images in various digital and print applications.
Pros and Cons of Raster Images
Raster images, also known as bitmap images, have both advantages and disadvantages when compared to other types of digital graphics. Understanding the pros and cons will help you make informed decisions when using raster images for your projects. Here are some key points to consider:
Pros:
- Raster images excel at representing realistic and complex visuals, such as photographs and detailed artwork. They capture subtle variations in color, shading, and texture with precision.
- They are commonly supported by a wide range of software applications and devices, making them easy to work with and share.
- Raster images are created by capturing real-world scenes or digitally painting them, which allows for a high level of artistic expression and creativity.
- They can be edited and manipulated using bitmap graphics editors, providing extensive control over individual pixels, color adjustments, and various artistic effects.
- Compared to vector graphics, raster images are often more accessible and easier to understand, making them ideal for conveying realistic visuals to a broad audience.
Cons:
- Raster images are resolution-dependent, meaning that their quality is directly related to their pixel density. Enlarging or stretching a raster image beyond its original dimensions can result in pixelation, making the image appear blurry or pixelated.
- They can have larger file sizes compared to vector graphics, especially when uncompressed or saved at higher resolutions. This can affect storage space and increase loading times, especially on the web.
- Raster images do not scale well. Resizing them can lead to loss of quality and detail, and it is challenging to scale them up without visible pixelation.
- When working with raster images, it is crucial to ensure they are optimized for their intended use. This includes optimizing file sizes, selecting appropriate formats, and considering compatibility with different devices and software.
- Editing raster images can be challenging, especially when precise modifications are required. In some cases, it may be necessary to recreate or trace the image using vector graphics for more flexibility and better editing capabilities.
Understanding the pros and cons of raster images allows you to make informed decisions about when and how to use them effectively. They are particularly well-suited for capturing and reproducing realistic visuals, but it’s important to be aware of their limitations and consider alternative options when necessary.
Common Uses of Raster Images
Raster images, also known as bitmap images, are widely used in various fields due to their ability to capture and represent complex visuals with great detail and realism. Here are some common uses of raster images:
Photography: Raster images are the go-to format for capturing and displaying photographs. They excel at capturing the intricate details and color variations found in real-world scenes. Photographers use digital cameras to capture raster images that can be edited and shared digitally or printed as physical copies.
Web Design: Raster images play a vital role in web design, as they are used to enhance the visual appeal and user experience of websites. They are commonly used for showcasing product images, displaying featured images, and creating visually engaging backgrounds. Raster images are compressed to optimize website loading times while preserving a visually appealing appearance.
Graphic Design: Raster images are extensively used in graphic design for creating visually appealing illustrations, logos, icons, and other graphical elements. With the ability to achieve intricate details and complex color gradations, raster images are ideal for conveying artistic and visually stimulating concepts. Graphic designers use software like Adobe Photoshop to create and manipulate raster images with precision.
Digital Art: Many digital artists work exclusively with raster images, using tools like digital drawing tablets and software such as Corel Painter or Autodesk SketchBook. Raster images allow artists to create various styles and apply realistic textures, resulting in visually stunning digital paintings, concept art, and illustrations.
Advertising: Raster images are widely used in advertising to create eye-catching visuals that capture the attention of the target audience. Whether it’s print media, online banners, billboards, or social media ads, raster images allow advertisers to convey their message effectively by incorporating high-quality visuals that evoke emotions and engage viewers.
Print Media: Raster images are extensively used in print media, including magazines, brochures, posters, and packaging. Their ability to represent detailed photographs and complex visuals makes them a suitable choice for high-quality print reproduction. Printers utilize raster images to produce accurate and visually appealing hard copies of various materials.
These are just a few examples of the many common uses of raster images. Their versatility, ability to capture intricate details, and wide compatibility make them an essential component of modern digital media and design, serving various industries and creative endeavors.
Understanding Resolution and DPI in Raster Images
Resolution and DPI (dots per inch) are important concepts to understand when working with raster images. They determine the level of detail and quality of an image, as well as its suitability for different purposes. Let’s delve into the significance of resolution and DPI in raster images:
Resolution:
Resolution refers to the number of pixels that make up an image and is typically measured as pixels per inch (PPI). A higher resolution means more pixels are available, resulting in a sharper and more detailed image. At a lower resolution, the image appears less crisp and may lose fine details.
The resolution of a raster image is determined by its pixel dimensions. For example, an image that is 1920 pixels wide and 1080 pixels high has a resolution of 1920×1080 pixels. The resolution affects how the image is displayed on digital screens and printed materials.
It’s important to note that increasing the resolution of a raster image beyond its native resolution does not improve its quality. Enlarging a low-resolution image can result in pixelation, where individual pixels become visible and the image appears blurry or distorted.
DPI (Dots Per Inch):
DPI refers to the number of dots (or pixels) that fit within one inch of an image when printed. It is a measurement of print resolution. The higher the DPI, the more dots are used to represent the image, resulting in a sharper and more detailed printout.
For example, an image with a resolution of 300 DPI will have 300 pixels horizontally and 300 pixels vertically for every inch of the printed output. Higher DPI values are generally preferred for images that require fine detail, such as photographs or graphics with complex patterns.
However, it’s important to note that DPI is not the same as PPI. While DPI refers to the print resolution, PPI refers to the display resolution of an image on digital screens. The same pixel dimensions can be displayed differently on screens with different pixel densities.
Ultimately, understanding resolution and DPI helps ensure that raster images are used appropriately for their intended purpose. Higher resolutions and DPI values are typically desirable for print materials and situations where fine details matter, while lower resolutions are suitable for web display or small-scale digital usage.
When working with raster images, it’s important to consider the specific requirements of the project, including the intended viewing medium, print size, and the level of detail needed. This will help ensure that the image is appropriately sized and optimized to achieve the desired quality and clarity.
How to Create and Edit Raster Images
Creating and editing raster images require the use of various tools and techniques to capture, manipulate, and enhance digital visuals. Whether you are a photographer, graphic designer, or digital artist, here are the general steps involved in creating and editing raster images:
1. Capture or Import: To create a raster image, you can start by capturing a photograph using a digital camera or scanning a physical image using a scanner. Alternatively, you can import existing images into editing software from sources such as stock photo libraries.
2. Choose Editing Software: Use bitmap graphics editors, such as Adobe Photoshop or GIMP, to open and edit the raster image. These software tools provide a range of advanced features and controls for manipulating the image’s pixels, colors, and other attributes.
3. Evaluate and Adjust: Review the image and make initial adjustments to improve its appearance, such as correcting exposure, adjusting brightness and contrast, or cropping the image to focus on specific elements.
4. Enhance and Modify: Use various editing tools and features to enhance the image’s visual characteristics. This may involve adjusting colors, adding special effects, removing imperfections, or retouching specific areas of the image.
5. Resize and Resample: If needed, resize the image to the desired dimensions. Keep in mind that enlarging raster images beyond their original size can result in loss of quality and pixelation, while reducing their size may lead to loss of detail.
6. Save and Export: Select an appropriate file format for saving the edited raster image. Consider the purpose and characteristics of the image, such as JPEG for photographs, PNG for transparent backgrounds, or TIFF for high-quality prints. Ensure that the chosen file format retains the desired level of image quality and is compatible with the intended use.
7. Apply Non-Destructive Editing: It is best practice to use non-destructive editing techniques by working with layers and adjustment layers in editing software. This allows you to make changes without permanently altering the original image data and provides flexibility for future edits.
8. Experiment and Iterate: The creative process often involves experimenting with various techniques, filters, and effects. Don’t be afraid to explore different possibilities and iterate to achieve the desired result.
9. Consider Workflow and Organization: As you create and edit raster images, establish an organized workflow by naming your files appropriately, creating backups, and organizing them within a logical file structure. This ensures easy access and management of your image assets.
By following these steps and mastering the relevant software tools, you can create and edit raster images to bring your artistic vision to life, enhance photographs, or design captivating visuals for various digital and print applications.
Converting Raster Images to Vector Graphics
Converting raster images to vector graphics can be a valuable process when you need to scale or edit images without losing quality or encountering pixelation. Vector graphics are resolution-independent and consist of mathematically defined shapes and lines, allowing for flexibility in resizing and editing. Here’s how you can convert raster images to vector graphics:
1. Choose the Right Software: Use vector graphics software like Adobe Illustrator, CorelDRAW, or Inkscape, which have powerful tools and features specifically designed for creating and editing vector graphics.
2. Import or Open the Raster Image: Import the raster image into the vector graphics software. Most software allows you to import common raster image formats such as JPEG, PNG, or TIFF.
3. Create a New Document: Create a new document in the vector graphics software, specifying the desired dimensions and other settings suitable for the final output. This ensures that the resulting vector graphic has the appropriate size and resolution.
4. Use the Image Trace/Trace Bitmap Tool: In the vector graphics software, locate and use the image trace or trace bitmap tool. This tool analyzes the raster image and converts it into vector paths or shapes based on different settings and parameters you can adjust.
5. Adjust the Conversion Settings: Experiment with different settings like threshold, color tolerance, and curve fitting to achieve the desired level of detail and accuracy in the vector conversion. Fine-tuning these settings can greatly affect the final result.
6. Refine the Vector Graphic: After the conversion, review and refine the vector graphic if necessary. This may involve smoothing out curves, simplifying complex shapes, adjusting anchor points, or eliminating unwanted elements. These refinements help optimize the vector graphic for its intended purpose.
7. Save the Vector Graphic: Once you’re satisfied with the vector graphic, save it in a vector file format like SVG (Scalable Vector Graphics) or EPS (Encapsulated PostScript). These formats preserve the vector data and allow for further editing and scaling in the future.
8. Export the Vector Graphic: If you need to use the vector graphic in non-vector-friendly software or for specific purposes, export a raster image of the vector graphic in a suitable format, such as JPEG or PNG. However, keep in mind that once exported as a raster image, the vector benefits will be lost, and the image will become resolution-dependent.
Converting raster images to vector graphics provides numerous advantages, including the ability to scale the image up or down without loss of quality, edit individual elements easily, and achieve smooth and crisp output for various applications such as logos, illustrations, and typography.
Tips for Optimizing Raster Images for Different Purposes
Optimizing raster images involves applying specific techniques and considerations to ensure they are well-suited for their intended purposes. Whether you’re preparing images for web use, printing, or other digital media, these tips will help you optimize raster images effectively:
1. Determine the Desired Size and Resolution: Consider the required dimensions and resolution for the final output. This will ensure that the image is appropriately sized and that the level of detail meets the desired quality.
2. Choose the Right File Format: Select the appropriate file format based on the image content and the purpose of use. This includes considering factors such as compression, transparency, and animation support. JPEG, PNG, and GIF are popular formats, each with their own strengths and use cases.
3. Compress Images for Web: For web use, optimize the file size of raster images without compromising image quality. Use image compression techniques, such as reducing the color depth or adjusting the compression settings during the saving/exporting process.
4. Be Mindful of DPI and Print Resolution: When preparing images for print, ensure that you have the appropriate resolution (typically 300 DPI or higher) to maintain sharpness and detail. Consider the final print size and adjust the image dimensions accordingly to meet the required printing standards.
5. Preserve Original Files: Keep a backup of your original high-resolution files to preserve image quality and allow for future edits. This is particularly important when working on projects that may require different variations or reprints.
6. Use Layered Editing: When making edits to raster images, work with layers in your editing software. This allows you to make non-destructive tweaks, experiment with different adjustments, and easily revert changes if needed.
7. Be Mindful of Color Spaces: Pay attention to color spaces and ensure the image is converted to the appropriate color profile for its intended use. This is especially crucial when dealing with images for print, as different printing processes require specific color profiles to maintain color accuracy.
8. Optimize Metadata: Remove unnecessary metadata from image files, such as camera settings or geolocation information. This helps reduce file size and ensures better compatibility across different platforms and applications.
9. Test Across Different Devices and Environments: Preview your optimized raster images on multiple devices and environments to ensure they appear as intended. This includes testing on various screen sizes, operating systems, and web browsers to account for differences in color rendering and display capabilities.
By following these optimization tips, you can ensure that your raster images are appropriately sized, compressed, and prepared for their specific purposes. This will result in improved performance, better visual quality, and a seamless user experience whether the images are intended for web use, print media, or other digital applications.