
What is Disk Utility?
Disk Utility is a powerful tool included in macOS that allows you to manage and troubleshoot your Mac’s hard drive. It provides several functionalities, including formatting, erasing, repairing, and partitioning your disk.
When it comes to partitioning, Disk Utility allows you to divide your hard drive into separate sections called partitions. Each partition behaves like an individual drive, with its own file system, volume name, and capacity.
With Disk Utility, you have the flexibility to create multiple partitions on a single hard drive or SSD. This can be useful for various purposes, such as organizing your data more efficiently, installing multiple operating systems, or creating a separate backup space.
Additionally, Disk Utility also enables you to resize and delete partitions, providing you with the ability to adjust your storage allocation as needed. It’s a versatile tool that allows you to manage your disk space with ease.
Whether you’re a tech-savvy user or a novice, Disk Utility provides a user-friendly interface that makes partitioning your Mac’s hard drive a fairly straightforward process. It’s an essential tool for maintaining and optimizing your storage space.
Why should you partition your Mac’s hard drive?
Partitioning your Mac’s hard drive can offer a range of benefits and enhance your overall computing experience. Here are several reasons why you should consider partitioning your Mac’s hard drive:
1. Organization and data management: By dividing your hard drive into multiple partitions, you can keep your files and data organized. You can allocate separate partitions for your operating system, personal files, work-related documents, multimedia content, and even for specific projects. This segmentation makes it easier to locate and access specific data, improving your productivity.
2. Operating System flexibility: Partitioning your Mac’s hard drive allows you to install multiple operating systems. This can be handy if you want to run different platforms, such as macOS, Windows, or Linux, on the same machine. It not only enables you to switch between operating systems seamlessly but also provides a sandbox environment for testing and development purposes.
3. Backup and data protection: Creating a dedicated partition for backups ensures that your important files and data are secure. In the event of a system failure or accidental data loss, having a separate partition for backups can significantly simplify the recovery process. It also reduces the risk of data corruption and provides an extra layer of protection against malware or hardware failures.
4. Performance optimization: Partitioning your hard drive can improve overall system performance. By separating your operating system and applications from personal files and data, you can minimize disk fragmentation and increase the efficiency of data retrieval. Additionally, you can allocate specific partitions for resource-intensive tasks, ensuring optimal utilization of system resources.
5. Testing and experimentation: If you’re a software developer or an IT professional, creating dedicated partitions for testing and experimentation purposes can be incredibly useful. You can try out new software, configurations, or even beta versions of operating systems without risking the stability of your main setup. It provides a controlled environment to explore and learn new technologies.
It’s important to note that while partitioning offers numerous advantages, it’s crucial to plan your partitions carefully. Allocating too much or too little space to a partition can impact performance and storage efficiency. Regular maintenance, such as periodic disk cleanup, defragmentation, and monitoring disk usage, is also essential to ensure optimal performance.
Partitioning your Mac’s hard drive provides flexibility, organization, and improved performance, allowing you to maximize your productivity and protect your valuable data. Consider your specific needs and workload to determine the optimal partitioning strategy for your Mac.
Understanding partitioning
Partitioning is the process of dividing a hard drive or SSD into separate sections or partitions. Each partition acts as an individual storage unit with its own file system, volume name, and storage capacity. Understanding the concept of partitioning is crucial before you begin creating partitions on your Mac’s hard drive.
Here are some key points to help you grasp the fundamentals of partitioning:
1. File Systems: Each partition requires a file system to manage and organize the stored data. Common file systems used on macOS include APFS (Apple File System) and HFS+ (Hierarchical File System Plus). The file system you choose depends on your specific needs, compatibility requirements, and the macOS version you’re running.
2. Volume Name: A volume name is a user-defined label for a partition that helps identify and differentiate it from others. It’s important to choose a descriptive and memorable volume name, especially if you plan to create multiple partitions on your hard drive.
3. Storage Capacity: When partitioning your hard drive, you need to allocate the available storage capacity to each partition. You can choose to distribute the storage space evenly or assign more space to partitions that require higher storage demands. Careful consideration of your data storage needs and future growth is crucial in deciding the appropriate storage allocation.
4. Partition Table: A partition table is a data structure stored on the hard drive that contains information about the partitions. It keeps track of the start and end locations of each partition, their sizes, file systems, and other relevant details. Common partition table formats used on Macs include GUID Partition Table (GPT) and Master Boot Record (MBR).
5. Primary vs. Logical Partitions: The primary partition is the main partition used to install the operating system and store essential files. On the other hand, logical partitions are secondary partitions created within an extended partition. Logical partitions are often used for data storage and organization purposes.
Partitioning your Mac’s hard drive offers several benefits, such as improved performance, data organization, and flexibility. However, it’s important to proceed with caution and back up your important files before making any changes to your disk partition structure. It’s also recommended to familiarize yourself with the specific disk management tools available on macOS, such as Disk Utility, to ensure a smooth and successful partitioning process.
Using Disk Utility to partition your hard drive
Disk Utility is a built-in tool on macOS that provides a user-friendly interface for managing your Mac’s hard drive partitions. Here’s a step-by-step guide on how to use Disk Utility to partition your hard drive:
1. Launch Disk Utility: Open Finder, go to the “Applications” folder, and then select “Utilities.” Double-click on “Disk Utility” to launch the application.
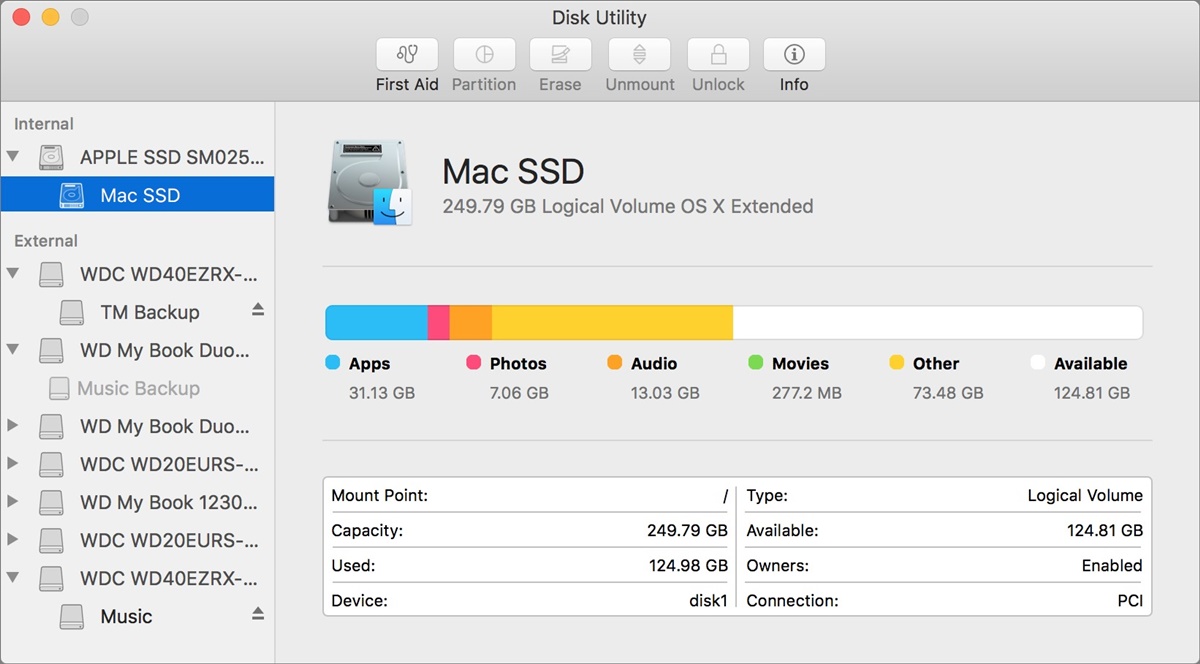
2. Select your hard drive: In the Disk Utility window, you’ll see a list of available drives and volumes on the left sidebar. Choose your main hard drive from the list.
3. Click on “Partition”: With your hard drive selected, click on the “Partition” button at the top of the Disk Utility window. This will open the partitioning options for your drive.
4. Add a partition: To add a new partition, click on the “+” button below the partition layout. Specify the size, name, and format for the new partition.
5. Adjust partition sizes: You can adjust the sizes of existing partitions by clicking and dragging the divider lines between them. This allows you to allocate more or less space to a specific partition as needed.
6. Choose the format: Select the format for your partition. macOS supports multiple file system formats, such as APFS, HFS+, and exFAT. Choose the format that best fits your requirements.
7. Apply the changes: After setting up the partitions and adjusting the sizes, click on the “Apply” button to start the partitioning process. Disk Utility will prompt you to confirm the changes and may require your administrator password.
8. Wait for the partitioning process: Disk Utility will now create the new partitions and adjust the existing ones according to your specifications. The process may take some time, depending on the size of your hard drive and the number of partitions.
9. Verify the partitions: Once the partitioning process is complete, you can verify the new partitions by checking the updated partition layout in the Disk Utility window.
10. Start using your partitions: The newly created partitions will now be accessible as separate volumes on your Mac. You can start utilizing them for different purposes, such as installing an operating system, storing files, or organizing your data.
Remember to exercise caution when partitioning your hard drive, as any changes made will affect the data stored on the drive. Ensure that you have adequate backups of your important files before proceeding with the partitioning process.
Disk Utility is a powerful tool that simplifies the partitioning process on your Mac. It provides an intuitive interface and ample options to customize your partitions based on your specific needs and preferences.
Step-by-step guide to partitioning your Mac’s hard drive
Partitioning your Mac’s hard drive can be done efficiently using Disk Utility. Follow these step-by-step instructions to successfully partition your hard drive:
1. Launch Disk Utility: Open Finder, go to the “Applications” folder, and then select “Utilities.” Double-click on “Disk Utility” to open the application.
2. Select your hard drive: In the Disk Utility window, you’ll see a list of available drives and volumes on the left sidebar. Choose your main hard drive from the list.
3. Click on “Partition”: At the top of the Disk Utility window, click on the “Partition” button to access the partitioning options for your drive.
4. Add a partition: To add a new partition, click on the “+” button located below the partition layout. Specify the size, name, and format for the new partition.
5. Adjust partition sizes: Resize existing partitions by clicking and dragging the divider lines between them. This enables you to allocate more or less space to specific partitions as required.
6. Select the format: Choose the desired file system format for your partition. macOS supports formats like APFS, HFS+, and exFAT. Select the format that suits your needs.
7. Apply the changes: After setting up the partitions and adjusting their sizes, click on the “Apply” button to initiate the partitioning process. You may be prompted to confirm the changes and provide your administrator password.
8. Wait for the partitioning process: Disk Utility will create the new partitions and adjust the existing ones according to your specifications. The time taken for this process depends on the size of your hard drive and the number of partitions.
9. Verify the partitions: Once the partitioning process is complete, review the new partition layout in the Disk Utility window to ensure everything is as expected.
10. Start using your partitions: The newly created partitions will be accessible as separate volumes on your Mac. You can begin utilizing them for various purposes, such as installing operating systems, storing files, or organizing your data.
Remember to exercise caution during the partitioning process, as any changes made will impact the data stored on your hard drive. It’s essential to have proper backups of important files before proceeding.
Disk Utility simplifies partitioning on your Mac, offering an intuitive interface and customizable options for your specific requirements. By following these steps, you can partition your hard drive efficiently and effectively.
Tips for optimizing your partitions
Optimizing your partitions is crucial to ensure efficient storage management and optimal performance on your Mac. Here are some tips to help you make the most out of your partition setup:
1. Allocate space wisely: When creating partitions, allocate space based on your specific needs. Consider the size of your files, applications, and operating systems. Avoid allocating too much or too little space to each partition, as it can lead to inefficient storage utilization.
2. Regularly update and maintain: Keep your partitions organized by regularly updating and maintaining them. Delete unnecessary files, perform disk cleanup, and defragment the partitions if necessary. This helps to optimize storage space and maintain optimal performance.
3. Use separate partitions for different purposes: Divide your hard drive into separate partitions for different purposes such as the operating system, applications, personal files, work-related data, and backups. This segregation makes it easier to manage and locate specific data when needed.
4. Consider partitioning for specific projects: If you work on specific projects with large amounts of data, consider creating a separate partition dedicated to that project. This allows you to keep all project-related files organized and easily accessible in one place.
5. Backup partitions separately: If you have important data on specific partitions, consider backing them up separately. This ensures that your critical files are safeguarded in the event of data loss or system failures. Use external storage or cloud backup services to create reliable backups.
6. Keep your operating system partition clean: The partition containing your operating system should ideally be kept clean and free from unnecessary files. Avoid storing personal files or large media files on this partition to maintain optimal system performance.
7. Plan for future growth: When creating partitions, consider future growth and storage needs. Leave some unallocated space that can be utilized in the future for expanding existing partitions or creating new ones without major disruptions.
8. Monitor disk usage: Regularly check the disk usage of each partition to ensure efficient storage management. Identify any large or unnecessary files taking up valuable space and remove them to free up storage for more important data.
9. Utilize partition management tools: Take advantage of partition management tools available on macOS, such as Disk Utility, to optimize and fine-tune your partitions. These tools provide additional options for resizing, renaming, and formatting partitions manually.
10. Seek professional assistance: If you’re unsure about partitioning or want to make complex changes, consider consulting with a professional or seeking assistance from Apple Support. They can provide guidance tailored to your specific needs.
Optimizing your partitions improves storage efficiency, organization, and system performance. By following these tips, you can ensure your partitions are well-managed and optimized to meet your requirements effectively.
Benefits of partitioning your Mac’s hard drive
Partitioning your Mac’s hard drive can bring several benefits and enhance various aspects of your computing experience. Here are some key advantages of partitioning:
1. Improved data organization: Partitioning allows you to organize your data more efficiently. You can separate different types of files, such as documents, multimedia, and applications, into separate partitions. This segmentation makes it easier to locate and access specific data, leading to improved productivity.
2. Flexibility to run multiple operating systems: Partitioning enables you to install and run multiple operating systems on a single machine. Whether you need to run macOS, Windows, Linux, or other platforms, partitioning allows you to create dedicated partitions for each operating system. This flexibility ensures you can switch between systems without the need for separate physical machines.
3. Enhanced system performance: Partitioning can improve overall system performance. By separating your operating system and applications from personal files and data, you can minimize disk fragmentation and optimize data retrieval. You can also allocate specific partitions for resource-intensive tasks, ensuring optimal utilization of system resources.
4. Data backup and protection: Creating separate partitions dedicated to backups provides an efficient way to protect your important data. In the event of system failures or accidental data loss, having a dedicated backup partition simplifies the recovery process and safeguards your valuable files.
5. Easier troubleshooting and maintenance: When facing system issues or errors, having separate partitions can make troubleshooting easier. You can isolate and troubleshoot specific partitions without affecting the rest of your system. This helps in diagnosing and resolving problems more efficiently.
6. Customized storage allocation: Partitioning allows you to allocate storage based on your specific needs. You can allocate more space to partitions that require higher storage demands and allocate less space to others. This flexibility ensures efficient utilization of your available storage capacity.
7. Enhanced security and privacy: Partitioning can contribute to improved security and privacy for your data. By keeping sensitive files on a separate partition, you can restrict access to them and add an extra layer of protection against unauthorized access.
8. Simplified software testing and development: Separate partitions dedicated to testing and development activities provide a controlled environment for experimenting with new software, configurations, or even beta versions of operating systems. This helps in preventing any negative impacts on your primary setup and allows for seamless exploration of new technologies.
Partitioning your Mac’s hard drive offers a range of benefits, including improved data organization, flexibility to run multiple operating systems, enhanced performance, data backup and protection, and simplified troubleshooting and maintenance. By carefully planning and configuring your partitions, you can optimize your storage space and enhance your overall computing experience.
Potential drawbacks of partitioning your Mac’s hard drive
While partitioning your Mac’s hard drive can bring many advantages, it’s important to consider potential drawbacks that may arise. Here are some potential drawbacks to be aware of:
1. Storage limitations: Partitioning your hard drive means dividing the available storage capacity among multiple partitions. If you miscalculate the allocation or have limited storage, you may find yourself running out of space on certain partitions, while others remain underutilized.
2. Inflexibility with partition sizes: Once partitions are created and allocated, adjusting their sizes can be challenging. If you later realize that the allocated sizes are not optimal, resizing the partitions could result in data loss or complications.
3. Fragmentation: Partitioning can potentially lead to disk fragmentation, especially if partitions are frequently resized or files within them are continuously modified. Fragmentation can cause slower disk access and affect overall system performance.
4. Complicated disk management: Managing multiple partitions on a Mac requires familiarity with the appropriate disk management tools, such as Disk Utility. For less tech-savvy users, the process of creating, resizing, or deleting partitions may seem complex or confusing.
5. Data loss risks: Partitioning involves the modification of your hard drive, and any errors or interruptions during the process can result in data loss. It’s crucial to back up your important files before making any changes to your hard drive partitions.
6. Increased maintenance: Having multiple partitions means additional maintenance tasks. Each partition requires regular disk cleanup, defragmentation, and monitoring for optimal performance. Failing to perform these maintenance activities can lead to decreased performance and storage inefficiencies.
7. Compatibility issues: Running multiple operating systems on separate partitions may raise compatibility challenges. Hardware or software conflicts can arise when installing or updating operating systems, requiring additional technical troubleshooting or fixes.
8. Reduced usable storage capacity: Partitioning your hard drive sets aside a portion of the storage capacity for each partition. This can result in a reduced amount of usable storage compared to having a single partition, especially if the partitions are not well-utilized.
It’s essential to carefully consider these potential drawbacks and weigh them against the benefits when deciding to partition your Mac’s hard drive. Analyze your specific needs and usage patterns to determine whether the advantages outweigh the potential disadvantages in your particular case. Proper planning, regular maintenance, and cautious management can help mitigate these drawbacks and ensure a positive experience with partitioning your Mac’s hard drive.
Frequently asked questions about partitioning a Mac’s hard drive
Partitioning a Mac’s hard drive can be a topic of interest for many users. Here are some frequently asked questions regarding the partitioning process:
1. Can I partition my Mac’s hard drive without losing data?
Yes, you can partition your Mac’s hard drive without losing data by carefully following the partitioning process. However, it’s always recommended to have a backup of your important files before making any changes to your partitions.
2. How many partitions can I create on my Mac’s hard drive?
macOS allows you to create a maximum of 16 partitions on a single hard drive or SSD. However, it’s important to consider the storage limitations and the impact on overall system performance when deciding the number of partitions.
3. Can I resize or delete a partition after it’s been created?
Yes, Disk Utility provides the option to resize or delete partitions even after they have been created. However, these changes may result in data loss or require the reformatting of the affected partitions.
4. Can I merge partitions on my Mac?
Merging partitions is not supported directly by Disk Utility. To merge partitions, you would need to back up the data on both partitions, delete them, create a new single partition, and then restore the backup onto the new partition.
5. Can I change the file system format of a partition?
Yes, Disk Utility allows you to change the file system format of a partition. However, note that changing the format will result in the loss of all data on that partition, so it’s crucial to have a backup before proceeding.
6. What is the difference between logical and primary partitions?
Primary partitions are the main partitions used for installing the operating system and storing essential files. Logical partitions, on the other hand, are secondary partitions created within an extended partition. They are primarily used for data storage and organization.
7. Can I access data from one partition while working in another?
Yes, you can access data from one partition while working on another partition, as long as both partitions are mounted and accessible. Each partition acts as a separate volume within the operating system.
8. Can I undo or revert the partitioning process?
Undoing or reverting the partitioning process is generally not supported. Once the partitioning changes have been applied and the partitions have been resized or created, it can be difficult to revert to the previous state without data loss.
9. Can I boot from any partition on my Mac’s hard drive?
You can choose to boot from any bootable partition on your Mac’s hard drive, depending on the specific configurations and settings. Choose the desired partition as the startup disk in the System Preferences or hold down the Option key during startup to select the boot partition.
Partitioning your Mac’s hard drive can be a helpful process for organizing data, running multiple operating systems, and optimizing storage performance. However, it’s important to approach partitioning with caution, make regular backups, and consider the potential consequences for your data and system configuration.