
Why Delete Your Pandora Account?
While Pandora is a popular music streaming platform that offers personalized stations and a vast library of songs, there may come a time when you decide to delete your Pandora account. There could be several reasons why you might want to take this step:
- Switching to a Different Streaming Service: You may have found another music streaming platform that better suits your preferences, offers a larger music catalog, or provides additional features and benefits.
- Concerns about Privacy: Privacy concerns may be a motivating factor in your decision to delete your Pandora account. If you feel that your personal information is not adequately protected or if you are uncomfortable with the data that Pandora collects, deleting your account can provide peace of mind.
- Cost Considerations: If you have been using a paid Pandora subscription, you may want to cancel it to save money. There are free alternatives available that offer similar music streaming services.
- Reducing Digital Footprint: Deleting your Pandora account can be a part of a larger effort to reduce your digital footprint. By closing accounts that you no longer use, you can have better control over your online presence and protect your personal information.
Whatever your reason may be, deleting your Pandora account is a straightforward process. In the following sections, we will provide you with step-by-step instructions on how to delete your Pandora account on both desktop and mobile devices. We will also guide you on how to manage your personalized stations and delete your listening history.
Step-by-Step Guide to Deleting Your Pandora Account
If you’ve made the decision to delete your Pandora account, follow these simple steps to complete the process:
- Sign in to Your Pandora Account: Visit the Pandora website and log in to your account using your email and password. If you’re already signed in, skip this step.
- Access the Account Settings: Once logged in, click on your profile picture or username located in the top-right corner of the page. From the drop-down menu, select “Settings” to access your account settings.
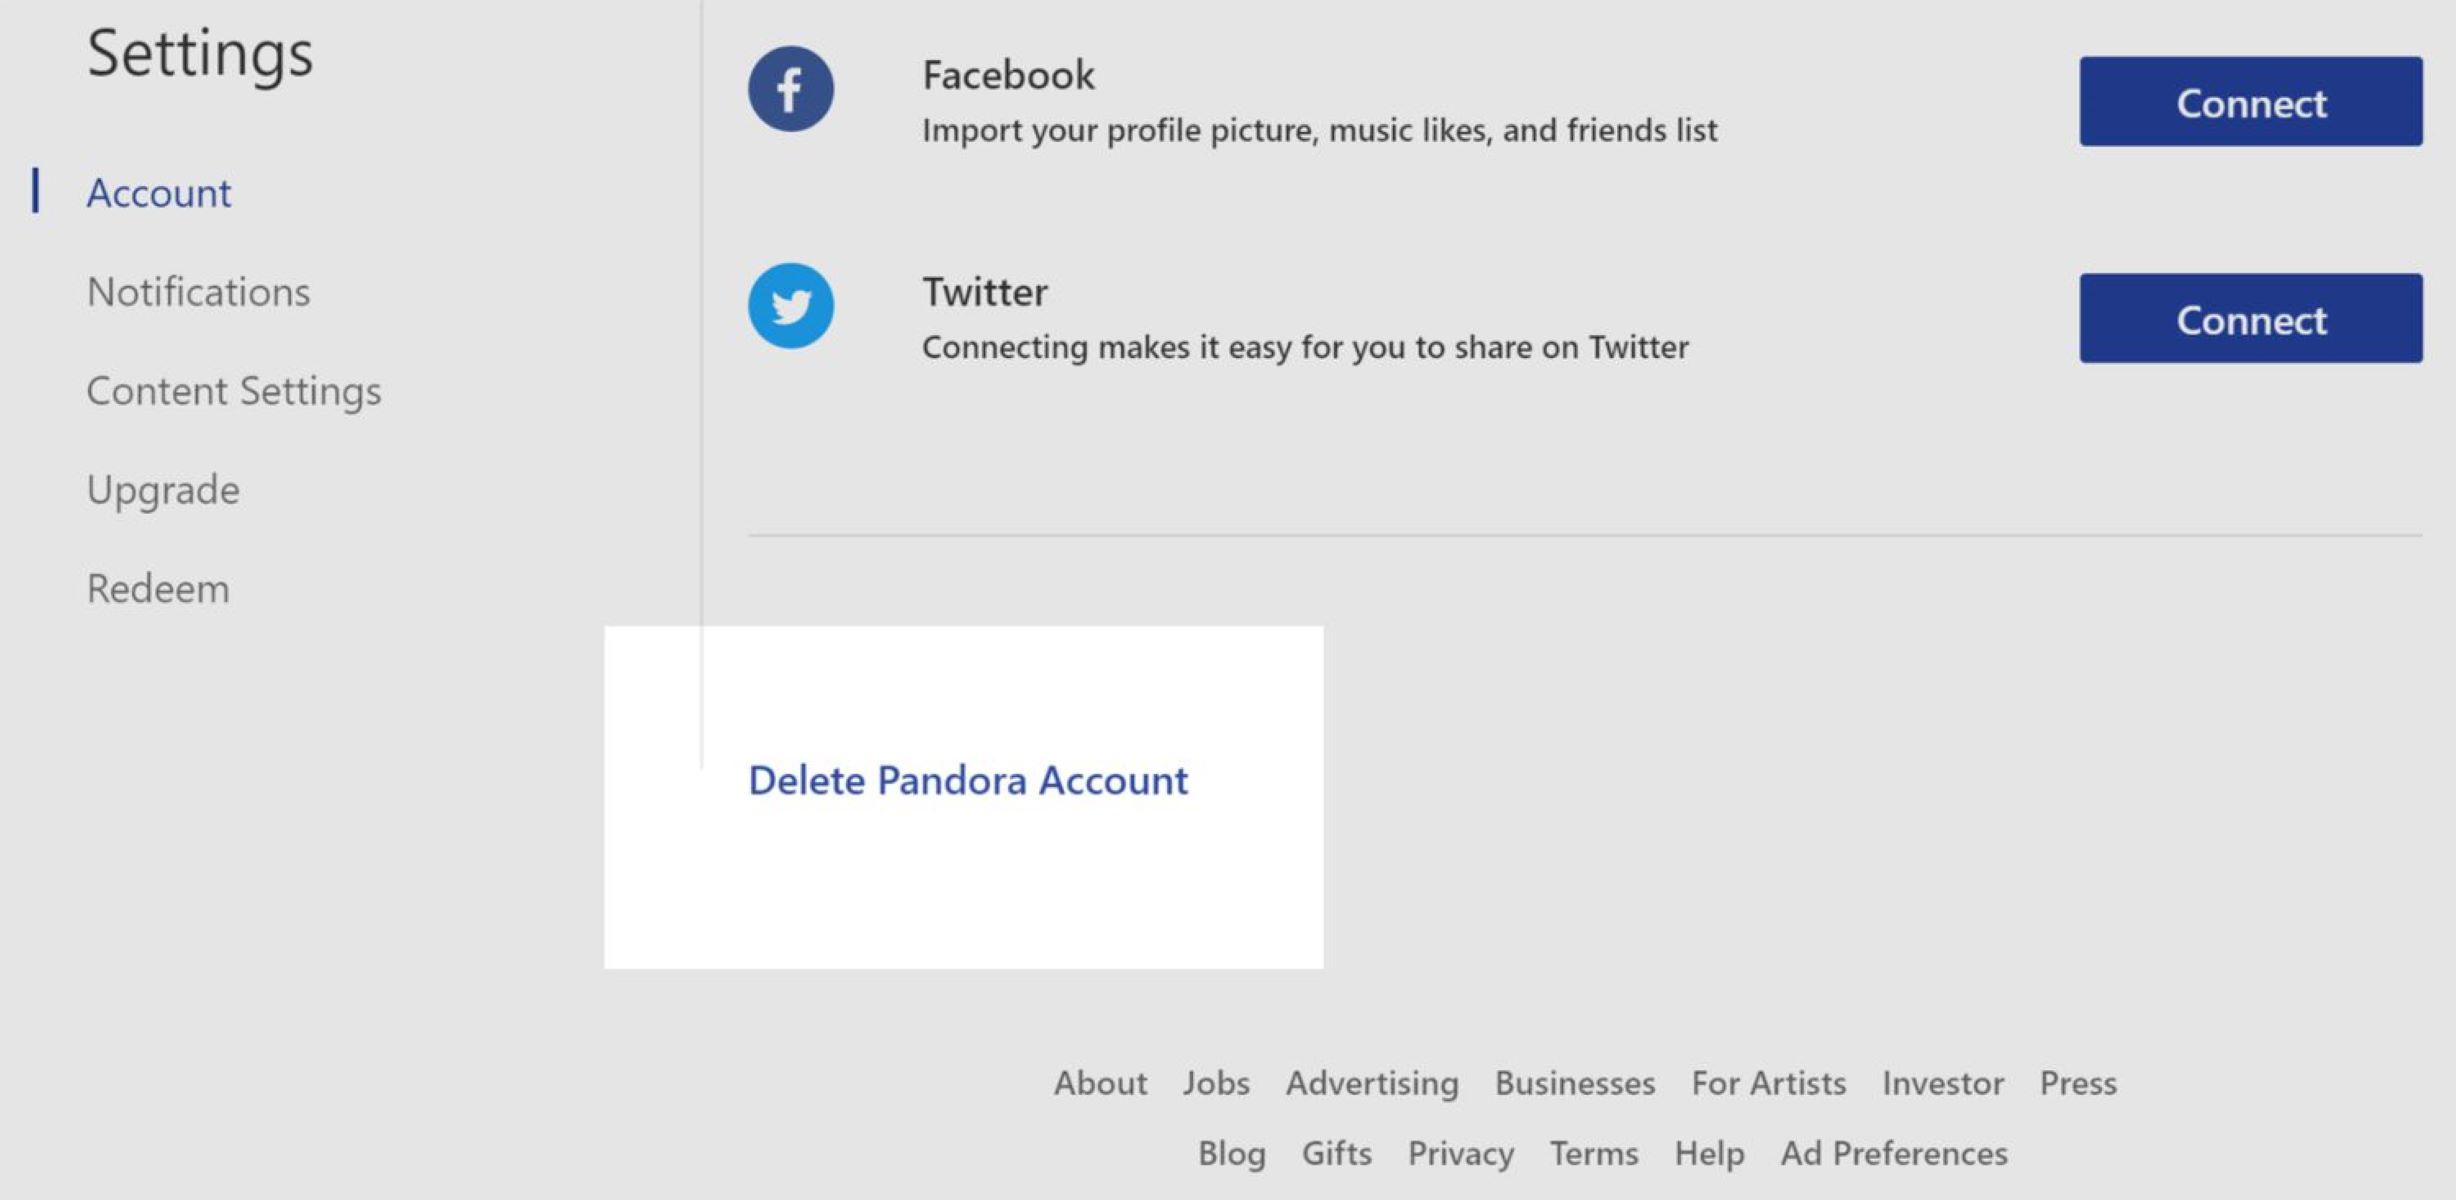
- Navigate to the Account Tab: In the left-hand menu, click on the “Account” tab. This will open the account settings page where you can manage various aspects of your Pandora account.
- Scroll Down to the Account Information Section: On the account settings page, scroll down until you find the “Account Information” section.
- Select “Delete Account”: Within the “Account Information” section, you will see a link that says “Delete Account.” Click on this link to proceed with deleting your account.
- Confirm Your Decision: Pandora will prompt you to confirm your decision to delete your account. Read the information provided and make sure you understand the consequences of deleting your account, including the loss of your personalized stations and listening history.
- Click on “Delete Account”: If you are certain that you want to proceed, click on the “Delete Account” button to permanently delete your Pandora account.
- Provide Feedback (Optional): After deleting your account, Pandora may ask you to provide feedback on your reason for leaving. This step is optional but can help Pandora improve its services.
Once you have completed these steps, your Pandora account will be deleted, and you will no longer have access to personalized stations, playlists, and saved songs. Keep in mind that this action is irreversible, so make sure you have backed up any important data before proceeding.
Next, we will provide instructions on how to cancel a Pandora subscription, should you have an active paid subscription that you wish to terminate.
Cancelling a Pandora Subscription
If you have a paid Pandora subscription and wish to cancel it before deleting your Pandora account, follow these steps:
- Sign in to Your Pandora Account: Visit the Pandora website and log in to your account using your email and password. If you’re already signed in, skip this step.
- Access the Account Settings: Once logged in, click on your profile picture or username located in the top-right corner of the page. From the drop-down menu, select “Settings” to access your account settings.
- Navigate to the Subscription Tab: In the left-hand menu, click on the “Subscription” tab. This will take you to the subscription settings page where you can manage your Pandora subscription.
- Click on “Cancel Subscription”: On the subscription settings page, you will find an option to “Cancel Subscription.” Click on this option to proceed with canceling your Pandora subscription.
- Follow the Cancellation Process: Pandora may ask you to provide a reason for canceling your subscription. Select the appropriate reason or choose “Other” if your reason is not listed.
- Confirm Subscription Cancellation: Review the details of your cancellation and confirm the cancellation of your Pandora subscription.
- Verify Cancellation Status: After canceling your subscription, double-check your account settings to ensure that your subscription status has been updated to “Canceled.”
By following these steps, you can easily cancel your Pandora subscription and avoid any further charges. Once your subscription is canceled, you can proceed with deleting your Pandora account using the steps mentioned earlier.
Now that you have learned how to cancel your Pandora subscription, let’s move on to the process of deleting your Pandora account on desktop and mobile devices.
Deleting Your Pandora Account on Desktop
If you prefer to delete your Pandora account using a desktop computer, follow these steps:
- Open the Pandora Website: Launch your preferred web browser and visit the Pandora website at www.pandora.com.
- Sign in to Your Account: Click on the “Sign In” button located at the top-right corner of the webpage. Enter your email and password to log in to your Pandora account. If you’re already signed in, skip this step.
- Access Account Settings: After signing in, locate and click on your profile picture or username at the top-right corner of the page. From the drop-down menu, select “Settings.”
- Select the Account Tab: In the left-hand menu of the Settings page, click on the tab labeled “Account.”
- Find the Account Information Section: Scroll down on the Account tab until you see the “Account Information” section.
- Click on “Delete Account”: Within the Account Information section, you will find a link labeled “Delete Account.” Click on this link to proceed with deleting your Pandora account.
- Confirm Your Decision: Pandora will display a confirmation message detailing the consequences of deleting your account, including the loss of personalized stations and listening history. Read the information carefully.
- Finalize Account Deletion: If you are certain about deleting your Pandora account, click on the “Delete Account” button. Your Pandora account will be permanently deleted.
After completing these steps, your Pandora account will be successfully deleted. Remember that this action is permanent, and all your personalized stations, playlists, and other data associated with your account will be lost.
In the next section, we will provide instructions on how to delete your Pandora account using mobile devices.
Deleting Your Pandora Account on Mobile Devices
If you prefer to delete your Pandora account using a mobile device, follow these steps:
- Launch the Pandora Mobile App: Locate the Pandora app on your mobile device and open it.
- Sign in to Your Account: If you’re not already signed in to your Pandora account, enter your email and password to log in.
- Access Account Settings: Tap on the menu icon (usually represented by three horizontal lines) located in the top-left corner of the app. This will open the side menu.
- Select Settings: From the side menu, select “Settings” to access the Pandora app settings.
- Navigate to the Account Section: Scroll down in the settings menu until you find the section labeled “Account.” Tap on it to proceed.
- Tap on “Delete Account”: Within the Account section, you will find an option labeled “Delete Account.” Tap on this option to initiate the process of deleting your Pandora account.
- Confirm Your Decision: Pandora will display a confirmation message informing you about the consequences of deleting your account. Carefully review the information provided.
- Permanently Delete Your Account: If you are certain about deleting your Pandora account, tap on the “Delete Account” button to proceed. Your Pandora account will be deleted permanently.
Once you have completed these steps, your Pandora account will be successfully deleted from your mobile device. Bear in mind that this action is irreversible, and all your personalized stations, playlists, and other data associated with your account will be lost.
In the next section, we will provide instructions on how to delete your Pandora profile, as well as how to manage your listening history and personalized stations.
How to Delete Your Pandora Profile
If you want to delete your Pandora account but want to keep your listening history and personalized stations, you have the option to delete your Pandora profile instead. Here’s how you can do it:
- Sign in to Your Pandora Account: Visit the Pandora website or launch the Pandora app and log in to your account using your email and password.
- Access Account Settings: On the Pandora website, click on your profile picture or username in the top-right corner, and select “Settings” from the drop-down menu. On the Pandora app, tap on the menu icon and select “Settings.”
- Go to the Profile Section: In the account settings, find the section labeled “Profile” and click on it.
- Scroll Down to the Delete Profile Option: Within the Profile section, scroll down until you find the option to “Delete Profile.”
- Review and Confirm: Pandora will present you with information on what deleting your profile entails. Read through the details to ensure you understand the consequences.
- Delete Your Profile: If you still wish to proceed, click on the “Delete Profile” button. Pandora will remove your profile information, including your display name and bio, but retain your listening history and personalized stations.
- Verify the Profile Deletion: After deleting your profile, Pandora will display a confirmation message. You can proceed to log out or continue using your Pandora account with your remaining data.
By following these steps, you can delete your Pandora profile while preserving your listening history and personalized stations. This option is ideal if you want a fresh start with a new profile but still want to keep your customized music preferences intact.
In the next sections, we will provide guidance on how to manage your personalized stations on Pandora and how to delete your listening history.
Deleting Your Pandora Listening History
If you want to remove your listening history from Pandora, follow these steps:
- Sign in to Your Pandora Account: Visit the Pandora website or open the Pandora app on your device and log in to your account using your email and password.
- Access Account Settings: On the Pandora website, click on your profile picture or username in the top-right corner, and select “Settings” from the drop-down menu. On the Pandora app, tap on the menu icon and select “Settings.”
- Go to the Profile Section: In the account settings, find the section labeled “Profile” and click on it.
- Locate the Listening History: Within the Profile section, scroll down to find your “Listening History” option.
- Delete Listening History: Click on the “Delete Listening History” button to initiate the deletion process. Pandora will remove all your past listening activities from your account.
- Confirm Deletion: Pandora will display a confirmation message to ensure you want to proceed with deleting your listening history. Review the details provided.
- Complete Deletion: If you still wish to delete your listening history, click on the “Delete” or “Confirm” button to finalize the process.
By following these steps, you can delete your Pandora listening history and start with a clean slate. Keep in mind that once your listening history is deleted, it cannot be recovered.
Now that you know how to manage your Pandora account by deleting your profile and listening history, let’s move on to understanding how to manage your personalized stations on Pandora.
Managing Personalized Stations on Pandora
Pandora allows you to create personalized stations based on your music preferences. You can easily manage these stations by following these steps:
- Sign in to Your Pandora Account: Visit the Pandora website or open the Pandora app on your device and log in to your account using your email and password.
- Access Your Stations: On the Pandora website, click on the “My Collection” tab, located at the top of the page. On the Pandora app, tap on the “My Collection” icon on the bottom navigation bar.
- View Your Personalized Stations: On the “My Collection” page, you will see a list of your personalized stations. Scroll through the list to find the station you want to manage.
- Options for Managing Stations: On the Pandora website, hover over the station name to reveal several options, including “Play,” “Add Variety,” “Share,” and “Delete.” On the Pandora app, swipe left on the station to display the available options.
- Play a Station: To play a station, simply click on the station name or the play icon. Pandora will start playing songs based on your preferences.
- Add Variety: If you want to add more variety to a station, select the “Add Variety” option. Pandora will introduce new artists and songs into the station’s rotation.
- Share a Station: If you wish to share a station with others, choose the “Share” option. Pandora will provide you with multiple ways to share the station, such as through social media or email.
- Delete a Station: To delete a station, select the “Delete” option. Pandora will ask you to confirm the deletion. Please note that deleting a station is permanent, and you will lose all the data associated with that station, including the songs you thumbs-upped or thumbs-downed.
By following these steps, you can easily manage your personalized stations on Pandora. You can play, add variety, share, and delete stations according to your preferences. This allows you to curate your listening experience and tailor it to your specific music tastes.
Now that you have learned how to manage your personalized stations, you have the knowledge to make the most out of your Pandora account.