
Why customize the first page header or footer in Word?
When working with Word documents, you may have come across situations where you need to make the header or footer on the first page different from the rest of the document. This customization can serve a variety of purposes, depending on your specific needs. Let’s explore some reasons why you might want to customize the first page header or footer in Word.
These are just a few examples of why you might want to customize the first page header or footer in Word. By taking advantage of this customization feature, you can create professional and visually appealing documents that effectively convey your intended message to readers.
How to access the header and footer in Word
Before you can customize the first page header or footer in Word, it’s important to know how to access and navigate to the header and footer sections. Here are the steps to follow:
These steps apply to Microsoft Word versions 2010 and later. If you’re using an earlier version, the steps might vary slightly, but the general concept remains the same – double-clicking in the margin area or using the Header & Footer tab in the Ribbon will give you access to the header and footer sections of your document.
Now that you know how to navigate to the header and footer sections in Word, let’s dive into the different methods you can use to make the first page header or footer different from the rest of the document.
Making the first page header or footer different
Customizing the first page header or footer in Word is a straightforward process. There are multiple methods you can use, depending on your specific requirements and the version of Word you’re using. Here are four common methods:
By using these methods, you can easily customize the first page header or footer in Word. Remember to save your changes and preview the document to ensure the desired formatting is applied to the first page. Experiment with different methods to find the one that works best for your specific document requirements.
Method 1: Different First Page option
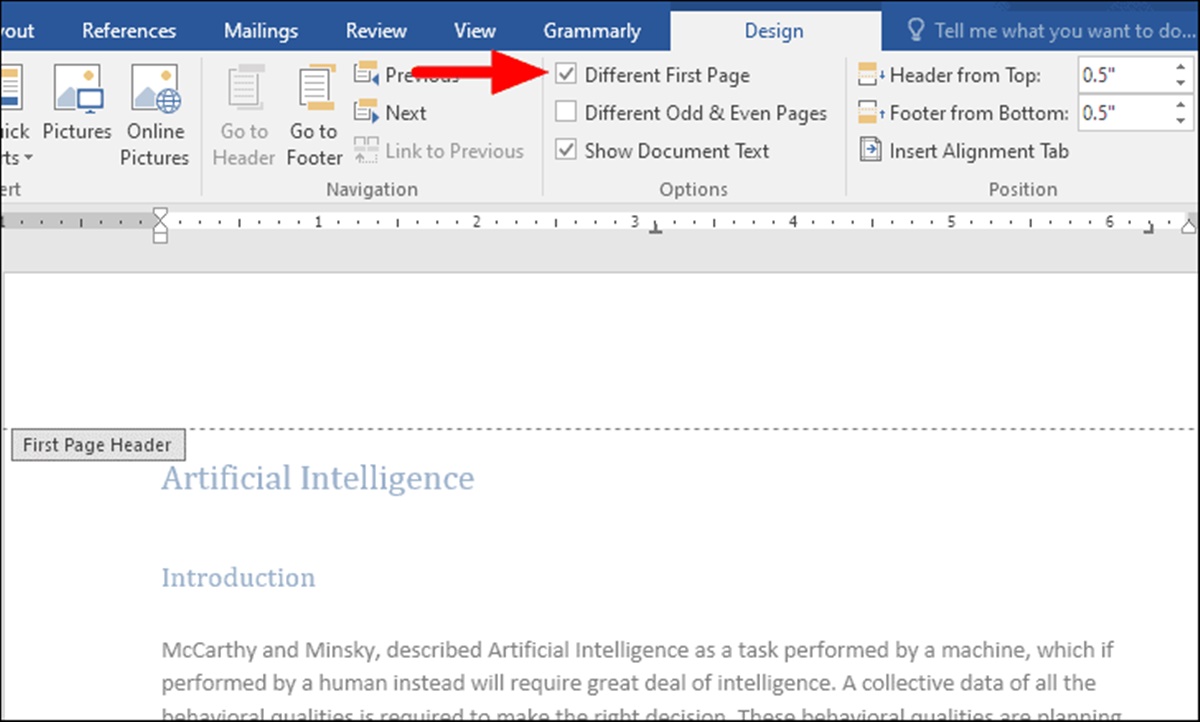
One convenient method for making the first page header or footer different in Word is by using the “Different First Page” option. This method is available in newer versions of Word and offers a straightforward approach to customizing the first page header or footer. Here’s how to use this method:
Step 1: Open your Word document and navigate to the Header & Footer tab in the Ribbon menu at the top.
Step 2: In the Navigation section of the Header & Footer tab, check the “Different First Page” box. This will automatically create a separate first-page header or footer, distinct from the rest of the document.
Step 3: Click on the header or footer area of the first page to begin customizing it. You can add text, insert images, adjust formatting, or include any desired content specific to that page.
Step 4: To modify the header or footer on the subsequent pages, simply navigate to those pages and make the required changes. The “Different First Page” option ensures that any modifications made to the first page header or footer do not affect the rest of the document.
Using the “Different First Page” option provides a convenient way to create a custom header or footer for the first page while maintaining consistency on subsequent pages. This method is especially useful when you want to include a unique title, introductory information, or other specific details that are relevant only to the first page of your document.
Remember to save your document after making the necessary changes, and preview it to ensure that the first page header or footer appears as desired. Experiment with different formatting options and content to fully customize the first page of your Word document.
Method 2: Sections Break
If you’re working with an older version of Word or need a more complex document structure, using sections breaks can help you achieve a different first page header or footer. This method involves inserting section breaks and unlinking the header or footer to create the desired customization. Follow these steps to implement this method:
Step 1: Open your Word document and place the cursor at the end of the first page, where you want the first page header or footer to end.
Step 2: Go to the “Layout” tab in the Ribbon menu at the top and click on the “Breaks” button. Select “Next Page” under the “Section Breaks” category. This will insert a section break, separating the first page from the rest of the document.
Step 3: Double-click on the header or footer area of the first page to access it. Once in the header or footer section, make the desired changes specific to the first page. You can add text, insert images, adjust formatting, or personalize it according to your needs.
Step 4: To ensure that the header or footer on the subsequent pages remains consistent, deselect the “Link to Previous” option. This option can usually be found on the Header & Footer tab or in the Design tab when working on the header or footer section.
Step 5: Navigate to the pages following the first page and modify the header or footer based on your requirements. The section break ensures that any changes made in the subsequent pages do not affect the first page header or footer.
Using sections breaks allows you to create different first page headers or footers when working with complex documents or older versions of Word. This method provides more granular control over the customization process, allowing you to tailor the headers or footers to specific sections or chapters within your document.
Remember to save your changes and preview the document to ensure the desired formatting and content are applied correctly. Experiment with different section breaks and modifications to achieve the desired layout for your first page header or footer.
Method 3: Manual Formatting
If your document has a simple structure and you want to make the first page header or footer different, you can achieve this effect by manually formatting the header or footer section. This method involves making direct changes to the header or footer content and removing it from subsequent pages. Follow these steps to use manual formatting:
Step 1: Open your Word document and navigate to the first page where you want to customize the header or footer.
Step 2: Double-click on the header or footer area to access it. You can also go to the Header & Footer tab, select the “Edit Header” or “Edit Footer” option, and make the desired changes.
Step 3: Modify the header or footer content as needed. You can add text, insert images, adjust formatting, or customize it according to your preferences.
Step 4: Once you’ve customized the header or footer for the first page, go to the subsequent pages and delete the header or footer content. You can do this by either double-clicking on the header or footer area of the subsequent pages and pressing the Backspace or Delete key, or by going to the Insert tab, selecting the “Header” or “Footer” option, and choosing “Remove Header” or “Remove Footer”.
By manually formatting the first page header or footer, you have full control over its content and design. This method is useful when you want to include specific information, such as a title, date, author name, or other details, on the first page while keeping subsequent pages clean and consistent.
Remember to save your document after making the necessary changes and preview it to ensure that the first page header or footer appears as desired. Experiment with different formatting options and content to fully customize the first page of your Word document.
Method 4: Using a Pre-designed Template
If you want a quick and effortless way to make the first page header or footer different in Word, using a pre-designed template can be a great option. Word offers a wide variety of templates for different document types, many of which come with pre-defined header and footer sections, including different layouts for the first page. Follow these steps to use a pre-designed template:
Step 1: Open Word and create a new document. Alternatively, you can open an existing document that you want to customize.
Step 2: Go to the “File” tab and select “New” to open the template gallery. You can choose from the available categories or search for a specific template using keywords.
Step 3: Browse through the available templates and select one that suits your document’s purpose and design preferences. Pay attention to the preview images and template descriptions to ensure that the first page header or footer layout matches your requirements.
Step 4: Once you’ve chosen a template, click on it to open a new document based on that template. The first page will already have a custom header or footer layout specifically designed for that template.
Step 5: Customize the header or footer content on the first page as needed. You can add your own text, insert images or logos, adjust formatting, or make any other modifications to personalize the template to your liking.
By using a pre-designed template, you can save time and effort in creating a professional-looking document with a different first page header or footer. Templates provide a visually appealing and cohesive design, with the added benefit of an already customized first page header or footer layout, ensuring consistency and a polished look throughout your document.
Remember to save your changes, preview the document, and modify any other sections or content as necessary to complete your document based on the selected template.
Tips and Tricks for Customizing the First Page Header or Footer
Customizing the first page header or footer in Word allows you to create professional and visually appealing documents. To make the most of this customization feature, consider the following tips and tricks:
1. Use different content: Make the first page header or footer stand out by including specific information or elements that are relevant only to the first page. This could be a title, subtitle, introductory text, or any other content that sets the tone for the rest of the document.
2. Utilize formatting options: Experiment with different font styles, sizes, colors, and formatting options to enhance the appearance of the first page header or footer. Consider using bold or italicized text, dividers, or borders to make the header or footer visually distinct.
3. Incorporate visuals: Inserting images, logos, or graphics can add visual interest to the first page header or footer. Align these visual elements strategically to complement other content and maintain a professional look.
4. Add page numbering: If you want to include page numbers, ensure that they are displayed correctly on the subsequent pages while being omitted from the first page. This can be achieved by adjusting the page numbering format or using the “Different First Page” option.
5. Consider section-specific content: If your document is divided into sections, each with its own header or footer, leverage this opportunity to customize the content based on the specific section’s purpose or theme. This can further enhance document organization and readability.
6. Use templates or styles: Save time and effort by utilizing pre-designed templates or document styles that already come with well-designed first page headers or footers. This way, you can easily create a professional look without having to start from scratch.
7. Test and preview: Before finalizing your document, review the first page header or footer by previewing the document in print layout or by printing a test page. This allows you to catch any inconsistencies or formatting issues and make adjustments accordingly.
8. Refer to style guides or formatting guidelines: If you’re creating a document for a specific purpose or audience, such as an academic paper or a business report, refer to any applicable style guides or formatting guidelines. Ensure that the first page header or footer adheres to the required specifications.
By applying these tips and tricks, you can effectively customize the first page header or footer in Word, creating visually appealing and well-organized documents that make a professional impression on your readers.