
Adjusting Margins in Word
When working with documents in Microsoft Word, you may find the need to change the margins to achieve a desired layout or formatting. Thankfully, Word provides several options for adjusting margins to suit your specific requirements. In this section, we will explore various methods to adjust margins in Word.
To get started, navigate to the “Layout” tab in the Word ribbon and click on the small arrow in the bottom right corner of the “Page Setup” group. This will open the Page Setup dialog box, where you can customize various settings for your document.
One of the easiest ways to change margins in Word is by using the preset options available. In the Page Setup dialog box, you will find a range of predefined options such as “Narrow,” “Normal,” and “Wide” under the “Margins” tab. Simply select the desired option and click “OK” to apply the changes to your document.
If you require more precise control over the margins, you can manually customize them. In the Page Setup dialog box, go to the “Margins” tab and enter your preferred margin values in the “Top,” “Bottom,” “Left,” and “Right” fields. You can specify the measurements in inches, centimeters, millimeters, or points, depending on your preference.
In addition to adjusting the overall margins of your document, Word allows you to apply different margin settings to specific sections. To do this, place your cursor at the beginning of the section where you want to change the margins. Go to the “Layout” tab, click on “Breaks,” and select “Next Page” under the “Section Breaks” section. Now you can modify the margins in the desired section independently from the rest of the document.
Headers and footers in Word have separate margin settings, which you can customize independently. To change the header and footer margins, go to the “Layout” tab, click on the “Margins” button, and select “Custom Margins.” In the Page Setup dialog box, click on the “Layout” tab and adjust the header and footer margin values accordingly.
Once you have made all the necessary margin adjustments, you may want to save your customized margins as the default for future documents. To do this, go to the Page Setup dialog box, make sure the desired margin settings are applied, click on the “Set As Default” button, and confirm your selection.
Remember a few helpful tips when working with margins in Word. First, consider the purpose and audience of your document when selecting margin options. Academic papers or legal documents may require specific margin sizes for formatting purposes. Secondly, be mindful of the document’s total page count and content placement when adjusting margins to prevent unwanted page breaks or text overlaps.
Opening the Page Setup Dialog Box
In order to adjust the margins in Microsoft Word, you will need to open the Page Setup dialog box. This dialog box contains various options for customizing your document’s layout and formatting. Here’s how you can open the Page Setup dialog box:
The first step is to navigate to the “Layout” tab in the Word ribbon. This tab is located at the top of the application window, alongside other tabs such as “Home,” “Insert,” and “Review.”
Once you are on the “Layout” tab, look for the “Page Setup” group. This group is typically located towards the right side of the tab.
In the “Page Setup” group, you will find a small arrow in the bottom right corner. Click on this arrow to open the Page Setup dialog box.
Alternatively, you can also access the Page Setup dialog box by clicking on the “File” tab in the top-left corner of the Word window. In the backstage view that appears, select “Options” to open the Word Options dialog box. In the Word Options dialog box, go to the “Advanced” tab and scroll down to the “Show document content” section. Here, click on the “Show” button next to “Show measurements in units of” and select your preferred unit of measurement. Finally, click on the “OK” button to apply the changes. Now, when you open the Page Setup dialog box, you will see the measurements in your desired unit.
Once the Page Setup dialog box is open, you will have access to a range of settings for adjusting your margins, such as margin size, orientation, and paper size. Explore the different tabs in the dialog box to find and adjust the settings that meet your requirements.
Keep in mind that the exact appearance and layout of the Page Setup dialog box may vary slightly based on your version of Microsoft Word. However, the basic steps outlined above should guide you in accessing the dialog box regardless of the version you are using.
Now that you know how to open the Page Setup dialog box, you are ready to proceed with adjusting the margins in Word according to your preferences.
Changing Margins Using Preset Options
Microsoft Word provides convenient preset options for changing the margins of your document with just a few clicks. These predefined options offer a quick way to adjust the margins to commonly used settings. Here’s how you can change margins using preset options:
To begin, open the Page Setup dialog box by following the steps outlined in the previous section.
In the Page Setup dialog box, navigate to the “Margins” tab. This tab contains various options for adjusting the margins of your document.
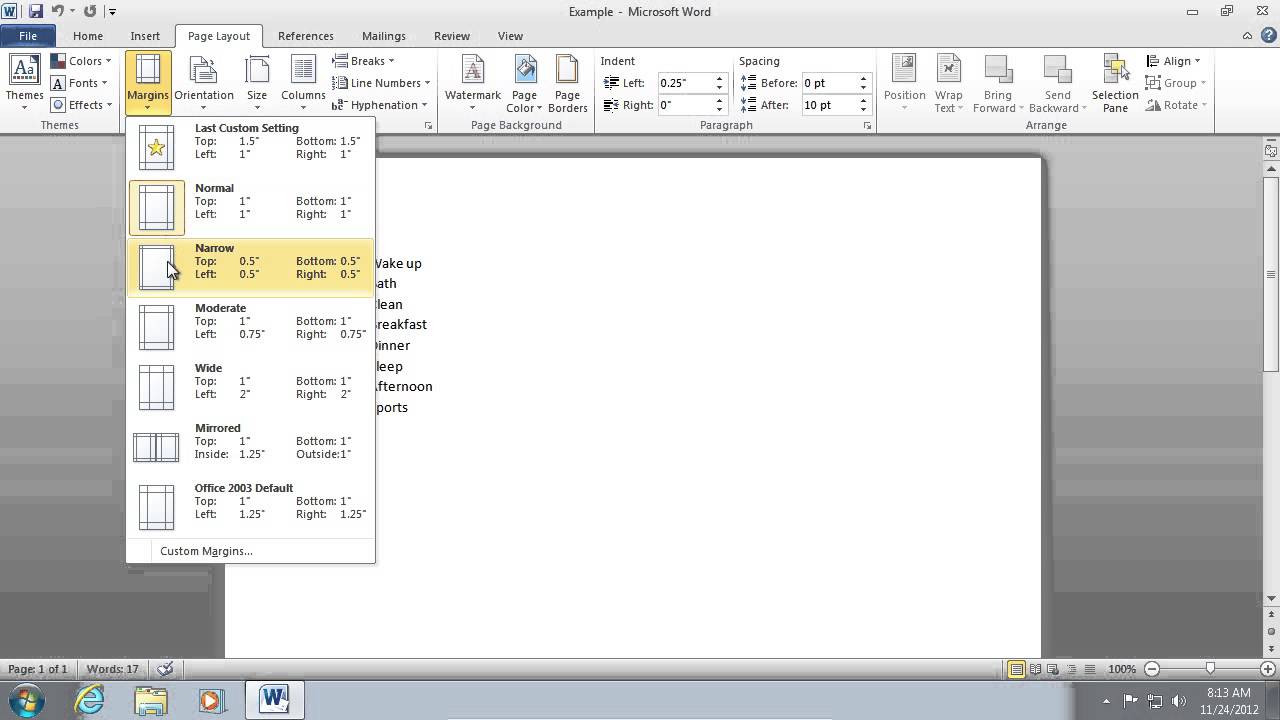
Under the “Margins” tab, you will find a range of preset margin options. These options include “Normal,” “Narrow,” “Wide,” and others, each offering different margin sizes for different document requirements.
Take a moment to consider the purpose and audience of your document. If you are unsure which margin option to choose, the “Normal” margin setting is typically a safe choice for most standard documents.
Click on the desired preset margin option to select it. You will see a preview of the margin settings in the preview area of the dialog box, giving you a visual representation of how the margins will appear in your document.
Once you have selected the desired preset margin option, click the “OK” button to apply the changes to your document.
Word will automatically adjust the margins of your document to the selected preset option, providing you with a consistent and professional-looking layout.
Changing margins using preset options is a straightforward and convenient way to modify the layout of your document. However, keep in mind that these options may not meet your specific requirements in certain cases. If you need more precise control over the margins, consider customizing them manually, as explained in the next section.
Now that you know how to utilize preset margin options in Word, you can easily adjust the margins of your documents to suit your needs and preferences.
Customizing Margins Manually
If the preset margin options in Microsoft Word don’t quite fit your specific requirements, you have the option to customize the margins manually. This allows you to have precise control over the margin sizes and tailor them to your preferences. Here’s how you can customize margins manually:
Start by opening the Page Setup dialog box, following the steps mentioned earlier.
In the Page Setup dialog box, navigate to the “Margins” tab. This tab displays various options for adjusting the margins of your document.
Under the “Margins” tab, you will see fields labeled “Top,” “Bottom,” “Left,” and “Right.” These fields represent the measurements for each margin. By default, the measurements are displayed in inches, but you can change the unit of measurement by modifying your Word preferences (as mentioned earlier).
Enter the desired margin values in the corresponding fields. You can manually input the measurements or use the arrow buttons to increase or decrease the values incrementally.
As you make changes to the margin values, you will see a live preview of the margin adjustments in the preview area of the Page Setup dialog box. This allows you to visually assess the impact of your margin customizations.
Consideration should be given to the purpose of your document and any specific formatting guidelines you need to follow. For example, academic papers or legal documents may require specific margin sizes. Make sure to verify any specific requirements before finalizing your margin choices.
Once you are satisfied with your custom margin settings, click the “OK” button to apply the changes to your document.
Word will then adjust the margins of your document according to the values you’ve entered, resulting in a layout that suits your specific needs and preferences.
Customizing margins manually provides you with the flexibility to create a document layout that precisely meets your requirements. This method is particularly useful when working with documents that have unique formatting needs or when adhering to specific guidelines.
Now that you know how to customize margins manually in Microsoft Word, you can easily tailor the layout of your documents to your exact specifications.
Applying Different Margins to Specific Sections
In Microsoft Word, you have the ability to apply different margin settings to specific sections within a document. This feature comes in handy when you want to have distinct margin layouts for different parts of your document, such as chapters, sections, or even pages with different content requirements. Here’s how you can apply different margins to specific sections:
First, open the Page Setup dialog box by following the steps outlined earlier.
Next, place your cursor at the beginning of the section where you want to apply different margin settings.
Go to the “Layout” tab in the Word ribbon and locate the “Breaks” group.
Click on the “Breaks” button to expand the options, and then select “Next Page” under the “Section Breaks” section. This will create a section break, indicating the start of a new section in your document.
Once the section break is inserted, you can customize the margins for that specific section without affecting the margins of the rest of the document.
Return to the Page Setup dialog box and navigate to the “Margins” tab.
Adjust the margin values according to your desired settings for the specific section. You can enter the measurements manually or use the arrow buttons to make incremental changes.
After setting the desired margin values, click the “OK” button to apply the changes.
The margins in the specific section that you created will now be different from the rest of the document, allowing you to have customized layouts for different portions of your content.
This feature is particularly useful when working on documents with multiple chapters, sections, or when you have certain pages that require specific margin setups, such as appendices or references.
Keep in mind that if you make changes to the margins in the main section, those changes will not affect the margins of the sections with different settings. Likewise, modifying the margins in the specific section will not affect the margins of the main section or other sections.
Applying different margin settings to specific sections gives you the flexibility to create a diverse and dynamic document layout to suit your content’s unique requirements.
Now that you know how to apply different margins to specific sections in Microsoft Word, you can easily create visually appealing and tailored layouts within your documents.
Adjusting Header and Footer Margins
In addition to adjusting the main margins of your document, Microsoft Word allows you to customize the margins specifically for headers and footers. This feature is especially useful when you want to control the spacing between the content of your document and the headers and footers. Here’s how you can adjust the header and footer margins:
First, open the Page Setup dialog box by following the steps mentioned earlier.
In the Page Setup dialog box, navigate to the “Layout” tab. This tab contains options for adjusting various layout-related settings.
Within the “Layout” tab, click on the “Margins” button to reveal additional margin options.
From the options that appear, select “Custom Margins.” This will open the Page Setup dialog box with additional customization options.
In the “Page Setup” dialog box, click on the “Layout” tab to access the settings specifically related to headers and footers.
Under the “Layout” tab, you will see sections for setting the header and footer distances from the edge of the page. These sections are labeled “Header” and “Footer” respectively.
Adjust the margin values for the header and footer as desired. You can enter the measurements manually or use the arrow buttons to make incremental changes.
As you modify the margin values for the header and footer, you will see a live preview of the changes in the preview area of the Page Setup dialog box.
Once you are satisfied with your header and footer margin settings, click the “OK” button to apply the changes to your document.
Word will now adjust the margins specifically for the headers and footers, providing you with the desired spacing and layout between the content and these elements.
By customizing the header and footer margins, you can efficiently manage the space allocation for headers and footers in your document. This is particularly useful if you want to include specific information, page numbers, or branding elements in these areas while ensuring proper alignment with the main content.
Remember that changing the header and footer margins will not impact the main margins of your document, and vice versa. This allows you to have distinct control over the spacing between headers, footers, and the main content.
Now that you know how to adjust the header and footer margins in Microsoft Word, you can create professional-looking documents with properly formatted headers and footers that seamlessly integrate with your content.
Saving and Applying Custom Margins as Default
After fine-tuning the margins in your document to your exact specifications, it can be time-consuming to adjust them every time you start a new document. However, Microsoft Word allows you to save your custom margin settings as the default, making it quick and simple to apply them to any new document you create. Here’s how you can save and apply custom margins as the default:
First, open the Page Setup dialog box by following the steps mentioned earlier.
In the Page Setup dialog box, make sure the desired margin settings are applied. Adjust the margins manually or use other methods discussed earlier to set them to your preferred values.
With the custom margin settings in place, click on the “Set As Default” button located at the bottom of the Page Setup dialog box.
A dialog box will appear, asking if you want to set the custom settings as the default for all new documents based on the currently selected template. Click “OK” to confirm and apply the changes.
From now on, whenever you create a new document based on the same template or using the default template, the custom margin settings will automatically be applied.
If you want to revert to the original default margin settings, follow the same steps mentioned earlier, but this time click on the “Reset” button in the Page Setup dialog box.
By saving custom margins as the default, you save time and effort in setting them manually for every new document. This is particularly beneficial if you consistently work with specific margin requirements, such as academic papers or organization-specific formatting guidelines.
Keep in mind that saving custom margins as default only applies to the specific template or the default template in use. If you want to apply the custom margins to existing documents based on a different template, you will need to manually adjust the margins in those documents.
Now that you know how to save and apply custom margins as the default in Microsoft Word, you can streamline your document creation process by ensuring consistent margin settings across all your new documents.
Tips for Margins in Word
Working with margins in Microsoft Word can greatly impact the overall appearance and readability of your document. To make the most out of your margin settings, consider the following tips:
1. Understand your document’s purpose: Different types of documents may have specific margin requirements. For example, academic papers, legal documents, or business reports may have guidelines for margin sizes. Familiarize yourself with any specific requirements before adjusting the margins.
2. Consider your audience: Think about who will be reading your document. If your document will be printed, it may be wise to leave wider margins to accommodate binding or hole-punching. Additionally, consider the readability of your document on different devices and screen sizes.
3. Maintain consistency: It’s crucial to ensure consistency in margin sizes throughout your document. Inconsistent margins can make your document appear disorganized and unprofessional. Use preset options or customize margins to match the desired layout and consistently implement them throughout the document.
4. Strike a balance: While it’s essential to make the most of the available space and include your content, be cautious not to make the margins too narrow. Overly narrow margins can make your document look cramped and hinder readability. Find the balance between maximizing content space and providing comfortable reading margins.
5. Mind your page count: Adjusting margins can affect the total page count of your document. Enlarging margins may result in additional pages, while reducing margins can help fit more content on a page. Be mindful of your desired page count and ensure that any changes to the margins align with your formatting goals.
6. Avoid excessive white space: While white space is necessary to provide visual breathing room and improve readability, excessive white space caused by wide margins can make your document appear unbalanced. Evaluate your document and ensure that the margin sizes complement the content without creating unnecessary large white spaces.
7. Proofread and preview: Finally, before finalizing your margins, thoroughly proofread your document to catch any inconsistencies, deviations, or awkward page breaks caused by margin adjustments. Additionally, preview your document in different views (such as Print Layout or Print Preview) to ensure that the margins appear as intended.
By keeping these tips in mind, you can effectively manipulate margins in Word to create visually appealing and professional-looking documents that are tailored to your specific needs.