
Why Change the Paper Size?
When working with a Word document, you may find yourself in a situation where you need to print the document on a different paper size. Perhaps you want to print a document designed for letter-sized paper on legal-sized paper, or maybe you need to print a document for a specific label or envelope size. Whatever the case may be, being able to change the paper size in your Word document is essential.
Changing the paper size allows you to customize your document to fit the specific requirements of your printing needs. It ensures that your content is aligned correctly on the page and avoids any cropping or formatting issues. Additionally, resizing the paper can be especially helpful when dealing with international standards or specialized printing tasks.
Whether you are drafting a business report, designing a flyer, or working on any other type of document, having the ability to adjust the paper size gives you more flexibility and control over the final output. By following a few simple steps, you can easily change the paper size in your Word document and be ready to print it on the desired size with confidence.
In the following sections, we will walk you through the process of changing the paper size in a Word document. By following these steps, you will be able to modify the paper size effortlessly and ensure that your document is perfectly tailored to your printing requirements.
Step 1: Open the Word Document
The first step to changing the paper size in your Word document is to open the document you want to work on. Launch Microsoft Word on your computer and locate the document file you wish to modify. You can do this by navigating to the file’s location or using the recently opened document list in Word.
If you already have Word open, you can choose to open a new, blank document or open an existing document by clicking on the “File” tab in the top left corner of the screen. From the dropdown menu, select “Open” and browse your computer to find the document you want to adjust.
Once you have located the document, double-click on it or click on the “Open” button at the bottom right corner of the window to open it in Word. The document will appear on your screen, ready for you to make any necessary changes.
It’s essential to have the document open before moving forward with the process. So take a moment to ensure that you have successfully opened the Word document you want to modify. Now that you have your document ready, we can move on to the next step, where you will access the page layout options to change the paper size.
Step 2: Access the Page Layout Options
Once you have your Word document open, the next step is to access the page layout options. These options allow you to customize various aspects of your document’s layout, including the paper size. To access the page layout settings, navigate to the “Layout” tab in the Word toolbar.
At the top of the Word window, you will see several tabs, such as “Home,” “Insert,” “Design,” and more. Click on the “Layout” tab to reveal a range of layout-related options and settings. The “Layout” tab provides you with the necessary tools to make changes to your document’s size, orientation, and margins.
Once you have clicked on the “Layout” tab, you will notice a section called “Page Setup.” Within this section, you will find various options related to page layout. Look for the button or link labeled “Size” or “Page Size.” Clicking on this button will open a dropdown menu where you can select from a list of predefined paper sizes.
By accessing the page layout options, you are one step closer to changing the paper size of your Word document. In the next step, we will cover how to select a custom page size that suits your specific printing needs.
Step 3: Select the Custom Page Size
After accessing the page layout options in your Word document, the next step is to select a custom page size. While Word provides several predefined paper sizes to choose from, selecting a custom size allows you to input specific dimensions that meet your unique printing requirements.
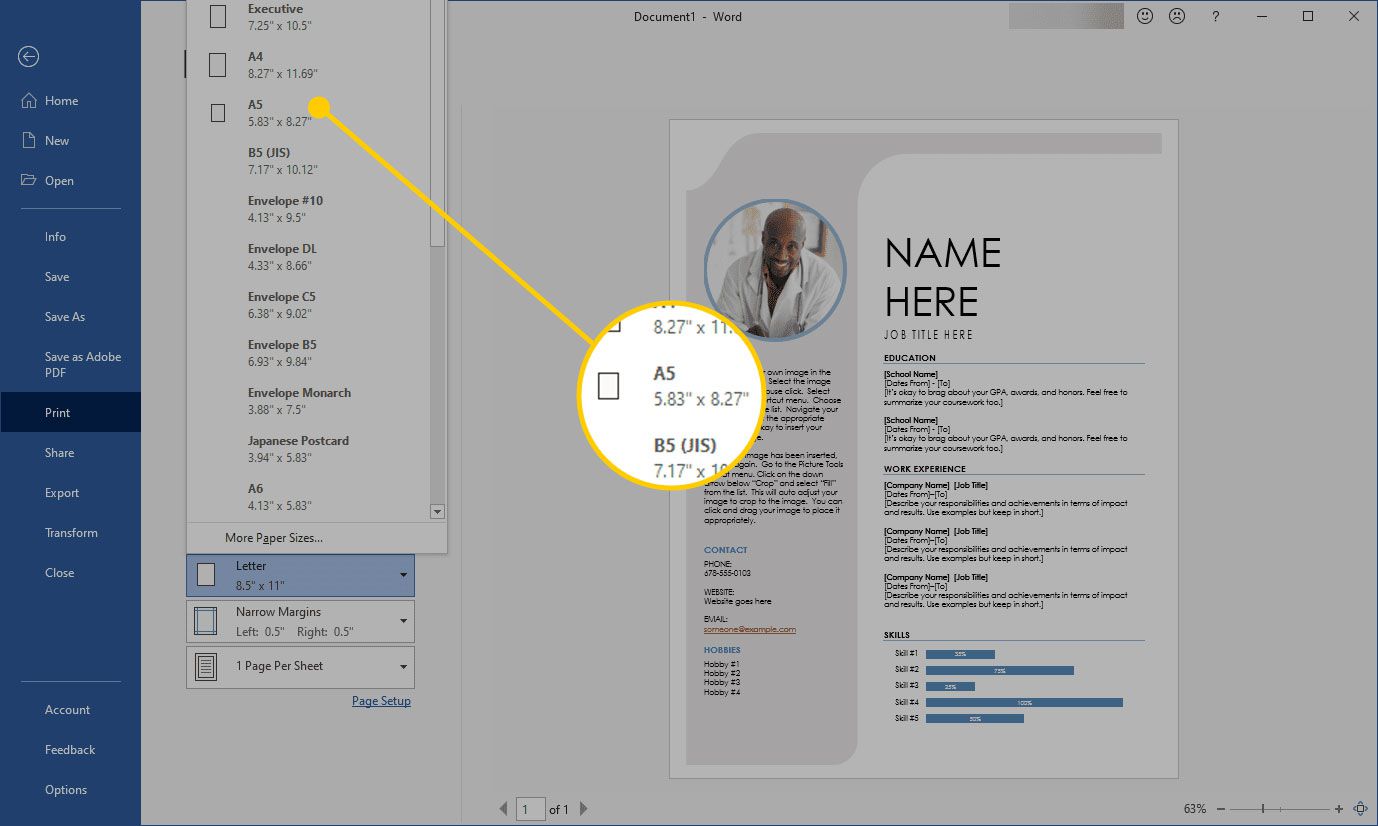
To select a custom page size, locate the “Size” or “Page Size” option in the page layout settings. Clicking on this option will open a dropdown menu with a list of predefined paper sizes. However, since we want to select a custom size, we need to choose the “More Paper Sizes” or “Custom Sizes” option, usually found at the bottom of the dropdown menu.
Clicking on the “More Paper Sizes” or “Custom Sizes” option will open the “Page Setup” dialog box, where you can define your custom page size. In this dialog box, you will find various options, including paper size, orientation, margins, and more.
Locate the “Paper” or “Page” tab in the “Page Setup” dialog box. Within this tab, you will find an area to input the width and height of your custom page size. Enter the desired dimensions for your paper size, ensuring you select the appropriate unit of measurement (e.g., inches, centimeters).
Once you have entered the dimensions, click on the “OK” button to save your changes and apply the custom page size to your Word document. Congratulations! You have successfully selected a custom page size, and you are now ready to move on to the next step: inputting the desired paper size.
Step 4: Input the Desired Paper Size
Now that you have accessed the page layout options and selected the option for a custom page size in your Word document, it’s time to input the desired paper size. This step allows you to specify the exact dimensions of the paper you want to use for printing.
In the “Page Setup” dialog box, navigate to the “Paper” or “Page” tab, where you will find the option to input the width and height of the paper. These fields are typically labeled “Width” and “Height” or “Paper Size.” Enter the appropriate numerical values for the width and height, making sure to use the correct unit of measurement (e.g., inches, centimeters).
When inputting the desired paper size, it’s essential to consider the requirements of your specific printing task. For example, if you’re printing on a standard letter-sized paper, the dimensions might be 8.5 inches by 11 inches. However, if you’re using a specialized paper size, such as legal or A4, you will need to input the corresponding dimensions.
If you’re unsure about the exact dimensions of the paper you’re using, consult the packaging or specifications for the paper. Alternatively, you can measure the paper manually using a ruler or measuring tape to ensure accurate input of the desired paper size.
Once you have inputted the correct dimensions for the paper size, click on the “OK” button to save your changes. By completing this step, you have successfully specified the desired paper size for your Word document, getting one step closer to finalizing the changes and preparing the document for printing.
Step 5: Apply the Changes
After inputting the desired paper size in your Word document, it’s time to apply the changes and ensure that the new paper size is set for the entire document. Applying the changes will ensure that all pages in the document are adjusted to the specified paper size.
To apply the changes, simply click on the “OK” button in the “Page Setup” dialog box. This action will save your modifications and update the page layout settings for the document.
Once you click “OK,” you will notice that the document layout adjusts accordingly to the new paper size. All pages will be resized to fit the dimensions you specified, allowing your content to align correctly on the page.
It’s essential to double-check your document after applying the changes to ensure that all elements, such as text, images, and formatting, are properly adjusted to the new paper size. Pay attention to any elements that might need further adjustments, such as resizing or repositioning.
If you encounter any issues or notice any inconsistencies in the document layout after applying the changes, you can always revisit the “Page Setup” options and make further adjustments as needed. Remember, the goal is to have a document that is perfectly tailored to your desired paper size.
By successfully applying the changes, you have completed an important step in the process of changing the paper size in your Word document. The next step involves adjusting the content to fit the new paper size, ensuring a seamless and professional-looking final print.
Step 6: Adjust the Content to Fit the New Paper Size
Once you have applied the changes and set the new paper size in your Word document, it’s important to review and adjust the content to ensure it fits correctly within the new dimensions. This step ensures that all elements on each page, such as text, images, and margins, are properly aligned and optimized for the new paper size.
Start by scrolling through your document to visually inspect each page. Look for any elements that are cut off or seem squeezed within the new page dimensions. Pay attention to headers, footers, page numbers, and any other design elements that might need adjustment.
To make adjustments, you can use Word’s formatting and layout tools to resize and reposition elements. For instance, you can adjust margins, resize images, or modify font sizes to fit the content appropriately within the new page size.
If necessary, you can also consider modifying the page layout options further. For example, you may need to adjust the orientation (portrait or landscape) or adjust the margins to create more whitespace and improve readability.
It’s crucial to ensure that all content is not only fitting within the new paper size but also maintains its legibility and visual appeal. Avoid crowding the page with too many elements or making the text too small to read comfortably.
Take your time to adjust and review each page carefully, making any necessary modifications until you are satisfied with the overall appearance and layout. By doing so, you are ensuring that your document is tailored to the new paper size and ready for printing.
After making the necessary adjustments, it’s always a good idea to preview your document before proceeding to the final step of actually printing it. This allows you to double-check how the content looks on each page and make any additional changes if needed.
Step 7: Preview the Document before Printing
Before you proceed with printing your Word document with the new paper size, it’s essential to preview the document to ensure that everything looks as expected. The preview feature allows you to get a visual representation of how the content will appear on each printed page.
To access the document preview, go to the “File” tab in the Word toolbar and select the “Print” option from the dropdown menu. This will open the print settings and preview window.
In the print preview window, you can scroll through the document and examine the layout and formatting of each page. Pay attention to any elements that appear distorted, cut off, or improperly positioned. If you notice any issues, you can still go back and make further adjustments to the content or page layout settings.
Take this opportunity to also review the page breaks and ensure that the content flows smoothly from one page to the next. You can use the navigation arrows or the page thumbnails in the preview window to navigate and inspect each page individually.
Additionally, check that the headers, footers, and page numbers are consistently applied and appear correctly on each page. This step is particularly important if you have customized headers or footers that might be affected by the change in paper size.
If you are satisfied with the document preview and everything looks as desired, you can proceed to the final step: printing your Word document with the new paper size.
However, if you notice any issues or discrepancies during the preview, make the necessary adjustments before moving forward. It’s better to address any layout or formatting problems at this stage rather than wasting paper and ink during the actual printing process.
Once you have finalized the document preview, you are ready to move on to the final step and print your Word document with the selected paper size.
Step 8: Print the Document with the New Paper Size
Now that you have previewed the document and made any necessary adjustments, it’s time to print your Word document with the newly set paper size. Printing allows you to have a physical copy of your document that conforms to the specified dimensions.
To print the document, go to the “File” tab in the Word toolbar and select the “Print” option from the dropdown menu. This will bring up the print settings window, where you can choose your printer, set the desired number of copies, and configure other print options.
Make sure that your printer is properly connected and functional before proceeding. Select the correct printer from the available options if you have multiple printers connected to your computer.
Verify that the page range is set correctly, ensuring that you print all the pages you need. You can choose to print all pages, a specific range of pages, or even select individual pages if necessary.
Double-check the paper size settings in the print settings window. Confirm that the chosen paper size matches the custom size you selected earlier in the page layout options.
Take a moment to review any additional print settings, such as duplex printing (printing on both sides of the paper), color settings, or quality options. Adjust these settings according to your preferences and requirements.
Once you are satisfied with the print settings, click on the “Print” button to begin the printing process. Ensure that your printer has enough paper and ink or toner to complete the print job successfully.
Wait for the printer to complete printing the document. Depending on the length and complexity of the document, this process may take a few moments.
Once the printer has finished printing your Word document, collect the printed pages and examine them to ensure that the content is aligned correctly within the new paper size. Check for any print errors or formatting issues that may have occurred during the printing process.
Congratulations! You have successfully printed your Word document with the new paper size. Now you can use or distribute the printed document according to your needs.