
Before You Print
When you’re preparing to print a document in Microsoft Word, there are a few important factors to consider to ensure a successful and efficient printing process. Here are some essential steps to take before hitting that print button:
1. Review and Edit: Before printing, it’s crucial to carefully review and edit your document. Look for any spelling or grammatical errors, formatting inconsistencies, or content issues. Taking the time to proofread and make necessary adjustments will help you avoid wasting paper and ink.
2. Save Your Document: Don’t forget to save your document before printing. This will ensure that you have a backup in case of any unexpected issues with the printing process. It’s always better to be safe than sorry!
3. Check Page Layout: Verify that your document is properly formatted for printing. Ensure that the margins, page size, and orientation are set correctly. You want to avoid any unwanted cropping or distorted formatting when the document is printed.
4. Consider Page Setup Options: Microsoft Word offers several page setup options that allow you to customize the appearance of your document when printed. You can adjust the headers and footers, add page numbers, and choose whether to include background colors and images. Take advantage of these features to make your printed document look professional and polished.
5. Preview Before Printing: It’s a good idea to preview your document before printing to ensure that everything appears as intended. Use the “Print Preview” option in Microsoft Word to get an accurate representation of how your document will look on paper. This can help you catch any formatting issues and make any necessary adjustments before wasting paper and ink.
6. Check Printer Settings: Double-check your printer settings to ensure they align with your printing needs. Select the correct printer, paper size, orientation, and ensure that color settings are accurate. Verifying these settings will prevent any surprises and help you achieve the desired results.
7. Consider Digital Alternatives: Before automatically opting to print a document, consider whether a digital alternative could be just as effective. Electronic documents are not only more environmentally friendly, but they also provide greater flexibility in terms of sharing and storage.
By following these preliminary steps, you’ll be well-prepared to print your Word document without any unnecessary setbacks or waste. Taking the time to review, adjust, and ensure your settings are correct will result in a more efficient printing process and a professional-looking printed document.
Printing Specific Pages
If you only need to print certain pages of your Word document, rather than the entire document, Microsoft Word provides a straightforward solution. Here’s how you can print specific pages:
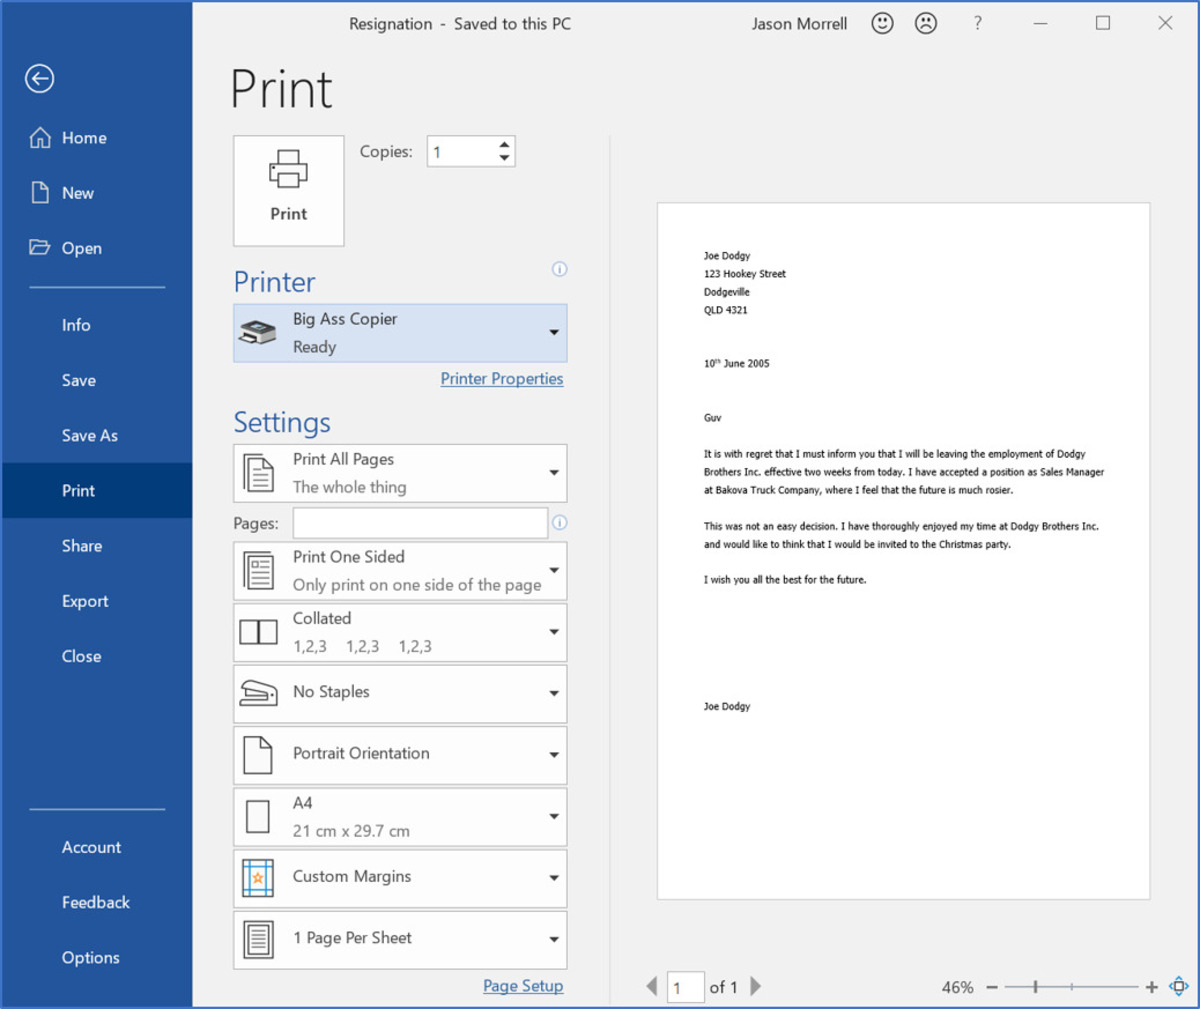
1. Open the Print Dialog: Click on the “File” tab at the top left corner of the Word window and select “Print” from the dropdown menu. Alternatively, you can press “Ctrl+P” on your keyboard to open the Print dialog.
2. Specify the Pages to Print: In the Print dialog, you’ll see a section called “Page Range.” By default, the option “Print All Pages” is selected. To print specific pages, click on the radio button next to “Pages” and enter the page numbers or page range you want to print. For example, if you want to print pages 3, 5, and 7, enter “3, 5, 7” in the text box, or you can use a hyphen to specify a range, such as “1-5”.
3. Adjust Print Settings: Take a moment to review and adjust your print settings. Ensure that the correct printer is selected, and check other options like paper size, orientation, and page margins to ensure they align with your requirements.
4. Print Preview (Optional): If you want to see how the selected pages will appear when printed, click on the “Print Preview” button. This will display a preview of the pages with the specified content and settings. You can make any necessary adjustments before proceeding with the printing process.
5. Print the Specific Pages: Once you’re satisfied with the settings and preview, click on the “Print” button to start printing the specific pages you’ve selected. Ensure that your printer is properly connected and has sufficient paper and ink/toner before proceeding.
Printing specific pages can save time and resources, especially when dealing with lengthy documents. Instead of printing the entire document, you can focus on the specific pages that are relevant or necessary for your needs. This feature also comes in handy when you want to print multiple copies of certain pages without duplicating unnecessary ones.
By following these simple steps, you can easily print specific pages from your Word document. Enjoy the convenience and efficiency of being able to select and print only the pages you need while minimizing paper and ink usage.
Printing Specific Sections
Microsoft Word provides a helpful feature that allows you to print specific sections of your document instead of printing the entire document. Whether you have a lengthy document with multiple sections or you want to focus on specific content, here’s how you can print specific sections in Word:
1. Identify Document Sections: Before proceeding with printing specific sections, ensure that your Word document is properly divided into sections. To do this, use the “Page Break” feature to separate content into different sections. Sections can be helpful when you want to apply specific formatting or headers/footers to certain parts of your document.
2. Navigate to the Section: Locate the section that you want to print. You can do this by scrolling through your document or using the “Find” feature (press “Ctrl+F” and enter a unique word or phrase from the section). Ensure that you are within the desired section in Microsoft Word.
3. Open the Print Dialog: Click on the “File” tab at the top left corner of the Word window and select “Print” from the dropdown menu. Alternatively, you can press “Ctrl+P” on your keyboard to open the Print dialog.
4. Select Specific Section to Print: In the Print dialog, locate the “Settings” section. Under “Settings,” you’ll see a dropdown menu labeled “Print All Pages In Range.” Click on the dropdown menu and select “Current Section” or “Selection.” This option will instruct Word to print only the current section or the selected content.
5. Review and Adjust Print Settings: Take a moment to review your print settings. Ensure that the correct printer is selected, and adjust other options such as paper size, orientation, and page margins to suit your requirements. Double-check these settings before proceeding with the printing process.
6. Print the Specific Section: Once you’re satisfied with the settings, click on the “Print” button to start printing the specific section you’ve chosen. Ensure that your printer is properly connected and has sufficient paper and ink/toner before proceeding.
Printing specific sections can be particularly useful when you want to focus on a particular part of your document, such as a specific chapter, section, or topic. It allows you to print only the necessary content, saving time and resources.
By following these steps, you can easily print specific sections of your Word document. Take advantage of this feature to streamline your printing process and eliminate the need to include unnecessary sections in your printouts.
Printing Selected Text
Printing selected text from your Word document can be useful when you only want to print specific paragraphs, sentences, or even individual words. Instead of printing the entire document, you can easily print only the selected text by following these steps:
1. Select the Text: Highlight the specific text you want to print. You can do this by clicking and dragging the cursor over the desired text. If you want to select multiple non-contiguous sections, hold down the Ctrl key while selecting each section of text.
2. Copy the Text (Optional): If you prefer to keep the original content intact, you may choose to copy the selected text and paste it into a new Word document. This allows you to work with a separate file for printing while preserving the original document.
3. Open the Print Dialog: Click on the “File” tab at the top left corner of the Word window and select “Print” from the dropdown menu. Alternatively, use the shortcut “Ctrl+P” to open the Print dialog.
4. Print Selected Text: In the Print dialog, under the “Settings” section, select the option “Print Selection” or “Selected Text” from the dropdown menu. This instructs Word to print only the currently highlighted text rather than the entire document.
5. Review and Adjust Print Settings: Take a moment to review the print settings, ensuring that the correct printer is selected and adjusting other options such as paper size, orientation, and page margins as needed. Verify these settings before proceeding with the printing process.
6. Print the Selected Text: Once you’re satisfied with the settings, click on the “Print” button to start printing the selected text. Make sure your printer is connected and has sufficient paper and ink/toner.
Printing selected text allows you to focus on specific content without wasting paper and ink. It can be particularly helpful when you only need to reference or share a small portion of a larger document with others.
By following these simple steps, you can easily print selected text from your Word document. Take advantage of this feature to print only the necessary information while minimizing printing resources.
Printing a Range of Pages
When you want to print a specific range of pages from your Word document, rather than printing the entire document, Microsoft Word offers a simple solution. Follow these steps to print a range of pages:
1. Open the Print Dialog: Click on the “File” tab at the top left corner of the Word window and select “Print” from the dropdown menu. Alternatively, you can press “Ctrl+P” on your keyboard to open the Print dialog.
2. Enter the Page Range: In the Print dialog, locate the section labeled “Page Range.” By default, the option “Print All Pages” is selected. To print a specific range of pages, click on the radio button next to “Pages” and enter the page numbers or page range you want to print. For example, if you want to print pages 5 to 10, enter “5-10” in the text box.
3. Adjust Print Settings: Take a moment to review and adjust your print settings. Ensure that the correct printer is selected, and check other options like paper size, orientation, and page margins to ensure they align with your requirements.
4. Print Preview (Optional): If you want to see how the selected range of pages will appear when printed, click on the “Print Preview” button. This will display a preview of the pages with the specified content and settings. You can make any necessary adjustments before proceeding with the printing process.
5. Print the Range of Pages: Once you’re satisfied with the settings and print preview, click on the “Print” button to start printing the specified range of pages. Make sure your printer is properly connected and has enough paper and ink/toner.
Printing a range of pages allows you to customize your printouts to include only the necessary pages, reducing paper and ink waste. This feature is particularly useful when you have a large document and need to print specific sections or exclude irrelevant pages.
By following these steps, you can easily print a range of pages from your Word document. Enjoy the flexibility and efficiency of being able to select the exact pages you need while saving on printing resources.
Printing Multiple Copies of a Specific Section
If you need to print multiple copies of a specific section within your Word document, Microsoft Word provides a convenient solution. Here’s how you can print multiple copies of a specific section:
1. Identify the Section: Locate the section within your Word document that you want to print multiple copies of. Ensure that the content is properly divided into sections using page breaks or other formatting options.
2. Select the Section: Highlight the specific section of text you want to print multiple copies of. You can do this by clicking and dragging the cursor over the desired content. If the section is non-contiguous, hold down the Ctrl key and select each part of the section individually.
3. Copy and Paste the Section (Optional): If you prefer to keep the original content intact, you can choose to copy the selected section and paste it into a new Word document. This allows you to work with a separate file for printing while preserving the original document.
4. Open the Print Dialog: Click on the “File” tab at the top left corner of the Word window and select “Print” from the dropdown menu. Alternatively, use the shortcut “Ctrl+P” to open the Print dialog.
5. Adjust Print Settings: Review and adjust your print settings as necessary. Make sure to select the correct printer and customize options such as paper size, orientation, and page margins to align with your requirements.
6. Specify the Number of Copies: In the Print dialog, locate the section labeled “Copies.” By default, the option “1” is selected. Click on the arrow to increase the number of copies you want to print. Specify how many copies of the selected section you need.
7. Print the Multiple Copies: Once you’ve adjusted the settings and specified the number of copies, click on the “Print” button to start printing. Ensure that your printer is properly connected and has enough paper and ink/toner for the desired number of copies.
Printing multiple copies of a specific section can be beneficial when you need to distribute identical information to multiple recipients or when you require additional copies for reference or documentation purposes.
By following these steps, you can easily print multiple copies of a specific section of your Word document. Enjoy the convenience and efficiency of being able to reproduce the desired content while reducing the need for manual duplication.
Printing Specific Pages in a Different Format
If you want to print specific pages of your Word document in a different format from the rest of the document, Microsoft Word offers a flexible solution. Here’s how you can print specific pages in a different format:
1. Open the Print Dialog: Click on the “File” tab at the top left corner of the Word window and select “Print” from the dropdown menu. Alternatively, you can press “Ctrl+P” on your keyboard to open the Print dialog.
2. Specify the Pages to Print: In the Print dialog, you’ll see a section called “Page Range.” By default, the option “Print All Pages” is selected. To print specific pages, click on the radio button next to “Pages” and enter the page numbers or range you want to print. For example, if you want to print pages 3, 5, and 7, enter “3, 5, 7” in the text box or use a hyphen to specify a range, such as “1-5”.
3. Adjust Print Settings: Take a moment to review and adjust your print settings. Ensure that the correct printer is selected, and check other options like paper size, orientation, and page margins to suit your requirements.
4. Choose a Different Format: To print the specified pages in a different format, you can make use of Word’s “Page Setup” feature. Click on the “Page Setup” link or button within the Print dialog to access the settings for customizing the selected pages.
5. Customize Page Setup: In the Page Setup dialog, you can modify various formatting options for the selected pages. This includes adjusting margins, paper size, orientation, headers, footers, and other formatting elements. Make the desired changes to suit your needs and preferences.
6. Preview (Optional): If you want to see a preview of how the selected pages will appear when printed, click on the “Print Preview” button within the Print dialog. This will allow you to assess the visual representation of the pages with the specified formatting settings.
7. Print the Specific Pages: Once you’re satisfied with the settings and preview, click on the “Print” button to start printing the specific pages in the desired format. Ensure that your printer is properly connected and has sufficient ink/toner and paper.
Printing specific pages in a different format can be helpful when you want to emphasize certain sections, create custom layouts, or apply unique styling to those pages. It allows for greater flexibility and customization in the printing process.
By following these steps, you can easily print specific pages of your Word document in a different format. Enjoy the ability to customize the appearance of selected pages while maintaining consistency throughout the rest of the document.
Tips and Tricks for Printing Part of a Word Document
Printing only a portion of a Word document can help save time, resources, and provide a more focused printout. To make the most out of this feature, here are some useful tips and tricks:
1. Use Bookmarks: Set bookmarks within your Word document to mark specific sections you frequently print. This allows you to quickly navigate to those sections and print them without having to manually select the content each time.
2. Utilize Selection Options: Experiment with different selection options in Word to choose exactly what you want to print. These options include selecting specific paragraphs, sentences, or individual words. Use combinations of Ctrl and Shift key along with mouse click and drag to make precise selections.
3. Print Multiple Selections: If you need to print multiple non-adjacent sections, select each section while holding the Ctrl key. This way, you can print all the selected sections at once without having to go through the process for each one individually.
4. Preview Before Printing: Always preview your printout before sending it to the printer. Take the time to review the selected content, formatting, and page breaks to ensure that everything appears as desired. This helps catch any mistakes or formatting issues ahead of time.
5. Check Page Layout: Verify that the page layout settings are consistent and appropriate for the selected content. Adjust margins, page size, orientation, and headers/footers if needed to achieve optimal printing results.
6. Save Printer Settings: If you frequently print specific sections in the same format, save those printer settings as a default or preset. This way, you can quickly select the desired format without having to adjust the settings each time you print.
7. Consider Print to PDF: Instead of using a physical printer, consider using the “Print to PDF” option. This allows you to create digital copies of the selected content, which are easy to share, store, and reference without wasting paper.
8. Experiment with Layout Options: Explore Word’s layout options to create custom printouts. You can adjust the page orientation, insert section breaks for different headers/footers, or even apply different styles and formatting within the selected content.
9. Print Styles: Word offers predefined “Print Styles” that you can apply to the selected content. These styles are specifically designed for printing and can help enhance readability and optimize the appearance of the printed part.
10. Consider Print Settings Outside of Word: Depending on your printer and its software, you may have additional print settings and options available outside of Word. Explore those options to further customize your printouts and optimize the printing process.
By following these tips and tricks, you can make printing specific parts of a Word document more efficient and tailored to your needs. Whether it’s selecting content precisely or optimizing the formatting and layout, these strategies help you make the most out of this feature while ensuring a professional-looking printout.