
Connecting the Ledger Nano S to your computer
Before you can view the balance on your Ledger Nano S device, you need to connect it to your computer. The Ledger Nano S comes with a USB cable that you can use for this purpose.
To begin, locate the USB port on your computer and insert one end of the cable into it. Then, take the other end of the cable and connect it to the micro USB port on the bottom of your Ledger Nano S device.
Once the Ledger Nano S is connected to your computer, you will need to power it on. To do this, press both buttons on the device simultaneously and hold them down until the Ledger logo appears on the screen.
Your Ledger Nano S should now be recognized by your computer as a new device. If you are using Windows, it may prompt you to install the necessary drivers. Simply follow the on-screen instructions to complete the installation process.
Once the Ledger Nano S is successfully connected to your computer and the drivers are installed (if needed), you can proceed to the next steps to view your balance.
Launching the Ledger Live Application
After connecting your Ledger Nano S device to your computer, the next step is to launch the Ledger Live application. Ledger Live is the official software provided by Ledger to manage your cryptocurrency wallets and view your balances.
To launch Ledger Live, first make sure that your Ledger Nano S is unlocked and displaying the main menu on its screen. Then, on your computer, open your preferred web browser and visit the Ledger website at www.ledger.com. From there, navigate to the “Downloads” section and locate the Ledger Live application for your operating system (Windows, macOS, or Linux).
Click on the appropriate download link and follow the instructions to install Ledger Live on your computer. Once the installation is complete, you can open the application and begin the setup process.
Upon launching Ledger Live for the first time, you will be prompted to choose between “Set up a new device” or “Restore a device.” Since you have already connected your Ledger Nano S, select the “Set up a new device” option.
Follow the on-screen instructions to proceed with the device setup. You may be prompted to update the firmware on your Ledger Nano S. If a firmware update is available, it is recommended to proceed with the update to ensure that your device is running the latest version.
Once the device setup is complete, Ledger Live will automatically detect your Ledger Nano S and display your connected wallets. You are now ready to view your balance and manage your cryptocurrency assets using the Ledger Live application.
Unlocking your Ledger Nano S Device
Before you can view your balance on the Ledger Nano S device, you need to unlock it. The device has a built-in security feature that requires you to enter your PIN code to gain access to your wallets.
Once Ledger Live is open on your computer and your Ledger Nano S is connected, you will be prompted to unlock the device. On the Ledger Nano S screen, you will see a “Enter PIN” message.
To enter your PIN code, simply use the buttons on the device to navigate and enter each digit of your PIN. Press both buttons simultaneously to validate each digit. You should enter your PIN carefully and ensure that it matches the one you set up when configuring your device initially.
If you enter your PIN incorrectly three times in a row, the Ledger Nano S will display a message indicating that the device is locked. In such cases, you will have to wait for the timeout period (usually 3-5 minutes) before you can attempt to unlock it again. This security measure is in place to protect your funds from unauthorized access.
Once you have successfully unlocked your Ledger Nano S device, you will be able to access and view the balances of your cryptocurrency wallets through Ledger Live. It is important to keep your device and PIN code secure to prevent unauthorized access to your funds.
Navigating to the Account Section
After unlocking your Ledger Nano S device, you will need to navigate to the Account section in the Ledger Live application to view your cryptocurrency wallet balances. This section provides an overview of all the wallets associated with your Ledger Nano S.
To access the Account section, first ensure that Ledger Live is open on your computer and your Ledger Nano S is connected and unlocked. Once you are in the main dashboard of Ledger Live, you will see a left-hand sidebar with various options.
Locate and click on the “Accounts” tab in the sidebar. This will take you to the Account section, where you will find a list of all the supported cryptocurrencies and their respective wallet balances.
By default, the Account section will display the balances for the wallets that are associated with your Ledger Nano S device. It is important to note that each cryptocurrency wallet is represented as a separate account within Ledger Live.
If you have multiple wallets for the same cryptocurrency, for example, multiple Bitcoin wallets, you can switch between them by selecting the desired wallet from the list. This allows you to easily view the balance of each specific wallet.
In addition, Ledger Live provides convenient filters and sorting options to help you organize and navigate through your accounts. You can search for specific accounts, sort them by balance, or even hide empty accounts for a cleaner view.
Now that you have successfully navigated to the Account section, let’s proceed to the next step of selecting the specific cryptocurrency wallet you want to view the balance for.
Selecting the Cryptocurrency Wallet You Want to View the Balance For
Once you have accessed the Account section in the Ledger Live application, you will be able to select the specific cryptocurrency wallet that you want to view the balance for. Ledger Live supports a wide range of cryptocurrencies, including Bitcoin, Ethereum, Ripple, and many more.
To select a specific cryptocurrency wallet, look for the list of accounts displayed in the Account section. Each account represents a different wallet associated with your Ledger Nano S device.
Scroll through the list or use the search function to find the cryptocurrency wallet you are interested in. The wallets are typically named after the specific cryptocurrency they represent, making it easy to identify the one you want to view the balance for.
Once you have located the desired cryptocurrency wallet, click on it to select it. Ledger Live will then display the detailed information about this wallet, including its balance, transaction history, and any additional features or settings specific to that cryptocurrency.
By selecting the cryptocurrency wallet, you are now able to view the balance for that particular wallet. You will see the current balance displayed prominently on the screen, allowing you to keep track of your holdings at a glance.
It is important to note that if you have multiple wallets of the same cryptocurrency, such as different Bitcoin wallets, you will need to select each wallet individually to view its specific balance. Ledger Live allows you to easily switch between wallets within the same cryptocurrency, providing a comprehensive view of your holdings.
Now that you have selected the cryptocurrency wallet you want to view the balance for, let’s move on to the next step of verifying the address on your Ledger Nano S device.
Verifying the Address on the Ledger Nano S Device
Verifying the address on your Ledger Nano S device is an essential step to ensure the security and accuracy of your cryptocurrency transactions. By comparing the address displayed on the device with the address shown on the Ledger Live application, you can confirm that you are sending or receiving funds to the correct wallet.
To verify the address, start by accessing the specific cryptocurrency wallet you want to view the balance for in the Ledger Live application.
Once you have selected the wallet, Ledger Live will display the balance along with the corresponding wallet address. Take note of this address as it will be used for verification.
Next, on your Ledger Nano S device, navigate to the wallet you want to verify. You can use the device buttons to scroll through the wallet options until you find the desired wallet.
Upon selecting the wallet on your Ledger Nano S, the device will display the address associated with that particular wallet. Make sure to carefully compare this address with the one shown on Ledger Live.
Verify that the characters and sequence of the address on your Ledger Nano S device match exactly with the address shown on Ledger Live. Any discrepancy in the address could indicate a compromised or incorrect wallet.
If the addresses match, you can proceed with confidence, knowing that you are viewing the balance for the correct wallet. However, if there is a mismatch, do not proceed with any transactions and double-check the addresses to ensure accuracy and prevent any potential loss of funds.
Verifying the address on the Ledger Nano S device adds an extra layer of security to your cryptocurrency transactions and helps protect against phishing attacks or malicious software that may attempt to display fraudulent addresses. It is a recommended practice to always verify the address before initiating any transactions.
Now that you have verified the address on your Ledger Nano S device, you can proceed to confirm the account on the computer screen.
Confirming the Account on the Computer Screen
After verifying the address on your Ledger Nano S device, the next step is to confirm the account on the computer screen. By doing so, you ensure that the account displayed on Ledger Live matches the wallet you intend to view the balance for.
To confirm the account, make sure that you have selected the specific cryptocurrency wallet you want to view the balance for in the Ledger Live application. The wallet’s balance and address should be visible on the screen.
Take a moment to compare the wallet address shown on Ledger Live with the verified address on your Ledger Nano S device. Ensure that the addresses match exactly to eliminate any possibility of error or unauthorized access.
If the addresses match, you can proceed to confirm the account on the computer screen. This is typically done by clicking on a confirmation button or entering a password or passphrase, depending on the configuration of your Ledger Live account.
By confirming the account, you are essentially authenticating your ownership of the wallet and authorizing Ledger Live to display the balance and perform other account-related functions.
It is important to note that if you are using a passphrase on your Ledger Nano S device for additional security, you may be prompted to enter it at this stage. Ensure that you enter the correct passphrase to successfully confirm the account.
Once the account is confirmed, Ledger Live will update the displayed balance for the selected cryptocurrency wallet. You will now be able to view the updated balance, along with any transaction history or additional details associated with the account.
Confirming the account provides peace of mind, knowing that you are viewing the balance and accessing the correct wallet on Ledger Live. It adds an extra layer of security and helps prevent any accidental or unauthorized access to your cryptocurrency funds.
With the account confirmed, you can proceed to view the balance of your selected cryptocurrency wallet.
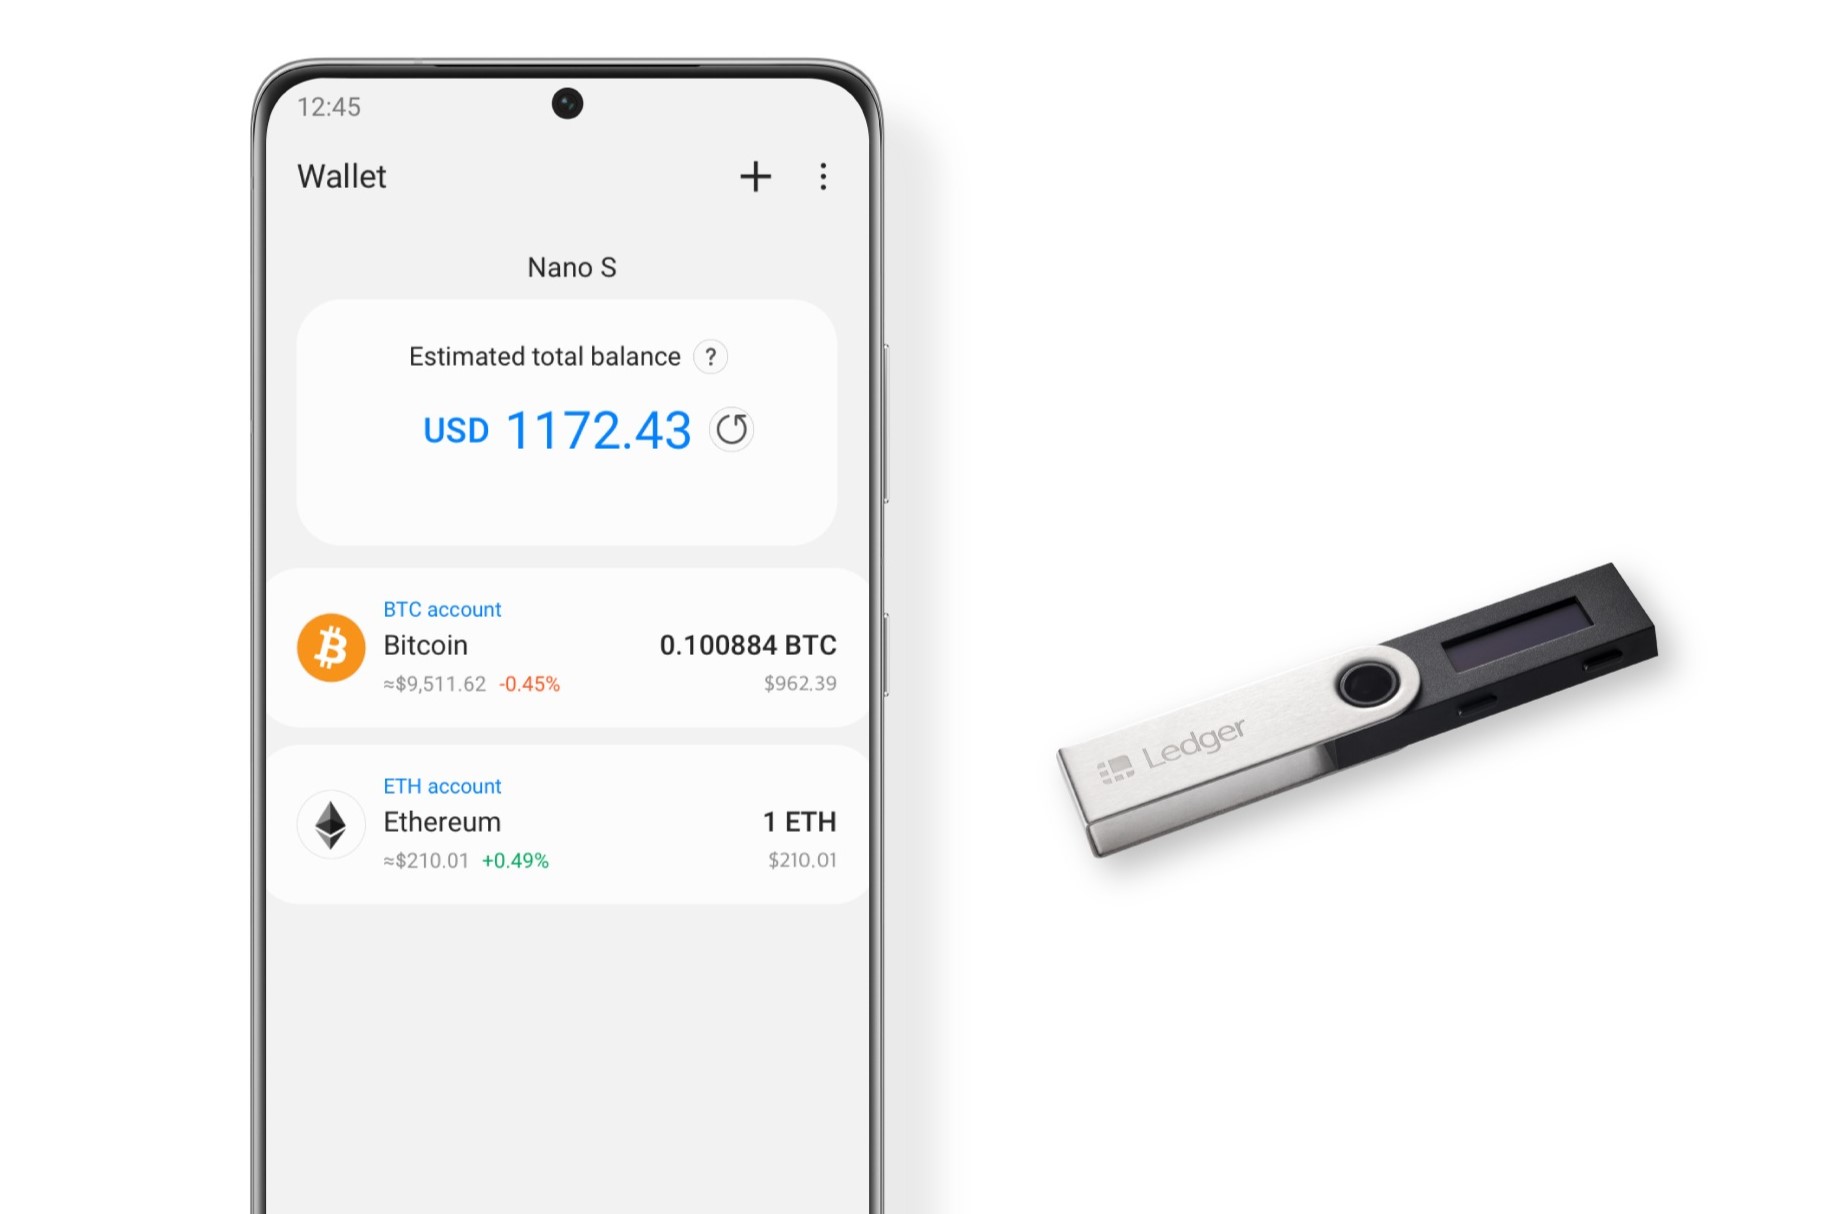
Viewing the Balance of Your Selected Cryptocurrency Wallet
Once you have confirmed the account on the computer screen, you can now proceed to view the balance of your selected cryptocurrency wallet. Ledger Live provides a clear and convenient interface to display your wallet’s balance and other relevant information.
With your desired cryptocurrency wallet selected in the Ledger Live application, the balance of the wallet should be prominently displayed on the screen. This balance represents the total value of the cryptocurrency held in that particular wallet.
Take note that the balance may be denoted in the specific cryptocurrency’s unit, such as BTC for Bitcoin or ETH for Ethereum. The balance will reflect the current market value of the holdings, and it may fluctuate based on the cryptocurrency’s price movements.
Additionally, Ledger Live may provide other useful details related to your selected cryptocurrency wallet. This could include the transaction history of the wallet, any pending transactions, or additional features and settings specific to that cryptocurrency.
The ability to view your balance directly in Ledger Live offers convenience and real-time updates, ensuring that you have an accurate snapshot of your cryptocurrency holdings at any given moment.
It is crucial to regularly monitor your wallet balances, especially in the volatile cryptocurrency market. Keeping an eye on the balance helps you track and manage your investments effectively, and it allows you to make informed decisions regarding buying, selling, or transferring your cryptocurrency.
If you have multiple cryptocurrency wallets connected to your Ledger Nano S, you can easily switch between them in Ledger Live to view the balances of each individual wallet. This feature allows for a comprehensive overview of your cryptocurrency portfolio.
By viewing the balance of your selected cryptocurrency wallet in Ledger Live, you gain valuable insights into your cryptocurrency holdings and can ensure that your financial assets are accurately represented.
Now that you have successfully viewed the balance of your selected cryptocurrency wallet, you can proceed to check the balance in a different wallet or take note of the balances for each cryptocurrency wallet you own.
Checking the Balance in a Different Wallet
If you have multiple cryptocurrency wallets connected to your Ledger Nano S, you may want to check the balance in a different wallet. Ledger Live allows you to easily switch between wallets, giving you the flexibility to monitor the balances of each individual wallet.
To check the balance in a different wallet, start by ensuring that Ledger Live is open on your computer and your Ledger Nano S device is connected and unlocked.
Next, navigate back to the Account section in Ledger Live. Here, you will find a list of all the supported cryptocurrencies and their respective wallets associated with your Ledger Nano S.
Scroll through the list or use the search function to locate the cryptocurrency wallet you want to check the balance for. Click on the desired wallet to select it.
Once you have selected the wallet, Ledger Live will display the updated balance for that particular wallet. The balance represents the current value of the cryptocurrency held in that wallet, and it may fluctuate based on market conditions.
Take note that switching to a different wallet does not affect the balances or transactions in other wallets. Each wallet functions independently, and switching between them allows you to view the balances individually.
This feature is particularly useful if you have diversified cryptocurrency holdings or if you separate your funds into different wallets for organizational purposes. Checking the balance in a different wallet provides a comprehensive overview of your cryptocurrency assets.
By regularly checking the balance in different wallets, you can keep track of your investments and ensure that your cryptocurrency portfolio is well-diversified and properly managed. It allows you to make informed decisions regarding buying, selling, or transferring your cryptocurrencies.
It’s important to note that the process of checking the balance in a different wallet remains consistent throughout Ledger Live. Simply navigate to the Account section, select the desired wallet, and Ledger Live will display the updated balance for that particular wallet.
Now that you know how to check the balance in a different wallet, you can take note of the balances for each cryptocurrency wallet you own and effectively manage your cryptocurrency holdings.
Taking Note of the Balances for Each Cryptocurrency Wallet
Keeping track of the balances for each cryptocurrency wallet is an important aspect of managing your cryptocurrency portfolio. Ledger Live allows you to easily take note of the balances for each wallet associated with your Ledger Nano S device, providing you with a comprehensive overview of your cryptocurrency holdings.
To take note of the balances, start by ensuring that Ledger Live is open on your computer and your Ledger Nano S device is connected and unlocked.
Navigate to the Account section in Ledger Live, where you will find a list of all the supported cryptocurrencies and their respective wallets.
Scroll through the list or use the search function to locate each cryptocurrency wallet. Click on each wallet to select it.
As you select each wallet, Ledger Live will display the corresponding balance for that particular cryptocurrency wallet. Take note of the balance, which represents the current value of the cryptocurrency held in that wallet.
You can record the balances in a separate document, spreadsheet, or any method that suits your organizational preferences. This allows you to have a clear overview of the value of each cryptocurrency wallet and easily track the performance of your investments over time.
Additionally, Ledger Live may provide other relevant details for each wallet, such as the transaction history, pending transactions, or additional settings specific to that cryptocurrency. These details can also be recorded alongside the balances to provide a comprehensive snapshot of each wallet’s status.
By taking note of the balances for each cryptocurrency wallet, you can monitor the growth or decline in the value of your investments. It also helps in assessing the diversification of your portfolio and making informed decisions regarding your cryptocurrency holdings.
Remember to keep your notes updated regularly by revisiting Ledger Live and checking the balances periodically. The cryptocurrency market is known for its volatility, and keeping track of the balances ensures that you are aware of any fluctuations in the value of your holdings.
Now that you have taken note of the balances for each cryptocurrency wallet, you are equipped with the necessary information to manage your cryptocurrency portfolio effectively.
Safely Disconnecting Your Ledger Nano S Device
After you have finished viewing the balances of your cryptocurrency wallets and managing your Ledger Nano S device, it is essential to safely disconnect it from your computer to maintain its security and integrity.
To safely disconnect your Ledger Nano S device, follow these steps:
- Ensure that you have closed Ledger Live and any other applications or websites that were accessing your Ledger Nano S device.
- On your computer, locate the system tray or taskbar at the bottom right corner of the screen. Find the USB device icon that represents your Ledger Nano S device.
- Right-click on the USB device icon and select the option to safely remove or eject the device. This will ensure that all data transfers and communications with the device are completed before disconnecting it.
- Wait for the computer to display a notification indicating that it is safe to remove the USB device.
- Once you see the notification, gently remove the USB cable from your computer’s USB port.
- On your Ledger Nano S device, navigate to the main menu and select the “Power off” option. This will power down the device before physically disconnecting it.
- Carefully unplug the other end of the USB cable from the micro USB port on the bottom of your Ledger Nano S device.
- Once disconnected, store your Ledger Nano S device in a safe and secure location, preferably in a tamper-proof bag or container.
By following these steps, you ensure that your Ledger Nano S device is safely disconnected from your computer without any risk of data corruption or unauthorized access to your wallets.
It is important to note that proper disconnection of the Ledger Nano S device is crucial to protect the privacy and security of your cryptocurrency holdings. Failure to do so may result in potential risks, such as exposure to malware or unauthorized tampering of your wallets.
Remember to always follow best practices when handling your Ledger Nano S device and keep it securely stored when not in use. By doing so, you can have peace of mind knowing that your cryptocurrency assets are protected.