
What is email redirection?
Email redirection, also known as email forwarding or email rerouting, is the process of redirecting an incoming email from one recipient to another. This feature is commonly found in email clients and applications, such as Microsoft Outlook, and is useful when you want to ensure that a specific email is delivered to a different address.
When an email is redirected, it is essentially sent again to the new recipient, as if it was originally sent to them in the first place. This can be done automatically by the email client or manually by the user.
The concept of email redirection can be compared to that of mail forwarding in the physical world. Just as you can request your mail to be forwarded from one address to another, email redirection allows you to have your electronic mail automatically forwarded to a different email address.
Email redirection is a flexible and convenient solution for managing your email flow. It enables you to seamlessly receive and respond to emails without having to constantly check multiple accounts. Additionally, it simplifies the process of consolidating your email communications in one central location.
It is important to note that email redirection works for incoming emails only. Any replies or subsequent conversations stemming from the redirected email will be sent back to the original sender rather than the recipient of the redirection.
Why would I need to redirect an email?
There are several reasons why you might need to redirect an email. Here are some common scenarios where email redirection can be useful:
- Change of email address: If you have recently changed your email address and want to ensure that you don’t miss any important messages sent to your old email, you can redirect those emails to your new email address. This way, you can continue receiving emails from contacts who may not have updated your contact information yet.
- Team collaboration: In a team or collaborative environment, email redirection can be helpful when a team member is on leave or has left the organization. By redirecting their emails to another team member, you can ensure that important communications are not missed and that the workflow continues smoothly.
- Email consolidation: If you have multiple email accounts and find it cumbersome to check each one individually, email redirection can streamline your email management. By redirecting all your emails to a single email address, you can conveniently access and respond to all your messages from one central location.
- Filtering and organization: If you receive a high volume of emails from different sources and want to categorize them more effectively, email redirection can be used to automatically route specific types of emails to dedicated folders or labels. This can help you prioritize and organize your inbox more efficiently.
- Forwarding to a specialist: In certain cases, you may receive an email that requires the attention or expertise of a specific individual or department. By redirecting the email to the appropriate person, you ensure that it reaches the right person without delay, improving response time and preventing miscommunication.
Overall, email redirection offers flexibility and convenience in managing your email communications. Whether you need to ensure you don’t miss important messages, streamline your email management, or facilitate team collaboration, email redirection is a valuable tool that can enhance your productivity and efficiency.
How to redirect an email in Outlook
If you are using Microsoft Outlook as your email client, redirecting an email is a straightforward process. Follow these steps to redirect an email in Outlook:
- Step 1: Open Outlook and go to your inbox
- Step 2: Find the email you want to redirect
- Step 3: Right-click on the email
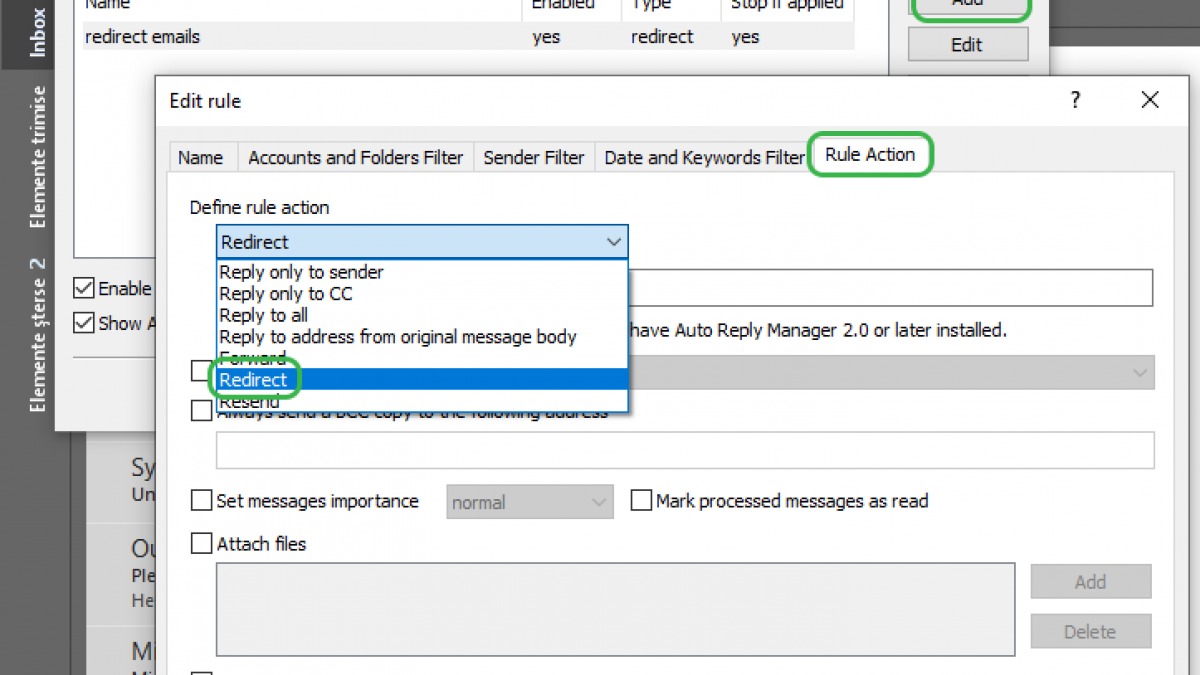
- Step 4: Select “Redirect” from the drop-down menu
- Step 5: Choose the recipient to redirect the email to
- Step 6: Click “Send” to redirect the email
Launch Microsoft Outlook and navigate to your inbox where the email you want to redirect is located.
Scroll through your inbox or use the search function to find the specific email that you want to redirect to another recipient.
Once you have located the email, right-click on it with your mouse to bring up a context menu.
In the context menu, you will see various options. Choose the “Redirect” option to initiate the redirection process.
A new email composition window will open, allowing you to specify the recipient to whom you want to redirect the email. Enter their email address in the “To” field.
Once you have entered the recipient’s email address, you can add any additional information or comments if needed. Finally, click the “Send” button to redirect the email.
That’s it! The email will now be sent to the specified recipient, as if it was originally sent to them.
It’s important to note that when you redirect an email, the original sender of the email will not be aware of the redirection. The recipient will receive the email as if it was sent directly to them, without any indication that it was redirected.
Remember that only the original email is redirected. Any subsequent replies or conversations resulting from the redirected email will be sent back to the original sender, rather than the recipient of the redirection.
Step 1: Open Outlook and go to your inbox
To begin the process of redirecting an email in Microsoft Outlook, you need to first open the application and navigate to your inbox. Here’s how:
- Launch Microsoft Outlook: Locate the Outlook application on your computer and open it. You can usually find it in your list of installed programs or by searching for “Outlook” in the Start menu.
- Sign in to your email account: If you haven’t already signed in, you will be prompted to enter your email address and password to access your account. Enter the required information and click “Sign In” or “Log In” to proceed.
- Select your inbox: Once you are logged in, you will be taken to the main Outlook interface. Look for the “Inbox” folder, which is typically located in the left sidebar. Click on the “Inbox” folder to open it and view your incoming emails.
- View your emails: After opening the inbox, you will see a list of your emails sorted by date, with the most recent ones displayed at the top. Scroll through the list or use the search bar at the top of the window to locate the specific email that you want to redirect.
It’s important to ensure that you are signed in to the correct email account in Outlook and that you have access to the inbox where the email is located. If you have multiple email accounts linked to Outlook, make sure you are accessing the correct one before proceeding with the redirection process.
By following these steps, you will successfully open Outlook and navigate to your inbox, ready to proceed with the email redirection process.
Step 2: Find the email you want to redirect
Once you have opened Outlook and accessed your inbox, the next step in redirecting an email is to locate the specific email that you want to redirect. Follow these steps to find the email you want to redirect:
- Scroll through your inbox: Start by scrolling through the list of emails in your inbox. The emails are typically displayed in chronological order, with the newest ones at the top. Look for the email you want to redirect by visually scanning the subject lines and sender names.
- Use the search function: If you have a large number of emails in your inbox and scrolling through them proves time-consuming, you can use the search function in Outlook. Locate the search bar at the top of the Outlook window and enter relevant keywords from the email you want to redirect, such as the sender’s name or a specific subject line. Hit the enter key or click the search icon to initiate the search.
- Apply filters: Outlook provides various filtering options that can help you narrow down your search and find the email you want to redirect more efficiently. You can filter by date, sender, recipient, or other criteria. To apply filters, look for the filter icon or drop-down menus near the search bar, and select the relevant filters to refine your search.
- Sort emails by categories: Outlook allows you to categorize your emails into different folders or labels. If you have already categorized the email you want to redirect, you can simply navigate to the corresponding category folder to find it quickly.
By utilizing these methods, you should be able to locate the email you want to redirect in Outlook. Once you’ve found the email, you can proceed to the next step to initiate the redirection process.
Step 3: Right-click on the email
After locating the email you want to redirect in Microsoft Outlook, the next step is to right-click on the email to display a context menu with various options. Follow these steps to right-click on the email:
- Position your cursor: Move your cursor over the email you want to redirect. Ensure that your cursor is positioned directly over the email you want to redirect.
- Press the right mouse button: With your cursor positioned over the email, press the right mouse button on your mouse or trackpad. This action will bring up a context menu with different options related to the selected email.
- Ensure the correct email is selected: When the context menu appears, verify that the correct email is selected. This is indicated by the email being highlighted or slightly shaded in the list of emails.
- Review the options: Once the context menu is visible, take a moment to review the various options that are available to you. These options may include “Reply,” “Forward,” “Delete,” and other actions you can perform on the selected email.
- Continue to the next step: After right-clicking on the email and reviewing the available options, you can proceed to the next step in the email redirection process.
Right-clicking on the email is an essential step as it allows you to access the specific options related to the email, including the option to redirect the email to another recipient. By following these steps, you are one step closer to successfully redirecting the email in Microsoft Outlook.
Step 4: Select “Redirect” from the drop-down menu
After right-clicking on the email in Microsoft Outlook, a contextual menu will appear with several options related to the selected email. Follow these steps to select the “Redirect” option from the drop-down menu:
- Review the contextual menu: Take a moment to review the options that are available in the contextual menu. Look for an option that is labeled “Redirect” or similar.
- Hover over the “Redirect” option: Move your cursor over the “Redirect” option in the drop-down menu. As you hover over the option, it should highlight or be visually distinguishable from the other options.
- Left-click on the “Redirect” option: With the “Redirect” option selected, left-click on it using your mouse or trackpad. This action will activate the redirection process and open a new email composition window.
- Verify the selection: Once you have selected the “Redirect” option, ensure that the email you want to redirect is still selected. This is important to confirm that the redirection will be applied to the correct email.
- Proceed to the next step: After selecting the “Redirect” option from the drop-down menu, you are now ready to move on to the next step in the process of redirecting the email in Microsoft Outlook.
Selecting the “Redirect” option from the drop-down menu is a crucial step that initiates the actual redirection of the email to another recipient. By following these steps, you will successfully activate the redirection process and be one step closer to redirecting the email in Microsoft Outlook.
Step 5: Choose the recipient to redirect the email to
After selecting the “Redirect” option from the drop-down menu in Microsoft Outlook, a new email composition window will open, allowing you to specify the recipient to whom you want to redirect the email. Follow these steps to choose the recipient:
- Locate the “To” field: In the new email composition window, find the “To” field. This field is usually located at the top of the window and is labeled “To” or “Recipient.”
- Enter the recipient’s email address: Once you have located the “To” field, enter the email address of the recipient to whom you want to redirect the email. Ensure that you enter the correct email address to ensure successful delivery.
- Optional: Add a subject and message: If desired, you can add a subject line or a message to the redirected email. This is not mandatory, but it can be useful for providing context or additional instructions to the recipient.
- Verify the recipient’s email address: Before proceeding, double-check the recipient’s email address to ensure accuracy. This step is important to avoid redirecting the email to the wrong recipient.
- Continue to the next step: Once you have entered the recipient’s email address and reviewed the details, you are ready to move on to the final step in the email redirection process.
Choosing the recipient to redirect the email to is an essential step in the process. It ensures that the email is delivered to the intended recipient and reaches the correct mailbox. By following these steps, you will successfully specify the recipient and be ready to proceed with redirecting the email in Microsoft Outlook.
Step 6: Click “Send” to redirect the email
After specifying the recipient and adding any necessary subject or message, the final step in redirecting an email in Microsoft Outlook is to click the “Send” button. Follow these steps to complete the email redirection process:
- Locate the “Send” button: In the email composition window, find the “Send” button. This button is usually located at the top or bottom of the window and is labeled “Send” or represented by an envelope icon.
- Ensure all details are correct: Before clicking “Send,” take a moment to review the email content, including the recipient’s email address, subject, and any message you have added. Verify that all the details are accurate and as intended.
- Click “Send”: Once you are satisfied with the email content and recipient information, click the “Send” button. This action will initiate the sending process and redirect the email to the specified recipient.
- Wait for confirmation: After clicking “Send,” Outlook will process the email and attempt to deliver it to the recipient’s mailbox. Depending on various factors, such as internet connectivity and the recipient’s email server, this delivery process may take a few moments.
- Confirm successful redirection: In most cases, you will receive a confirmation message or notification once the email has been successfully redirected. This confirmation may appear as a pop-up message or within the Outlook interface.
By clicking “Send,” you finalize the email redirection process. The email will be sent to the specified recipient, and it will appear in their inbox as if it was originally sent to them. Remember that any further replies or conversations stemming from the redirected email will be sent back to the original sender.
It is crucial to ensure that you have chosen the right recipient and reviewed all details before clicking “Send” to avoid any unintended consequences or miscommunication.
Things to consider when redirecting an email
When redirecting an email in Microsoft Outlook or any other email client, there are several important factors to keep in mind. Here are some things to consider during the email redirection process:
- Accuracy of recipient’s email address: Ensure that you have entered the correct email address of the recipient to avoid redirecting the email to the wrong person. Double-check the email address for any typos or errors before clicking “Send”.
- Confidentiality and privacy: Take privacy concerns into account when redirecting emails, especially if the content is sensitive or confidential. Ensure that the redirected email is only sent to recipients who are authorized to access the information.
- Replies and subsequent conversations: Be aware that any replies or subsequent conversations resulting from the redirected email will be sent back to the original sender, not the recipient of the redirection. Inform the recipient about this to avoid confusion in ongoing email exchanges.
- Email formatting and attachments: Consider how the email’s formatting and attachments will be handled during the redirection process. Some email clients may preserve the original email’s formatting and attachments, while others may modify or remove them. Inform the recipient if any changes to the email’s presentation are expected.
- Notification to original sender: Keep in mind that the original sender of the email will not be notified or aware that the email has been redirected. If necessary, inform the original sender directly or communicate any necessary information on their behalf to the recipient.
- Email filtering and rules: Note that any email filtering or rules set up in your email client may affect the redirection process. Ensure that the redirected email is not unintentionally moved to a different folder or affected by any automated rules you have set up.
- Clarity of communication: Clearly communicate the purpose and context of redirecting the email to the recipient to avoid any confusion or misunderstanding. Provide relevant information or instructions, if necessary, to ensure that the recipient understands the redirection’s purpose and any follow-up actions required.
- Review before redirecting: Before redirecting an email, review the content and consider if any confidential or sensitive information needs to be removed or redacted. Take the opportunity to ensure that the email’s content is appropriate for the new recipient.
- Legal and regulatory compliance: If you work in an industry with specific legal or regulatory requirements for email communication, ensure that the email redirection process and any forwarded content comply with those regulations. Consult any applicable policies or guidelines to avoid any violations.
By considering these factors, you can ensure a seamless and efficient email redirection process while maintaining privacy, clarity, and compliance with any relevant regulations or policies.
Can the recipient see that the email has been redirected?
When an email is redirected in Microsoft Outlook or other email clients, the recipient typically cannot see that the email has been redirected. Here are a few key points to understand about email redirection and its visibility to the recipient:
No visible indication: When an email is redirected, it appears in the recipient’s inbox as if it was originally sent by the original sender. There is usually no visible indication or label that indicates the email has been redirected.
Seamless delivery: Email redirection works by resending the email to the new recipient. As a result, the redirected email is seamlessly delivered to the recipient’s inbox, appearing just like any other email they receive.
Original sender unaware: The original sender of the email is generally unaware that the email has been redirected. From their perspective, the email was sent directly to the original recipient and does not indicate any redirection.
Effect on subsequent replies: It is important to note that any replies or subsequent conversations stemming from the redirected email will be sent back to the original sender, not the recipient of the redirection. This is something both the original sender and the new recipient should be aware of to avoid confusion.
Email headers and traces: While the recipient cannot see that an email has been redirected within the email content itself, certain email headers or traces within the email’s technical information may indicate that the email has passed through an intermediate server or been forwarded. However, these headers and traces are typically only visible to the recipient if they actively inspect the email’s technical details.
Exceptions: It’s worth noting that certain email service providers or corporate email systems may have configurations that add a visible indication or provide notifications to the recipient when an email has been redirected. These configurations may vary depending on the specific email platform or organization’s policies.
Overall, for most standard email redirection processes, recipients cannot see that an email has been redirected. The email appears in their inbox as if it was originally sent by the original sender, maintaining the seamless nature of email communication.
What happens to the original email after it is redirected?
When an email is redirected in Microsoft Outlook or other email clients, the original email undergoes specific handling and behavior. Here’s what typically happens to the original email after it is redirected:
Copy of the email: When you redirect an email, a copy of the original email is created. The original email remains intact in your inbox, and a duplicate of it is redirected to the specified recipient.
No alteration of the original email: The original email that you redirected remains unchanged. The content, attachments, and other details of the original email are not modified or altered in any way.
Original sender retains control: After redirecting an email, the original sender maintains control over the email thread. If the recipient replies to the redirected email or initiates a new conversation, those replies will be sent back to the original sender’s email address, not to the recipient of the redirection.
Recipient receives redirected email: The recipient specified in the redirection process receives a duplicate copy of the original email. From their perspective, it appears as if the email was initially sent directly to them, and there is usually no visible indication that the email has been redirected.
Tracking delivery: When an email is redirected, it typically retains the original delivery tracking information. This allows you, as the redirector, to have visibility into whether the redirected email was successfully delivered to the intended recipient.
Visibility to the original sender: The original sender of the email is generally unaware that the email has been redirected. They will not receive any notification or indication that the email has been redirected to another recipient.
Completion of redirect process: Once the email has been successfully redirected and sent to the specified recipient, the redirect process is considered complete. The original email remains in your inbox, and the redirect operation does not impact its status or existence.
It’s important to note that the behavior and handling of the original email after redirection may vary slightly depending on the email client or system being used, as well as any specific configurations or policies in place. However, in most cases, the original email remains unchanged and sent to the recipient as a duplicate, without any alteration or visible indication of the redirection.