
Backing Up Your Data
Before returning your iPhone 10, it's crucial to back up your data to ensure that none of your precious photos, important documents, or cherished memories are lost. Apple provides a seamless and efficient way to back up your data through iCloud or iTunes. Here's how you can safeguard your data before wiping your device:
-
iCloud Backup:
- iCloud offers a convenient way to back up your iPhone wirelessly. To initiate an iCloud backup, ensure that your device is connected to a Wi-Fi network and plugged into a power source. Then, navigate to "Settings," tap on your name, select "iCloud," and click on "iCloud Backup." Finally, tap "Back Up Now" to commence the backup process. It's advisable to leave your device connected to Wi-Fi and power until the backup is complete.
-
iTunes Backup:
- If you prefer a more traditional approach, iTunes allows you to create a backup of your iPhone on your computer. Simply connect your iPhone to your computer using a USB cable, launch iTunes, and select your device. From there, click on "Back Up Now" to initiate the backup process. It's essential to ensure that you have enough space on your computer to store the backup file.
-
Verify Your Backup:
- Once the backup process is complete, it's prudent to verify that your data has been successfully backed up. For iCloud backups, you can navigate to "Settings," tap on your name, select "iCloud," click on "iCloud Backup," and confirm the time and size of your latest backup. If you've opted for an iTunes backup, you can check the backup's status within iTunes.
By following these steps to back up your data, you can rest assured that your information is safely stored and ready to be transferred to your new device or retrieved if needed. This proactive approach ensures that your transition to a new iPhone or the return of your current device is seamless and stress-free.
Signing Out of Your Accounts
When preparing to return your iPhone 10, it's essential to sign out of all your accounts to safeguard your privacy and ensure a smooth transition. Signing out of your accounts not only protects your sensitive information but also prevents any potential access issues for the device's new owner. Here's a comprehensive guide on how to sign out of various accounts on your iPhone 10:
iCloud
Signing out of your iCloud account is a crucial step in the process of preparing your iPhone for return. To do this, navigate to "Settings," tap on your name at the top of the screen, and then scroll down to find "Sign Out." You will be prompted to enter your Apple ID password and choose whether you want to keep a copy of your data on the device. Once you confirm the sign-out, your iPhone will no longer be associated with your iCloud account.
iTunes & App Store
To ensure that your iPhone is disassociated from your iTunes and App Store accounts, open the "Settings" app, tap on "iTunes & App Store," and select your Apple ID. From there, choose "Sign Out" to complete the process. This step is essential to prevent any unintended purchases or downloads on your device after it has been returned.
Email and Social Media Accounts
If you have configured email and social media accounts on your iPhone, it's important to sign out of these accounts to protect your privacy. Open the respective apps, such as Mail, Facebook, Twitter, Instagram, or any other social media platform, and locate the option to sign out or log out. By doing so, you prevent unauthorized access to your personal information and ensure a clean slate for the next user.
Messaging Apps
For messaging apps like iMessage, WhatsApp, or Messenger, it's crucial to deactivate your accounts on the device. Open each messaging app, navigate to the settings or account section, and select the option to log out or deactivate your account. This step is vital to protect your private conversations and prevent any confusion for the new user of the device.
By diligently signing out of all your accounts on the iPhone 10, you not only protect your privacy and data but also contribute to a seamless experience for the device's next user. This proactive approach ensures that your personal information remains secure and that the transition to a new device or the return of your current device is hassle-free.
Resetting Your iPhone to Factory Settings
Resetting your iPhone 10 to factory settings is a critical step in preparing the device for return or transition to a new owner. This process ensures that all your personal data, settings, and accounts are removed from the device, effectively restoring it to its original state. By following the steps outlined below, you can confidently initiate the factory reset process and safeguard your privacy and security.
Step 1: Backup Your Data
Before proceeding with the factory reset, it's essential to back up your data to prevent any loss of important information. As mentioned earlier, utilizing iCloud or iTunes to create a comprehensive backup of your iPhone ensures that your photos, contacts, messages, and other valuable data are safely stored and can be transferred to a new device or retrieved if needed.
Step 2: Disable Find My iPhone
To initiate the factory reset, it's crucial to disable the "Find My iPhone" feature on your device. This security feature, designed to prevent unauthorized access to your device, must be turned off before proceeding with the reset. To disable "Find My iPhone," navigate to "Settings," tap on your name, select "iCloud," and then choose "Find My iPhone." Toggle the switch to turn off the feature and enter your Apple ID password to confirm.
Step 3: Initiate the Factory Reset
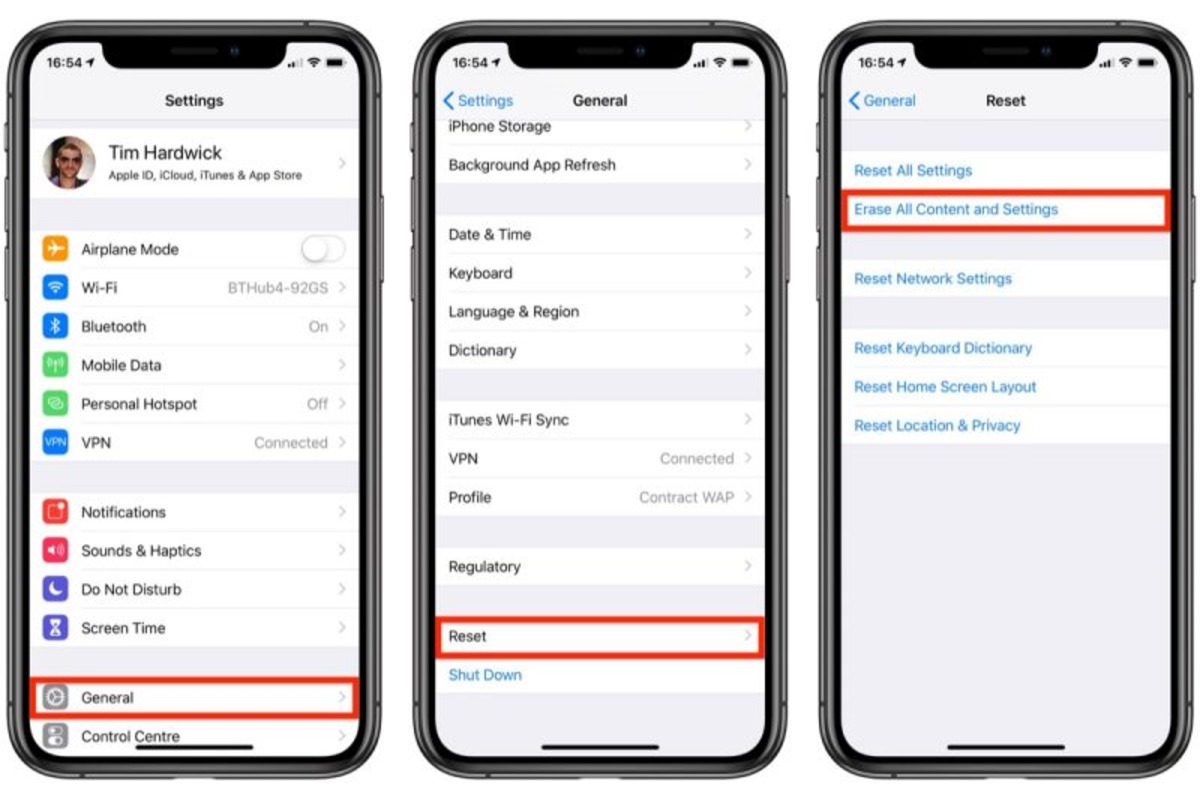
With your data backed up and "Find My iPhone" disabled, you can now proceed to reset your device to factory settings. To do this, navigate to "Settings," tap on "General," and scroll down to find "Reset." Select "Erase All Content and Settings" and confirm your decision. You may be prompted to enter your device passcode and Apple ID password to initiate the reset process.
Step 4: Wait for the Reset to Complete
Once you confirm the factory reset, your iPhone will begin the process of erasing all data and settings. This may take some time, depending on the amount of data stored on your device. It's crucial to ensure that your device remains connected to a power source and Wi-Fi network throughout the reset process to prevent any interruptions.
Step 5: Set Up as New or Prepare for Return
After the factory reset is complete, your iPhone 10 will reboot to its initial setup screen. At this point, you can choose to set up the device as new if you're transitioning to a new iPhone, or prepare it for return by powering it off and removing any accessories or SIM card before packaging it securely.
By diligently following these steps to reset your iPhone 10 to factory settings, you can confidently prepare the device for return or ensure a seamless transition to a new device. This proactive approach not only safeguards your privacy and security but also contributes to a positive experience for the device's next user.
Removing Your SIM Card
Removing the SIM card from your iPhone 10 is a crucial step in the process of preparing the device for return or transition to a new owner. The SIM card, which stores important information related to your cellular network and account, must be carefully removed to ensure the privacy and security of your personal data. Here's a detailed guide on how to safely remove the SIM card from your iPhone 10:
Step 1: Locate the SIM Card Tray
The SIM card tray is typically located on the side of the iPhone 10. To access it, you will need a SIM eject tool or a small paperclip. Insert the tool into the small pinhole next to the SIM card tray to release the tray.
Step 2: Remove the SIM Card Tray
Gently pull out the SIM card tray once it is released from the device. The tray will contain the SIM card, which is a small, rectangular card with a metallic chip. Take care not to apply excessive force when removing the tray to avoid damaging the device or the SIM card.
Step 3: Remove the SIM Card
Carefully remove the SIM card from the tray by sliding it out. It's essential to handle the SIM card with care to prevent any damage to the chip or the card itself. Avoid touching the metallic contacts on the SIM card to maintain its integrity.
Step 4: Safely Store the SIM Card
Once the SIM card is removed, it's advisable to store it in a safe place, such as a SIM card holder or the original packaging. This ensures that the SIM card is protected and can be easily retrieved if needed in the future.
Step 5: Reinsert the SIM Card Tray
If you are returning the iPhone 10, ensure that the SIM card tray is securely reinserted into the device. Take a moment to verify that the tray is properly aligned before gently pushing it back into place.
By meticulously following these steps to remove the SIM card from your iPhone 10, you can effectively safeguard your personal information and ensure a seamless transition for the device's next user. This proactive approach contributes to maintaining the privacy and security of your data while preparing the device for return or a new owner.
Cleaning Your iPhone
Cleaning your iPhone 10 before returning it is a thoughtful gesture that not only ensures a pristine appearance but also contributes to the overall user experience for the device's next owner. Over time, smartphones can accumulate dust, fingerprints, and other residues that may affect their aesthetic appeal and functionality. By following these simple yet effective cleaning steps, you can leave your iPhone 10 in top condition:
Step 1: Power Off the Device
Before initiating the cleaning process, it's essential to power off your iPhone 10 to prevent any accidental interactions with the touchscreen or buttons. This ensures a safe and thorough cleaning experience without the risk of activating the device unintentionally.
Step 2: Gather Cleaning Supplies
To clean your iPhone 10, you will need a few basic supplies, including a microfiber cloth, isopropyl alcohol (70% concentration or higher), cotton swabs, and a soft brush. These items are readily available and can be used to effectively remove dirt, smudges, and grime from the device.
Step 3: Wipe Down the Exterior
Using a slightly dampened microfiber cloth, gently wipe down the exterior of your iPhone 10 to remove any surface-level dirt, fingerprints, or smudges. Take care to avoid excessive moisture and ensure that the cloth is only slightly damp to prevent any liquid from entering the device's ports or openings.
Step 4: Clean the Ports and Openings
Dip a cotton swab in isopropyl alcohol and carefully clean the ports and openings of your iPhone 10. This includes the charging port, speaker grills, and headphone jack. The alcohol helps to dissolve and remove any stubborn residues that may have accumulated in these areas.
Step 5: Detail the Camera Lens
Using a clean microfiber cloth, gently wipe the camera lens and flash to ensure that they are free from dust and smudges. It's important to handle the lens with care to avoid scratching or damaging its surface.
Step 6: Brush the Speaker Grills
A soft brush, such as a clean, dry toothbrush, can be used to gently brush the speaker grills and other intricate areas of the device. This helps dislodge any debris that may be trapped in these small openings, ensuring optimal audio performance.
Step 7: Allow the Device to Dry
After cleaning, allow your iPhone 10 to air dry for a few minutes to ensure that any residual moisture evaporates. This step is crucial before powering the device back on or packaging it for return.
By meticulously following these cleaning steps, you can present your iPhone 10 in a well-maintained and polished condition, reflecting your attention to detail and consideration for the device's next user. This proactive approach not only enhances the device's visual appeal but also contributes to a positive and seamless experience for its future owner.