
Reasons for Factory Reset
A factory reset is a powerful tool that can breathe new life into your iPhone 12, resolving a myriad of software issues and restoring it to its original state. There are several compelling reasons why you might consider performing a factory reset on your device:
-
Resolving Persistent Software Issues: Over time, iPhones can accumulate software glitches and performance issues that may hinder their functionality. These issues can manifest as frequent app crashes, unresponsive touchscreens, or slow performance. A factory reset can effectively wipe the slate clean, erasing these persistent issues and providing a fresh start for your device.
-
Preparing for Resale or Transfer: If you're planning to sell or give away your iPhone 12, performing a factory reset is essential to protect your privacy and ensure that the new owner receives a device in its original, pristine condition. By resetting the device to factory settings, you can safeguard your personal data and prevent it from falling into the wrong hands.
-
Improving Battery Life and Performance: If you've noticed a significant decline in your iPhone's battery life or overall performance, a factory reset can help address these issues. By clearing out unnecessary background processes and system clutter, a factory reset can optimize your device's performance and potentially extend its battery life.
-
Resolving Network or Connectivity Problems: If you're experiencing persistent network issues, such as Wi-Fi connectivity problems or cellular signal issues, a factory reset can serve as a troubleshooting step to address these issues. By resetting network settings to their default state, you may be able to resolve connectivity issues that have been plaguing your device.
-
Addressing Security Concerns: In the event that your iPhone 12 has been compromised by malware or unauthorized access, a factory reset can effectively eliminate these security threats. By wiping the device and restoring it to its factory state, you can mitigate the risks associated with unauthorized access and potential data breaches.
By understanding the various reasons for performing a factory reset on your iPhone 12, you can make an informed decision about whether this course of action is suitable for addressing your specific needs. Whether you're seeking to resolve software issues, prepare your device for resale, or optimize its performance, a factory reset can be a valuable tool in maintaining the health and functionality of your iPhone 12.
Backing Up Your Data
Before embarking on the process of resetting your iPhone 12 to its factory settings, it is crucial to safeguard your valuable data through a comprehensive backup. This step ensures that your personal information, cherished memories, and essential files are preserved and can be seamlessly restored once the factory reset is complete.
Importance of Backing Up
Backing up your data serves as a safety net, protecting against the loss of irreplaceable photos, videos, contacts, messages, and app data. It provides peace of mind, knowing that even after the reset, your digital footprint remains intact. Additionally, a backup enables a smooth transition back to your preferred settings and configurations, minimizing the disruption caused by the reset process.
Methods for Backing Up
iCloud Backup
Apple's iCloud offers a convenient and secure method for backing up your iPhone 12. By enabling iCloud Backup in your device settings, your data, including photos, app data, device settings, and more, is automatically and wirelessly backed up to your iCloud account. This seamless process ensures that your most recent data is readily available for restoration after the factory reset.
iTunes Backup
Alternatively, you can create a backup of your iPhone 12 using iTunes on your computer. This method provides a local backup stored on your computer's hard drive, offering a tangible copy of your device's data. By connecting your iPhone to your computer and initiating a backup through iTunes, you can safeguard your data locally, providing an additional layer of security and accessibility.
Verifying Your Backup
Once the backup process is complete, it is prudent to verify its integrity to ensure that all essential data has been successfully preserved. This verification can be achieved by reviewing the backup settings in iCloud or iTunes and confirming the backup's timestamp and size. Additionally, spot-checking specific data, such as contacts, photos, and app data, can offer reassurance regarding the backup's completeness.
Ensuring Continuous Backup
To maintain ongoing protection of your data, it is advisable to enable automatic backups on your iPhone 12. By configuring automatic backups, you can ensure that your most recent data is consistently and effortlessly backed up, minimizing the risk of data loss between backup sessions.
By diligently backing up your data before initiating a factory reset on your iPhone 12, you can safeguard your valuable information and streamline the restoration process, ensuring a seamless transition back to your personalized digital environment. This proactive approach empowers you to embrace the factory reset with confidence, knowing that your data is securely preserved and primed for restoration.
Turning Off Find My iPhone
Before proceeding with a factory reset on your iPhone 12, it is imperative to disable the "Find My iPhone" feature to ensure a smooth and uninterrupted reset process. "Find My iPhone" is a security feature designed to help locate and protect your device in the event of loss or theft. While this feature is invaluable for safeguarding your device under normal circumstances, it can impede the factory reset process if not properly deactivated beforehand.
Importance of Disabling Find My iPhone
Disabling "Find My iPhone" is a critical preparatory step for initiating a factory reset. This security feature is tightly integrated with the device's iCloud account and activation lock, which can hinder the reset process if left active. By turning off "Find My iPhone," you effectively disassociate the device from your iCloud account, allowing for a seamless reset and preventing potential complications during the restoration phase.
Step-by-Step Guide to Turning Off Find My iPhone
-
Accessing Settings: Begin by unlocking your iPhone 12 and navigating to the "Settings" app on the home screen. The "Settings" app is represented by a gear icon and serves as the central hub for managing your device's configurations and preferences.
-
Tapping Your Name: Within the "Settings" app, locate and tap on your name at the top of the screen to access your Apple ID settings. This step ensures that you are accessing the specific settings associated with your iCloud account and device.
-
Selecting iCloud: After accessing your Apple ID settings, scroll down and select "iCloud" from the list of available options. This action directs you to the iCloud settings, where you can manage various features and configurations related to your iCloud account and device synchronization.
-
Disabling Find My iPhone: Within the iCloud settings, locate the "Find My iPhone" option and tap on it to access the feature's settings. Here, you will find a toggle switch that allows you to turn off "Find My iPhone." Upon tapping the toggle switch, you will be prompted to enter your Apple ID password to confirm the action.
-
Entering Apple ID Password: To complete the process of turning off "Find My iPhone," enter your Apple ID password as prompted. This authentication step ensures that only authorized users can make changes to the device's security settings, enhancing the overall security of the deactivation process.
Verifying Find My iPhone Deactivation
After following the aforementioned steps to disable "Find My iPhone," it is advisable to verify that the feature has been successfully turned off. This verification can be performed by returning to the "Find My iPhone" settings and ensuring that the toggle switch is in the "off" position. Additionally, you can cross-reference this change by accessing your iCloud account settings from a web browser and confirming the status of the "Find My iPhone" feature.
By meticulously following the steps outlined above to turn off "Find My iPhone" on your iPhone 12, you can effectively prepare your device for a factory reset. This proactive measure ensures a seamless and unobstructed reset process, allowing you to restore your device to its factory settings with confidence and ease.
Performing the Factory Reset
Performing a factory reset on your iPhone 12 is a straightforward yet impactful process that restores the device to its original settings, effectively erasing all data and configurations. This comprehensive reset is a powerful tool for addressing persistent software issues, optimizing performance, and preparing the device for resale or transfer. To initiate the factory reset, follow these step-by-step instructions:
-
Accessing Settings: Begin by unlocking your iPhone 12 and navigating to the "Settings" app on the home screen. The "Settings" app, represented by a gear icon, serves as the central hub for managing your device's configurations and preferences.
-
Selecting General: Within the "Settings" app, scroll down and select "General" from the list of available options. This action directs you to the general settings, where you can manage fundamental configurations and preferences related to your device.
-
Resetting: Within the General settings, locate and tap on the "Reset" option. This section houses various reset and restoration features, including the factory reset option.
-
Erasing All Content and Settings: Upon selecting the "Reset" option, tap on "Erase All Content and Settings" to initiate the factory reset process. A confirmation prompt will appear, requiring you to enter your device passcode and Apple ID password to proceed.
-
Confirming the Reset: After entering the necessary authentication details, confirm your decision to erase all content and settings. This action triggers the factory reset process, effectively wiping the device and restoring it to its original factory state.
-
Patience and Completion: The factory reset process may take several minutes to complete, during which the device will undergo a thorough erasure of data and configurations. It is essential to exercise patience and allow the process to conclude uninterrupted.
Upon completion of the factory reset, your iPhone 12 will reboot and present the initial setup screen, resembling the experience of a new device. At this stage, you have successfully restored your device to its factory settings, effectively addressing software issues, optimizing performance, and preparing the device for a fresh start or resale.
By following these precise steps to perform a factory reset on your iPhone 12, you can harness the full potential of this powerful tool, rejuvenating your device and ensuring its readiness for the next phase of use or ownership.
Restoring Your Data
After successfully performing a factory reset on your iPhone 12, the next crucial step involves restoring your backed-up data to reclaim your personalized digital environment. This process ensures that your cherished photos, essential contacts, app data, and device settings are seamlessly reinstated, allowing you to resume your digital activities without missing a beat. To restore your data with precision and efficiency, follow these comprehensive steps:
iCloud Data Restoration
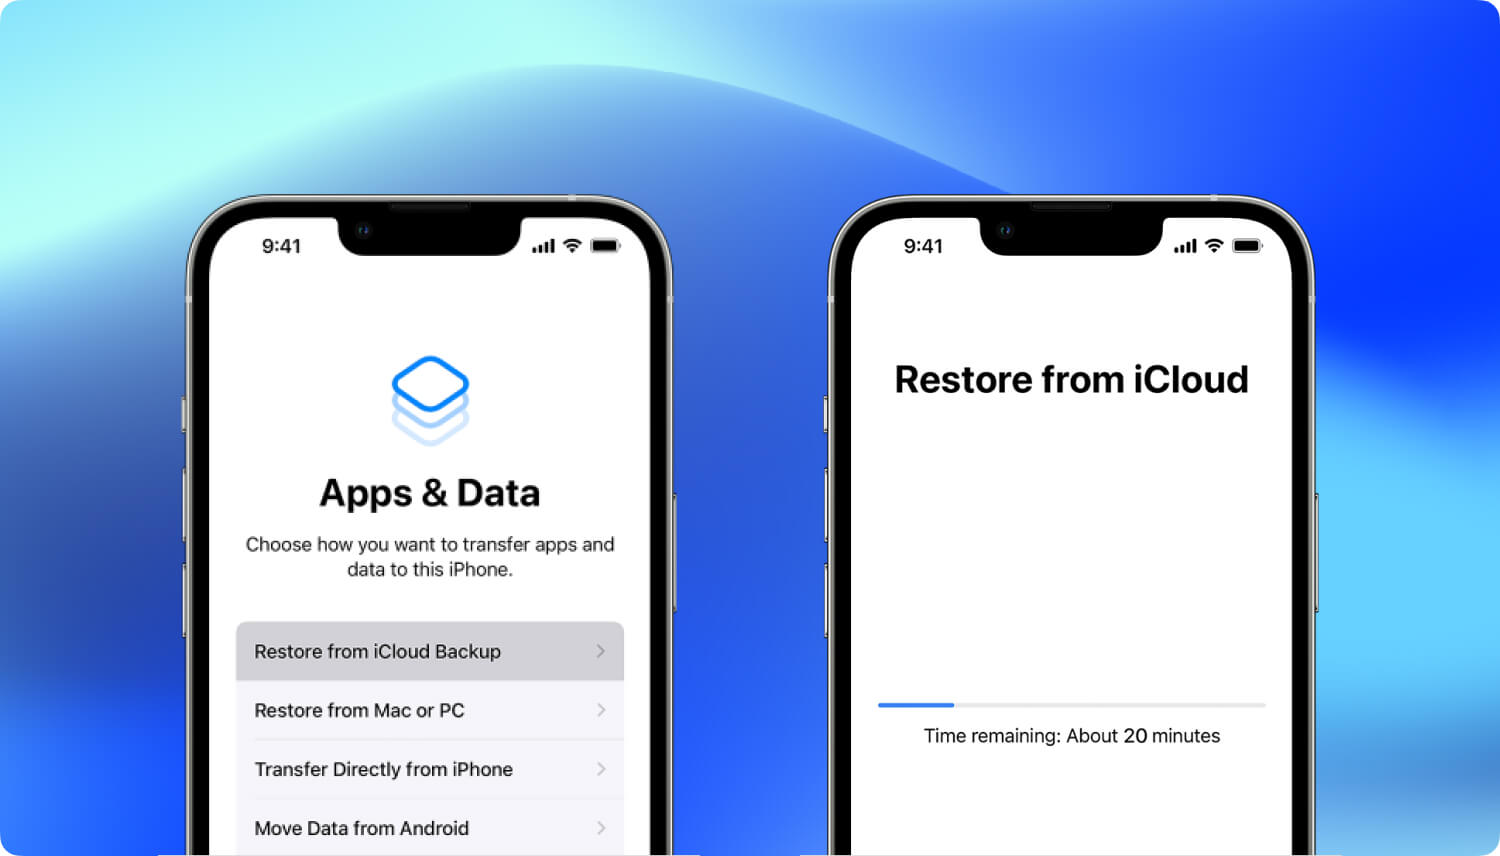
If you opted for iCloud backup before initiating the factory reset, the restoration process can be initiated during the device setup. Upon reaching the "Apps & Data" screen during the initial setup, select the "Restore from iCloud Backup" option. Sign in to your iCloud account using your Apple ID and password, then choose the most relevant backup from the available options. The restoration process will commence, and your device will begin downloading and reinstating the backed-up data, including photos, app data, device settings, and more. It is essential to ensure a stable and reliable Wi-Fi connection during this process to facilitate the seamless restoration of your data.
iTunes Data Restoration
For those who opted for a local backup using iTunes, the data restoration process involves connecting your iPhone 12 to the computer used for the backup. Launch iTunes on the computer and select your device when it appears. Choose the "Restore Backup" option and select the most relevant backup from the available list. The restoration process will commence, and iTunes will begin reinstating the backed-up data to your device. It is advisable to keep your device connected to the computer throughout the restoration process to ensure a continuous and uninterrupted transfer of data.
Verification and Completion
Once the data restoration process is underway, it is prudent to verify the completeness and accuracy of the restored data. This verification can involve spot-checking specific categories of data, such as contacts, photos, and app data, to ensure that the restoration is comprehensive. Additionally, verifying the restoration of device settings and configurations can help ensure a seamless transition back to your preferred digital environment. Upon confirming the successful restoration of your data, your iPhone 12 will be fully equipped with your personalized content and settings, ready to resume its role as your indispensable digital companion.
By meticulously following these steps to restore your data after a factory reset, you can seamlessly reintegrate your valuable information and configurations, ensuring a smooth and uninterrupted transition back to your personalized digital environment. This proactive approach empowers you to harness the full potential of the factory reset, leveraging it as a tool for rejuvenating your device and preserving your digital footprint.