
Basic Keyboard Shortcuts for Zooming In or Out
When it comes to accessing the zoom functionality on your computer, keyboard shortcuts can be a real lifesaver. These shortcuts allow you to quickly and effortlessly zoom in or out on your screen, whether you’re browsing the web, editing images, or watching videos. Here are some of the basic keyboard shortcuts you can use to zoom in or out with ease.
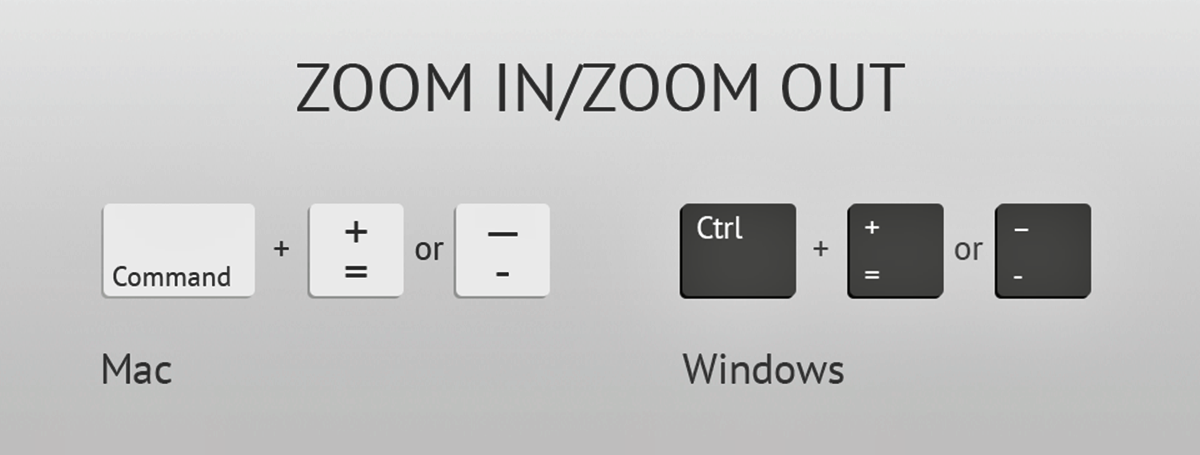
1. Ctrl and ‘+’ or ‘-‘ Keys:
One of the most common keyboard shortcuts for zooming in or out is to use the Ctrl key in combination with the plus (+) or minus (-) keys. Pressing Ctrl and the plus key will zoom in, making the content appear larger. Conversely, pressing Ctrl and the minus key will zoom out, making the content appear smaller.
2. Ctrl and Scroll Wheel:
Another handy shortcut for zooming in or out is to use the Ctrl key in combination with your mouse’s scroll wheel. Simply hold down the Ctrl key while scrolling up or down to zoom in or out. This method offers a quick and intuitive way to adjust the zoom level according to your preferences.
3. Ctrl and 0 (Zero):
If you want to reset the zoom level to its default setting, you can use the Ctrl key along with the 0 (zero) key. This will revert the zoom level back to its original state, ensuring that the content is displayed at its default size.
These keyboard shortcuts are widely supported across various applications and platforms, making them incredibly versatile. Whether you’re working in a web browser, office software, or multimedia applications, mastering these basic shortcuts can save you time and frustration.
It’s worth noting that the exact keyboard shortcuts for zooming in or out may vary slightly depending on the operating system and the specific software you’re using. However, the Ctrl and ‘+’ or ‘-‘ keys, along with the Ctrl and scroll wheel method, are commonly used across different platforms.
By familiarizing yourself with these keyboard shortcuts, you can easily navigate and adjust the zoom level to suit your needs. Whether you need to enlarge text for easier reading, zoom in on images for precise editing, or zoom out to fit more content on the screen, these shortcuts are your go-to tools for zooming in or out with just a few keystrokes.
Using Ctrl and ‘+/-‘ Keys to Zoom In or Out
If you’re looking for a simple and quick way to adjust the zoom level on your computer, using the Ctrl key in combination with the plus (+) or minus (-) keys is a convenient option. With just a few keystrokes, you can easily zoom in or out on your screen to make content appear larger or smaller. Here’s how you can use this method effectively across different applications.
Zooming In: To zoom in on your screen, hold down the Ctrl key and press the plus (+) key. Each press of the plus key will incrementally increase the zoom level, making the content appear larger. This is especially useful when you need to enlarge text for easier reading or zoom in on details in images or documents.
Zooming Out: Conversely, if you want to zoom out and make the content appear smaller, hold down the Ctrl key and press the minus (-) key. Each press of the minus key will decrease the zoom level, allowing you to fit more content on the screen or see a broader view of the document or webpage.
This keyboard shortcut is widely supported in various applications, including web browsers, office software, and image editing programs. By using the Ctrl and ‘+/-‘ keys, you can seamlessly adjust the zoom level to suit your needs, enhancing your overall computer experience.
It’s important to note that the actual zoom increments may vary depending on the application or software you’re using. Some programs allow for finer adjustments with smaller zoom increments, while others may have predefined zoom levels. Experimenting with the keyboard shortcut in different applications will give you a better understanding of how it works in each specific context.
Keep in mind that this shortcut may not work in all applications or operating systems, as some software may have different zooming mechanisms or require alternative shortcuts. However, the Ctrl and ‘+/-‘ keys are widely recognized and utilized, making them a versatile and efficient option for zooming in or out on your computer.
By mastering this simple keyboard shortcut, you can effortlessly adjust the zoom level to enhance readability, focus on details, or get a broader view of your content. Whether you’re browsing the web, editing documents, or working with graphics, using the Ctrl and ‘+/-‘ keys is a handy technique to optimize your computer usage and improve your productivity.
Using Ctrl and Scroll Wheel to Zoom In or Out
If you prefer a more hands-on approach to zooming in or out on your computer, using the Ctrl key in combination with your mouse’s scroll wheel is a convenient and intuitive option. This method allows you to adjust the zoom level smoothly and precisely, giving you control over the size of the content displayed on your screen. Here’s how you can use this technique effectively across different applications.
Zooming In: To zoom in using the Ctrl key and scroll wheel, simply hold down the Ctrl key on your keyboard and scroll the wheel away from you or towards you. Scrolling the wheel away from you will increase the zoom level, making the content appear larger. This is particularly useful when you need to magnify text for easier reading or zoom in on specific details in images or documents.
Zooming Out: If you want to zoom out, hold down the Ctrl key and scroll the wheel towards you. This action will decrease the zoom level, allowing you to fit more content on the screen or see a broader view of the document or webpage. It offers a seamless and intuitive way to adjust the zoom level according to your preference.
This method of zooming in or out using the Ctrl key and scroll wheel is widely supported across various applications, including web browsers, office software, and image editing programs. It provides a smooth and continuous adjustment of the zoom level, giving you precise control over the size of the content without the need for complex menus or settings.
It’s worth noting that the zoom increments may vary depending on the program or application you’re using. Some software allows for fine-grained zoom adjustments with small increments, while others may have predefined zoom levels that jump in larger increments. Experimenting with this method in different applications will help you understand how it behaves in each specific context.
Keep in mind that this method relies on your mouse having a scroll wheel. If you’re using a laptop or a mouse without a scroll wheel, you may need to look for alternative methods or settings to adjust the zoom level. Additionally, some applications may have specific settings that disable or modify the behavior of the Ctrl and scroll wheel zooming feature.
By mastering this technique, you can easily and precisely adjust the zoom level to enhance readability, focus on details, or get a broader view of your content. Whether you’re reading articles, working with documents, or exploring images, using the Ctrl key and scroll wheel to zoom in or out is a convenient and efficient way to optimize your computer usage and improve your overall experience.
Zooming In or Out in Web Browsers
Web browsers are a primary gateway to the online world, and being able to adjust the zoom level can greatly enhance your browsing experience. Fortunately, modern web browsers offer several options for zooming in or out, allowing you to make content larger or smaller according to your preferences. Here’s how you can easily adjust the zoom level in popular web browsers.
1. Ctrl and ‘+’ or ‘-‘ Keys:
This method works across most web browsers. To zoom in using this method, simply hold down the Ctrl key on your keyboard and press the plus (+) key. Each press of the plus key will incrementally increase the zoom level. Conversely, to zoom out, hold down the Ctrl key and press the minus (-) key, decreasing the zoom level. This method offers a quick and straightforward way to adjust the zoom level while browsing the web.
2. Ctrl and Scroll Wheel:
Another handy option is to use the Ctrl key in combination with your mouse’s scroll wheel. Hold down the Ctrl key and scroll the wheel away from you to zoom in, making the content appear larger. To zoom out, hold down the Ctrl key and scroll the wheel towards you. This method provides a smooth and intuitive way to adjust the zoom level, allowing you to read text more comfortably or get a broader view of webpages.
3. Browser Menu Options:
Most web browsers also offer zoom controls in their menu options. Look for options like “Zoom In,” “Zoom Out,” and “Reset Zoom” in the browser’s menu or settings. These options typically provide more precise control over the zoom level and may offer additional customization features, such as text-only zoom or zoom levels beyond the default limits.
It’s important to note that some webpages may have fixed zoom settings or may not respond to certain zooming methods due to design limitations. However, for most web content, the Ctrl and ‘+/-‘ keys or the Ctrl and scroll wheel method should work seamlessly.
Additionally, modern web browsers often remember your zoom preferences for each website, allowing you to set a default zoom level or adjust the zoom on a per-site basis. This can be useful if you consistently need to zoom in or out on specific websites or if you prefer a different zoom level for different types of content.
Being able to adjust the zoom level in web browsers can greatly improve readability, make websites more accessible, and help you focus on specific elements of a webpage. Whether you’re reading articles, viewing images, or exploring web-based applications, utilizing these zooming options will enhance your browsing experience and make it more enjoyable.
Zooming In or Out in Microsoft Office Programs
Microsoft Office programs, such as Word, Excel, and PowerPoint, offer built-in zoom functionality to help you get a closer look at your documents, spreadsheets, and presentations. Whether you need to examine small details or view content from a distance, the zoom features in Microsoft Office programs provide a flexible way to adjust the display. Here’s how you can easily zoom in or out in Microsoft Office programs.
1. Zoom Slider:
In most Microsoft Office programs, you’ll find a zoom slider located in the bottom-right corner of the application window. You can click and drag the slider to the right to zoom in or to the left to zoom out. This slider allows for quick and precise adjustments, making it easy to find the optimal zoom level for your content.
2. Zoom Percentage Options:
Alternatively, you can also set the zoom level using specific percentage options provided in the Microsoft Office programs. Look for the zoom options in the toolbar or ribbon at the top of the application window. You can choose predefined zoom percentages, such as 100%, 200%, or adjust the zoom to a custom percentage to meet your specific needs.
3. Zoom Dropdown Menu:
Many Microsoft Office programs have a zoom dropdown menu in the toolbar or ribbon that gives you access to additional zoom options. This menu offers predefined zoom levels, such as Fit Page or Fit Width, which automatically adjust the zoom level to display the entire document or fit the width of the content within the window.
It’s worth noting that the specific location of the zoom controls may vary slightly between different versions of Microsoft Office and the individual programs within the suite. However, the basic principles for zooming in or out remain consistent across the applications.
Utilizing the zoom features in Microsoft Office programs can help you focus on details, ensure accurate formatting, and improve overall readability. Whether you’re creating documents, working with spreadsheets, or designing presentations, having control over the zoom level is essential for a productive and comfortable working environment.
By exploring and utilizing the zoom options in Microsoft Office programs, you can optimize your viewing experience, customize the display according to your preferences, and make the most of the powerful features these programs have to offer.
Zooming In or Out in Adobe Acrobat Reader
Adobe Acrobat Reader is a widely used software for viewing and working with PDF documents. Whether you need to analyze detailed information or get a broader view of the content, Acrobat Reader offers various zooming options to facilitate your reading and navigation. Here’s how you can easily zoom in or out using Adobe Acrobat Reader.
1. Zoom Tools:
Acrobat Reader provides a set of zoom tools that you can access from the toolbar at the top of the application window. Click on the zoom-in tool (represented by a magnifying glass with a plus symbol) to zoom in. Similarly, click on the zoom-out tool (represented by a magnifying glass with a minus symbol) to zoom out. These tools allow you to control the zoom level precisely, making it easy to focus on specific sections or reduce the size of the document for a better overview.
2. Zoom Percentage Options:
You can also set the zoom level in Adobe Acrobat Reader using specific percentage options. You can access these options by clicking on the percentage value displayed in the toolbar at the bottom of the application window. A dropdown menu will appear, allowing you to choose from predefined zoom percentages or enter a custom percentage to adjust the zoom according to your preferences.
3. Zoom In and Out Keyboard Shortcuts:
Keyboard shortcuts in Acrobat Reader offer a quick way to zoom in or out. Press Ctrl and plus (+) to zoom in, making the content larger. Conversely, press Ctrl and minus (-) to zoom out and reduce the size of the content. Using keyboard shortcuts can speed up your workflow and provide a seamless way to adjust the zoom level without reaching for the mouse or toolbar.
Additionally, Acrobat Reader includes other useful zoom features, such as Fit Width and Fit Page. The Fit Width option adjusts the document’s zoom level to fit the width of the application window, ensuring that the content is easily readable. The Fit Page option adjusts the zoom level to display the entire page within the application window, providing a comprehensive view of the document’s layout.
By utilizing the zooming options in Adobe Acrobat Reader, you can optimize your reading experience, focus on specific details, and navigate through complex PDF documents more efficiently. Whether you’re reviewing reports, studying textbooks, or annotating documents, having control over the zoom level is essential for a productive and comfortable reading environment.
Exploring the various zooming options in Adobe Acrobat Reader will help you customize the display to meet your specific needs, ensuring that you can view PDF documents with clarity and ease.
Zooming In or Out in Google Maps
Google Maps is a powerful tool that allows you to explore and navigate locations worldwide. Whether you’re planning a trip, searching for nearby attractions, or finding the best route, being able to adjust the zoom level is crucial for getting a clear and detailed view of the map. Here’s how you can easily zoom in or out in Google Maps.
1. Zoom Controls:
One of the most straightforward ways to zoom in or out in Google Maps is by using the zoom controls. These controls appear in the lower-right corner of the map and consist of a plus (+) and minus (-) button. Clicking the plus button will zoom in, while clicking the minus button will zoom out. Using these controls gives you the flexibility to adjust the zoom level to focus on specific areas or get a broader view of the map.
2. Double-Click or Pinch Gesture:
Another convenient method to zoom in or out in Google Maps is by using double-click or pinch gestures on touch-enabled devices. Double-clicking on a location on the map will zoom in, and double-clicking again will zoom in further. Conversely, you can use a pinch motion (spreading your fingers apart or bringing them closer together) on a touch screen to zoom in or out smoothly. This method provides a quick and intuitive way to adjust the zoom level according to your preference.
3. Mouse Scroll Wheel:
If you’re using a computer or laptop with a mouse that has a scroll wheel, you can use it to zoom in or out in Google Maps. Simply position your cursor over the map and scroll the wheel away from you to zoom in or towards you to zoom out. This method offers a seamless and precise way to adjust the zoom level to explore the map with ease.
Additionally, Google Maps provides zoom controls that appear in the top-left corner of the map when you hover over it. These controls allow you to zoom in and out with a single click, providing another convenient method for adjusting the zoom level.
By being able to zoom in or out in Google Maps, you can get a better understanding of the locations you’re exploring, visualize detailed street views, and plan your journeys with accuracy. Whether you’re navigating through unfamiliar cities, searching for specific addresses, or estimating distances, having control over the zoom level in Google Maps is essential for a smooth and successful experience.
Experimenting with the various zooming methods in Google Maps will help you find the most comfortable and effective way to view and interact with the map, ensuring that you make the most of this powerful navigation tool.
Zooming In or Out in Image Editing Software
Image editing software provides powerful tools for manipulating and enhancing digital images. Being able to zoom in or out is crucial when working with intricate details, making precise adjustments, or getting an overview of the entire image. Here’s how you can easily zoom in or out in popular image editing software.
1. Zoom Tool:
Most image editing software, such as Adobe Photoshop or GIMP, features a dedicated zoom tool. This tool is typically represented as a magnifying glass icon. By selecting the zoom tool, you can click on different areas of the image to zoom in or use a right-click or scroll wheel to zoom out. This provides precise control over the zoom level, allowing you to focus on specific areas or get a broader view of your work.
2. Zoom Percentage Options:
Many image editing programs allow you to set the zoom level using predefined percentage options. Look for a zoom percentage dropdown or input field in the software’s toolbar or menu. Here, you can select from a list of predefined zoom percentages or enter a custom value to adjust the zoom level to your liking. This method gives you the flexibility to work at precise zoom levels and ensures accurate editing.
3. Keyboard Shortcuts:
Keyboard shortcuts are often available in image editing software for zooming in or out. For example, pressing Ctrl and the plus (+) key on your keyboard will zoom in, while pressing Ctrl and the minus (-) key will zoom out. Using keyboard shortcuts provides a fast and convenient way to adjust the zoom level and can significantly speed up your workflow.
Additionally, image editing software may offer additional zoom options, such as Fit to Window or Fit to Screen. These options automatically adjust the zoom level to fit the image within the application window or screen, making it easier to view your work in its entirety.
By utilizing the zooming capabilities of image editing software, you can precisely examine and modify your images, ensuring accurate edits, retouches, or enhancements. Whether you’re working on professional photography, graphic design projects, or simply editing personal images, having control over the zoom level is essential for achieving desired results.
Exploring the various zooming options in image editing software will help you customize the display, focus on specific details, and work efficiently with your images. With the ability to zoom in or out, you can unleash your creativity and bring your vision to life with precision and clarity.
Zooming In or Out in Video Players
Video players offer a range of features to enhance your viewing experience, and being able to control the zoom level is one of them. Whether you want to focus on specific details or fit the video to your screen, the ability to zoom in or out can greatly impact your enjoyment. Here’s how you can easily adjust the zoom level in video players.
1. Video Player Controls:
Most video players provide built-in controls that allow you to adjust the zoom level of the video. These controls are typically accessible through the player’s toolbar or menu. Look for options like “Zoom In,” “Zoom Out,” or “Fit to Screen.” Clicking on the zoom in option will increase the video size, bringing it closer and magnifying the content. Conversely, using the zoom out option will decrease the video size, allowing you to fit more content on the screen. The fit to screen option adjusts the video size to fit perfectly within the player’s window.
2. Keyboard Shortcuts:
Some video players offer keyboard shortcuts for zooming in or out. While the specific shortcuts can vary depending on the video player, popular keyboard shortcuts usually involve using the plus (+) and minus (-) keys to zoom in or out, respectively. This offers a quick and convenient way to adjust the zoom level without needing to navigate through menus or toolbars.
3. Mouse Scroll Wheel:
Using the scroll wheel on your mouse while hovering over the video player can also provide a seamless way to zoom in or out. Scrolling away from you will zoom in, making the video appear larger, while scrolling towards you will zoom out, reducing the video size. This method allows for easy and precise adjustments and is especially useful if you prefer using mouse gestures.
It’s worth noting that the exact zoom functionality and options can vary between different video players. Some players may offer more advanced zoom settings, such as pan and scan functionalities, which allow you to move within the video frame when zoomed in. Others may provide the option to set a default zoom level or remember your zoom preferences for individual videos.
By utilizing the zooming options in video players, you can enhance your viewing experience and tailor it to your preferences. Whether you’re watching movies, TV shows, or personal videos, having control over the zoom level allows you to focus on details or adjust the video size to fit your screen perfectly.
Exploring and making use of the zooming capabilities in video players can greatly enrich your video-watching experience, ensuring that you don’t miss any important details and enjoy your favorite content to the fullest.
Troubleshooting Common Issues with Zooming In or Out
While zooming in or out is generally a straightforward process, you may encounter some common issues that can hinder your ability to adjust the zoom level. Understanding and troubleshooting these issues will help you regain control over the zoom functionality and ensure a smooth user experience. Here are some common problems and their potential solutions:
1. Zoom Not Working:
If you find that the zooming functionality is not working at all, double-check whether the correct keyboard shortcuts or mouse gestures are being used. Ensure that any special function keys on your keyboard are not accidentally activated, as they may interfere with the zooming functionality. If the issue persists, try closing and reopening the application or restarting your computer.
2. Limited Zoom Range:
Some applications or software may have limits on the maximum or minimum zoom level. If you find that the zoom range is limited and not going beyond a certain point, refer to the software’s documentation or settings to see if there are any restrictions in place. In some cases, alternative methods, such as using an external magnifying tool or adjusting the screen resolution, may be necessary to achieve the desired level of zoom.
3. Blurry or Pixelated Zoom:
Occasionally, when zooming in too far, images or text may appear blurry or pixelated. This can happen when the original content does not have enough resolution to support the zoom level. To address this issue, try zooming out slightly or use a higher quality source image or document. Additionally, adjusting the settings of your monitor or display to a higher resolution can improve the clarity of zoomed-in content.
4. Inconsistent Zoom across Applications:
Different applications or software may have varying zooming mechanisms or default zoom settings. This can result in inconsistent zoom levels between programs. To maintain consistency, explore the zoom options within each application and adjust the settings according to your preference. Additionally, check if there are any compatibility issues or updates available for the software that could resolve any inconsistencies.
5. Zoom Lock:
In some cases, the zoom level may appear to be locked or unresponsive. This issue can often be resolved by resetting the zoom level or adjusting the settings within the application. Look for options like “Reset Zoom” or “Default Zoom” to restore the default zoom settings. If the issue persists, try restarting the application or clearing any temporary files that may be affecting the zoom functionality.
As with any technical issue, it’s important to keep your software or applications updated with the latest patches and updates. This can address any known bugs or compatibility issues that may affect the zoom functionality. Additionally, referring to the software’s documentation or support resources can provide further guidance in troubleshooting specific zooming issues.
By understanding these common issues and their potential solutions, you can overcome zooming challenges and ensure a seamless experience when adjusting the zoom level. Whether you’re browsing the web, editing images, or watching videos, troubleshooting these issues will help you regain control and make the most of the available zooming features.