
What is the Tracert Command in Windows?
The Tracert command is a network diagnostic tool available in Windows operating systems that allows users to trace the route taken by data packets from their computer to a destination IP address or hostname. It provides valuable insights into the network path and helps identify any potential network issues or delays. Tracert stands for “trace route,” and it is commonly used by network administrators and IT professionals to troubleshoot network connectivity problems, analyze network performance, and identify the source of latency or packet loss.
When you execute the Tracert command, it sends out a series of Internet Control Message Protocol (ICMP) Echo Request packets with increasing Time to Live (TTL) values. Each packet is sent to the target destination, and as it traverses each router along the path, it records the round-trip time (RTT) and IP address of each router. This information is then displayed to the user, providing a detailed view of the path taken by the data packets.
The Tracert command can be an invaluable tool in diagnosing network issues. By analyzing the RTT values for each router, you can identify routers with high latency, which may indicate network congestion or connectivity problems. Additionally, the Tracert command can help pinpoint the exact hop where packet loss occurs, allowing network administrators to take appropriate actions to resolve the issue.
Overall, the Tracert command is a powerful utility that provides essential network diagnostic information. Whether you are a network administrator, IT professional, or an advanced user, understanding how to use the Tracert command can help you troubleshoot and optimize your network connectivity.
How Does the Tracert Command Work?
The Tracert command works by sending out a series of ICMP Echo Request packets with varying TTL values to the destination IP address or hostname. TTL stands for “Time to Live,” and it represents the maximum number of hops (routers) that a packet can pass through before being discarded.
When the first packet is sent, it has a TTL value of 1. This causes the packet to be discarded by the first router it encounters, which in turn generates an ICMP Time Exceeded message. This message is then sent back to the Tracert command’s source IP address, providing the information about the first hop’s IP address and round-trip time (RTT).
The Tracert command then increments the TTL value by 1 and sends out the second packet. This process continues until the packet successfully reaches the destination or the maximum hop count is reached. As the packets traverse each hop, the IP address and RTT for that hop are recorded and displayed to the user.
By analyzing the sequence of IP addresses and RTT values, users can determine the route taken by the packets, identify potential bottlenecks or network issues, and troubleshoot any problems that may arise. If a particular hop is showing excessive latency or packet loss, it can indicate network congestion, a faulty router, or connectivity problems at that specific point in the network.
It is important to note that the Tracert command relies on ICMP Echo Request packets, which are often given lower priority by routers compared to other types of traffic. This means that some routers may not respond to the Tracert command or may give inaccurate results due to ICMP packet filtering or configuration settings.
Overall, the Tracert command provides valuable information about the path taken by data packets and helps in diagnosing network issues. By understanding its inner workings, users can effectively analyze network connectivity and optimize their network performance.
Open the Command Prompt
To use the Tracert command in Windows, you will need to open the Command Prompt. The Command Prompt is a built-in utility that allows users to interact with the operating system using command-line instructions.
Here’s how you can open the Command Prompt:
- Click on the “Start” menu or press the Windows key.
- Type “Command Prompt” in the search bar.
- Click on the “Command Prompt” application that appears in the search results.
Alternatively, you can also open the Command Prompt using the “Run” dialog:
- Press the Windows key + R to open the “Run” dialog.
- Type “cmd” in the dialog box.
- Press Enter or click on the “OK” button.
Once you have opened the Command Prompt, you will see a black window with a blinking cursor. This is where you can enter commands to execute various tasks, including running the Tracert command.
It is worth noting that the Command Prompt provides a direct and efficient way to interact with your computer and execute commands. While its interface may seem intimidating to newcomers, mastering the Command Prompt can significantly enhance your ability to troubleshoot and perform advanced tasks on your Windows system.
Now that you have the Command Prompt open, you are ready to use the Tracert command to trace the route to a destination IP address or hostname. In the next section, we will cover the syntax and usage of the Tracert command in more detail.
Syntax of the Tracert Command
The Tracert command in Windows follows a specific syntax that allows you to customize its behavior and tailor it to your specific needs. Understanding the syntax is crucial for using the Tracert command effectively.
Here is the basic syntax of the Tracert command:
tracert [options] destination
The tracert keyword followed by any specified options is used to initiate the Tracert command. The destination parameter represents the IP address or hostname of the target server or device to which you want to trace the route.
Let’s take a closer look at some commonly used options with the Tracert command:
-dor--do not resolve addresses: This option instructs the Tracert command to avoid resolving IP addresses to hostnames. By using this option, you can save time by skipping the reverse DNS lookup process.-h numberor--max-hops number: This option allows you to specify the maximum number of hops or routers that the Tracert command will trace. By default, the maximum hop count is 30, but you can adjust it according to your needs.-w millisecondsor--timeout milliseconds: This option sets the amount of time, in milliseconds, that the Tracert command waits for each reply from a hop. You can modify this timeout value if you want to increase or decrease the waiting time.
These are just a few examples of options that can be used with the Tracert command. To explore the full range of available options and their descriptions, you can type tracert /? in the Command Prompt.
It is important to note that the Tracert command must be executed with administrative privileges. Make sure you open the Command Prompt as an administrator to ensure proper functionality and access to all features and options.
Now that you have a good understanding of the Tracert command’s syntax and options, you are ready to start tracing the route to your desired destination. In the next section, we will explore how to use the Tracert command to trace the route to a specific IP address or hostname.
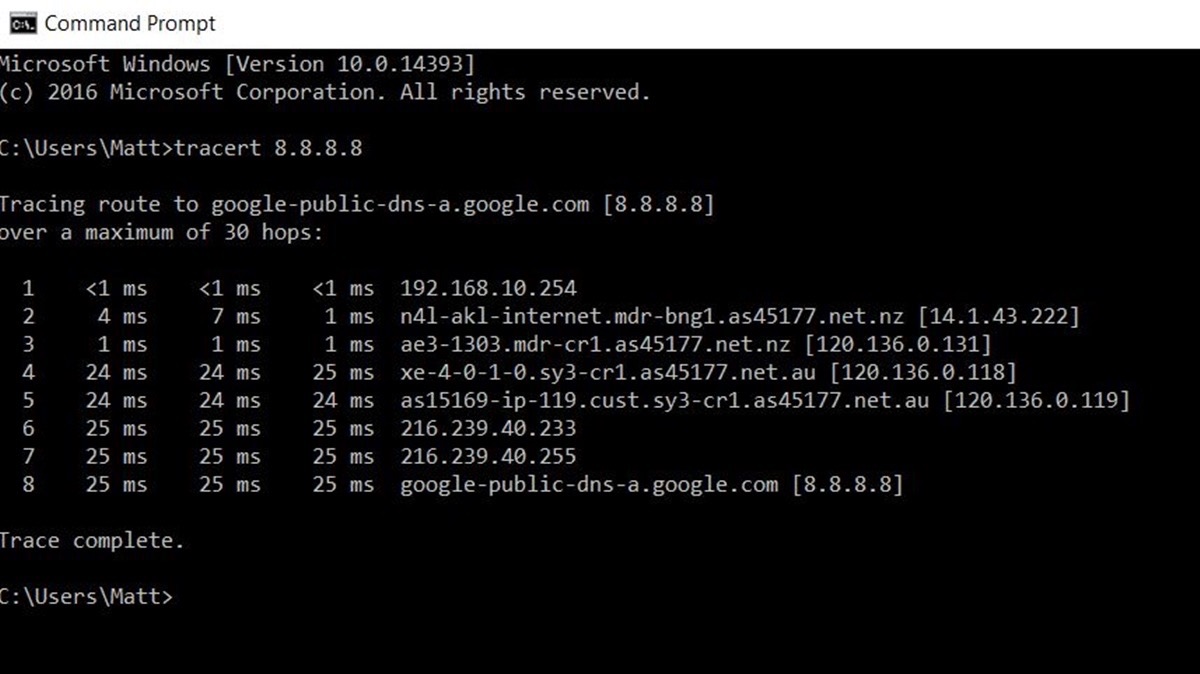
Tracing the Route to a Destination
Tracing the route to a destination using the Tracert command is a straightforward process. Once you have the Command Prompt open and understand the basic syntax, you can begin tracing the route to a specific IP address or hostname.
To trace the route to a destination, follow these steps:
- Open the Command Prompt as an administrator.
- Type
tracertfollowed by the destination IP address or hostname. - Press Enter to execute the command.
For example, if you want to trace the route to the website “www.example.com,” you would type:
tracert www.example.comOnce you press Enter, the Tracert command will start sending out ICMP Echo Request packets with increasing TTL values. Each router encountered along the path will respond with an ICMP Time Exceeded message, indicating its IP address and round-trip time (RTT).
The output of the Tracert command will display a list of all the routers the packets passed through, along with their IP addresses and RTT values. This information can help you identify the network path and spot any potential latency or connectivity issues.
Take note that the Tracert command may take some time to complete, depending on the network conditions and the number of hops required to reach the destination. Be patient and allow the command to finish running before analyzing the output.
It’s also important to remember that the Tracert command relies on ICMP traffic, which may be filtered or given lower priority by some routers. As a result, you may not always receive a response from each hop or encounter discrepancies in the RTT values.
Now that you know how to trace the route to a destination using the Tracert command, you can utilize this valuable information to diagnose network issues, analyze network performance, and troubleshoot connectivity problems.
Adjusting the Maximum Hop Count
The Tracert command allows you to customize the maximum hop count, which is the number of routers or hops that a packet can pass through before it is discarded. By default, the maximum hop count is set to 30. However, you can adjust this value to meet your specific requirements.
To adjust the maximum hop count when using the Tracert command, follow these steps:
- Open the Command Prompt as an administrator.
- Type
tracertfollowed by the destination IP address or hostname. - Add the
-h numberoption, replacingnumberwith the desired hop count. - Press Enter to execute the command.
For example, to set the maximum hop count to 20 when tracing the route to “www.example.com,” you would type:
tracert -h 20 www.example.comBy adjusting the maximum hop count, you can control how far the Tracert command will trace the route. This is useful when you have a rough idea of the maximum number of routers the packets will pass through to reach the destination.
It’s important to note that setting the hop count too low may result in the Tracert command not reaching the destination and therefore not providing a complete route trace. Conversely, setting the hop count too high may lead to unnecessary waiting time and longer execution times.
Experimenting with different maximum hop count values can help you strike a balance between efficiency and obtaining sufficient information about the network path. Factors such as geographic distance, network topology, and network congestion can affect the hop count required to reach a destination.
Now that you know how to adjust the maximum hop count when using the Tracert command, you can tailor the command to your specific needs and gather the necessary information to diagnose network issues and analyze network performance.
Displaying Milliseconds for Each Hop
When using the Tracert command in Windows, you have the option to display the round-trip time (RTT) for each hop along the traced route in milliseconds. This can provide valuable insights into the network latency at each hop and help identify potential issues or bottlenecks.
To display the RTT in milliseconds when using the Tracert command, follow these steps:
- Open the Command Prompt as an administrator.
- Type
tracertfollowed by the destination IP address or hostname. - Add the
-w millisecondsoption, replacingmillisecondswith the desired timeout value in milliseconds. - Press Enter to execute the command.
For example, to display the RTT in milliseconds when tracing the route to “www.example.com” with a timeout of 200 milliseconds, you would type:
tracert -w 200 www.example.comBy specifying a timeout value, you are instructing the Tracert command to wait for a reply from each hop for the specified time before moving on to the next hop. If a hop does not respond within the given timeout, it will be displayed as an asterisk (*) in the output.
The displayed RTT values can provide insights into network latency. A higher RTT indicates a potentially longer delay at that hop, which could be due to network congestion, a slower router, or other factors affecting network performance.
It is worth noting that the accuracy of the displayed RTT values can vary due to network conditions, ICMP packet prioritization, and other factors affecting ICMP traffic. Therefore, it’s important to interpret the RTT values as indicators rather than definitive measurements.
By displaying the RTT in milliseconds for each hop, you can get a clearer picture of the network latency and identify potential areas for further investigation or optimization. This information can be invaluable when troubleshooting network issues and optimizing network performance.
Resolving IP Addresses to Hostnames
When using the Tracert command in Windows, you have the option to resolve IP addresses to hostnames, which can provide more meaningful and recognizable information about each hop along the traced route. Resolving IP addresses to hostnames allows you to identify the routers or devices that the packets pass through.
To resolve IP addresses to hostnames when using the Tracert command, follow these steps:
- Open the Command Prompt as an administrator.
- Type
tracertfollowed by the destination IP address or hostname. - Add the
-doption or the--do not resolve addressesoption. - Press Enter to execute the command.
For example, to resolve the IP addresses to hostnames when tracing the route to “www.example.com,” you would type:
tracert -d www.example.comBy using the -d option or the --do not resolve addresses option, the Tracert command will skip the reverse DNS lookup process and display the IP addresses of each hop without resolving them to hostnames. This can be useful when you want to quickly gather information about the route without waiting for the hostname resolution process to complete.
Resolving IP addresses to hostnames can provide additional context and make it easier to identify the routers or devices along the traced route. This information can be particularly helpful for network administrators and IT professionals who are familiar with the hostnames of the network infrastructure within their organization.
It’s important to note that hostname resolution relies on the availability and accuracy of DNS (Domain Name System) services. If a DNS server is slow or unavailable, or if there are issues with DNS resolution, the Tracert command may not be able to resolve IP addresses to hostnames.
Now that you know how to resolve IP addresses to hostnames when using the Tracert command, you can customize your route trace to display either IP addresses or hostnames based on your preference and the level of information you need for your analysis.
Specifying the Source IP Address
The Tracert command in Windows allows you to specify the source IP address when tracing the route to a destination. Specifying the source IP address can be useful in situations where you have multiple network interfaces or want to trace the route from a specific network interface.
To specify the source IP address when using the Tracert command, follow these steps:
- Open the Command Prompt as an administrator.
- Type
tracertfollowed by the destination IP address or hostname. - Add the
-s source_ipoption, replacingsource_ipwith the desired source IP address. - Press Enter to execute the command.
For example, to trace the route to “www.example.com” using the source IP address 192.168.1.100, you would type:
tracert -s 192.168.1.100 www.example.comBy specifying the source IP address, you instruct the Tracert command to use a specific network interface or IP address as the starting point for the route trace. This can be helpful when you want to isolate the network path from a particular interface or troubleshoot connectivity issues from a specific IP address.
It is important to note that the source IP address specified must be associated with a valid network interface on your computer. If the specified source IP address is not available, the Tracert command will use the default network interface for the route trace.
Specifying the source IP address can provide valuable insights into how the network path differs from each interface and help diagnose issues related to specific network configurations or connectivity problems.
Now that you know how to specify the source IP address when using the Tracert command, you can customize your route trace and gather more targeted information based on your network setup and requirements.
Avoiding Resolution of IP Addresses to Hostnames
By default, the Tracert command in Windows resolves IP addresses to hostnames, providing more recognizable information about each hop along the traced route. However, there are situations where you may want to avoid the resolution process and view the IP addresses without resolving them to hostnames.
To avoid the resolution of IP addresses to hostnames when using the Tracert command, follow these steps:
- Open the Command Prompt as an administrator.
- Type
tracertfollowed by the destination IP address or hostname. - Add the
-doption or the--do not resolve addressesoption. - Press Enter to execute the command.
For instance, if you want to trace the route to “www.example.com” without resolving IP addresses to hostnames, you would enter the following command:
tracert -d www.example.comBy using the -d option or the --do not resolve addresses option, the Tracert command will skip the reverse DNS lookup process and display the IP addresses of each hop without resolving them to hostnames. This can save time and provide a more straightforward view of the route trace output.
Avoiding the resolution of IP addresses to hostnames can be beneficial in scenarios where DNS resolution is slow, or when you primarily focus on analyzing network connectivity at the IP level rather than hostnames. It allows you to quickly identify the routers or devices along the route based on their IP addresses.
However, keep in mind that without hostname resolution, you may miss out on additional information about the network infrastructure and devices along the traced path. Hostnames can provide insights into the physical locations or naming conventions of routers, which may be valuable for troubleshooting or network documentation purposes.
Now that you know how to avoid the resolution of IP addresses to hostnames when using the Tracert command, you can choose the display option that best suits your needs and preferences for your network diagnostic and troubleshooting tasks.
Specifying the Number of Echo Requests
The Tracert command in Windows allows you to specify the number of ICMP Echo Requests sent to each hop along the traced route. ICMP Echo Requests, also known as pings, are used to measure the round-trip time (RTT) from the source to each hop in the route trace.
To specify the number of Echo Requests when using the Tracert command, follow these steps:
- Open the Command Prompt as an administrator.
- Type
tracertfollowed by the destination IP address or hostname. - Add the
-hops numoption or the--hops numoption, replacingnumwith the desired number of Echo Requests. - Press Enter to execute the command.
For example, to send 4 Echo Requests to each hop when tracing the route to “www.example.com”, you would type:
tracert -hops 4 www.example.comBy specifying the number of Echo Requests, you can gather more data points to analyze the RTT and determine if there are any fluctuations or inconsistencies in the response times along the route. This can provide a more comprehensive picture of the network performance and potential bottlenecks.
Keep in mind that increasing the number of Echo Requests will extend the time required for the Tracert command to complete as it waits for multiple responses from each hop. However, it can provide more accurate RTT measurements and help identify any intermittent or transient issues.
On the other hand, setting the number of Echo Requests too high may result in longer trace times and potentially generating additional network traffic. It’s essential to strike a balance between the number of Echo Requests and the time required to obtain the necessary information.
Now that you have learned how to specify the number of Echo Requests when using the Tracert command, you can customize the command based on your specific requirements and perform more detailed analysis of the network performance along the traced route.
Setting the Time to Live Value
The Tracert command in Windows allows you to set the Time to Live (TTL) value for the ICMP packets sent during the route tracing process. The TTL value determines the number of hops or routers that a packet can pass through before being discarded.
To set the TTL value when using the Tracert command, follow these steps:
- Open the Command Prompt as an administrator.
- Type
tracertfollowed by the destination IP address or hostname. - Add the
-w time_to_liveoption, replacingtime_to_livewith the desired TTL value. - Press Enter to execute the command.
For instance, to set the TTL value to 128 when tracing the route to “www.example.com”, you would type:
tracert -w 128 www.example.comBy setting the TTL value, you can control the number of hops that the Tracert command will trace before the packets are discarded. This allows you to limit the scope of the route trace to a specific number of routers and helps in situations where you want to focus on a particular segment of the network.
It’s important to note that setting the TTL value too low may result in the Tracert command not being able to reach the destination, causing the route trace to terminate prematurely. Conversely, setting the TTL value too high may prolong the route trace process.
When determining the appropriate TTL value, consider factors such as the estimated number of hops between the source and destination, network topology, and the desired level of detail in the route trace. Adjusting the TTL value can help narrow down the focus and provide a more targeted analysis of specific segments of the network.
Now that you know how to set the Time to Live (TTL) value when using the Tracert command, you can customize the route trace based on your specific requirements and gain insights into network connectivity and performance at different stages of the traced path.
Using IPv6 with the Tracert Command
The Tracert command in Windows is not limited to IPv4 addresses; it also supports IPv6 addresses. IPv6 is the latest version of the Internet Protocol, designed to replace the older IPv4 and address the limitations of its address space.
To use IPv6 with the Tracert command, follow these steps:
- Open the Command Prompt as an administrator.
- Type
tracertfollowed by the IPv6 address or hostname. Enclose the IPv6 address in square brackets [] to differentiate it from an IPv4 address. - Press Enter to execute the command.
For example, to trace the route to an IPv6 address “2001:db8:85a3::8a2e:370:7334”, you would type:
tracert [2001:db8:85a3::8a2e:370:7334]The Tracert command will then initiate the route trace and display the IPv6 addresses of each hop, along with the round-trip time (RTT) values. This allows you to analyze the network path and identify any potential issues or performance bottlenecks related to IPv6 connectivity.
Using IPv6 with the Tracert command can be beneficial for diagnosing issues specifically related to IPv6 networks, ensuring seamless connectivity for devices supporting the latest IP protocol version.
It’s important to note that not all networks or devices may fully support IPv6, and the availability and readiness of IPv6 connectivity may vary. Additionally, since the adoption of IPv6 is still ongoing, some routers or ISPs may not yet have complete IPv6 routing information, which can impact the accuracy or completeness of the Tracert command results for IPv6 addresses.
Now that you know how to use IPv6 with the Tracert command, you can leverage this feature to diagnose and troubleshoot issues related to IPv6 connectivity, ensuring smooth operation across the modern Internet infrastructure.
Tracert Command Examples
The Tracert command in Windows offers various options and customization possibilities to suit your specific network diagnostic needs. Here are a few examples demonstrating different use cases and scenarios:
- Tracing the route to a website:
tracert www.example.comThis example traces the route to the website “www.example.com” and displays the IP addresses and round-trip time (RTT) values for each hop along the network path.
tracert -h 15 www.example.comBy setting the maximum hop count to 15, this example limits the route trace to a maximum of 15 hops, providing a more focused view of the network path.
tracert -w 300 www.example.comHere, the Tracert command is configured to display the round-trip time (RTT) in milliseconds, waiting for a response from each hop for up to 300 milliseconds.
tracert www.example.comThis example resolves the IP addresses to hostnames, providing more recognizable information about each hop along the traced route.
tracert -d www.example.comBy using the -d option, this example avoids the resolution process and displays IP addresses instead of hostnames.
tracert [2001:db8:85a3::8a2e:370:7334]In this example, the Tracert command traces the route to an IPv6 address and provides insights into the network path for IPv6 connectivity.
These examples provide a glimpse into the various ways the Tracert command can be utilized to diagnose network issues, analyze network performance, and optimize network connectivity. Experimenting with different options and parameters can help you tailor the Tracert command to your specific requirements.