
What is the Equalizer in VLC Media Player?
The equalizer in VLC Media Player is a powerful tool that allows you to adjust the audio settings for your media playback. It works by modifying the frequency response of the audio signals, allowing you to enhance or attenuate specific frequency bands. This feature is particularly useful when you want to fine-tune the audio output to suit your preferences or compensate for specific audio limitations in your playback system.
The equalizer in VLC Media Player functions as a graphical user interface (GUI) that provides a visual representation of different frequency bands, ranging from low to high frequencies. By adjusting the levels of these frequency bands, you can effectively shape the overall sound of your media, optimizing it for a better listening experience.
Whether you’re listening to music, watching movies, or playing videos, the equalizer gives you the ability to customize the audio to your liking. It can help enhance the bass for a deeper and richer sound, boost the treble for clearer vocals, or balance out the overall audio response. With the equalizer, you have the flexibility to adjust the audio to match your personal preferences or compensate for the acoustics of your listening environment.
Furthermore, the equalizer in VLC Media Player is not limited to just basic audio adjustments. It offers a range of advanced features, such as the ability to apply preset equalizer settings, create and save custom equalizer profiles, and reset the equalizer to default settings. These additional functionalities make it a versatile tool for both casual users and audiophiles who want more control over their audio playback.
Overall, the equalizer in VLC Media Player is an essential tool for optimizing the audio output and tailoring it to your specific needs. With its range of adjustable frequency bands and additional features, it allows you to fine-tune the audio to create a more immersive and enjoyable listening experience.
How to Access the Equalizer in VLC Media Player
The equalizer in VLC Media Player can be accessed through the program’s settings. Here’s a step-by-step guide on how to access the equalizer:
- Open VLC Media Player on your computer.
- Click on the “Tools” tab in the menu bar at the top of the screen.
- Select “Preferences” from the dropdown menu. This will open the VLC settings window.
- In the settings window, click on the “Audio” tab on the left-hand side.
- Under the “Effects and Filters” section, you’ll find the equalizer option. Check the box next to “Enable” to activate the equalizer.
- Click on the “Equalizer” tab to access the equalizer controls.
Once you have accessed the equalizer, you can start adjusting the audio settings according to your preferences. The equalizer in VLC Media Player provides a graphical representation of different frequency bands, allowing you to modify the levels of these bands to enhance or attenuate specific frequencies.
It’s worth noting that VLC Media Player also offers a preamp control that allows you to increase or decrease the overall audio level. This can be useful if you want to boost the volume of the entire audio playback.
Remember to experiment with different settings and listen to the changes in real-time. This way, you can find the perfect audio balance that suits your personal preferences or compensates for specific audio limitations in your playback system.
By following these simple steps, you can easily access and utilize the equalizer in VLC Media Player to enhance your audio playback experience.
Understanding the Equalizer Controls
When using the equalizer in VLC Media Player, it’s important to understand how the different controls impact the audio settings. Here’s a breakdown of the equalizer controls and their functions:
- Frequency Bands: The equalizer in VLC Media Player typically displays 10 frequency bands, ranging from low to high frequencies. Each band represents a specific range of frequencies, and you can adjust the level of each band individually.
- Gain: The gain control allows you to increase or decrease the level of a specific frequency band. Moving the slider upwards increases the level, while moving it downwards decreases the level. Adjusting the gain for different frequency bands can help you enhance or attenuate specific frequencies according to your preferences.
- Preamp: The preamp control is located at the top of the equalizer interface. It allows you to adjust the overall audio level. Increasing the preamp value boosts the volume of the entire audio, while decreasing it decreases the volume. This control is useful for adjusting the overall loudness of the audio playback.
- Visual Representation: The equalizer also provides a visual representation of the audio settings. The bars on the graphical interface indicate the level of each frequency band. The higher the bar, the higher the level of that frequency band. This visual representation helps you visualize the changes you make to the audio settings in real-time.
- Reset Button: If you want to revert the equalizer settings back to their default values, you can click on the “Reset” button. This will reset all frequency bands and the preamp control to their default positions.
It’s important to note that adjusting the equalizer controls requires careful listening and experimentation. Start with small adjustments and listen to the changes in real-time to understand how each control affects the audio playback. You can then fine-tune the settings to achieve the desired audio balance and improve the overall sound quality.
By familiarizing yourself with the different equalizer controls and how they impact the audio settings, you can make precise adjustments to optimize your audio playback and create a more personalized, immersive listening experience.
Adjusting the Frequency Bands in the Equalizer
One of the key features of the equalizer in VLC Media Player is the ability to adjust the individual frequency bands. By altering the levels of these bands, you can enhance or attenuate specific frequency ranges to create a customized sound profile. Here’s how you can adjust the frequency bands in the equalizer:
- Open VLC Media Player and access the equalizer as mentioned earlier.
- Take a look at the graphical representation of the frequency bands on the equalizer interface. The leftmost band represents the lowest frequencies, while the rightmost band represents the highest frequencies.
- To adjust a specific frequency band, click and drag the corresponding slider up or down. Moving the slider up increases the level of that frequency band, while moving it down decreases the level.
- Listen to the changes in real-time as you adjust the levels. Pay attention to how different frequency bands affect the overall sound.
- Experiment with different combinations of frequency bands to achieve the desired audio balance. For example, boosting the bass frequencies can result in a more powerful and punchy sound, while reducing the high frequencies can create a warmer and smoother audio output.
When adjusting the frequency bands, it’s essential to keep in mind that the impact of each band is not isolated. Changes in one frequency band can affect the perception of other bands as well. It’s a delicate balancing act where you need to find the right combination to suit your audio preferences.
Remember, the equalizer is a powerful tool, but it’s recommended to make subtle adjustments rather than extreme changes. Small tweaks can have a significant impact on the audio quality without compromising the overall balance. Take your time to experiment with different configurations and find the sweet spot that enhances your listening experience.
By mastering the art of adjusting the frequency bands, you can fine-tune the audio output to match your personal preferences and enjoy a more customized and immersive sound experience.
Applying Preset Equalizer Settings
VLC Media Player provides a range of preset equalizer settings that you can apply to quickly alter the audio balance and achieve a desired sound profile. These presets are pre-configured combinations of frequency band adjustments, optimized for specific audio enhancements. Here’s how you can apply preset equalizer settings in VLC Media Player:
- Open VLC Media Player and access the equalizer.
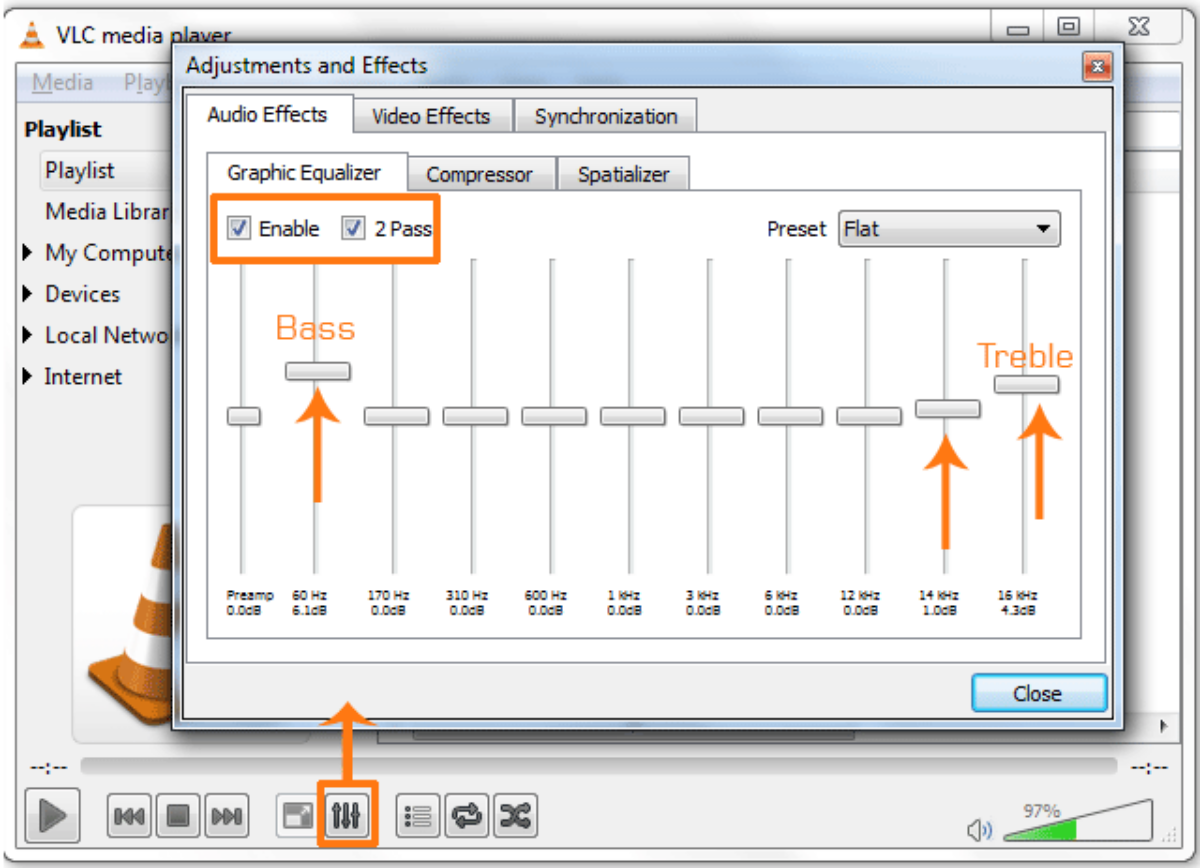
- Within the equalizer interface, you’ll find a dropdown menu labeled “Preset.” Click on it to reveal a list of available preset equalizer settings.
- Select a preset from the list to apply it to your audio playback. The graphical representation of the equalizer will update to reflect the adjustments made by the selected preset.
- Listen to your audio playback with the applied preset settings and evaluate how it affects the sound quality and balance. If you’re not satisfied, you can choose a different preset or customize the frequency bands manually.
The preset equalizer settings in VLC Media Player cater to various audio preferences and genres. They can include options such as “Rock,” “Jazz,” “Classical,” “Pop,” and more. Each preset is optimized to bring out specific elements of the audio to suit the genre or style it is associated with. For example, a “Rock” preset may emphasize the bass and mid-range frequencies, resulting in a more dynamic and punchy sound ideal for rock music.
Applying preset equalizer settings can save you time and effort in manually adjusting each frequency band. However, it’s worth noting that these presets are not a one-size-fits-all solution. They are general configurations that may or may not perfectly align with your audio preferences or the characteristics of your playback system. Therefore, it’s always a good idea to listen critically and make additional adjustments if necessary.
Furthermore, you can also create and save your own custom equalizer profiles if you find a combination of settings that you prefer and want to use it consistently. This allows you to have personalized audio adjustments readily available whenever you use VLC Media Player.
By utilizing the preset equalizer settings in VLC Media Player, you can quickly experiment with different audio configurations and find the audio balance that enhances your listening experience and complements the content you are enjoying.
Creating and Saving Custom Equalizer Profiles
In addition to the preset equalizer settings, VLC Media Player allows you to create and save your own custom equalizer profiles. This feature gives you the flexibility to fine-tune the audio settings to your exact preferences and save them for future use. Here’s how you can create and save custom equalizer profiles:
- Open VLC Media Player and access the equalizer.
- Adjust the frequency bands and gain controls to achieve the desired audio balance and sound profile.
- Once you have customized the equalizer settings to your liking, click on the “Save” button within the equalizer interface.
- Give your custom profile a descriptive name to easily identify it later.
- Click “Save” to save your custom equalizer profile.
By saving your own custom equalizer profiles, you can have specific audio configurations readily available whenever you use VLC Media Player. This is particularly beneficial if you have a preferred sound profile for different types of content or if you want to compensate for specific audio limitations in your playback system.
Additionally, VLC Media Player also offers the option to manage your saved equalizer profiles. You can edit existing profiles to make adjustments, delete profiles that are no longer needed, or simply select different profiles depending on your audio needs at any given time.
Custom equalizer profiles give you the opportunity to create a personalized audio experience that caters to your specific preferences. Whether you prefer a bass-heavy sound, a balanced audio output, or a boost in certain frequency ranges, creating and saving custom equalizer profiles in VLC Media Player can enhance your listening experience and provide a consistent audio configuration across different media.
Remember, by experimenting and refining your custom equalizer profiles over time, you can discover the perfect audio balance for your preferences and enjoy a more immersive and personalized sound experience with VLC Media Player.
Resetting the Equalizer to Default Settings
If you have made several adjustments to the equalizer settings in VLC Media Player and want to start fresh or revert to the original audio configuration, you can easily reset the equalizer to its default settings. Here’s how you can reset the equalizer:
- Open VLC Media Player and access the equalizer as mentioned earlier.
- Within the equalizer interface, you’ll find a “Reset” button.
- Click on the “Reset” button to restore the frequency bands and gain controls to their default positions.
- After clicking the “Reset” button, the equalizer settings will revert to the original configuration.
It’s essential to note that resetting the equalizer to default settings will undo any adjustments you have made to the frequency bands, gain controls, and any other modifications you have applied. This means that the audio output will return to the standard equalizer settings, as set by VLC Media Player.
Resetting the equalizer can be useful in several circumstances. For example, if you have experimented with multiple configurations and are not satisfied with the results, resetting the equalizer can give you a clean slate to start over. Additionally, if you have made accidental changes or want to compare the original audio profile with your modified settings, resetting the equalizer can provide a clear comparison.
Remember, the equalizer is a powerful tool for customizing the audio output, but it’s also important to explore different settings and experiment to find the right balance for your preferences and the content you are enjoying. The option to reset the equalizer to default settings ensures that you have the flexibility to explore and adjust the audio settings in VLC Media Player.
By utilizing the reset function when needed, you can maintain control over your audio experience and easily switch between customized settings and the original default configuration in VLC Media Player’s equalizer.
Enhancing and Optimizing Audio with the Equalizer
The equalizer in VLC Media Player offers a wide range of possibilities for enhancing and optimizing your audio playback. By utilizing the various controls and settings, you can fine-tune the audio to suit your preferences and improve the overall listening experience. Here are some ways to enhance and optimize your audio with the VLC Media Player equalizer:
- Balance Audio Response: The equalizer allows you to balance the audio response by adjusting the levels of different frequency bands. By boosting or attenuating specific frequencies, you can compensate for audio limitations in your playback system or tailor the sound to match your personal preferences.
- Improve Clarity: The equalizer provides the ability to boost the high-frequency range, which can enhance the clarity of vocals and instruments. By increasing the treble frequencies, you can make the sound more crisp and detailed, contributing to a more enjoyable listening experience.
- Enhance Bass Impact: If you enjoy deep and powerful bass, the equalizer allows you to increase the levels of the low-frequency bands. By boosting the bass, you can add impact and richness to music and movies, providing a more immersive audio experience.
- Compensate for Room Acoustics: Room acoustics can greatly influence the audio playback. If you are experiencing issues like uneven sound distribution or excessive reverberation, you can utilize the equalizer to adjust specific frequency bands to compensate for the room’s acoustics. By attenuating problematic frequencies or boosting others, you can achieve a more balanced and pleasing sound.
- Customize Sound Profiles: With the ability to create and save custom equalizer profiles, you can tailor the audio to different types of content or genres of music. For example, you can create a profile specifically optimized for movies with enhanced surround sound, or a profile focused on your favorite music genre, emphasizing the characteristics you enjoy the most.
It’s important to keep in mind that enhancing and optimizing audio with the equalizer is a subjective process. Everyone’s preferences and listening environments are different, so the adjustments you make should be based on your personal taste and the characteristics of your audio system.
By experimenting with different equalizer settings and actively listening to the changes, you can fine-tune the audio to achieve the best possible sound quality and create a more immersive and enjoyable listening experience with VLC Media Player.
Troubleshooting Common Issues with the Equalizer
While the equalizer in VLC Media Player is a powerful tool for adjusting and optimizing audio playback, you may encounter some common issues along the way. Here are a few troubleshooting tips to help you address these issues:
- No Sound or Audio Playback: If you’re not hearing any sound or experiencing audio playback issues after adjusting the equalizer, it’s important to check your system’s audio settings. Ensure that the volume is turned up and not muted. Additionally, verify that your speakers or headphones are properly connected and functional.
- Uneven Audio Quality: If you notice that the audio quality is uneven or certain frequency ranges are overpowering or lacking, it might be due to imbalanced equalizer settings. Try adjusting the levels of different frequency bands to achieve a more balanced sound. Pay attention to individual bands that may be causing the issue and make corresponding adjustments.
- Overwhelming Bass or Treble: If the bass or treble frequencies are overpowering and overwhelming the rest of the audio, reduce the gain for those specific bands. Subtle adjustments can help achieve a more balanced audio output.
- Auditory Fatigue: If you find that long periods of audio playback with equalizer adjustments are causing auditory fatigue, consider reducing the intensity of the applied equalizer settings. Too much boosting or attenuation of specific frequencies can lead to a fatiguing listening experience.
- Compatibility Issues: In rare cases, you might encounter compatibility issues with certain audio formats or codecs. If you experience issues with specific files or formats, try playing them with a different media player or ensure that VLC Media Player is updated to the latest version.
- Hardware Limitations: It’s important to understand that the equalizer can only work within the limitations of your hardware. If your speakers or headphones have poor audio quality or limited frequency response, adjusting the equalizer may not significantly improve the audio playback. Consider upgrading your audio equipment for a better audio experience.
Remember to approach troubleshooting systematically, making one adjustment at a time to identify the root cause of the issue. Take your time to experiment and listen critically to the changes to find the optimal equalizer settings for your specific needs and preferences.
If you’re still experiencing issues with the equalizer in VLC Media Player, consider seeking assistance from VLC’s official support channels or online forums, where you can find helpful tips and guidance from the community.
Troubleshooting common issues with the equalizer can help you resolve audio playback problems and ensure that you can fully take advantage of this powerful feature in VLC Media Player.