
Benefits of Creating a Media Library
Having a well-organized media library in VLC Player offers numerous advantages for both casual users and media enthusiasts. By creating a centralized hub for all your media files, you can easily access and manage your content without the hassle of searching through folders or scrolling endlessly. Let’s explore the benefits of creating a media library in VLC Player.
1. Efficient Organization: With a media library, you can keep all your audio and video files neatly organized in one place. You can categorize your media based on genres, artists, albums, or any other criteria that suits your preferences. This makes it easy to find and play your favorite songs or movies without wasting time searching.
2. Quick Access: VLC Player’s media library allows you to access your media files quickly and effortlessly. You can simply select a specific category or use the search function to locate a particular file within seconds. This convenience saves you from the hassle of navigating through multiple folders or directories.
3. Enhanced Playback Experience: By creating a media library, VLC Player can automatically retrieve metadata such as artist names, album covers, and movie information. This enriches your playback experience with visually appealing details and helps you identify and select the content you want to enjoy.
4. Customized Playlists: VLC Player’s media library enables you to create and manage playlists according to your preferences. You can curate playlists for specific occasions, moods, or genres, making it easy to switch between different media collections effortlessly.
5. Synchronized Playback: If you have multiple devices running VLC Player, a media library allows you to sync your playback history and playlists across devices. This means that you can seamlessly continue watching a movie or listening to a playlist on different devices without losing your progress.
6. Subtitle Management: VLC Player’s media library also simplifies the management of subtitles. You can associate subtitle files with specific media files in your library, ensuring that subtitles are readily available whenever you play the corresponding video. This avoids the hassle of manually searching for and loading subtitles every time.
7. Customizability: VLC Player’s media library is highly customizable. You can choose how your media is displayed, customize the appearance of the player, and adjust various settings to suit your preferences. This flexibility allows you to personalize your media library and create a seamless user experience.
Creating a media library in VLC Player brings organization, convenience, and customization to your media playback. Whether you’re a casual listener or a movie enthusiast, having all your media files organized in one place enhances your overall experience. Start creating your media library in VLC Player today and enjoy the benefits it brings to your media consumption.
How to Install VLC Player
VLC Player is a powerful and versatile media player that supports various audio and video formats, making it a popular choice among users worldwide. Installing VLC Player is a simple and straightforward process, and it is available for different operating systems, including Windows, macOS, and Linux. Here’s a step-by-step guide on how to install VLC Player on your preferred platform.
For Windows:
- Visit the official VLC website at www.videolan.org/vlc.
- Click on the Download VLC button on the homepage.
- Once the installation file is downloaded, open it.
- Choose your preferred language and click on the OK button.
- Read and accept the terms of the VLC Player license agreement, then click Next.
- Review the available components and features, and select or deselect based on your preferences. Click Next to proceed.
- Choose the destination folder where you want to install VLC Player or leave it as the default. Click Install.
- Wait for the installation process to complete.
- Once the installation is finished, click Finish.
- You can now launch VLC Player by double-clicking on the desktop shortcut or searching for it in the start menu.
For macOS:
- Go to the official VLC website at www.videolan.org/vlc.
- Click on the Download VLC button.
- Once the download is complete, open the downloaded file.
- Drag and drop the VLC Player icon into the Applications folder.
- You can now launch VLC Player from the Applications folder or by using Spotlight search.
For Linux:
- Linux users can install VLC Player directly from their distribution’s software repository. The exact installation process may vary depending on the Linux distribution being used.
- Open the terminal.
- Enter the appropriate package installation command based on your Linux distribution. For example:
- Ubuntu:
sudo apt-get install vlc - Fedora:
sudo dnf install vlc - Arch Linux:
sudo pacman -S vlc
Once the installation is complete, VLC Player will be available for use.
Follow the above steps according to your preferred operating system, and you’ll have VLC Player installed in no time. Enjoy the seamless playback and wide range of features that VLC Player has to offer.
Adding Media Files to VLC Player
VLC Player allows you to effortlessly add media files to your library for easy access and playback. Whether you have music, movies, or podcasts, adding them to VLC Player is a straightforward process. Here’s how you can add media files to VLC Player:
Method 1: Drag and Drop
- Open VLC Player on your computer.
- Open the folder where your media files are located.
- Drag and drop the desired media files directly into the VLC Player window.
- Alternatively, you can drag and drop the media files onto the VLC Player icon in your taskbar or dock.
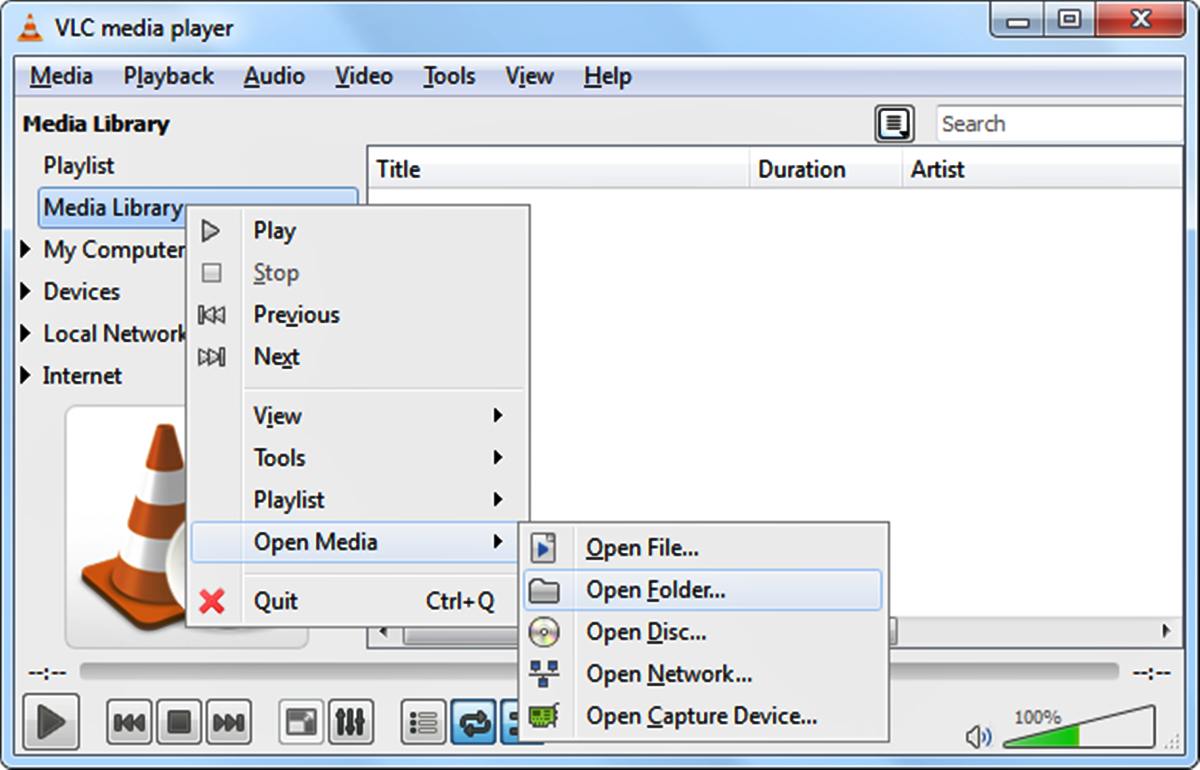
Method 2: Using the File Menu
- Open VLC Player on your computer.
- Click on the Media tab in the top menu bar.
- From the dropdown menu, select Open File or Open Folder, depending on whether you want to add a single file or a folder containing multiple files.
- Browse to the location of your media files and select the files or folder you want to add.
- Click on the Open button.
Method 3: Using the Playlist Window
- Open VLC Player on your computer.
- In the lower-left corner of the VLC Player window, click on the Playlist button to open the playlist window.
- Click on the Plus (+) icon at the bottom of the playlist window.
- Browse to the location of your media files, select the files you want to add, and click on the Open button.
Regardless of the method you choose, VLC Player will automatically start adding the media files to your library, and they will be available for playback right away. VLC Player supports a wide range of audio and video formats, allowing you to add all your favorite content to the library for easy access.
Adding media files to VLC Player is incredibly user-friendly and quick. You can add individual files or whole folders, depending on your preference. Start building your media library in VLC Player today and enjoy the convenience of having all your media files at your fingertips.
Organizing Media Files in VLC Player
Keeping your media files organized in VLC Player not only improves accessibility but also enhances your overall media playback experience. VLC Player offers various options to help you organize your media library efficiently. Here are some methods you can use to organize your media files in VLC Player:
1. Creating Folders: VLC Player allows you to create custom folders within the media library to group and categorize your files. You can create folders based on genres, artists, albums, or any other classification that suits your preferences. To create a new folder, right-click within the media library, select New Folder, and give it a name.
2. Sorting Options: VLC Player provides sorting options to arrange your media files based on different criteria. You can sort by name, date added, duration, or even custom metadata such as artist or album. To change the sorting order, right-click within the media library, select Sort By, and choose the desired sorting option.
3. Renaming Files: If you want to modify the file names within VLC Player, you can do so by right-clicking on a file, selecting Rename, and entering the new name. This can be helpful if you want to organize your files using a specific naming convention.
4. Editing Metadata: VLC Player allows you to edit the metadata of your media files, such as title, artist, album, genre, and more. To edit the metadata, right-click on a file, choose Tools, and then Media Information. In the window that appears, you can make changes to the metadata fields and click Save to apply the modifications.
5. Grouping: VLC Player provides the option to group media files within folders based on specific criteria. For example, you can group files by album, genre, or artist. Right-click within the media library, select Group By, and choose the desired grouping criterion. This can make it easier to navigate and locate specific files in your library.
6. Deleting Files: If you no longer need certain media files in your library, VLC Player allows you to remove them. Simply select the files you want to delete and press the Delete key on your keyboard or right-click and choose Delete. Please note that deleting a file from the VLC Player library does not delete the actual file from your computer; it only removes it from the library.
By utilizing these organization methods, you can build a well-structured media library in VLC Player that suits your preferences and makes it easy to find and enjoy your favorite content. Experiment with different methods and find a system that works best for you. Keep your media files organized in VLC Player and elevate your media playback experience.
Creating and Managing Playlists in VLC Player
VLC Player offers a powerful playlist feature that allows you to curate your favorite media files into custom playlists. Whether you want to create a playlist for a specific mood, occasion, or genre, VLC Player makes it easy to organize and manage your favorite content. Here’s how you can create and manage playlists in VLC Player:
Creating a Playlist:
- Open VLC Player on your computer.
- Click on the View tab in the top menu bar.
- Select Playlist from the dropdown menu. This will open the playlist window.
- In the playlist window, click on the Plus (+) icon at the bottom. A new playlist will be created.
- To give the playlist a meaningful name, right-click on the new playlist and select Rename. Enter the desired name for your playlist.
Adding Media to a Playlist:
- In the playlist window, locate the playlist to which you want to add media files.
- Drag and drop the desired media files from your library or computer into the playlist window.
- You can also right-click within the playlist window, select Add Files, and browse for the media files you want to add.
Reordering Media in a Playlist:
- In the playlist window, click and drag the media files within the playlist to change their order.
- You can rearrange the songs or videos in the playlist according to your preference.
Removing Media from a Playlist:
- In the playlist window, select the media file you want to remove.
- Press the Delete key on your keyboard or right-click and select Delete.
- The media file will be removed from the playlist, but it will still remain in your library.
Playing a Playlist:
- In the playlist window, locate the playlist you want to play.
- Double-click on the playlist, and VLC Player will start playing the media files in the playlist in the order they are listed.
Managing Multiple Playlists:
- You can create multiple playlists in VLC Player by following the steps mentioned above.
- To switch between playlists, click on the dropdown menu at the top of the playlist window and select the desired playlist.
With VLC Player’s playlist feature, you can create and manage personalized collections of media files for easy access and uninterrupted playback. Whether you want to create a playlist for a road trip or a workout session, VLC Player makes it simple to tailor your media experience to your liking. Start creating and managing playlists in VLC Player to enjoy a seamless and customized playback of your favorite media files.
Using VLC Player’s Search Feature
VLC Player offers a convenient search feature that allows you to quickly find specific media files within your library. Instead of manually browsing through your files, you can simply use the search feature to narrow down your search results and locate the desired content efficiently. Here’s how you can use VLC Player’s search feature:
1. Open VLC Player:
- Launch VLC Player on your computer.
2. Access the Media Library:
- Open the media library by clicking on the View tab in the top menu bar and selecting Playlist.
3. Enter Your Search Query:
- In the playlist window, you will find a search bar at the top.
- Type your search query into the search bar. You can search for various criteria such as the media file’s name, artist, album, genre, or even specific keywords within the file.
4. View Search Results:
- As you type your search query, VLC Player will display the search results in real-time.
- The search results will update and filter based on the words or phrases you enter.
- VLC Player will highlight the matching files, making it easy to identify the desired content quickly.
5. Play the Searched Media:
- Once you locate the desired media file in the search results, you can play it by double-clicking on the file within the playlist window.
- VLC Player will start playing the selected media file.
6. Clear the Search:
- If you want to clear the search and view all media files in your library again, simply delete the text in the search bar or click on the “x” icon within the search bar.
Using VLC Player’s search feature allows you to locate specific media files within your library easily. Whether you have a vast collection of music, movies, or other media files, the search feature saves you time and effort by immediately displaying the relevant results. By leveraging this powerful feature, you can quickly find and play the media content you want, enhancing your overall user experience with VLC Player.
Adding and Managing Subtitles in VLC Player
VLC Player offers a convenient feature that allows you to add and manage subtitles while playing videos or movies. Whether you prefer to watch foreign films or simply want to enhance your viewing experience with additional text, VLC Player makes it easy to incorporate subtitles into your video playback. Here’s how you can add and manage subtitles in VLC Player:
Adding Subtitles:
- Make sure the subtitle file is in the same folder as the video file or has the same name as the video file.
- Open VLC Player and play the desired video.
- Right-click on the VLC Player window and select Subtitles, then choose Add Subtitle File.
- Browse for the subtitle file and select it.
- The subtitles will be loaded and displayed on the video.
Adjusting Subtitle Settings:
- While playing a video with subtitles, right-click on the VLC Player window and select Subtitles.
- From the submenu, you can choose various options to adjust the subtitle settings:
- Subtitle Track: If the video has multiple subtitle tracks, you can select the desired track here.
- Subtitle Delay: If the subtitles are out of sync with the video, you can adjust the delay to synchronize them.
- Subtitle Synchronization: This option allows you to manually adjust the subtitle timing if needed.
- Subtitle Alignment: You can choose the alignment of the subtitles on the video screen.
- Subtitle Track Synchronization: If the subtitle track is out of sync, this option allows you to manually adjust its timing.
Managing Subtitle Preferences:
- To manage your subtitle preferences in VLC Player, go to the top menu bar and click on Tools, then select Preferences.
- In the preferences window, click on the Subtitles/OSD tab.
- Here you can customize various subtitle settings, including font, size, color, position, and more.
- Make the desired changes and click Save to apply the new subtitle preferences.
Disabling Subtitles:
- If you want to disable subtitles while playing a video, right-click on the VLC Player window, select Subtitles, and then click on Disable.
- The subtitles will be turned off, and the video will play without any text overlays.
Adding and managing subtitles in VLC Player allows you to enjoy videos in different languages or with additional text information. With its user-friendly interface and customizable subtitle settings, VLC Player provides a seamless experience for incorporating subtitles into your video playback. Enhance your viewing experience and enjoy movies and videos from around the world with subtitles using VLC Player.
Customizing VLC Player’s Media Library
VLC Player offers various customization options for its media library, allowing you to personalize your viewing and listening experience. Whether you want to change the appearance of the media library, modify the way your files are displayed, or adjust other settings, VLC Player provides flexibility to cater to your preferences. Here’s how you can customize VLC Player’s media library:
1. Changing the Media Library View:
- Open VLC Player on your computer.
- Click on the View tab in the top menu bar.
- From the dropdown menu, you can choose different views for your media library, such as List, Compact List, Extended List, Tile, or Thumbnail view. Select the view that suits your preference.
2. Customizing Columns:
- In VLC Player’s media library, right-click on the column headers.
- From the context menu, you can select the columns you want to display, such as Title, Artist, Album, Genre, Duration, and more.
- You can also rearrange the order of the columns by clicking and dragging them.
3. Modifying Thumbnail Sizes:
- If you are using Thumbnail view in the media library, you can adjust the size of the thumbnails.
- Go to the Tools menu in the top menu bar and select Preferences.
- In the preferences window, click on the Interface tab.
- Under the Playlist and Interface section, you will find the option to set the Thumbnail Size.
- Drag the slider to adjust the thumbnail size according to your preference.
- Click Save to apply the changes.
4. Changing the Library Background:
- If you prefer a custom background for the media library, go to the Tools menu and select Preferences.
- In the preferences window, click on the Interface tab.
- Under the Look and Feel section, you can click on the Choose… button next to the Background option.
- Browse your computer for the desired image file and click Open.
- Click Save to apply the new background image to the media library.
5. Customizing Playback Settings:
- To customize playback settings, go to the Tools menu and select Preferences.
- Under the Audio and Video sections, you can adjust various settings such as volume, equalizer, playback speed, aspect ratio, and more.
- Make the desired changes and click Save to apply the new settings.
VLC Player’s customization options allow you to tailor the appearance and functionality of the media library to your liking. Whether you want to change the view, adjust column settings, modify thumbnail sizes, customize the background, or fine-tune playback settings, VLC Player provides a user-friendly interface to accommodate your preferences. Personalize your media library in VLC Player and create a personalized and enjoyable media playback experience.
Backing Up and Restoring VLC Player’s Media Library
Backing up your VLC Player’s media library is essential to safeguard your collection of audio and video files. It ensures that your media library remains intact even in case of unexpected events like system crashes, hardware failures, or software glitches. Additionally, having a backup enables you to easily restore your media library on a different device or after re-installation of VLC Player. Here’s how you can back up and restore VLC Player’s media library:
Backing Up the Media Library:
- Locate the folder where VLC Player’s media library is stored on your computer.
- The default location for the media library varies depending on the operating system:
- Windows: C:\Users\[User]\AppData\Roaming\vlc\ml
- macOS: /Users/[User]/Library/Application Support/org.videolan.vlc/ml
- Linux: /home/[User]/.local/share/vlc/ml
- Copy the entire “ml” folder to a desired backup location, such as an external hard drive or cloud storage.
- This folder contains the entire media library, including your playlists, metadata, and other settings.
Restoring the Media Library:
- To restore the media library, make sure VLC Player is installed on the device where you want to restore the library.
- Copy the backed-up “ml” folder to the default location of the VLC Player’s media library on the new device.
- If VLC Player is open, close it and relaunch it to ensure the changes are applied.
- VLC Player will recognize the restored media library and display your playlists and media files as they were in the backup.
Note: It’s crucial to keep your backup up-to-date by regularly performing backups to avoid data loss. You can automate this process by using backup software or setting up a scheduled task to copy the “ml” folder to a secure location.
By following these steps, you can easily back up your VLC Player’s media library and restore it whenever needed. This ensures the safety of your media files and allows you to maintain your playlists, metadata, and settings across different devices or after a fresh installation. Take the necessary steps to protect your media library and enjoy a seamless media playback experience with VLC Player.