
What is the EDATE Function?
The EDATE function is a powerful tool in Microsoft Excel that allows you to add or subtract a specified number of months from a given date. This function is especially useful when dealing with financial calculations, forecasting, or analyzing data that involves time intervals.
The EDATE function follows a simple logic: it takes a starting date and adds or subtracts the specified number of months. The result is a new date that is calculated based on the adjusted time period.
This function can be particularly handy when working with data that involves monthly reports, project timelines, or any situation that requires manipulating dates and time intervals. It eliminates the need for manual calculations and allows for efficient data analysis and time-sensitive tasks.
By utilizing the EDATE function, you can focus on your analysis and decision-making without worrying about complex date calculations. Whether you need to shift dates forward or backward, the EDATE function gives you the flexibility to adjust your data with ease.
Now that you understand the basic concept of the EDATE function, let’s dive into the syntax and demonstrate how to use it in Excel.
Syntax of the EDATE Function
The syntax of the EDATE function in Excel is as follows:
=EDATE(start_date, months)
Here is an explanation of each element in the syntax:
start_date: This is the initial date from which you want to add or subtract months. The date should be entered as a valid Excel date or referenced by a cell containing a date.months: This is the number of months that you want to add or subtract from thestart_date. It can be a positive or negative value. A positive value adds months, while a negative value subtracts months.
It is important to note that when using the start_date argument, Excel considers dates after December 31, 1899, as positive values, and dates before that as negative values.
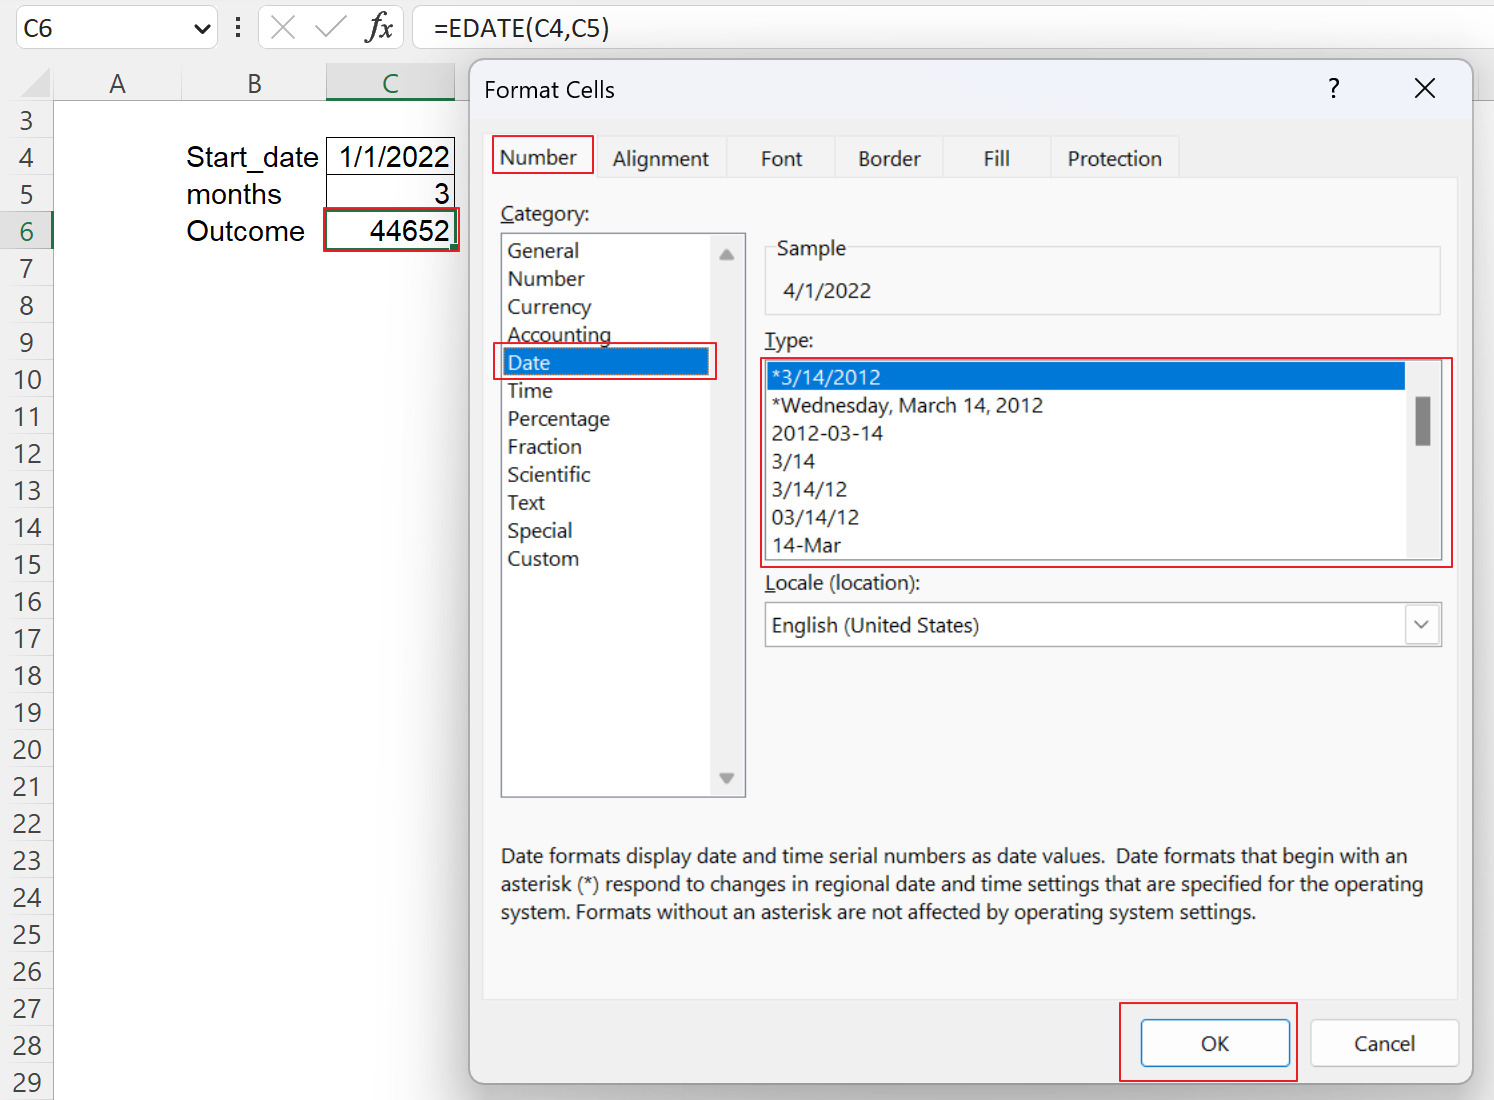
To illustrate this, let’s say we have a start date of January 1, 2022, and we want to add 3 months. The syntax for the EDATE function would be:
=EDATE("1/1/2022", 3)
This formula would return the date April 1, 2022.
Similarly, if we want to subtract 2 months from the start date, the syntax would be:
=EDATE("1/1/2022", -2)
This formula would return the date November 1, 2021.
Now that you understand the syntax of the EDATE function, let’s move on to applying it in Excel with some practical examples.
How to Use the EDATE Function
The EDATE function in Excel is straightforward to use. Follow these steps to utilize it effectively:
- Open Microsoft Excel and select the cell where you want the result of the EDATE function to appear.
- Type the EDATE function’s syntax:
=EDATE(start_date, months). Replacestart_datewith the starting date andmonthswith the number of months you want to add or subtract. - Make sure to enclose the
start_dateargument within quotation marks if you are directly entering the date. Alternatively, you can reference a cell that contains the date. - Press Enter, and Excel will calculate and display the result based on the specified date and number of months.
For example, if you want to add 3 months to the date January 1, 2022, you would enter the following formula in a cell:
=EDATE("1/1/2022", 3)
Excel will return the result as April 1, 2022.
If you prefer to subtract months, you can enter a negative value. For instance, to subtract 2 months from the date January 1, 2022, you would use the following formula:
=EDATE("1/1/2022", -2)
The result would be November 1, 2021.
The EDATE function is versatile and can be combined with other functions to handle more complex calculations. You can use it in combination with functions such as SUM, AVERAGE, IF, and more, to perform advanced calculations based on adjusted dates.
Now that you know how to use the EDATE function, let’s explore some practical examples to further illustrate its functionality.
Example 1: Adding Months to a Date
Let’s say you are managing a project with a starting date of March 1, 2022, and you want to determine the date when the project will be completed by adding 6 months to the starting date using the EDATE function.
To achieve this, follow these steps:
- Select a cell where you want the result to appear.
- Enter the EDATE function with the starting date and the number of months to add. For example,
=EDATE("03/01/2022", 6). - Press Enter, and Excel will calculate and display the result.
Excel will return the result as September 1, 2022, which signifies the completion date of the project after adding 6 months to the starting date.
This example highlights how the EDATE function simplifies date calculations and allows for accurate forecasting and planning.
You can also use cell references instead of directly inputting the date. For instance, if the project starting date is stored in cell A1, and you want the result in cell B1, the formula would be =EDATE(A1, 6).
In this way, if the starting date changes in cell A1, the EDATE function in cell B1 will automatically update the result accordingly.
The EDATE function offers flexibility and convenience when working with time-sensitive projects or any scenario that involves manipulating dates. It eliminates manual calculations and helps ensure accuracy in your data analysis.
Now that you have seen an example of adding months to a date, let’s explore subtracting months in the next example.
Example 2: Subtracting Months from a Date
In some situations, you may need to subtract a specific number of months from a given date. Let’s consider an example where you want to determine the payment due date by subtracting 2 months from a billing date.
To accomplish this using the EDATE function, follow these steps:
- Select a cell to display the result.
- Enter the EDATE function with the billing date and the negative number of months to subtract. For example,
=EDATE("07/15/2022", -2). - Press Enter, and Excel will calculate and display the result.
Excel will return the result as May 15, 2022, which represents the payment due date after subtracting 2 months from the billing date.
By utilizing the EDATE function in this manner, you can easily handle scenarios where you need to calculate dates in the past by subtracting months.
As with the previous example, you have the option to use cell references instead of directly inputting the date. If the billing date is stored in cell A1 and you want the result in cell B1, the formula would be =EDATE(A1, -2).
The EDATE function provides a simple and efficient way to manipulate dates in Excel, whether it’s adding or subtracting months for various calculations and analyses.
Now that you have seen how to subtract months from a date, let’s explore how the EDATE function can be combined with other functions to enhance its functionality.
Example 3: Using the EDATE Function with Other Functions
The EDATE function can be combined with other functions in Excel to perform more complex calculations and achieve specific results. Let’s explore an example where we use the EDATE function in combination with the SUM function.
Imagine you have a sales dataset that includes the date of each transaction and the corresponding sales amount. You want to calculate the total sales for the last 3 months using the EDATE and SUM functions.
Here’s how you can do it:
- Create a column in your dataset where you will input the EDATE function for each transaction. For example, if the date is in column A, enter
=EDATE(A2, -3)in cell B2 to calculate the date 3 months prior to the transaction. - In a separate cell, use the SUM function to sum the sales amounts based on the criteria of the last 3 months. For example, if the sales amounts are in column C, enter
=SUMIFS(C:C, A:A, ">="&B2, A:A, "<="&A2)to calculate the total sales for transactions within the last 3 months.
By using the EDATE function to determine the start date and combining it with the SUMIFS function, you can dynamically calculate the total sales for any given period.
This example demonstrates how the EDATE function can be used in conjunction with other functions to perform advanced calculations based on adjusted dates. You can apply similar logic with functions like AVERAGE, COUNTIFS, or MAX, depending on your specific requirements.
By leveraging the power of combining functions, Excel allows you to perform complex data analysis and calculations efficiently.
Now that you have seen an example of using the EDATE function with other functions, let's move on to discussing some common errors that you may encounter when working with the EDATE function in Excel.
Common Errors with the EDATE Function
While the EDATE function in Excel is a powerful tool for date calculations, it's not immune to errors. Understanding and addressing these common errors can help ensure accurate results. Here are some common errors you may encounter when using the EDATE function:
- #VALUE! error: This error occurs when the supplied arguments are not valid or when the starting date is not recognized as a valid date. Make sure that the start date is correctly formatted as a date or that the cell reference contains a valid date value.
- #NUM! error: This error can occur if the resulting date falls outside the range of valid dates in Excel. Keep in mind that Excel only recognizes dates between January 1, 1900, and December 31, 9999. Double-check your formula and ensure that the resulting date is within this range.
- Incorrect number of months: Ensure that you input the correct number of months to add or subtract. A positive value adds months, while a negative value subtracts months. Miscalculating or selecting the wrong sign can lead to incorrect results.
- Incorrect cell references: When using cell references in the EDATE function, make sure that the referenced cells contain the correct date values. An incorrect cell reference can lead to unexpected results or errors.
- Not updating formulas: If you have formulas that include the EDATE function and you modify the input values or cells referenced in the formula, ensure that the formulas are being updated properly. Check that the formulas are recalculated and displaying the correct results.
By being aware of these common errors and taking precautions to address them, you can minimize the risk of encountering issues and ensure the accuracy of your date calculations using the EDATE function.
Now that you know the common errors associated with the EDATE function, let's move on to some tips and tricks for using this function effectively.
Tips and Tricks for Using the EDATE Function
To make the most of the EDATE function in Excel and improve your date calculations, consider the following tips and tricks:
- Use cell references: Instead of hardcoding dates into the EDATE function, utilize cell references. This allows for easier updating of dates and promotes consistency throughout your spreadsheet.
- Combine with other functions: The EDATE function can be combined with other functions like SUM, AVERAGE, IF, and more. Experiment with different combinations to achieve advanced calculations based on adjusted dates.
- Handle leap year scenarios: When working with leap year dates, make sure to input the correct starting date and adjust the months accordingly. Excel automatically adjusts for leap year in its date calculations.
- Check for valid date ranges: Ensure that the resulting date falls within the range of valid dates recognized by Excel. For any dates outside the range of January 1, 1900 to December 31, 9999, you may encounter errors.
- Test and verify results: After applying the EDATE function, test the results against your expectations. Verify that the calculated dates align with your requirements. If something seems off, double-check your formula and input values.
- Format cells as dates: To enhance readability, format cells containing EDATE function results as dates. You can choose from various date formats available in Excel or customize the format to suit your preferences.
By following these tips and incorporating them into your date calculations, you can ensure accuracy, efficiency, and consistency in your Excel spreadsheets.
The EDATE function is a valuable tool for manipulating dates in Excel, simplifying calculations, and enabling accurate data analysis. With these tips and tricks, you can maximize the functionality of the EDATE function and leverage it effectively for your specific needs.
Now that you have learned some helpful tips and tricks, you are well-equipped to utilize the EDATE function to its full potential in your Excel spreadsheets.