
What is Problem Steps Recorder?
The Problem Steps Recorder (PSR) is a built-in tool in Windows operating systems that helps users capture and document the steps taken to reproduce a problem or error. It is designed to simplify the troubleshooting process by providing a detailed record of actions performed on the computer.
PSR records screenshots of each step, mouse clicks, and keystrokes, along with optional comments. This comprehensive documentation allows technical support personnel or software developers to understand the issue better and provide more effective assistance or resolve the problem.
One of the main advantages of PSR is its simplicity. It does not require any additional software installation or technical expertise to use. It is available in Windows Vista, Windows 7, Windows 8, and Windows 10, making it widely accessible to users across different versions of the operating system.
PSR is particularly helpful for troubleshooting software or application errors, documenting software bugs, and providing instructions on replicating complex issues. It is also a valuable tool for training purposes, as it allows users to create step-by-step guides or tutorials. Furthermore, PSR can be used in both personal and professional settings, making it versatile for various use cases.
With its user-friendly interface and comprehensive recording capabilities, PSR serves as an efficient and practical solution for capturing and sharing troubleshooting steps. By using PSR, users can save time and effort in explaining and resolving technical issues, leading to faster problem resolution and improved productivity.
How to Open Problem Steps Recorder
Opening the Problem Steps Recorder (PSR) in Windows is a straightforward process. Follow the steps below to access this useful tool:
- Click on the “Start” button in the bottom left corner of the desktop.
- Type “Problem Steps Recorder” in the search bar.
- From the search results, click on the “Problem Steps Recorder” option.
Alternatively, you can use the “Run” dialog box to open PSR:
- Press the “Windows” key + “R” on your keyboard to open the Run dialog box.
- Type “psr” in the Run dialog box.
- Click on the “OK” button or press “Enter” to open the Problem Steps Recorder.
Once you have performed these steps, the Problem Steps Recorder window will open, ready for you to start recording your steps.
Please note that the availability of the Problem Steps Recorder may vary depending on the version of Windows you are using. It is included in Windows Vista, Windows 7, Windows 8, and Windows 10, but may not be available in earlier versions.
It is essential to have administrative privileges to open PSR on your computer. If you are using a shared computer or an account with limited privileges, you may need to consult with your system administrator or log in with an administrator account to access PSR.
Using Problem Steps Recorder
Problem Steps Recorder (PSR) offers a simple and effective way to record and document steps to reproduce issues. Follow the steps below to make the most out of PSR:
- Step 1: Starting a recording
- Step 2: Recording steps
- Step 3: Adding comments
- Step 4: Stopping the recording
- Step 5: Saving the recording
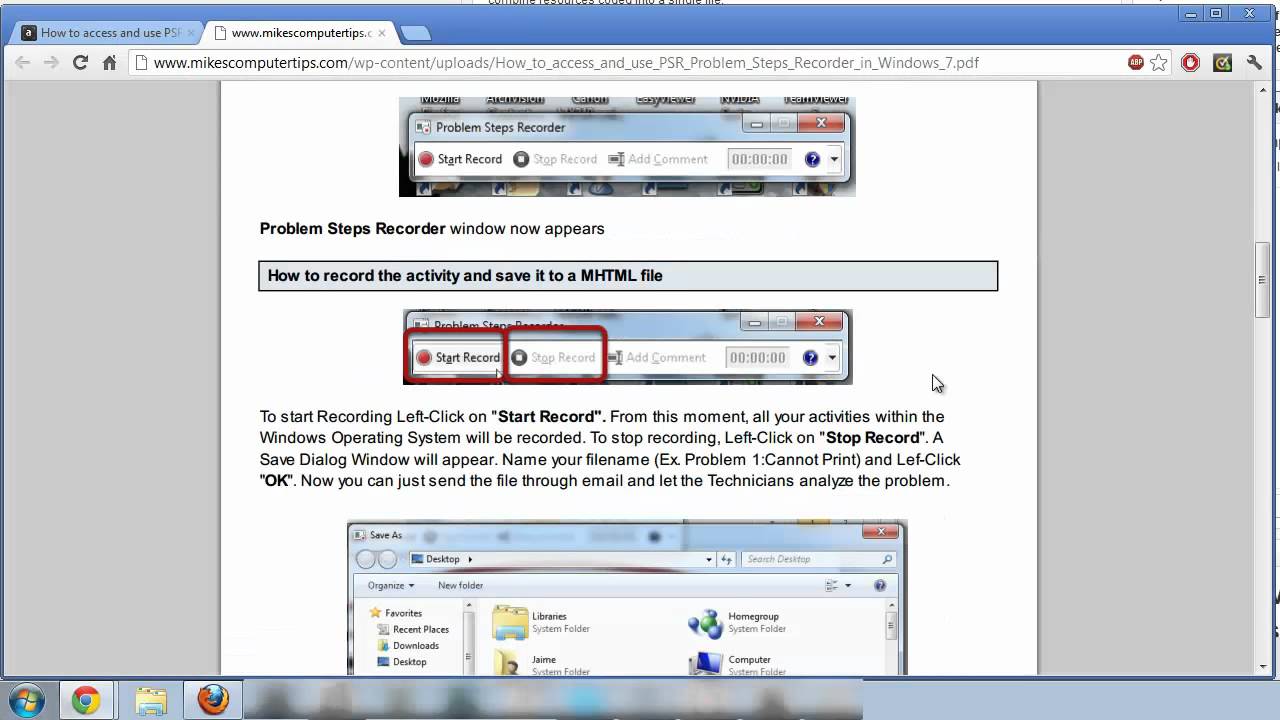
Once you have opened PSR, click on the “Start Record” button to begin the recording process. PSR will capture screenshots and record every action you take on your computer.
Perform the actions necessary to replicate the problem or error you are experiencing. PSR records each step, including mouse clicks and keystrokes, providing a detailed snapshot of the troubleshooting process.
During the recording, you can add comments to highlight specific details or provide additional information. Click on the “Add Comment” button and enter your comment in the text box. Comments can be inserted at any point during the recording to provide context and clarity.
Once you have completed the steps, click on the “Stop Record” button in PSR to finish the recording. PSR will prompt you to save the recorded steps for further use.
After stopping the recording, PSR will prompt you to save the recorded steps as a .zip file. Choose a location on your computer where you want to save the file and click on the “Save” button. The .zip file will contain an HTML document with all the recorded steps and comments.
By following these steps, you can create a comprehensive record of the troubleshooting process, which can be easily shared with technical support or development teams for further analysis and assistance.
Keep in mind that PSR may have limitations in capturing certain types of actions or interactions, such as dragging and dropping or certain keystrokes. It is always recommended to review the recorded steps to ensure all relevant information is captured accurately.
Remember to use PSR responsibly and respect privacy and security considerations while recording steps. Avoid capturing sensitive information or personal data that may be present on your screen.
Step 1: Starting a Recording
To effectively use the Problem Steps Recorder (PSR) to capture and document troubleshooting steps, you need to start a recording. Follow the instructions below to begin the recording process:
- Open the PSR tool on your Windows computer. You can do this by clicking the “Start” button and typing “Problem Steps Recorder” in the search bar. Select the “Problem Steps Recorder” option from the search results.
- Once the PSR window is open, click on the “Start Record” button to initiate the recording. This will prompt PSR to start capturing your actions on the screen.
- At this point, you can reproduce the problem or error you are encountering on your computer. Navigate through the necessary steps and perform any actions required to replicate the issue.
- As you proceed, PSR will capture screenshots of each step and record every mouse click and keystroke you make. This ensures that every action performed during the troubleshooting process is documented accurately.
- It is important to be thorough and deliberate in performing the steps. Take your time to ensure that all relevant actions are recorded, as this will help in providing a comprehensive overview of the troubleshooting process.
Starting the recording is the first crucial step in utilizing PSR effectively. By following these instructions, you will be ready to capture the necessary steps required to troubleshoot and document a problem or error on your computer.
Note that PSR will continually record all the actions until the recording is stopped. Therefore, it is essential to proceed carefully and intentionally during the troubleshooting process, ensuring that any irrelevant actions or sensitive information are avoided or minimized in the recorded steps.
Step 2: Recording Steps
Once you have started the recording in the Problem Steps Recorder (PSR), it’s time to capture the steps necessary to reproduce the problem or error. Follow these guidelines to ensure a comprehensive and accurate recording:
- Perform the steps: Carry out the sequence of actions required to replicate the issue or error. Whether it’s a software bug or a specific problem you’re facing, make sure to go through each step systematically.
- Take note of timing: Keep in mind that PSR captures everything that happens on the screen during the recording. Pay attention to the timing of your actions to ensure the recorded steps are synced with your intended workflow.
- Mouse clicks: PSR will detect and record every mouse click you make. Clicking on buttons, menu items, or any other interactive elements on the screen will be captured and documented.
- Keystrokes: Any keyboard input you provide will also be recorded by PSR. This includes typing in text fields, pressing shortcut keys, or executing commands using the keyboard.
- Pause between steps: When transitioning between steps, it’s a good practice to pause briefly. This allows PSR to capture individual screenshots for each step, making it easier to follow your troubleshooting process.
- Be deliberate and clear: While performing the steps, make sure to be deliberate and clear in your actions. Avoid rushing or skipping any necessary actions, as this may lead to incomplete recordings or confusion during troubleshooting.
By adhering to these guidelines, you can ensure that the recorded steps accurately reflect your troubleshooting process. This will facilitate effective communication and understanding when seeking assistance or sharing the recorded steps with technical support or development teams.
Remember, the goal is to provide a detailed and concise account of the steps taken. Take the time to verify the accuracy of each step recorded, ensuring that the screenshots and actions align with your intended workflow.
Following these practices will enable you to create a valuable resource that can aid in the resolution of issues, software bugs, or any other problems you may encounter.
Step 3: Adding Comments
Adding comments in the Problem Steps Recorder (PSR) can enhance the clarity and context of your recorded steps. It allows you to provide additional information or explanations regarding specific actions or problems. Follow these steps to effectively add comments to your PSR recording:
- During the recording: While the recording is in progress, click on the “Add Comment” button in the PSR window. A text box will appear on the screen where you can enter your comment.
- Adding relevant information: Use the comment feature to provide essential details about each step. This could include specific settings, error messages, or any observations that may be helpful in understanding the problem.
- Clarify complex actions: If any step requires additional explanation due to its complexity, use comments to break down the process or provide step-by-step instructions.
- Highlight important details: Use comments to draw attention to critical aspects of the troubleshooting process. This could include emphasizing a particular setting, pointing out a specific error message, or identifying potential causes or solutions.
- Be concise and specific: Keep your comments brief and to the point. Avoid unnecessary details that might overshadow the main purpose of the comment.
- Place comments strategically: Insert comments at the relevant point within the recording timeline. This ensures that they are associated with the appropriate step, making it easier for viewers to understand their context.
By adding comments, you can provide valuable insights and explanations that enrich the recording and help others better understand the troubleshooting process. This feature is especially useful when sharing the recording with technical support or development teams for assistance.
Remember to review and proofread your comments before finalizing the recording. Ensure that the language used is clear, concise, and accurately conveys the intended meaning. Verify that each comment adds clarity and additional relevant information to the troubleshooting steps.
By following these steps and using comments effectively, you can enhance the value and understanding of your PSR recording, leading to more efficient and effective troubleshooting and problem resolution.
Step 4: Stopping the Recording
To conclude the recording process in the Problem Steps Recorder (PSR), you need to stop the recording. Follow these simple steps to stop the recording and prepare for the next steps:
- Completing the troubleshooting process: Ensure that you have performed all the necessary steps to reproduce the problem or error. Take the time to verify that you have covered everything in your troubleshooting process before moving to the next step.
- Click on the “Stop Record” button: In the PSR window, click on the “Stop Record” button to halt the recording process. This will indicate to PSR that you have finished capturing the steps.
- Confirmation prompt: Once you click on “Stop Record,” PSR will prompt you to confirm the stop action. This is a precautionary measure to prevent accidental stopping of recordings.
- Review the recorded steps: After stopping the recording, take some time to review the captured steps. This allows you to ensure that all the necessary actions and details are included in the recording.
- Make modifications if needed: If you identified any missing or incorrect steps during the review, you can edit the recording to add, delete, or modify the recorded steps. PSR provides a simple and intuitive editing interface to make these modifications.
Stopping the recording is a critical step in the PSR process, as it finalizes the capturing of troubleshooting steps and prepares the recording for saving and sharing. It allows you to have a comprehensive record of the troubleshooting process to aid in problem resolution and communication with technical support or development teams.
Remember to stop the recording when all the essential steps have been recorded. Avoid unnecessary post-recording activities or actions that do not contribute to the understanding of the issue, as this may clutter the recording and potentially confuse viewers.
By following these steps and taking time to review the recorded steps, you can ensure that the troubleshooting process is accurately captured, increasing the effectiveness of your PSR recording for further analysis and assistance.
Step 5: Saving the Recording
Once you have completed the troubleshooting process and stopped the recording in the Problem Steps Recorder (PSR), it’s time to save the recorded steps. Follow these simple steps to save your PSR recording:
- Review the recorded steps: Before proceeding with the saving process, take a moment to review the captured steps. Ensure that all the necessary actions and details are included and that the recording accurately reflects the troubleshooting process.
- Click on the “Save” button: In the PSR window, click on the “Save” button to initiate the saving process. PSR will prompt you to choose a location on your computer where you want to save the recording.
- Select a save location: Browse to the desired location on your computer where you want to save the PSR recording. Choose a directory or folder that you can easily access later, such as your desktop or a designated troubleshooting folder.
- Enter a file name: Assign a descriptive file name to your PSR recording. This will help you identify it easily in the future. Consider using an informative title that reflects the content of the recording.
- Save the recording: After selecting a save location and providing a file name, click on the “Save” button to save the PSR recording as a .zip file. PSR will compress the recording along with any comments or additional files into a single compressed file.
- Locate the saved recording: Once the saving process is complete, navigate to the chosen save location to access the saved PSR recording. The .zip file will contain an HTML document that includes the recorded steps, comments, and any added files.
Saving the recording ensures that you have a permanent record of the troubleshooting steps, which can be easily accessed and shared for further analysis or assistance. It also allows you to keep a systematic record of your troubleshooting efforts for future reference.
Remember to choose a save location that is easily accessible and consider organizing your PSR recordings in a dedicated folder or directory. This will help you stay organized and locate specific recordings quickly when needed.
By following these steps, you can effectively save your PSR recording and maintain a comprehensive record of the troubleshooting process, enabling better problem resolution and collaboration with technical support or development teams.
Editing a Saved Recording
Editing a saved recording in the Problem Steps Recorder (PSR) allows you to make modifications or add additional details to the recorded steps. Follow these steps to effectively edit a saved PSR recording:
- Locate the saved recording: Navigate to the location where you saved the PSR recording. Identify the .zip file that contains the recorded steps, comments, and any additional files.
- Extract the contents: Extract the contents of the .zip file to a location on your computer using an extraction tool such as File Explorer. This will create a folder containing the HTML document and any associated files.
- Edit the HTML document: Open the HTML document in a web browser, such as Google Chrome or Microsoft Edge. This will display the recorded steps along with any comments or annotations.
- Review the recorded steps: Take the time to review the recorded steps in the HTML document. Identify any missing or incorrect information that needs to be edited or updated.
- Make modifications: To edit the recorded steps or comments, make the necessary changes directly in the HTML document. You can add, delete, or modify the recorded steps and associated comments as needed to improve clarity or accuracy.
- Save the edited document: After making the desired modifications, save the HTML document. This will update the changes made to the recorded steps and comments.
- Repackage the contents: Once you have finished editing the document, compress the HTML document and any associated files back into a .zip file. This ensures that all the modifications are contained in a single compressed file.
- Keep a backup: It’s a good practice to keep a backup of the original saved recording before editing. This allows you to revert back to the original recording if needed.
By following these steps, you can effectively edit a saved PSR recording, allowing you to refine and enhance the troubleshooting steps. Editing provides an opportunity to ensure accuracy, clarity, and completeness in the recorded documentation.
Remember that PSR does not provide extensive editing capabilities, but editing the HTML document can still offer valuable modifications to the recorded steps and comments. Consider providing additional explanations, clarifications, or updates to enhance the overall quality of the recording.
By being diligent and thorough in the editing process, you can create a more effective and informative PSR recording, ultimately aiding in better problem resolution and communication with technical support or development teams.
Sharing a Recording
Sharing a recording created with the Problem Steps Recorder (PSR) allows you to communicate the troubleshooting process and seek assistance from others. Follow these steps to effectively share a PSR recording:
- Locate the saved recording: Navigate to the location where you saved the PSR recording on your computer. Identify the .zip file that contains the recorded steps and related files.
- Prepare the recording: If desired, extract the contents of the .zip file to a folder on your computer to access the recording more conveniently.
- Choose a sharing method: Depending on your preferences and the intended recipient, select the most appropriate method to share the recording. This can include email attachments, cloud storage services, file sharing platforms, or collaboration tools.
- Compress the recording (optional): If the file size of the recording is large, consider compressing it into a smaller format, such as a .zip or .rar file. This simplifies the sharing process and reduces the file size for quicker transmission.
- Attach or upload the recording: Follow the instructions specific to the sharing method you have chosen to attach or upload the recording. This typically involves selecting the file and adding it as an attachment or uploading it to the designated platform.
- Include supporting information: To provide context and enhance understanding, consider including relevant details in the communication accompanying the shared recording. This can include a description of the problem, any additional observations, or specific questions you may have.
- Send or share the recording: Once the recording is properly attached or uploaded, send the email, share the link, or make the recording available for viewing or downloading according to the chosen sharing method.
By sharing the PSR recording, you can effectively communicate the troubleshooting steps to technical support or development teams, allowing them to review and analyze the issue in-depth. The recording serves as a comprehensive visual guide, providing valuable insights into the problem you encountered.
When sharing the recording, ensure that the recipients have the necessary tools or software to open and view the .zip file or extracted contents. It is also helpful to communicate the purpose of the recording and provide any additional instructions or context to aid in their understanding.
Remember to keep a backup of the original saved recording for your records. This ensures that you can refer back to the original recording if needed, especially if you plan to make further edits or revisions to the shared recording.
By following these steps, you can effectively share your PSR recording, enabling collaboration and assistance in resolving the problem or error you encountered.
Best Practices for Using Problem Steps Recorder
When utilizing the Problem Steps Recorder (PSR), incorporating these best practices can enhance the effectiveness and efficiency of your troubleshooting process:
- Provide clear and concise descriptions: When adding comments to the recording or communicating about the problem, use simple and specific language to describe actions, error messages, or observations. This aids in better understanding and avoids confusion.
- Capture relevant information: Focus on capturing the steps and details that are directly related to the problem or error you are encountering. Avoid including unrelated actions or excessive information that might distract or confuse viewers.
- Double-check before recording: Before starting the recording, double-check to ensure that all necessary applications, windows, or settings are visible on the screen. This saves time and ensures that all relevant steps are captured in the recording.
- Ensure privacy and protection: Avoid recording sensitive information or personal data that may be displayed on the screen. Review the captured steps to ensure that no confidential or private information is included in the recording.
- Review and edit recordings: After stopping the recording, take the time to review and edit the captured steps if needed. This ensures accuracy and clarity in the troubleshooting process, leading to more effective communication and problem resolution.
- Organize and label recordings: Keep a well-organized system for saving and labeling your PSR recordings. Use informative file names or tags that indicate the problem, date, or relevant keywords. This facilitates easy retrieval and reference in the future.
- Document additional troubleshooting steps: While PSR is a valuable tool, it may not capture all troubleshooting actions. Consider creating supplementary documentation, such as text notes or screenshots, to provide a comprehensive overview of the troubleshooting process.
- Share recordings with relevant context: When sharing the PSR recording with technical support or development teams, provide a concise overview of the problem, steps taken, and any relevant observations. This helps recipients understand the context and efficiently assist you.
- Keep backups of recordings: It is advisable to maintain backups of your PSR recordings, especially before making any edits or sharing them. This allows you to preserve the original recordings in case of accidental deletion or the need to revert back to the unedited version.
- Regularly update your software: Ensure that your Windows operating system and PSR tool are up to date. Microsoft periodically releases updates and improvements that may enhance the functionality and reliability of PSR.
By following these best practices, you can optimize your use of the Problem Steps Recorder and maximize its effectiveness in troubleshooting and problem resolution. These guidelines promote clear communication, accuracy, and privacy, ultimately leading to more efficient assistance and successful outcomes.
Troubleshooting Common Issues
While using the Problem Steps Recorder (PSR) can greatly assist in troubleshooting problems or errors, certain common issues may arise. Understanding and addressing these common problems can ensure a smooth troubleshooting experience. Here are some common issues and their potential solutions:
- Recording gaps: At times, PSR may not capture every single action or step due to various reasons. To minimize recording gaps, make sure to perform actions slowly and deliberately, allowing PSR to capture each step accurately. Additionally, check that there are no overlapping windows or pop-ups obscuring the recording area.
- Access denied error: If you encounter an “Access Denied” error while using PSR, it may be due to insufficient user permissions. To resolve this, ensure that you have administrative privileges on your Windows account or consult with your system administrator for assistance.
- Incomplete or missing screenshots: If you notice that certain screenshots are incomplete or missing altogether in the recording, it could be due to various factors. One common reason is when the recording window is minimized during a step. To address this, make sure to keep the recording window in focus and fully visible throughout the troubleshooting process.
- Failure to record certain actions: PSR may not capture some specific actions, such as dragging and dropping or certain keyboard shortcuts. These limitations are due to the way PSR records inputs. To overcome this, consider providing additional context or describing the unrecorded actions in the comments or accompanying documentation.
- Technical issues: Occasionally, technical issues may arise when using PSR, such as program crashes or freezing. To mitigate these problems, ensure that your Windows operating system and PSR tool are up to date, as updates often address known issues. Additionally, consider restarting your computer, which can resolve temporary glitches or conflicts.
If you encounter any of these problems, it is recommended to explore potential solutions or seek additional assistance. The Windows support documentation or online forums can provide valuable insights and troubleshooting steps specific to your situation.
Remember to document any troubleshooting steps you take to address these common issues. These steps can serve as a valuable reference for future use and can be shared with technical support if needed.
By being aware of these common issues and their respective solutions, you can troubleshoot more effectively, making the most out of the Problem Steps Recorder to document and resolve problems or errors.