
Check for Errors
When Windows Media Player fails to burn a CD, it’s essential to first check for any errors that might be causing the issue. Errors can occur due to various reasons, such as corrupted files, incompatible formats, or hardware conflicts. Here are some troubleshooting steps to help you identify and resolve any potential errors:
1. Check the error message: Pay attention to any error messages or notifications displayed by Windows Media Player. These messages often provide helpful hints on the cause of the issue.
2. Verify the file format: Ensure that the audio or media files you’re trying to burn are compatible with Windows Media Player. It supports popular formats like MP3, WMA, WAV, and more. If you’re attempting to burn an unsupported file format, consider converting it to a compatible format using a third-party conversion tool.
3. Scan for malware: Malware can sometimes interfere with the burning process. Run a reliable antivirus scan to ensure that your system is free from any malicious software that might be causing the issue.
4. Update Windows Media Player: It is important to keep your Windows Media Player up to date. Check for updates and install any available patches or updates to ensure that you’re using the latest version of the software.
5. Check the disc: Examine the blank CD or DVD for any physical damage or scratches. Even minor scratches can disrupt the burning process. If you notice any damage, try using a different blank disc.
6. Restart your computer: A simple restart can sometimes resolve minor software glitches. Restart your computer and try burning the CD again after the restart.
7. Temporarily disable third-party applications: Some third-party applications, such as antivirus software, may interfere with the burning process. Temporarily disable these applications and attempt to burn the CD again to see if the issue is resolved.
8. Check CD/DVD drive drivers: Ensure that the drivers for your CD/DVD drive are up to date. Outdated or corrupt drivers can cause issues with CD burning. Visit the manufacturer’s website for your CD/DVD drive to download and install the latest drivers.
By following these steps and checking for errors, you can troubleshoot the issue preventing Windows Media Player from burning a CD. Remember to test each step individually to identify the specific cause and solution for your situation. If you continue to experience issues, move on to the next troubleshooting step in the list.
Update Windows Media Player
One of the common reasons why Windows Media Player fails to burn a CD is an outdated version of the software. Updating Windows Media Player to the latest version can often resolve compatibility issues and provide necessary bug fixes. Here’s how you can update Windows Media Player:
1. Check for updates: Open Windows Media Player and navigate to the Help menu. Click on the “Check for Updates” option to search for any available updates. If updates are found, follow the on-screen instructions to install them.
2. Enable automatic updates: To ensure that Windows Media Player stays up to date, you can enable the automatic update feature. Go to the Tools menu, select Options, and navigate to the Player tab. Check the box that says “Download codecs automatically” to enable this feature.
3. Enable Windows automatic updates: Sometimes, Windows Media Player updates are bundled with Windows system updates. To ensure you have the latest version of Windows Media Player, make sure Windows automatic updates are enabled. Go to the Control Panel, open Windows Update, and click on the “Change settings” link on the left side of the window. Choose the option that suits you best, either “Install updates automatically” or “Check for updates but let me choose whether to download and install them.”
4. Download from Microsoft website: If Windows Media Player fails to update through the aforementioned methods, you can manually download the latest version from the official Microsoft website. Go to the Windows Media Player download page and follow the instructions provided to download and install the most recent version compatible with your operating system.
By keeping Windows Media Player updated, you can ensure that you have the latest features, bug fixes, and optimizations that can improve its performance, compatibility, and CD burning capabilities.
Remember to periodically check for updates and install them as they become available. Updating Windows Media Player is a simple yet effective troubleshooting step that can often resolve burning issues. If updating doesn’t solve the problem, continue troubleshooting using the next steps in the list.
Check Burning Settings
When Windows Media Player fails to burn a CD, it’s important to check the burning settings to ensure they are properly configured. Incorrect settings can cause issues with the burning process. Here’s how you can check and adjust the burning settings in Windows Media Player:
1. Open Windows Media Player: Launch Windows Media Player by searching for it in the Start menu or clicking on its desktop shortcut.
2. Navigate to the Burn tab: Click on the “Burn” tab at the top of the Windows Media Player interface. This will bring you to the CD/DVD burning section.
3. Check the burn speed: In the burn tab, locate the burn speed setting. By default, Windows Media Player selects the “Fast” option for burning speed. However, some CD/DVD drives may not support faster speeds. Try reducing the burn speed by selecting a lower value from the drop-down menu. Slower burn speeds can sometimes result in more successful burns.
4. Configure the burn list: Ensure that the files you want to burn are correctly added to the burn list. If the files are not present or there are duplicate entries, remove any unnecessary items. To add files, simply drag and drop them into the burn list or use the “Add to burn list” button.
5. Select the correct disc format: Consider the type of disc you are using and verify that the correct format is selected. Windows Media Player supports various formats like audio CD, data CD, and data DVD. Select the appropriate format based on your requirements.
6. Adjust the burn settings: Click on the “More Options” button to access additional burn settings. Here, you can adjust the burn quality, choose to eject the disc after burning, and enable crossfading between tracks, among other options. Make sure these settings are configured as desired.
7. Check available disc space: Verify that there is sufficient space on the disc to accommodate the files you intend to burn. If the disc is full or nearly full, consider using a larger capacity disc or removing some files to free up space.
By checking and adjusting the burning settings in Windows Media Player, you can ensure that the software is set up optimally for successful CD burning. Once you have reviewed and made any necessary changes, attempt to burn the CD again.
If the issue persists, continue to explore other troubleshooting steps to identify and resolve the problem.
Use a Different Blank CD or DVD
If you’re encountering issues with Windows Media Player not being able to burn a CD, it could be due to a problem with the blank CD or DVD itself. Sometimes, low-quality or damaged discs can cause compatibility issues or hinder the burning process. Here are a few steps to try using a different blank CD or DVD:
1. Remove the current disc: Eject the current blank disc from your CD/DVD drive and inspect it for any visible signs of damage, scratches, or smudges. If you notice any issues, discard the disc as it may be causing the problem.
2. Try a different blank disc: Grab a different blank CD or DVD from your collection. It’s always a good idea to use high-quality, reputable brands to ensure better compatibility and durability. Insert the new disc into your CD/DVD drive.
3. Check the burn settings: Before attempting to burn using the new disc, double-check the burn settings in Windows Media Player. Make sure the appropriate disc format is selected and that the burn speed is set to a suitable rate (either Auto or a specific speed).
4. Add files to the burn list: If necessary, reselect the files you wish to burn and add them to the burn list in Windows Media Player. Ensure that these files are compatible with the chosen disc format.
5. Start the burn process: Once you have confirmed the burn settings and added the desired files, initiate the burning process by clicking on the “Start burn” button or a similar option, depending on the version of Windows Media Player you are using.
By using a different blank CD or DVD, you eliminate the possibility of the original disc being the cause of the burning issue. High-quality discs, free from damage and scratches, are more likely to result in a successful burn.
If the problem still persists after using a different blank disc, there may be other underlying factors causing the burning problem. In such cases, continue troubleshooting using the next steps to identify and address the root cause.
Clean the CD/DVD Drive
When facing difficulties with burning a CD using Windows Media Player, it’s possible that the CD/DVD drive itself is dirty or contaminated. Dust, debris, or fingerprints on the drive’s lens can interfere with the burning process and lead to errors. Cleaning the CD/DVD drive can often resolve these issues. Here’s how you can clean the drive:
1. Gather the necessary tools: Before proceeding, make sure you have a clean, soft cloth or a specialized CD/DVD lens cleaning kit. Avoid using rough materials or harsh chemicals as they can damage the drive.
2. Power down the computer: Shut down your computer completely before attempting to clean the CD/DVD drive. This will prevent any accidental damage to the drive or interference with the cleaning process.
3. Open the CD/DVD drive tray: Locate the button or control on your CD/DVD drive that allows you to eject the tray. Press the button or use the appropriate software command to open the tray and expose the lens.
4. Gently clean the lens: If using a specialized CD/DVD lens cleaning kit, follow the instructions provided by the manufacturer. If using a soft cloth, ensure it is clean and free from lint. Gently wipe the lens in a circular motion to remove any dust or debris. Avoid applying too much pressure as this can damage the lens.
5. Close the CD/DVD drive tray: After cleaning the lens, carefully close the CD/DVD drive tray to prevent further dust or debris from entering the drive.
6. Restart the computer: Once the drive is clean and the tray is closed, power on your computer and launch Windows Media Player again.
7. Attempt to burn the CD: Insert a blank CD into the cleaned drive and attempt to burn your desired files using Windows Media Player. Hopefully, the cleaning process has resolved any issues caused by a dirty drive and allowed for successful burning.
Regularly cleaning your CD/DVD drive can help prevent dirt and debris buildup, ensuring optimal performance when it comes to burning CDs. It’s recommended to clean the drive periodically or whenever you encounter issues with burning.
If cleaning the drive does not solve the problem, there may be other underlying causes that need to be addressed. Continue troubleshooting using the next steps to pinpoint and resolve the issue.
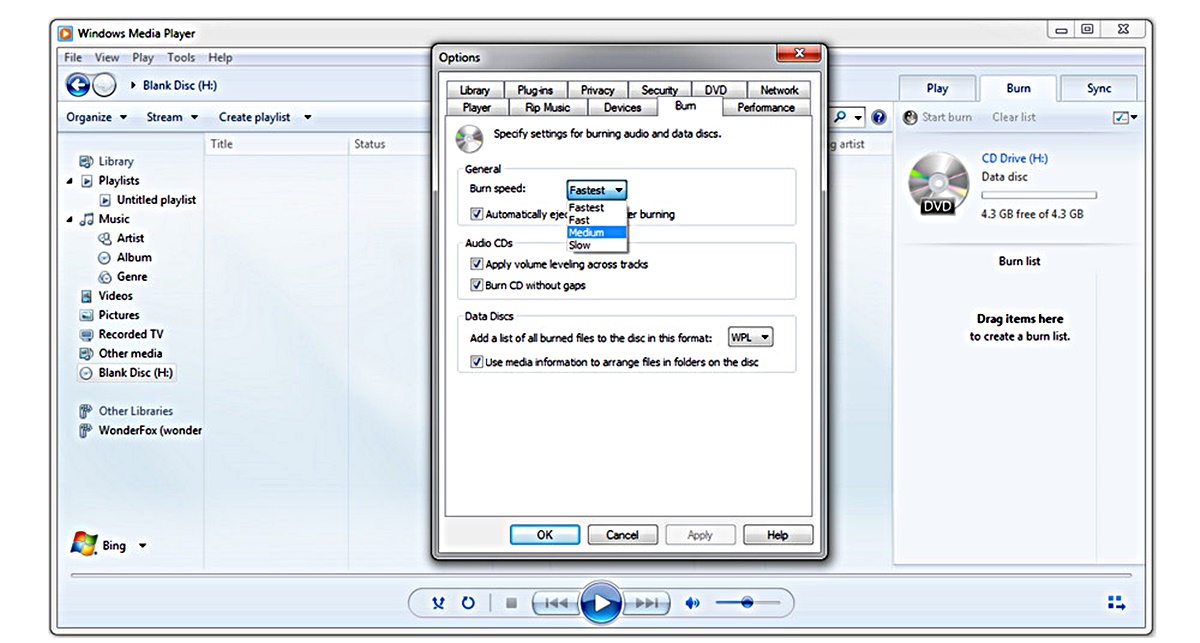
Increase the Burn Speed
Windows Media Player allows users to adjust the burn speed when creating CDs. In some cases, burning at a slower speed can result in more reliable and error-free burns. However, increasing the burn speed may also help resolve burning issues under certain circumstances. Here’s how you can increase the burn speed in Windows Media Player:
1. Open Windows Media Player: Launch Windows Media Player by searching for it in the Start menu or clicking on its desktop shortcut.
2. Navigate to the Burn tab: Click on the “Burn” tab at the top of the Windows Media Player interface. This will open the CD/DVD burning section.
3. Adjust the burn speed: Look for the burn speed settings, which is usually displayed as a drop-down menu. By default, Windows Media Player may be set to the “Fast” option. Try increasing the burn speed by selecting a faster option such as “Medium” or “Fast.” However, be cautious not to select a speed that is higher than what your CD/DVD drive supports.
4. Plan for longer burn times: It is worth noting that increasing the burn speed may result in shorter burn times. However, burning at faster speeds can potentially lead to more errors due to the increased strain on the drive. Consider starting with a slight increase in speed and monitor the results. If the burning process fails, revert to the previous slower speed.
5. Initiate the burn process: Once you have selected the desired burn speed, proceed to add the files to the burn list in Windows Media Player. Verify that the files are in a compatible format for burning and that there is enough space on the disc for the selected files.
6. Start the burn: Click on the “Start burn” button or a similar option available in Windows Media Player to commence the burning process.
Increasing the burn speed in Windows Media Player can potentially resolve burning issues by allowing for faster and more efficient data transfer. However, keep in mind that faster burn speeds may also increase the risk of errors, so it’s important to strike a balance. It is advisable to test a few different burn speeds and monitor the results to find the optimal speed that works best with your CD/DVD drive and disc quality.
If increasing the burn speed doesn’t resolve the burning problem, continue troubleshooting using the next steps to identify and address the root cause.
Enable CD Recording
If Windows Media Player is unable to burn a CD, it’s essential to verify that CD recording is enabled on your computer. Enabling CD recording allows Windows Media Player to access and utilize your CD/DVD drive for creating CDs. Here’s how you can enable CD recording:
1. Open Windows Media Player: Launch Windows Media Player by searching for it in the Start menu or clicking on its desktop shortcut.
2. Go to Options: Click on the “Tools” menu at the top of the Windows Media Player interface. From the drop-down menu, choose “Options.”
3. Navigate to the Burn tab: In the Options window, select the “Burn” tab. This will open the settings related to CD burning.
4. Check CD recording settings: Look for a checkbox or option that says “Enable CD recording” or something similar. Ensure that this option is checked to enable CD recording functionality in Windows Media Player.
5. Verify drive compatibility: Windows Media Player will display the CD/DVD drives available on your computer. Make sure that the drive you want to use for burning is listed and selected as the default drive for CD recording.
6. Apply the changes: After enabling CD recording and verifying the drive settings, click on the “Apply” or “OK” button to save the changes.
7. Restart Windows Media Player: Close and relaunch Windows Media Player to ensure that the changes take effect.
By enabling CD recording in Windows Media Player, you grant the necessary access and permissions for the software to interact with your CD/DVD drive and perform CD burning tasks. This ensures that Windows Media Player can recognize and utilize the drive for creating CDs.
If CD recording was already enabled, disabling and re-enabling it can sometimes resolve any underlying issues that may be preventing successful CD burning.
Once CD recording is enabled, attempt to burn a CD using Windows Media Player to see if the issue is resolved. If the problem persists, continue troubleshooting with the next steps to identify any additional factors causing the burning problem.
Reset Windows Media Player Library
If you’re experiencing difficulty with burning a CD using Windows Media Player, resetting the media library might help resolve any underlying issues. Resetting the library will clear the database and rebuild it from scratch, potentially resolving any database-related problems. Here’s how you can reset the Windows Media Player library:
1. Close Windows Media Player: If it is currently running, close Windows Media Player to ensure that all processes related to it are stopped.
2. Open the Run dialog: Press the Windows key + R on your keyboard to open the Run dialog box.
3. Type the command: In the Run dialog box, type or paste the following command: %LOCALAPPDATA%\Microsoft\Media Player
4. Delete the database files: After pressing Enter or clicking OK, a folder will open containing several files. Select all the files in the folder and delete them. Note that this step will clear your media library, so make sure to back up any important playlists or media files beforehand.
5. Restart Windows Media Player: Once the files are deleted, restart Windows Media Player. It will automatically scan and rebuild the media library.
6. Add media files back: After the media library has been reset, you can add your media files back into Windows Media Player. This can be done by either dragging and dropping the files into the Windows Media Player interface or selecting the “Add to Library” option under the “Organize” tab in the toolbar.
Resetting the Windows Media Player library can resolve issues caused by corrupted or incorrect database information, allowing for a fresh start with a clean media library. This process will not affect your actual media files; it will only clear and rebuild the library database.
After resetting the library, attempt to burn a CD using Windows Media Player to see if the problem has been resolved. If the burning issue persists, continue troubleshooting with the next steps to identify and address any other potential causes.
Restart Windows Media Player Network Sharing Service
Windows Media Player Network Sharing Service is a background service that allows sharing media libraries between devices on the same network. If this service encounters any issues, it can interfere with CD burning functionality. Restarting the service can often resolve the problem. Here’s how you can restart the Windows Media Player Network Sharing Service:
1. Open the Run dialog: Press the Windows key + R on your keyboard to open the Run dialog box.
2. Type the command: In the Run dialog box, type or paste the following command: services.msc
3. Locate the service: In the Services window that appears, scroll down the list to find “Windows Media Player Network Sharing Service.”
4. Restart the service: Right-click on the “Windows Media Player Network Sharing Service” and select “Restart” from the context menu. Alternatively, you can also select “Stop” and then “Start” to achieve the same effect.
5. Wait for the service to restart: Allow a few moments for the service to stop and restart. You can monitor the status of the service in the “Status” column of the Services window.
6. Close the Services window: Once the service has restarted successfully, close the Services window.
7. Restart Windows Media Player: After restarting the service, relaunch Windows Media Player to ensure the changes take effect.
By restarting the Windows Media Player Network Sharing Service, you grant it a fresh start and clear any potential issues that might have been affecting CD burning functionality. This service plays a crucial role in sharing media libraries, so restarting it can help ensure it is functioning properly.
After restarting the service and relaunching Windows Media Player, attempt to burn a CD to see if the issue has been resolved. If CD burning continues to be problematic, proceed with further troubleshooting steps to identify and address any other potential causes.
Disable Windows Media Player Network Sharing Service
In some cases, disabling the Windows Media Player Network Sharing Service can resolve CD burning issues in Windows Media Player. This service enables the sharing of media libraries between devices on the same network. However, if you do not require this feature or suspect it is causing conflicts, disabling the service may be a viable solution. Here’s how you can disable the Windows Media Player Network Sharing Service:
1. Open the Run dialog: Press the Windows key + R on your keyboard to open the Run dialog box.
2. Type the command: In the Run dialog box, type or paste the following command: services.msc
3. Locate the service: In the Services window that appears, scroll down the list to find “Windows Media Player Network Sharing Service.”
4. Disable the service: Right-click on the “Windows Media Player Network Sharing Service” and choose “Properties” from the context menu.
5. Change the startup type: In the Properties window, select the “Startup type” drop-down menu and choose “Disabled.”
6. Apply the changes: Click on the “Apply” or “OK” button to save the changes and disable the service.
7. Restart Windows Media Player: After disabling the service, close the Services window and restart Windows Media Player to ensure the changes take effect.
By disabling the Windows Media Player Network Sharing Service, you prevent it from running in the background and potentially interfering with CD burning functionality. This step can be useful if you do not require media sharing across devices or suspect conflicts with the service.
After disabling the service and relaunching Windows Media Player, try burning a CD to see if the issue has been resolved. If CD burning continues to be problematic, proceed with further troubleshooting steps to identify and address any other potential causes.