
Preparing to Burn a Music CD
Before you start burning a music CD on your Windows computer, there are a few things you should do to ensure a smooth and successful process.
First, make sure you have a CD burner drive on your computer. Most modern computers come equipped with a built-in CD burner, but if you don’t have one, you can always purchase an external CD burner to connect to your computer.
Next, gather all the music files you want to burn onto the CD. These can be songs downloaded from the internet or music files stored on your computer. It’s a good idea to have the songs organized in a specific folder for easy access.
Once you have your music files ready, check the length of the playlist to ensure it will fit on a standard CD. A CD can hold up to 80 minutes of music, so make sure the total length of your playlist doesn’t exceed this limit.
Another important aspect to consider is the quality of the music files. Ensure that the audio files you are using are in a format compatible with Windows Media Player or any other CD burning software you plan to use. Common audio formats, such as MP3 or WAV, work well for burning CDs.
It’s also essential to check for any copyright restrictions on the music files you intend to burn. Make sure you have the necessary rights or permissions to duplicate and distribute the songs legally.
Lastly, ensure your computer has a blank CD or a rewritable CD-RW disk inserted into the CD burner drive. If you are using a rewritable CD, keep in mind that you can erase and burn new music onto it multiple times.
By following these preparatory steps, you’ll be ready to proceed to the next phase of burning your music CD.
Gathering the Music Files
Once you’ve prepared yourself for the music CD burning process, the next step is to gather all the music files you want to include on the CD. Here’s how you can do it:
1. Identify the songs you want: Take some time to decide which songs you want to include on your music CD. Whether it’s a compilation of your favorite tracks, a mixtape for a special occasion, or a thematic playlist, choosing the right songs is crucial.
2. Locate the music files: Check your computer’s music library, downloads folder, or any other location where you have stored the music files. Make a list of the file names or jot them down for later reference.
3. Check file formats: Ensure that the music files you plan to use are in a compatible format for burning onto a CD. Common audio file formats, such as MP3, WAV, or WMA, are typically supported by CD burning software.
4. Organize the files: Create a dedicated folder for the music files you want to burn. This step helps in easily accessing and managing the files during the burning process. You can name the folder based on the CD’s theme or simply label it “Music CD.”
5. Verify the quality: Before proceeding, double-check the quality of the music files. Ensure that the files are not corrupted, distorted, or of low audio quality. It’s preferable to use high-quality files for the best audio experience on the finished CD.
6. Copy the files to the dedicated folder: Once you’ve verified the music files and organized them, copy or move them to the dedicated folder you created. This helps keep all the files in one place and minimizes the chances of missing any songs during the burning process.
7. Backup the files: It’s always a good idea to create a backup of the music files, especially if they are not easily replaceable. Store the backup files on an external hard drive, cloud storage, or another secure location to ensure they are protected.
By diligently gathering and organizing your music files, you’ll be well-prepared to proceed with creating a playlist and finally burning your music CD.
Creating a Playlist
Creating a playlist is an essential step in the process of burning a music CD. It allows you to arrange the order of the songs and determine which tracks will be included on the final CD. Here’s how you can create a playlist:
1. Launch your preferred media player: Open a media player software on your Windows computer. Windows Media Player is a commonly used program for creating playlists and burning CDs.
2. Access the “Library” or “Playlist” section: Depending on the media player you’re using, locate the “Library” or “Playlist” section within the software. This is where you will create your playlist.
3. Begin a new playlist: Look for an option to create a new playlist. In Windows Media Player, this can typically be found under the “File” or “Library” menu. Select “New Playlist” or a similar option to start a blank playlist.
4. Name your playlist: Give your playlist a descriptive and memorable name. This will help you identify it later when selecting the playlist for burning the CD.
5. Add songs to the playlist: To add songs to your newly created playlist, navigate to the location where you stored the music files. Select the desired files and drag them into the playlist window. Alternatively, you can right-click on the selected files and choose the option to add them to the playlist.
6. Arrange the song order: Rearrange the songs in the playlist to achieve the desired order. Most media players allow you to simply drag and drop the songs within the playlist to rearrange them. You can also use the provided options to move tracks up, down, or to specific positions in the playlist.
7. Save the playlist: Once you are satisfied with the song order and content, save the playlist. This step ensures that you can easily access and use the playlist for burning the CD in the future. Some media players automatically save the playlist, while others may require you to explicitly save it using the “Save” or “Export” option.
Creating a well-organized and thoughtfully ordered playlist sets the foundation for a cohesive and enjoyable music CD. Take your time to curate the perfect playlist, reflecting your musical preferences and the mood you wish to convey on the CD.
Adding Music Files to the Playlist
Now that you have your playlist set up, it’s time to add the music files to it. Adding the desired songs to your playlist allows you to customize the content and create a personalized music CD. Here’s how you can add music files to your playlist:
1. Open your media player: Launch the media player software you are using to create the playlist. Make sure the playlist you want to add songs to is open and selected within the software.
2. Access your music library: Navigate to the music library or the folder where you have stored the music files you wish to add to the playlist. This could be your computer’s local music library or a specific folder you have created.
3. Select the desired music files: Use your mouse to select the music files you want to add to the playlist. You can hold down the Ctrl key (or the Command key on a Mac) to select multiple files at once.
4. Drag and drop the selected files: With the music files selected, click and drag them to the playlist window in your media player. The playlist window should indicate that the files are being added. Once you see a visual confirmation, release the mouse button to drop the files into the playlist.
5. Verify the added songs: Double-check that the added songs are appearing in the playlist and are displayed in the order you intended. You can scroll through the playlist or use the provided player controls to navigate through the songs.
6. Repeat the process for additional files: If you have more music files to add, repeat steps 3 to 5 until you have included all the desired songs in your playlist. Take your time to select the right tracks, ensuring they align with the theme or mood you want to create on the music CD.
7. Save the playlist: Once you have added all the music files, save the playlist to retain your selections. Saving the playlist allows you to easily access it for future modifications or when it’s time to burn the music CD.
By following these steps, you can add your favorite songs to the playlist, curating a collection of tracks that perfectly represents your musical taste. Take this opportunity to create a unique and enjoyable music experience on your upcoming music CD.
Rearranging and Removing Songs from the Playlist
After adding songs to your playlist, you may want to rearrange the order or remove any tracks that don’t fit your desired sequence. Rearranging and removing songs allows you to fine-tune the playlist and ensure a cohesive listening experience on your music CD. Here’s how you can do it:
1. Open your media player and access the playlist: Launch the media player software you are using and open the playlist you want to edit. It’s important to have the playlist displayed before proceeding with rearranging or removing songs.
2. Rearranging songs: To rearrange the songs within the playlist, click and hold a song title with your mouse. Drag the song to the desired position in the playlist. As you drag, the other songs will make way to accommodate the new placement. Release the mouse button to drop the song into its new position. Repeat this process for other songs you want to move.
3. Removing songs: If you want to remove a song from the playlist, find the song title in the playlist window. Right-click on the song title, and a context menu will appear. From the menu, select the option to remove or delete the song. Confirm the action if prompted to remove the song from the playlist.
4. Recheck the playlist: After rearranging or removing songs, review the playlist to ensure it reflects your desired order and content. Take a moment to listen to a preview of the playlist within the media player software. This will help you gauge the flow and coherence of the songs.
5. Save the updated playlist: Once you are satisfied with the changes made to the playlist, save it to preserve the modifications. Saving the playlist ensures that the rearranged and removed songs will be present whenever you access the playlist for burning the music CD.
Rearranging and removing songs from the playlist allows you to customize the music CD to your preferences. Take advantage of this step to create a smooth and enjoyable listening experience with a well-organized sequence of songs that reflect your musical taste.
Adjusting Track Order and Length
When creating a music CD, you have the opportunity to adjust the track order and length to create a seamless and cohesive listening experience. This allows you to curate the flow of the songs and ensure the CD fits within the required duration. Here’s how you can adjust the track order and length:
1. Launch your CD burning software: Open the CD burning software you plan to use to create the music CD. Many media players, such as Windows Media Player or iTunes, have built-in CD burning capabilities.
2. Access the CD project or burning options: Locate the section within the software where you can configure the burning options for your music CD. This can usually be found under a “Burn,” “Create CD,” or similar menu.
3. Arrange the track order: Using the provided options, rearrange the tracks in the desired order. Some CD burning software allows you to drag and drop the tracks to reorder them. Others may have dedicated buttons or fields where you can manually input the track order.
4. Adjust track length if necessary: If the total duration of the tracks exceeds the maximum length of a CD, consider shortening some tracks or removing certain songs. Most CD burning software offers options to adjust the track length or automatically fit the tracks within the CD’s capacity.
5. Preview the track order and length: Before finalizing the adjustments, take a moment to preview the track order and length within the CD burning software. Some software provides a virtual preview of how the CD will play, allowing you to ensure a smooth transition between songs.
6. Fine-tune the adjustments: If necessary, make additional adjustments to the track order and length until you are satisfied with the overall composition of the music CD. Take into account factors like genre, tempo, and mood to create a cohesive and engaging sequence of songs.
7. Save or apply the changes: Once you have adjusted the track order and length to your liking, save the changes or apply them within the CD burning software. This action will ensure that the final CD reflects your modifications when you proceed with the burning process.
By carefully adjusting the track order and length, you can create a music CD that flows smoothly, captures the desired atmosphere, and fits within the limitations of the CD’s duration. This way, you can deliver an enjoyable listening experience to anyone who plays your finished music CD.
Finalizing the Playlist
After making any necessary adjustments to the track order and length, it’s time to finalize your playlist before moving forward with burning the music CD. This step ensures that you have double-checked and confirmed the composition of the playlist. Here’s how you can finalize the playlist:
1. Review the playlist content: Take a moment to review the songs in the playlist, ensuring that they are in the desired order and reflect your musical preferences. Confirm that all the tracks align with the theme or mood you intended to create on the music CD.
2. Listen to the playlist: Play through the playlist within the media player or CD burning software to listen to a preview of how the songs flow together. Pay attention to the transitions between tracks and verify that there are no abrupt or jarring shifts.
3. Check the track information: Verify that the track information, such as song titles, artist names, and album names, is correct and displayed accurately within the playlist. This step helps in ensuring a professional and organized presentation on the final music CD.
4. Make any final adjustments: If you notice any discrepancies or feel the need to make further modifications, take the time to fine-tune the playlist accordingly. You can rearrange songs, adjust volumes, or confirm that any special settings, like crossfades or gapless playback, are set correctly.
5. Save the finalized playlist: Once you are satisfied with the composition and order of the playlist, save it to lock in your final choices. Saving the playlist ensures that you can easily access it later when it’s time to burn the music CD or make any future modifications.
6. Back up your playlist: As an extra precaution, consider creating a backup copy of your finalized playlist. This can be done by exporting or saving a copy of the playlist file to a separate location or by making a physical copy on an external storage device.
By taking the time to thoroughly review and finalize your playlist, you can be confident that you have created a well-curated collection of songs that will deliver an engaging and enjoyable listening experience on the finished music CD.
Choosing Burning Settings
When it comes to burning a music CD, selecting the appropriate burning settings is crucial to ensure the best possible outcome. By choosing the right settings, you can optimize the quality, compatibility, and playback experience of your music CD. Here are the steps to choose the burning settings:
1. Launch your CD burning software: Open the CD burning software you plan to use to create the music CD. Ensure that you have the playlist open and ready for burning.
2. Access the burning options: Look for a section or menu within the software that provides the burning options. This could be labeled as “Burn settings,” “Burning options,” or similar terminology.
3. Select the burning speed: Choose the burning speed that works best for your CD burner and the quality of the CD you want to create. It’s recommended to select a moderate speed to ensure accurate and error-free burning.
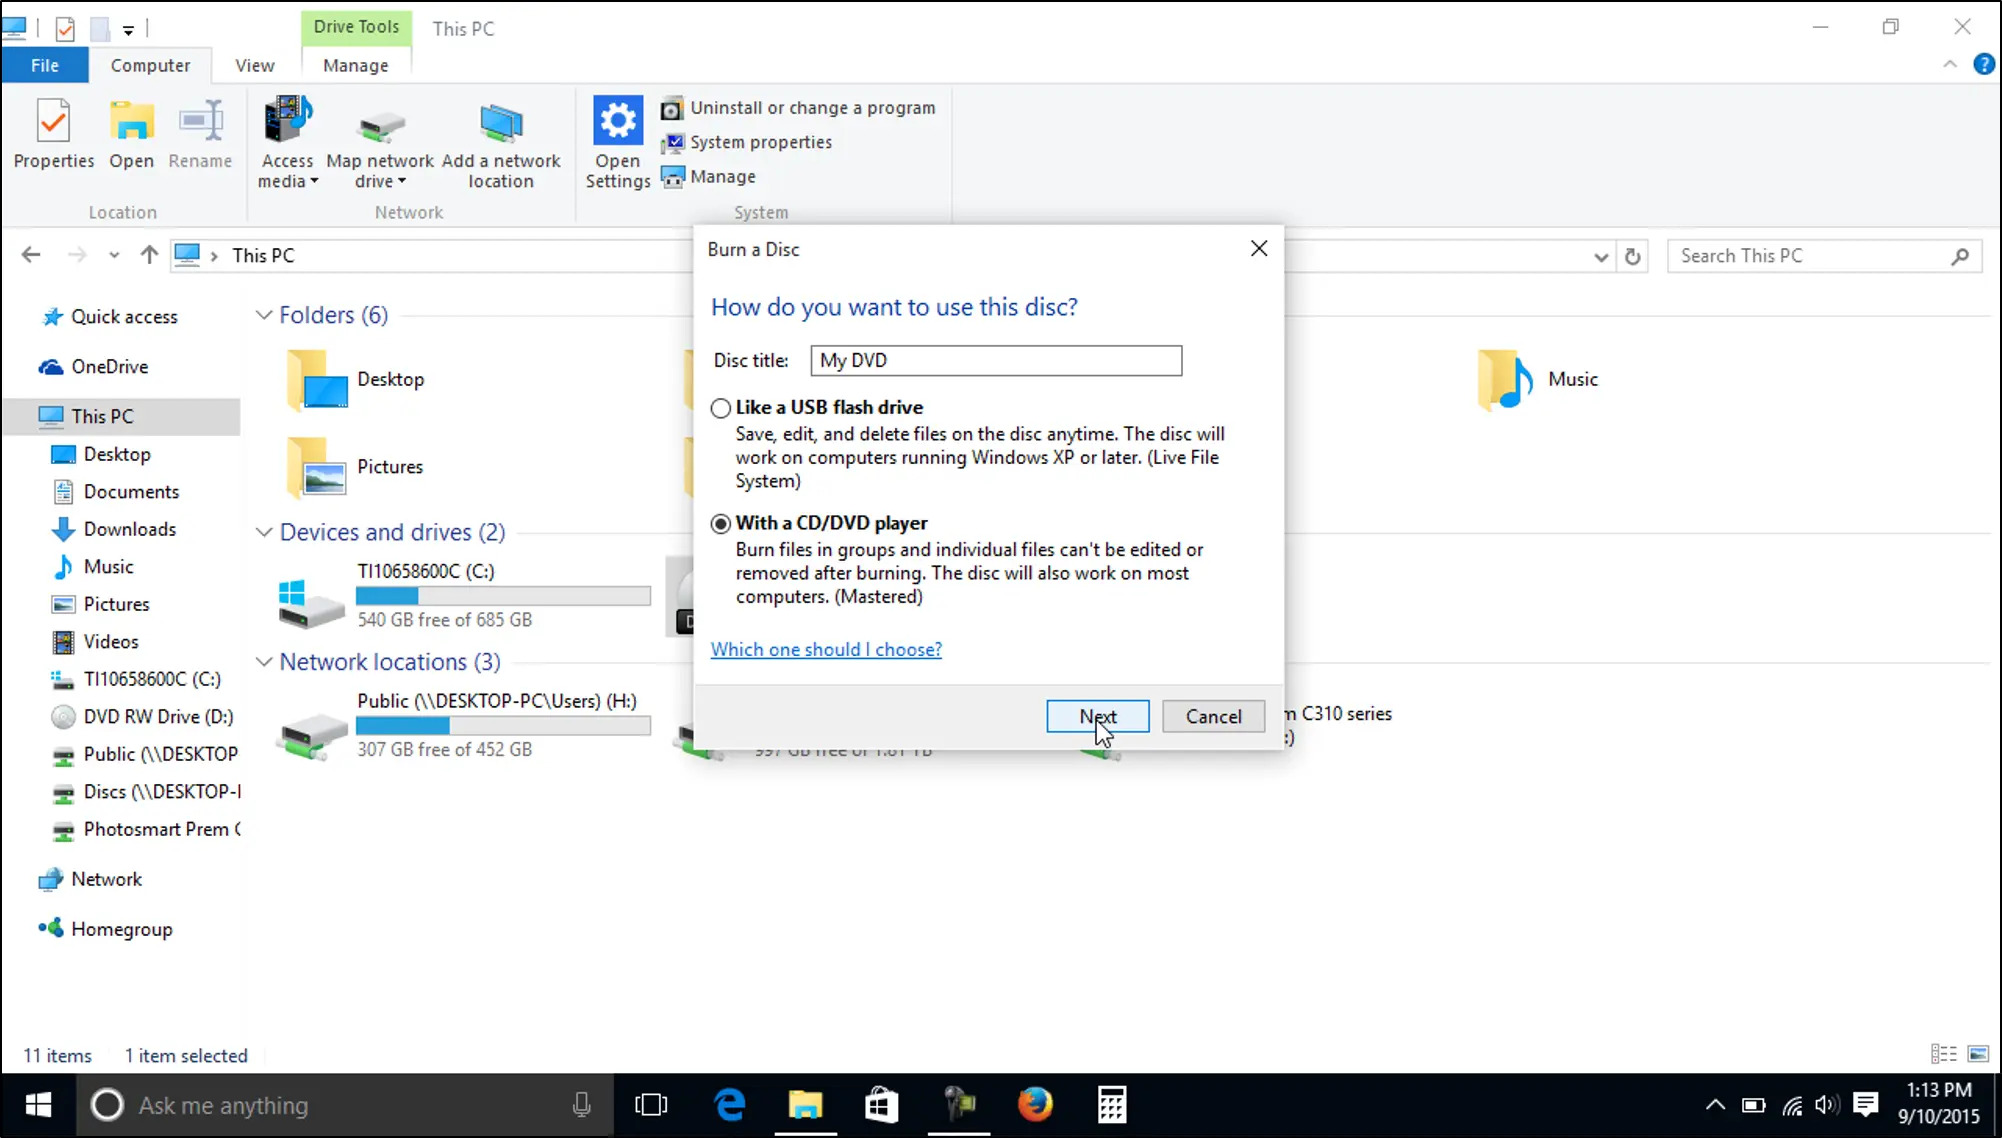
4. Choose the audio format: Select the appropriate audio format for your music CD. Most CD burning software offers options such as Audio CD, MP3 CD, or WMA CD. If you want to create a standard music CD, choose the Audio CD format.
5. Adjust the burning method: Depending on the software and options available, you may have the choice between Track-at-Once (TAO) or Disc-at-Once (DAO) burning methods. TAO allows you to pause between tracks, while DAO burns the entire disc in one continuous session. Choose the method that best suits your preferences.
6. Enable error checking: Consider enabling error checking during the burning process to ensure the highest quality and accuracy of the music CD. This setting verifies data and checks for errors during the burning process.
7. Verify disc-finalization option: If available, enable the option to finalize the disc. Finalizing the disc means that no further changes can be made to the CD, and it can be played in standard CD players.
8. Check other available settings: Explore any additional settings or options provided by your CD burning software. This may include settings for gap length between tracks, volume normalization, or crossfades. Adjust these settings according to your preferences and requirements.
9. Save or apply the settings: Once you have selected all the desired burning settings, save or apply them within the CD burning software. Confirm that the selected settings align with your intended outcome and goals for the music CD.
By carefully choosing the burning settings, you can optimize the burning process and ensure that the resulting music CD meets your desired specifications. Taking the time to make these selections will greatly enhance the overall listening experience when the CD is played.
Adjusting Burning Preferences
Before proceeding with the actual burning process of your music CD, it’s essential to adjust the burning preferences in your CD burning software. These preferences allow you to customize additional settings that can further enhance the quality, compatibility, and overall experience of the burned CD. Here’s how you can adjust the burning preferences:
1. Open your CD burning software: Launch the CD burning software you are using on your Windows computer. Ensure that you have the playlist or the music files ready for burning.
2. Access the burning preferences: Look for a “Preferences,” “Settings,” or “Options” menu within the CD burning software. These preferences may be listed under a specific section related to burning or recording.
3. Select the burning device: If you have multiple CD burner drives connected to your computer, choose the appropriate burning device you want to use for the CD burning process. This step is especially important if you have an external CD burner or multiple internal drives.
4. Adjust buffer underrun protection: Enable or adjust the buffer underrun protection settings if available. Buffer underrun protection helps prevent burning errors by temporarily storing data in a buffer before writing it to the CD.
5. Set the recording speed: Choose the recording speed that best suits your CD burning needs. Higher speeds are generally faster but may have a higher risk of errors. On the other hand, lower speeds may result in more accurate and reliable burning.
6. Configure the gap length between tracks: Some CD burning software allows you to adjust the gap length between tracks. This setting determines the pause or silence between songs on the burned CD. You can choose to have no gap, a short gap, or a longer gap based on your preference.
7. Enable auto-eject after burning: If desired, enable the option to automatically eject the CD after the burning process is complete. This feature can be convenient and prompt you to remove the CD promptly.
8. Check for additional options: Explore any other available preferences or options provided by your CD burning software. These may include settings for file conversion, audio normalization, or even the ability to add CD text, which displays the track information on compatible CD players.
9. Save or apply the preferences: Once you have adjusted all the necessary burning preferences, save or apply them within the CD burning software. Confirm that the selected preferences align with your desired outcome for the burned music CD.
By adjusting the burning preferences, you can fine-tune the burning process to suit your specific needs and preferences. These preferences give you more control over the burning process and can greatly enhance the final result of the music CD.
Verifying and Finalizing the Burn Process
After adjusting the necessary settings, it’s important to verify and finalize the burn process before completing the creation of your music CD. This step ensures that the burning process is error-free, and the resulting CD is ready for playback. Here’s how you can verify and finalize the burn process:
1. Check the playlist and settings: Before proceeding with the burn process, double-check the playlist and the burning settings within your CD burning software. Verify that the track order, length, and any additional preferences are accurately reflected.
2. Insert a blank CD: Ensure that you have a blank, recordable CD (CD-R) inserted into the CD burner drive of your computer. Check that the CD is compatible with the burning software you are using.
3. Start the burning process: Initiate the burn process by clicking on the “Burn” or “Start” button within the CD burning software. The software will begin transferring the music files from the playlist onto the CD.
4. Monitor the burn progress: Keep an eye on the progress bar or indicator provided by the CD burning software. This will show you the real-time progress of the burn process, indicating how much data has been written to the CD.
5. Don’t interrupt the burn process: Avoid performing any resource-intensive tasks or opening other applications while the burning process is ongoing. Interruptions can lead to errors or incomplete burning.
6. Verify the burned tracks: Once the burn process is complete, use the CD burning software to verify the burned tracks. This verification ensures that the songs were successfully written to the CD without any errors or discrepancies.
7. Label the burned CD: Once you have verified the successful burn, it’s a good practice to label the burned CD. Use a permanent marker or printable labels to write the title of the CD and any relevant information on the CD surface.
8. Test the burned CD: Before finalizing the burn process, play the burned CD on a compatible CD player or computer to ensure that it plays without any issues. Check for skips, distortion, or any other playback problems.
9. Finalize the burn process: If the burned CD plays correctly and meets your expectations, consider finalizing the burn process within the CD burning software. This step ensures that no further changes can be made to the CD, and it will be compatible with most CD players.
By carefully verifying and finalizing the burn process, you can ensure the successful creation of your music CD. Take the time to double-check the settings and test the burned CD to guarantee a high-quality and error-free playback experience.
Ejecting the Burned Music CD
Once the burn process is complete and you have verified the quality of the burned music CD, it’s time to safely eject the CD from your computer’s CD burner drive. Ejecting the CD properly helps prevent any damage and ensures that it can be used for playback or distribution. Here’s how you can eject the burned music CD:
1. Wait for the burn process to finish: Before attempting to eject the CD, make sure that the burn process has completed successfully. Check the CD burning software or the progress indicator to confirm that the burn process is finished.
2. Check for any indicator lights: On the CD burner drive, there may be a light or indicator that shows the status of the drive. Wait for the indicator light to turn off or change to indicate that the drive is idle or ready.
3. Use the eject button: Most CD burner drives have an eject button located on the front panel. Press the eject button gently to release the CD tray or disc compartment. The tray will open or the compartment will slide out to allow access to the burned music CD.
4. Handle the CD with care: When handling the burned music CD, make sure to hold it by its outer edges or the center hole. Avoid touching the shiny recording surface to prevent fingerprints or scratches that could affect the playback quality.
5. Remove the CD from the tray or compartment: Carefully lift the burned music CD from the tray or compartment of the CD burner drive. Make sure to hold it securely to prevent dropping or accidental damage.
6. Close the CD tray or compartment: After removing the burned music CD, gently push the CD tray or slide the compartment back into the CD burner drive until it is fully closed. This will protect the internal components of the drive from dust and debris.
7. Store the CD in a protective case: To keep the burned music CD safe and free from scratches or dust, place it in a CD case or sleeve specifically designed for CDs. This will provide additional protection during storage or transport.
8. Label the CD: To easily identify the contents of the burned music CD, use a permanent marker or printable labels to write the title or any relevant information on the CD surface. This will help you locate the desired CD quickly when needed.
9. Keep the CD in a cool and dry place: Proper storage conditions are vital to maintain the longevity and playability of the burned music CD. Store it in a cool, dry place away from direct sunlight, heat sources, or extreme humidity.
By following these steps, you can safely and effectively eject the burned music CD from your computer’s CD burner drive. Remember to handle the CD with care and store it properly to preserve its quality for future enjoyment.