
Check Hardware Connections
One of the first steps to take when your Lenovo’s microphone is not working is to check the hardware connections. Sometimes, loose or faulty connections can cause sound-related issues. Follow these steps to ensure the hardware is properly connected:
- Check the microphone cable: Ensure that the cable connecting the microphone to your computer is securely plugged in on both ends. If it is a removable cable, try reconnecting it to see if that resolves the issue.
- Inspect the microphone port: Examine the microphone port on your Lenovo device for any physical damage or debris. Use compressed air or a clean, soft cloth to gently remove any dirt or dust that may be blocking the port.
- Test the microphone on another device: If possible, connect the microphone to another computer or device to determine if the issue is specific to your Lenovo device. If it works on another device, the problem may lie with your computer’s audio settings or drivers.
By thoroughly checking the hardware connections, you can eliminate simple issues that could be preventing the microphone from working properly. If the problem persists after checking the connections, proceed to the next troubleshooting steps.
Update Audio Drivers
If your Lenovo’s microphone is still not working, it may be due to outdated or incompatible audio drivers. Here’s how you can update them:
- Open Device Manager: Right-click on the Start button and select “Device Manager” from the context menu.
- Expand Audio inputs and outputs: In the Device Manager window, locate the “Audio inputs and outputs” section and click on the arrow to expand it.
- Right-click on the microphone device: Look for your microphone device in the list. It may be named something like “Microphone” or “External Microphone.” Right-click on the device and select “Update driver.”
- Automatic driver update: Choose the option to search automatically for updated driver software. Windows will scan your computer and the internet for the latest driver updates for your microphone.
- Manually update the driver: If the automatic update doesn’t find any new drivers, you can visit the Lenovo support website or the website of the microphone manufacturer to manually download the latest driver for your microphone. Follow the installation instructions provided by the manufacturer.
Updating the audio drivers can often resolve compatibility issues and improve the functionality of your microphone. After updating the drivers, restart your Lenovo device and check if the microphone is now working.
Run Troubleshooters
If you’re still experiencing microphone issues with your Lenovo device, running troubleshooters can help diagnose and potentially fix the problem automatically. Here’s how to run them:
- Open Windows Settings: Press the Windows key + I to open the Windows Settings menu.
- Select “Update & Security”: Click on “Update & Security” to access the troubleshooting options.
- Go to Troubleshoot: On the left-hand side, click on “Troubleshoot” to open the troubleshooting menu.
- Select “Additional troubleshooters”: Scroll down and click on “Additional troubleshooters.”
- Run the audio troubleshooter: Under the “Get up and running” section, locate and click on “Playing Audio” and follow the on-screen instructions to run the troubleshooter. If the microphone is still not working, you can also try running the “Recording Audio” troubleshooter.
- Follow the troubleshooting steps: The troubleshooter will scan your system for issues and provide suggestions for fixing them. Follow the recommended steps to resolve any problems detected.
The Windows troubleshooters are designed to identify and fix common audio-related issues, including microphone problems. Running these troubleshooters may help pinpoint the cause of the problem and apply the necessary fixes.
Check Microphone Settings in Windows
Incorrect microphone settings in Windows can sometimes cause microphone issues on your Lenovo device. Here’s how to check and adjust the microphone settings:
- Open Windows Settings: Press the Windows key + I to open the Windows Settings menu.
- Select “System”: Click on “System” to access the system settings.
- Go to “Sound” settings: On the left-hand side, click on “Sound” to access the audio settings.
- Check input devices: Under the “Input” section, ensure that the correct microphone device is selected as the input device. If not, choose the appropriate device from the dropdown menu.
- Adjust microphone volume: Click on “Device properties” or “Manage sound devices” and then click on your microphone device. Adjust the “Volume” and “Microphone boost” settings according to your preference. Make sure the volume is not set to the minimum or muted.
- Test the microphone: Under the “Input” section, click on “Test your microphone” to verify if the microphone is working properly. Speak into the microphone and observe the volume indicator to see if it responds.
By checking and adjusting the microphone settings in Windows, you can ensure that the correct input device is selected and that the volume levels are properly configured. If the microphone still isn’t working, continue troubleshooting using the following steps.
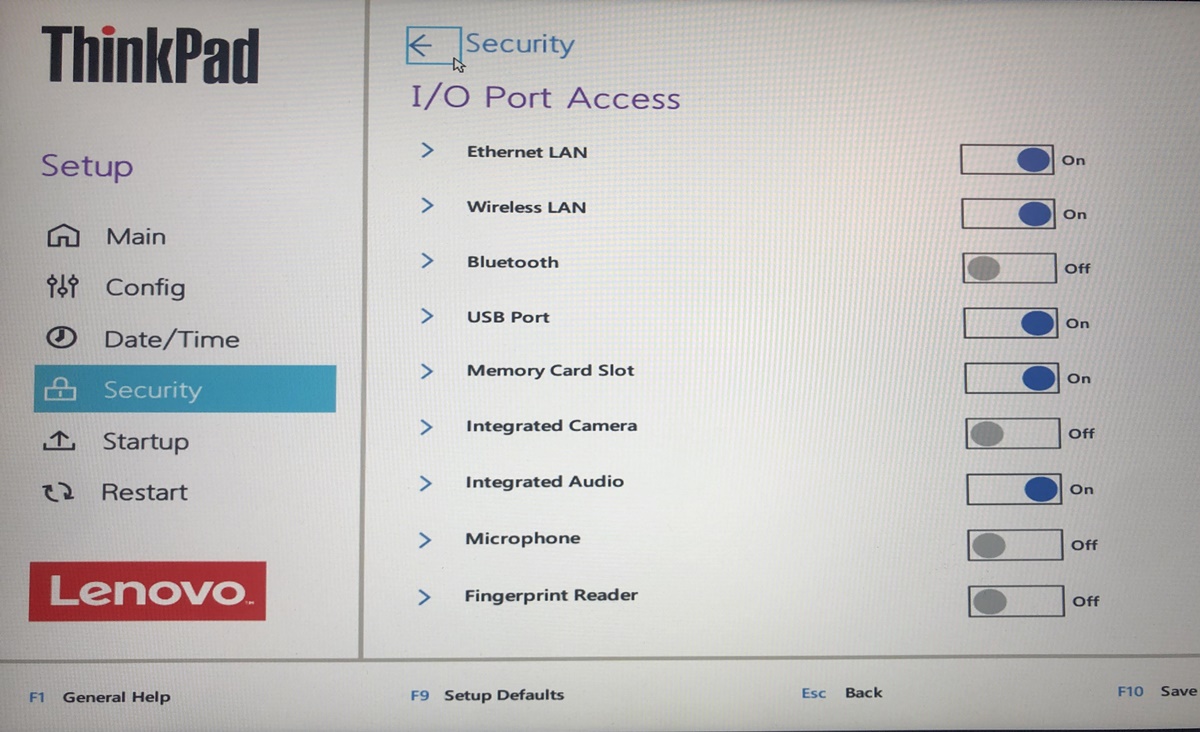
Enable/Disable Microphone Privacy Settings
In some cases, microphone issues on your Lenovo device may be related to privacy settings that restrict microphone access for certain apps or services. Here’s how to enable or disable microphone privacy settings:
- Open Windows Settings: Press the Windows key + I to open the Windows Settings menu.
- Select “Privacy”: Click on “Privacy” to access the privacy settings.
- Go to “Microphone” settings: On the left-hand side, click on “Microphone” to access the microphone privacy settings.
- Allow apps to access the microphone: Under the “Microphone access for this device” section, make sure the toggle switch for “Allow apps to access your microphone” is turned on. This allows applications to use your microphone.
- Manage app access to the microphone: Scroll down to the “Choose which apps can access your microphone” section. Here, you can individually enable or disable microphone access for specific apps or services. Make sure the apps you want to use with the microphone are allowed access.
- Restart applications: After making any changes to the microphone privacy settings, it is recommended to close and reopen the applications that require microphone access for the changes to take effect.
By enabling or disabling microphone privacy settings, you can control which apps have access to your microphone, ensuring that the necessary apps are allowed to use the microphone on your Lenovo device.
Reset Audio Settings to Default
If you’re still facing microphone issues on your Lenovo device, resetting the audio settings to their default configuration can help resolve any conflicting settings or configurations. Here’s how to reset the audio settings to default:
- Open Windows Settings: Press the Windows key + I to open the Windows Settings menu.
- Select “System”: Click on “System” to access the system settings.
- Go to “Sound” settings: On the left-hand side, click on “Sound” to access the audio settings.
- Reset audio settings: Under the “Output” or “Input” section, depending on your microphone’s configuration, click on “Troubleshoot” and select “Reset” to reset the audio settings to their default values.
- Restart your Lenovo device: After resetting the audio settings, restart your device to apply the changes.
By resetting the audio settings to default, you can eliminate any customized settings or configurations that might be causing issues with your microphone. After the reset, check if the microphone is functioning properly.
Change Default Recording Device
If your Lenovo’s microphone is still not working, it might be necessary to change the default recording device. Here’s how you can do it:
- Open Windows Settings: Press the Windows key + I to open the Windows Settings menu.
- Select “System”: Click on “System” to access the system settings.
- Go to “Sound” settings: On the left-hand side, click on “Sound” to access the audio settings.
- Manage sound devices: Under the “Input” section, click on “Manage sound devices.”
- Select the default recording device: Locate your microphone device from the list of available input devices. If it is not already set as the default device, click on the microphone device and select “Set as default.”
By changing the default recording device to your Lenovo’s microphone, you ensure that it is being recognized and used as the primary input source for audio recordings and communication applications.
Check if Microphone is Muted
Another factor to consider when troubleshooting microphone issues on your Lenovo device is whether the microphone is muted. It’s possible that the microphone has been unintentionally muted, causing it to appear as if it’s not working. Here’s how you can check if the microphone is muted:
- Open Windows Settings: Press the Windows key + I to open the Windows Settings menu.
- Select “System”: Click on “System” to access the system settings.
- Go to “Sound” settings: On the left-hand side, click on “Sound” to access the audio settings.
- Check microphone volume: Under the “Input” section, locate the microphone device and ensure that the volume slider is not set to the minimum. If it is, increase the volume by dragging the slider to the desired level.
- Verify microphone mute status: Below the volume slider, there may be a microphone mute button or an option to mute/unmute the microphone. Make sure the microphone is not muted by checking if the button is in the “unmute” position or deselecting the mute option.
By checking if the microphone is muted and adjusting the volume settings accordingly, you can ensure that the microphone is correctly set up and ready to capture audio input.
Disable Exclusive Mode
If you’re still experiencing microphone issues on your Lenovo device, it may be beneficial to disable the exclusive mode for your microphone. Exclusive mode allows an application to take full control over the microphone device, which can sometimes conflict with other applications or settings. Here’s how you can disable exclusive mode:
- Open Windows Settings: Press the Windows key + I to open the Windows Settings menu.
- Select “System”: Click on “System” to access the system settings.
- Go to “Sound” settings: On the left-hand side, click on “Sound” to access the audio settings.
- Manage sound devices: Under the “Input” section, click on “Manage sound devices.”
- Open microphone properties: Locate your microphone device from the list of input devices and click on it to open its properties.
- Disable exclusive mode: In the microphone properties window, navigate to the “Advanced” tab. Uncheck the box that says “Allow applications to take exclusive control of this device.”
- Apply changes: Click “Apply” and then “OK” to save the changes and exit the properties window.
By disabling exclusive mode for your microphone, you allow multiple applications to use the microphone simultaneously without conflicts. This can help resolve compatibility issues and ensure that your microphone functions properly across different applications.
Scan for Malware and Viruses
In some cases, microphone issues on your Lenovo device may be caused by malware or viruses that are interfering with the system’s functionality. Performing a thorough scan for malware and viruses can help identify and remove any malicious software that might be affecting the microphone. Here’s how you can scan for malware and viruses:
- Install a reputable antivirus software: If you don’t have an antivirus program installed on your Lenovo device, it’s important to choose and install a reliable one. There are numerous trusted antivirus options available, such as Avast, AVG, or Windows Defender.
- Update the antivirus software: Ensure that your antivirus software is up to date with the latest virus definitions. This will ensure that it can effectively identify and remove the latest malware threats.
- Perform a full system scan: Open the antivirus software and initiate a full system scan. This comprehensive scan will examine all files and directories on your Lenovo device for signs of malware or viruses.
- Follow the instructions of the antivirus program: If any malware or viruses are detected during the scan, follow the prompts provided by the antivirus program to quarantine or remove the threats.
- Restart your Lenovo device: After completing the scan and removing any identified threats, restart your device to ensure that all changes are applied.
Scanning for malware and viruses is an essential step in troubleshooting microphone issues, as malicious software can interfere with system processes and cause various problems. By regularly scanning your Lenovo device, you can help maintain its security and overall performance.
Use System Restore
If all other troubleshooting steps have failed to resolve the microphone issues on your Lenovo device, you can attempt to use System Restore to revert your system back to a previous working state. System Restore allows you to undo recent system changes, including software installations or updates that might have caused the microphone problem. Here’s how you can use System Restore:
- Open the System Restore tool: Press the Windows key + R to open the Run dialog box. Type “rstrui.exe” in the box and press Enter to open the System Restore window.
- Select a restore point: In the System Restore window, select a restore point that predates the onset of the microphone issues. Choose a date when you know the microphone was working correctly.
- Follow the instructions: System Restore will provide guidance on the consequences of the restore and any programs or drivers that will be affected. Carefully read the information and click “Next” to proceed.
- Start the restore process: Confirm your chosen restore point and click “Finish” to start the restoration process. Your Lenovo device will restart and begin the restoration process.
- Wait for the process to complete: The system restore process may take some time to complete. Make sure not to turn off your computer or interrupt the process.
By using System Restore, you can revert your Lenovo device to a previous state where the microphone was functioning correctly. It’s important to note that any changes made after the selected restore point will be lost, so be sure to back up any important files or data before proceeding with the System Restore.
Contact Lenovo Support
If you’ve tried all the troubleshooting steps mentioned above and are still experiencing microphone issues with your Lenovo device, it may be time to seek assistance from Lenovo’s support team. Lenovo provides dedicated support services to help resolve hardware and software-related problems. Here’s how you can contact Lenovo support:
- Visit Lenovo’s Support Website: Go to Lenovo’s official website and navigate to the support page specific to your region.
- Find the Contact Information: Look for the “Contact Us” or “Support” section on the website. Here, you will find contact details for reaching out to Lenovo support.
- Choose the Preferred Support Method: Lenovo provides various support options, including phone support, live chat, or email support. Select the method that suits you best.
- Provide Relevant Details: When contacting Lenovo support, be ready to provide information about your device, the microphone issue you’re facing, and the troubleshooting steps you’ve already tried. This will help them better understand the problem and provide appropriate assistance.
- Follow the Guidance: Once connected with a Lenovo support representative, follow their instructions and answer any questions they may have. They will guide you through additional troubleshooting steps or determine if your device needs further assistance.
Lenovo’s support team is trained to deal with various technical issues, including microphone problems. They can provide specific guidance based on your device model and configuration, helping you find a resolution to the microphone issue.