
What is a mobile signature in Gmail?
A mobile signature in Gmail is a personalized text that is automatically appended to the end of your outgoing emails when using the Gmail app on your mobile device. It serves as a digital business card or a professional closing for your emails, allowing you to provide important information and make a lasting impression.
Think of a mobile signature as your virtual handout, where you can include your name, job title, contact details, social media links, and even a promotional message or call-to-action. It’s a powerful tool for branding, conveying professionalism, and saving time by automatically including your contact information in every email you send.
With a mobile signature, you can create a consistent and professional image across all your email communications, whether you’re using Gmail for personal or business purposes. It adds a touch of personalization and credibility to your emails, making them more memorable and easily identifiable.
Mobile signatures are especially valuable for professionals, entrepreneurs, freelancers, and small businesses who are constantly on the go and rely on their mobile devices to stay connected and communicate with clients and colleagues. By including a mobile signature, you can ensure that even when you’re on the move, your emails still reflect your professionalism and brand identity.
Setting up a mobile signature in Gmail is quick and easy, allowing you to customize and control the information you want to include in your email signature. Whether you’re an individual looking to showcase your credentials or a business aiming to promote your brand, a mobile signature in Gmail can be a valuable asset in your email communication strategy.
How to set up a mobile signature in Gmail
If you want to create a professional and personalized touch in your email communications, setting up a mobile signature in Gmail is a straightforward process. Follow the step-by-step guide below to add a mobile signature to your Gmail app on your mobile device:
- Step 1: Open the Gmail app on your mobile device.
- Step 2: Tap on the three horizontal lines in the top-left corner of the screen to open the menu.
- Step 3: Scroll down and tap on “Settings.”
- Step 4: Select the email account you want to add a signature to. If you have multiple email accounts linked to your Gmail app, choose the one you wish to set up the mobile signature for.
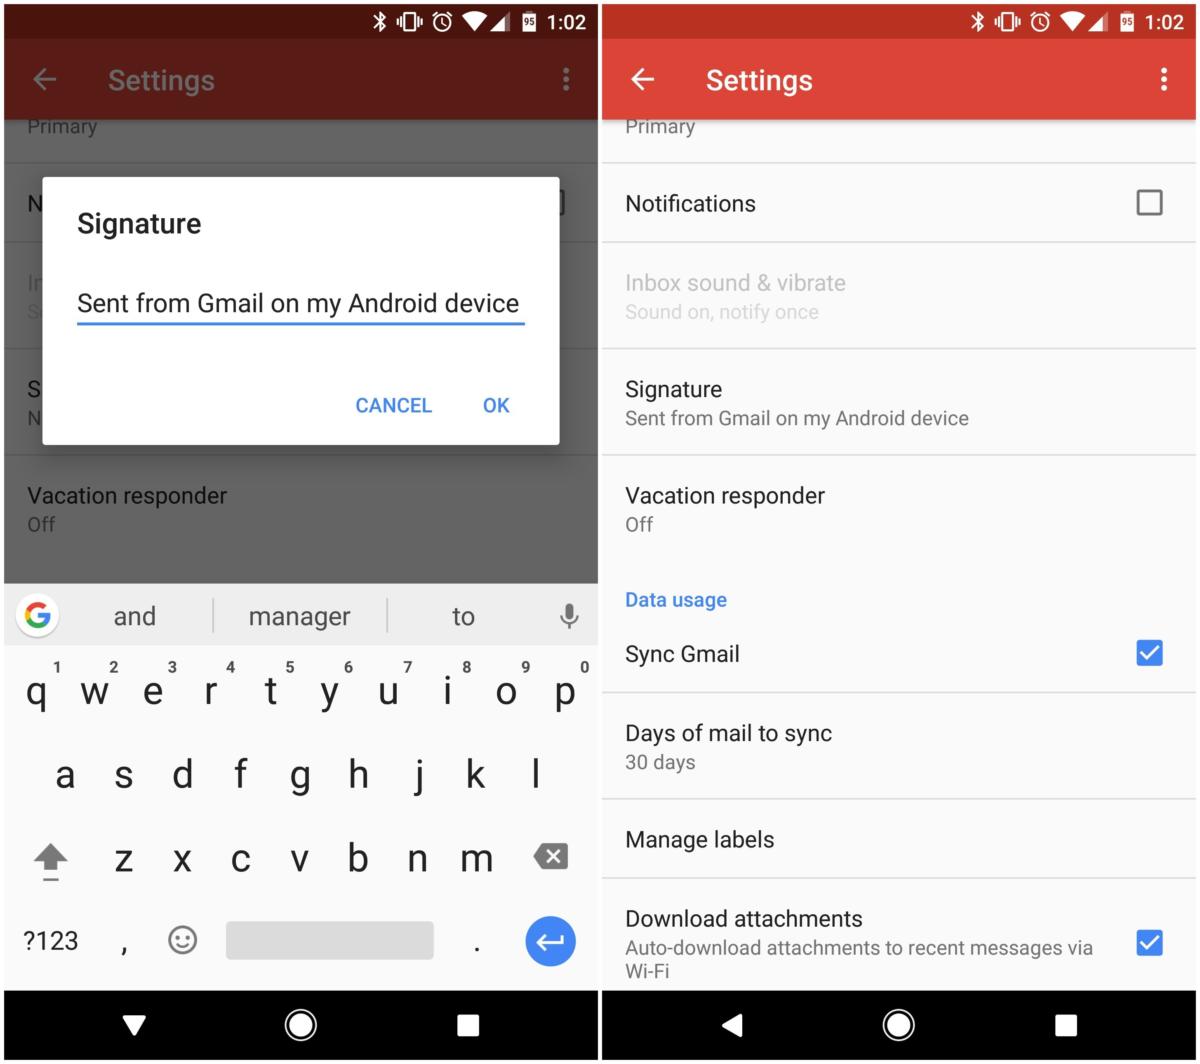
- Step 5: Tap on “Signature.”
- Step 6: Toggle on the “Mobile signature” option.
- Step 7: Enter your desired mobile signature text in the provided text box. You can include your name, job title, contact information, and any other details you wish to include.
- Step 8: Customize the formatting of your mobile signature. Use the text editing tools to change the font style, size, color, and alignment to match your preferences and brand identity.
- Step 9: Once you’re satisfied with your mobile signature, tap on “Save” or the checkmark icon to save your mobile signature settings.
It’s important to note that the steps may slightly vary depending on the version of the Gmail app and the operating system of your mobile device. However, the general process remains the same.
Now that you’ve successfully set up your mobile signature in Gmail, every new email you compose in the app will automatically include your mobile signature at the end. Take a moment to compose a test email to ensure that your mobile signature appears as intended.
By adding a mobile signature to your Gmail app, you’ll save time and effort in manually typing your contact details at the end of each email. Plus, it adds a professional touch to your email communications, reinforcing your brand image and enhancing your overall email experience.
Step 1: Open the Gmail app on your mobile device
The first step to setting up a mobile signature in Gmail is to open the Gmail app on your mobile device. Before proceeding with the setup process, ensure that you have downloaded and installed the Gmail app from the app store on your device. Once the app is installed, follow the steps below to access it:
- Locate the Gmail app icon on your home screen or in your app drawer. It is usually represented by a white envelope with a red outline.
- Tap on the Gmail app icon to launch the application.
- If you have multiple email accounts added to the Gmail app, you will be directed to the account selection screen. Choose the email account for which you want to set up the mobile signature by tapping on the appropriate account.
- After selecting the account, the Gmail inbox for that particular account will be displayed.
It’s worth mentioning that the exact steps to open the Gmail app may vary slightly depending on your device’s operating system (Android or iOS) and its unique interface. However, the general process remains similar across devices.
Once you have successfully opened the Gmail app and selected the desired email account, you are ready to move on to the next step in setting up your mobile signature in Gmail.
Remember, the Gmail app allows you to manage multiple email accounts in one place, making it convenient to access and customize your mobile signature for each account individually. Whether you have a personal email account, a work email, or both, you can easily switch between accounts to add a unique mobile signature to each one.
Now that you have opened the Gmail app on your mobile device, let’s proceed to the next step of the mobile signature setup process.
Step 2: Tap on the three horizontal lines in the top-left corner
After successfully opening the Gmail app on your mobile device and selecting the desired email account, the next step in setting up your mobile signature in Gmail is to access the settings menu. Follow the steps below to proceed:
- Once you are in the Gmail app and viewing your inbox for the selected email account, look for the three horizontal lines located in the top-left corner of the screen.
- Tap on the three horizontal lines to open the menu. This menu gives you access to various options and settings within the Gmail app.
- Upon tapping, a sidebar or dropdown menu will appear on the left-hand side of the screen, displaying different sections and features of the app.
- Scroll through the menu until you find the option labeled “Settings.” It is usually represented by a gear icon or the word “Settings” itself.
- Tap on the “Settings” option to proceed to the settings screen.
It’s important to note that the location and appearance of the three horizontal lines may vary slightly depending on the version of the Gmail app and the specific device you are using. However, the general concept remains the same, and you will be able to easily identify and access the settings menu.
By tapping on the three horizontal lines and navigating to the settings menu, you are one step closer to customizing your mobile signature in Gmail. The settings menu allows you to control various aspects of the Gmail app, including email preferences, account management, and signature settings.
Now that you have successfully accessed the settings menu, let’s move on to the next step in setting up your mobile signature in Gmail.
Step 3: Scroll down and tap on “Settings”
Once you have tapped on the three horizontal lines in the top-left corner of the Gmail app and opened the menu, the next step in setting up your mobile signature is to find and access the “Settings” option. Follow the steps below to proceed:
- After opening the menu, carefully scroll down the sidebar or dropdown menu that appeared on the left-hand side of the screen.
- Continue scrolling until you locate the option labeled “Settings.” This option is typically represented by a gear icon, and the word “Settings” may be written next to it.
- Tap on the “Settings” option to access the Gmail settings screen.
It’s important to note that depending on the version of the Gmail app and the layout of your particular device, the settings option might be positioned slightly differently. However, most versions of the Gmail app for mobile devices place the settings option near the bottom of the menu.
By tapping on “Settings,” you will enter the settings screen, where you can configure various aspects of your Gmail app according to your preferences. The settings screen allows you to personalize your email experience, manage notifications, adjust privacy and security settings, and more.
Now that you have successfully located and tapped on “Settings,” you are ready to move on to the next step of setting up your mobile signature in Gmail. The next step involves selecting the email account for which you want to add or edit your mobile signature.
Step 4: Select the email account you want to add a signature to
Once you have accessed the settings screen in the Gmail app, the next step in setting up your mobile signature is to select the specific email account for which you want to add or edit the signature. Follow the steps below to proceed:
- Within the settings screen, you will see a list of options related to different aspects of the Gmail app.
- Look for the section or option that is related to “Accounts” or “Manage Accounts.” This section allows you to view and manage the email accounts linked to your Gmail app.
- Tap on the “Accounts” or “Manage Accounts” option to expand it and view the list of email accounts you have added to the app.
- From the list of accounts displayed, select the email account for which you want to add or edit the mobile signature by tapping on it.
It’s worth noting that if you only have one email account added to the Gmail app, you will directly access the settings for that specific account. However, if you have multiple email accounts added, it is important to select the correct account to ensure that the mobile signature is applied to the desired email address.
By selecting the desired email account, you will be directed to the settings specifically related to that account. This allows you to customize the mobile signature for each account individually, if needed.
Now that you have selected the email account you want to add a mobile signature to, it’s time to proceed to the next step of actually configuring and adding the signature in your Gmail app. Stay tuned for the next step!
Step 5: Tap on “Signature”
Once you have selected the specific email account for which you want to add or edit the mobile signature in the Gmail app, the next step is to access the signature settings. Follow the steps below to proceed:
- Within the account settings screen, scroll down until you find the option labeled “Signature.”
- Tap on the “Signature” option to access the settings related to your email signature.
When you tap on “Signature,” the signature settings screen will open, where you can view and modify your current email signature or create a new one for the selected email account.
It’s important to note that the option to set up a signature in Gmail may vary slightly depending on the version of the app you are using. In some cases, you may find the option labeled as “Mobile signature” or similar, but the purpose and functionality remain the same.
By tapping on “Signature,” you are one step closer to creating a personalized mobile signature to accompany your outgoing emails on the selected account. The signature settings screen allows you to customize the text, formatting, and other details of your mobile signature.
Now that you have accessed the signature settings, it’s time to move on to the next step and actually enter the desired text for your mobile signature. Let’s proceed!
Step 6: Toggle on the “Mobile signature” option
After accessing the signature settings in the Gmail app, the next step in setting up your mobile signature is to enable the “Mobile signature” option. This allows Gmail to automatically append your chosen signature to the end of your outgoing emails. Follow the steps below to proceed:
- In the signature settings screen, look for the option labeled “Mobile signature.” It is typically represented by a toggle switch or checkbox.
- Tap on the “Mobile signature” option to toggle it on. This indicates that you want to include a mobile signature in your outgoing emails.
Enabling the “Mobile signature” option ensures that your personalized mobile signature will be automatically added to the end of each email you send from the selected account. This saves you time and effort as you no longer need to manually add your signature with every email.
It’s important to note that if you have multiple email accounts linked to the Gmail app, you can toggle on the “Mobile signature” option for each individual account. This allows you to have different mobile signatures for different accounts, tailoring them to your specific needs and branding.
By enabling the “Mobile signature” option, you are one step closer to finalizing the setup of your mobile signature in the Gmail app. Now, it’s time to move on to the next step and enter the text for your mobile signature.
Stay tuned for the next step, where you will customize and personalize your mobile signature to make it uniquely yours!
Step 7: Enter your desired mobile signature text
Once you have toggled on the “Mobile signature” option in the signature settings of the Gmail app, the next step in setting up your mobile signature is to enter the text you want to include in your signature. Follow the steps below to proceed:
- In the signature settings screen, locate the text box labeled “Mobile signature” or “Signature text.”
- Tap on the text box to activate it and start entering your desired mobile signature text.
When entering your mobile signature text, consider including key details that you want to provide in your emails, such as:
- Your full name
- Your job title or role
- Your company name
- Your contact information (e.g., phone number, email address)
- Optional additional details (e.g., website, address)
Keep in mind that the available text space in the mobile signature settings may vary depending on your device and app version. Ensure that your mobile signature text is concise and clear, conveying the necessary information while maintaining a professional appearance.
Furthermore, you may choose to include any additional elements that align with your personal or brand image. For instance, you can consider adding social media icons or links to your professional profiles to enhance your online presence.
Take your time to carefully enter your desired mobile signature text, ensuring that it accurately reflects your identity and provides the necessary information to recipients.
Now that you have entered your desired mobile signature text, let’s proceed to the next step and customize the formatting of your mobile signature to make it even more visually appealing and professional.
Step 8: Customize the formatting of your mobile signature
Once you have entered your desired mobile signature text in the signature settings of the Gmail app, the next step is to customize the formatting to make your signature visually appealing and professional. Follow the steps below to proceed:
- In the signature settings screen, you may notice various formatting options available to you. These options can include font styles, font sizes, text colors, alignment, and more.
- Explore the formatting options and select the ones that best align with your personal or brand style.
- You can change the font style to match your preference, whether it’s a more formal and professional font or a creative and modern one.
- Adjust the font size so that your mobile signature text is clearly legible but not too overwhelming for the recipient.
- Consider using different colors to highlight specific information or create visual interest in your signature.
- Align the text in your mobile signature to your preference, whether it’s left-aligned, centered, or right-aligned.
Take your time to experiment with different formatting options until you achieve the desired look for your mobile signature. Remember that a well-formatted and visually appealing signature can leave a positive impression on the recipients of your emails.
While customizing the formatting of your mobile signature, it’s important to maintain a balance between personalization and professionalism. Ensure that the style and design choices you make align with your brand identity or personal image, while still maintaining a polished and business-oriented appearance.
Now that you have customized the formatting of your mobile signature, it’s time to proceed to the final step and save your mobile signature settings. Let’s move on!
Step 9: Save your mobile signature settings
After customizing the formatting of your mobile signature in the Gmail app, the final step is to save your mobile signature settings. Follow the steps below to complete the process:
- Once you are satisfied with the text and formatting of your mobile signature, look for the option to save your changes. This option is typically represented by a button labeled “Save,” “Apply,” or a checkmark icon.
- Tap on the “Save,” “Apply,” or checkmark icon to save your mobile signature settings.
When you save your mobile signature settings, Gmail will apply the changes you made to your signature and activate it for the selected email account. Moving forward, every new email you compose on your mobile device using the Gmail app will include your mobile signature at the end.
If you have multiple email accounts linked to the Gmail app and you want to set up a mobile signature for each account, repeat the steps mentioned for each individual account to customize and save their respective mobile signatures.
It’s important to note that your mobile signature settings will take effect immediately, and any email you send after saving the settings will include the mobile signature. However, emails that were already composed or drafts that were saved prior to creating the mobile signature will not be automatically updated. To include the mobile signature in those emails, you will need to manually edit the signature for each one.
Congratulations! You have successfully set up your mobile signature in the Gmail app. Your emails will now have a professional touch and easily provide your contact information to recipients.
Remember, you can always revisit the signature settings to make changes, update your contact details, or customize your mobile signature further if needed.
With your mobile signature set up, you are ready to compose and send emails with a personalized and professional touch from your mobile device using the Gmail app!
Tips for creating an effective mobile signature
Now that you have set up your mobile signature in the Gmail app, it’s essential to optimize it for maximum impact. Here are some tips to create an effective mobile signature:
- Keep it concise and professional: Remember that your mobile signature should be concise and easy to read on a mobile device screen. Avoid cluttering it with unnecessary details and stick to providing essential information.
- Include contact information and social media links: Ensure that your mobile signature contains your name, job title, email address, and phone number. Additionally, consider adding links to your professional social media profiles such as LinkedIn or Twitter.
- Consider adding a call-to-action or promotional message: Depending on your use case, include a call-to-action or a brief promotional message in your mobile signature. This could be a link to your latest blog post, an upcoming event, or a special offer.
By following these tips, you can create a mobile signature that not only presents your contact information but also showcases your professionalism and encourages engagement.
Remember to periodically review and update your mobile signature to keep it current and aligned with any changes in your contact information or branding.
Now that you have a well-crafted mobile signature, take advantage of this valuable feature to leave a lasting impression on your email recipients and enhance your professional communication.
Tip 1: Keep it concise and professional
One of the most important tips for creating an effective mobile signature is to keep it concise and professional. As mobile devices have limited screen space, it’s crucial to make your mobile signature clear, concise, and easily readable. Here are some guidelines to follow:
- Include essential information: Include your full name, job title, and company name in your mobile signature. This provides recipients with a quick understanding of who you are and what you do.
- Limit the number of lines: Keep your mobile signature to a maximum of four to six lines to avoid overwhelming the recipient with excessive text. This ensures that your email remains focused and concise.
- Use a legible font size: Select a font size that is easily readable on mobile screens. Aim for a font size between 10 to 12 points to ensure clarity without compromising space.
- Avoid using too many colors or formatting: While it’s important to make your mobile signature visually appealing, using too many colors or excessive formatting can make it appear unprofessional and cluttered. Stick to a simple and clean design.
By keeping your mobile signature concise and professional, you make it easier for recipients to quickly scan and absorb the most important information. It also projects a sense of professionalism and demonstrates that you value your recipients’ time and attention.
Remember, simplicity and clarity are key when it comes to creating an effective mobile signature. Strive to strike the right balance between providing essential information and maintaining a clean, professional appearance.
With this tip in mind, you can optimize your mobile signature to make a lasting impression and effectively communicate your contact details to recipients on their mobile devices.
Tip 2: Include contact information and social media links
When creating your mobile signature, it’s important to include your contact information and provide easy access to your professional network and online presence. Here are some tips on how to effectively incorporate contact information and social media links into your mobile signature:
- Email address and phone number: Include your email address and phone number to allow recipients to easily reach out to you. Make sure to use a professional email address and provide a phone number that you actively use for business communication.
- Professional social media profiles: If you have relevant professional social media profiles, such as LinkedIn or Twitter, consider including links to them in your mobile signature. This allows recipients to connect with you on various platforms and explore your professional online presence.
- Website or portfolio: If you have a personal website or online portfolio showcasing your work, including a link to it in your mobile signature can provide recipients with more information about your expertise and accomplishments.
By including your contact information and social media links in your mobile signature, you make it convenient for recipients to get in touch with you and explore your professional background. It also helps in establishing credibility and gives an opportunity for potential clients, employers, or colleagues to learn more about you and your work.
However, ensure that you only include relevant and professional links in your mobile signature. Avoid adding personal social media profiles or unrelated websites that may not contribute to your professional image.
Remember, the purpose of including contact information and social media links in your mobile signature is to provide easy access to your professional network and make it seamless for recipients to connect with you and learn more about your expertise.
By following this tip, your mobile signature will become a valuable tool for expanding your professional connections and strengthening your online presence.
Tip 3: Consider adding a call-to-action or promotional message
Adding a call-to-action or a promotional message to your mobile signature can further enhance its effectiveness by encouraging recipients to take a specific action. Here are some tips on how to effectively incorporate a call-to-action or promotional message:
- Direct recipients to your latest blog post or newsletter: If you regularly publish content on a blog or send out newsletters, consider including a link or call-to-action button in your mobile signature that directs recipients to your latest post or subscription page.
- Promote an upcoming event or webinar: If you’re hosting an event, workshop, or webinar, use your mobile signature to create awareness by including a short blurb, date, and link for recipients to register or learn more.
- Offer a special discount or promotion: Use your mobile signature as a platform to promote exclusive discounts or offers for your products or services. This can create a sense of urgency and encourage recipients to take advantage of the special deal.
- Include a request for referrals or reviews: If you’re looking to expand your network or build your online reputation, you can add a polite request for referrals or reviews from satisfied clients.
The key to incorporating a call-to-action or promotional message is to strike a balance between being persuasive without being pushy. The message should be concise and clearly state the benefit or value that recipients will gain by taking the desired action.
Remember to periodically update your call-to-action or promotional message to keep your mobile signature fresh and aligned with your current marketing initiatives.
By adding a call-to-action or promotional message in your mobile signature, you can drive engagement, increase conversions, and create new opportunities for your business or professional endeavors.
Troubleshooting common issues with mobile signatures in Gmail
While setting up and using mobile signatures in Gmail, you may encounter some issues that could affect the appearance or functionality of your signature. Here are some common issues and troubleshooting tips:
- Issue 1: Mobile signature not appearing in emails: If your mobile signature is not showing up in your outgoing emails, check if the “Mobile signature” option is toggled on in the Gmail app settings. Also, ensure that you have entered the mobile signature text correctly and have saved the changes. If the issue persists, try signing out of your Gmail account and signing back in to refresh the settings.
- Issue 2: Mobile signature formatting appears inconsistent: If the formatting of your mobile signature appears different or inconsistent in different email clients or devices, it could be due to limitations or variations in HTML rendering. To ensure a more consistent appearance, stick to basic formatting options and avoid using complex styles or fonts. You can also test your mobile signature by sending emails to different devices or clients to see how it appears.
- Issue 3: Mobile signature not syncing across devices: If you have multiple devices and your mobile signature is not syncing across all of them, check if the “Sync” or “Auto-sync” option is enabled for your Gmail account on each device. Additionally, ensure that you are signed in to the same Gmail account on all devices. If the issue persists, try updating the Gmail app or contacting Gmail support for further assistance.
If you encounter any other issues or have specific questions related to mobile signatures in Gmail, it can be helpful to consult Gmail’s official support documentation or community forums for more detailed troubleshooting steps.
By familiarizing yourself with these common issues and troubleshooting tips, you can quickly resolve any problems that may arise while working with mobile signatures in Gmail. Enjoy the benefits of adding a professional touch and convenient contact information to your emails!
Issue 1: Mobile signature not appearing in emails
One common issue you may encounter when setting up a mobile signature in Gmail is that the signature does not appear in your outgoing emails. Several factors could contribute to this issue, but here are some troubleshooting steps to help resolve it:
- Check the “Mobile signature” setting: Make sure that the “Mobile signature” option is toggled on in the Gmail app settings. To do this, access the signature settings and ensure that the toggle switch or checkbox for the mobile signature is enabled. Without this option turned on, your mobile signature will not be automatically appended to your emails.
- Verify the signature text: Double-check the text you entered for your mobile signature. It’s possible that you may have entered the text incorrectly or missed a character. Ensure that your signature text is accurate, appropriate, and saved in the signature settings.
- Save your changes: After making any modifications to your mobile signature, be sure to save your changes. Sometimes, users forget to save their signature settings, which causes the mobile signature not to appear in emails. Verify that you have properly saved the changes before composing new emails.
- Refresh the Gmail app: Occasionally, the Gmail app may need to be refreshed to display the mobile signature correctly. Sign out of your Gmail account, close the app, and then sign in again. This can help refresh the settings and ensure that the mobile signature shows up in your outgoing emails.
- Reach out to Gmail support: If you have tried the above steps and the mobile signature still does not appear, it’s advisable to contact Gmail support for further assistance. They can provide more specific troubleshooting steps or investigate any possible technical issues related to your account.
By following these troubleshooting steps, you should be able to resolve the issue of your mobile signature not appearing in emails. Enjoy the benefits of having a professional and customized signature automatically added to all your outgoing messages in Gmail!
Issue 2: Mobile signature formatting appears inconsistent
Another common issue that you might encounter when setting up a mobile signature in Gmail is inconsistent formatting. The appearance of your mobile signature may vary across different email clients or devices. Here are some troubleshooting tips to address this issue:
- Simplify your formatting: To ensure a more consistent appearance, keep your mobile signature formatting simple and avoid using complex styles or fonts. Stick to basic formatting options like font style, font size, and text color that are widely supported across email clients and devices.
- Avoid excessive use of colors: While it can be tempting to make your mobile signature visually appealing by using multiple colors, it’s important to exercise caution. Excessive or contrasting colors may cause inconsistencies in how the signature appears on different devices. Stick to a simple and cohesive color scheme to maintain consistency.
- Test your mobile signature: Send test emails to different devices and email clients to see how your mobile signature appears. This will help you identify any potential formatting issues and make adjustments accordingly. Pay attention to how your signature looks on both mobile devices and desktop email clients.
- Consider responsive design: If you’re proficient in HTML and CSS, you can create a responsive design for your mobile signature. Responsive design ensures that the signature adapts smoothly to different screen sizes, helping to maintain consistent formatting across various devices and resolutions.
- Seek professional help: If you’re unsure about creating a consistent and visually appealing mobile signature, you may want to consider hiring a professional email designer or developer. They can help ensure that your mobile signature renders correctly on different devices and email clients, providing a polished and consistent appearance.
By following these troubleshooting tips, you can address the issue of inconsistent formatting in your mobile signature. Remember, simplicity, compatibility, and testing are key to achieving a consistent appearance across various email clients and devices.
Enjoy the confidence of knowing that your mobile signature will consistently reflect your professionalism and brand image, regardless of how recipients access your emails!
Issue 3: Mobile signature not syncing across devices
One frustrating issue that you may encounter when using a mobile signature in Gmail is that it doesn’t sync across all your devices. This means that changes made to your mobile signature on one device may not appear on other devices. Here are some troubleshooting steps to address this issue:
- Ensure sync is enabled: Check if the “Sync” or “Auto-sync” option is enabled for your Gmail account on each of your devices. This setting ensures that changes made on one device are synced and reflected on all connected devices. To enable sync, go to the device’s settings, locate the “Accounts” section, find your Gmail account, and make sure that the sync toggle switch is enabled.
- Confirm signed-in account: Ensure that you are signed in to the same Gmail account across all your devices. If you have multiple Google accounts, double-check that you’re using the correct account associated with your mobile signature settings. Adding or removing accounts may affect the synchronization of your mobile signature.
- Update the Gmail app: Make sure that you are using the latest version of the Gmail app on all your devices. Outdated versions may have compatibility issues or bugs that prevent proper syncing. Visit your device’s app store to check for any available updates to the Gmail app and install them.
- Restart the devices: Sometimes, a simple restart of your devices can help resolve syncing issues. Reboot each device that is experiencing trouble with syncing the mobile signature. After restarting, open the Gmail app and check if the mobile signature now appears correctly.
- Contact Gmail support: If the issue persists, despite attempting the above steps, consider reaching out to Gmail support for further assistance. They can provide more specific troubleshooting steps based on your account and device setup. Visit the Gmail Help Center to access support resources or contact their customer support directly for personalized assistance.
By following these troubleshooting steps, you should be able to resolve the issue of your mobile signature not syncing across devices. Once syncing is successfully established, any changes you make to your mobile signature will be reflected on all your connected devices, ensuring consistency and convenience.
Enjoy the convenience of having your mobile signature readily available, no matter which device you use to send emails through the Gmail app!