
Why Remove the Email Signature?
An email signature is a block of text displayed at the end of an email message, commonly used to provide contact information or additional details about the sender. While email signatures can be useful in professional settings, there are times when you may need to remove them. Here are a few reasons why you might want to remove your email signature:
- Clean and concise communication: In some cases, you may want to keep your email messages simple and focused on the content without any distractions from a signature. Removing the email signature ensures that the recipient’s attention is solely on the message you are conveying, promoting clear and concise communication.
- Relevance: Email signatures often include information like job titles, company names, and contact details. However, these details may change over time and become outdated. By removing the signature, you avoid potential confusion or presenting inaccurate information to the recipient.
- Privacy concerns: Certain situations may require you to share emails without revealing personal or professional contact information. By removing the signature, you can protect your privacy and prevent unauthorized access to your details.
- Email forwarding: When you forward an email, the signature from the original sender is typically preserved. Removing the signature from your emails ensures that the communication appears more seamless as it passes through different recipients.
- Formatting compatibility: Email signatures often contain different formatting elements like images, logos, or unique fonts. Some email clients or platforms may not render these elements correctly, resulting in a messy or distorted appearance. Removing the signature ensures that your email retains its intended formatting across various platforms and clients.
Next, we’ll explore different methods to remove an email signature from Gmail, whether through Gmail settings, manual editing, browser extensions, or mobile devices.
Method 1: Removing the Signature via Gmail Settings
Gmail offers a straightforward way to remove your email signature directly in the settings. Here’s how:
- Step 1: Open your Gmail account
- Step 2: Access the Gmail Settings
- Step 3: Locate and Modify the Signature
- Step 4: Save Changes
- Step 5: Test the Signature Removal
Launch your web browser and navigate to the Gmail website. Sign in to your Gmail account using your email address and password.
Once you have logged in, locate the gear icon in the upper right corner of the Gmail interface and click on it. A drop-down menu will appear. Select the “Settings” option from the menu.
Scroll through the settings until you find the “Signature” section. In this section, you can view and edit the currently set signature. To remove the signature, simply delete the existing text or select and delete any images.
After removing the signature, scroll down to the bottom of the Settings page and click on the “Save Changes” button. Gmail will automatically save your updated settings.
To test whether the email signature has been successfully removed, compose a new email and check if the signature is no longer present. If the email signature has been successfully removed, you will be able to send emails without it.
By following these simple steps, you can easily remove your email signature using the Gmail settings. However, if you prefer to manually edit the signature or use browser extensions, continue reading to explore alternative methods for removing your email signature.
Method 2: Editing the Signature Manually
If you prefer more control over your email signature, you can manually edit it in Gmail. Follow the steps below:
- Step 1: Open your Gmail account
- Step 2: Access the Gmail Settings
- Step 3: Locate and Open the Signature Settings
- Step 4: Edit or Remove the Signature
- Step 5: Save Changes
- Step 6: Test the Signature Removal
Launch your web browser and log in to your Gmail account using your email address and password.
Once you’re signed in, locate the gear icon in the upper right corner of the Gmail interface and click on it. From the drop-down menu, choose the “Settings” option.
Scroll down the settings page until you find the “Signature” section. Click on it to open the signature editor.
In the signature editor, you can directly modify the text or delete it entirely to remove the signature. Feel free to make any changes or adjustments to the content as desired.
Once you have finished editing or removing your signature, scroll down to the bottom of the page and click on the “Save Changes” button. This will update your signature settings.
To ensure that the signature has been successfully removed, compose a new email and check if the signature is no longer there. If the email is sent without a signature, it means you have successfully edited or removed it.
By manually editing your signature within the Gmail settings, you have full control over the content and layout of your email signature. This method allows you to personalize your signature or completely remove it according to your preferences.
Step 1: Open your Gmail account
To begin the process of removing your email signature in Gmail, follow these simple steps to open your Gmail account:
- Launch your web browser
- Go to the Gmail website
- Enter your email address
- Click on Next
- Enter your password
- Click on Sign In
Open any web browser on your computer, such as Google Chrome, Mozilla Firefox, or Safari.
In the address bar of your web browser, type in www.gmail.com and press Enter. The Gmail login page will appear.
On the Gmail login page, enter your email address associated with your Gmail account. Make sure to type it correctly to avoid any login errors.
After entering your email address, click on the “Next” button to proceed.
On the next page, carefully enter your Gmail account password. Ensure that you type the correct password to successfully log in to your account.
Once you have entered your password, click on the “Sign In” button. Gmail will then verify your credentials and log you into your Gmail account.
Once you have successfully logged in to your Gmail account, you can proceed to the next steps to remove the email signature.
Step 2: Access the Gmail Settings
After logging in to your Gmail account, you need to access the Gmail settings to make changes to your email signature. Follow these steps to access the settings:
- Locate the gear icon
- Click on “Settings” option
- Explore the settings menu
- Go to the “General” category
In the top-right corner of the Gmail interface, you will see a small gear icon. Click on this icon to open the settings menu.
Once you click on the gear icon, a drop-down menu will appear. From this menu, select the “Settings” option. This will open the Gmail settings page.
On the left side of the settings page, you will see a list of different categories. These include General, Labels, Inbox, etc. Take a moment to familiarize yourself with the settings menu. The category we’re interested in is “General”.
Click on the “General” category to access the general settings of your Gmail account. This is where you can make changes to various aspects of your account, including the email signature.
By following these steps, you can easily access the Gmail settings to make changes to your email signature. Once you have reached the settings page, you can proceed to the next steps to modify or remove your email signature configuration.
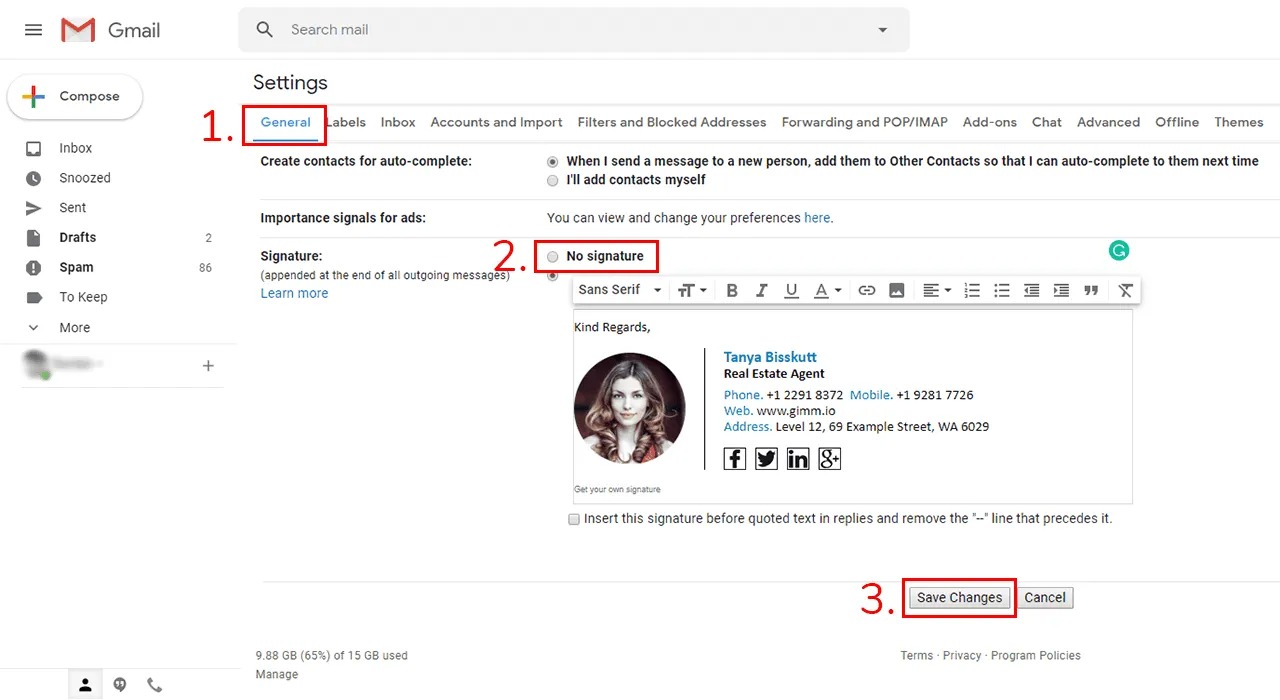
Step 3: Locate and Modify the Signature
Once you have accessed the Gmail settings, you can now locate and modify your email signature. Follow these steps:
- Scroll down to the “Signature” section
- View your current signature
- Edit the signature text
- Remove images or links
- Customize the appearance
On the settings page, you will see a section labeled “Signature.” Scroll down the page until you find this section.
In the “Signature” section, you will see your current email signature displayed. Take a moment to review the content and layout of your existing signature.
To modify your email signature, position your cursor within the signature text area. You can now edit the existing text by adding, removing, or modifying the content as you see fit. You can format the text using options like bold, italics, or font size.
If your email signature includes images or links, you can remove them by selecting the element and pressing the delete button or backspace key on your keyboard. This will remove the image or link from your signature.
Gmail provides various formatting options to customize the appearance of your signature. You can experiment with different font styles, colors, alignments, and spacing to achieve the desired look.
By following these steps, you will be able to locate and modify your email signature in the Gmail settings. Take your time to make the necessary changes and ensure that your signature is personalized and professional before moving on to the next steps.
Step 4: Save Changes
After making modifications to your email signature, it is important to save the changes in order for them to take effect. Follow these steps to save the changes you’ve made:
- Review the signature
- Scroll to the bottom of the settings page
- Click on “Save Changes”
- Confirmation message
Before saving your changes, take a moment to review your email signature to ensure that it appears as intended. Check for any errors, missing information, or formatting inconsistencies.
Scroll down to the bottom of the Gmail settings page, where you will find the “Save Changes” button. This button is located below all the settings categories.
Once you are satisfied with your modifications, click on the “Save Changes” button. Gmail will save your new email signature configuration.
After clicking on “Save Changes,” Gmail will display a confirmation message to let you know that your changes have been successfully saved. You can then proceed to the next step.
By saving your changes, your updated email signature will be applied to all outgoing emails from your Gmail account. It is important to verify that your signature appears correctly in the next step to ensure that the changes have been properly applied.
Step 5: Test the Signature Removal
Once you have saved the changes to your email signature in Gmail, it is important to test whether the signature has been successfully removed. Follow these steps to ensure that the signature has been removed:
- Compose a new email
- Check for the absence of the signature
- Send a test email
- Receive and inspect the test email
Click on the “Compose” button in Gmail to open a new email window.
In the email composition window, verify that the email signature is no longer present at the bottom of the email. If the signature has been successfully removed, you will not see any text or images related to the signature.
Send the test email to yourself or another recipient to confirm that the email signature has been completely removed.
Once you have sent the test email, navigate to your inbox and open the received email. Double-check that the signature is not included at the bottom of the email. If the signature is absent, it indicates that the removal process was successful.
By following these steps and carefully examining the test email, you can ensure that the email signature has been successfully removed from your outgoing emails. Congratulations! You have now learned how to remove the email signature from Gmail using the Gmail settings.
Method 3: Using a Browser Extension
If you prefer a more streamlined approach to remove your email signature in Gmail, you can consider using a browser extension. Here’s how you can utilize a browser extension to remove your signature:
- Step 1: Install the browser extension
- Step 2: Access the Gmail Settings
- Step 3: Disable the extension
- Step 4: Test the signature removal
Start by opening your web browser and searching for a suitable browser extension to remove email signatures in Gmail. Popular extensions include “Gmail Signature Remover” or “Email Signature Blocker”. Install the extension by following the provided instructions.
Once the extension is installed, go to your Gmail account and click on the gear icon at the top right corner of the interface to access the Gmail settings.
In the Gmail settings, navigate to the section where you can manage your extensions. Locate the extension you installed for removing email signatures and disable it. This will temporarily disable the extension’s function.
To confirm that the extension has removed your email signature, compose a new email. You should notice that the signature is no longer present. Send a test email to verify that the signature is indeed removed.
Using a browser extension can save you time and effort in removing email signatures in Gmail. However, keep in mind that browser extensions may vary in functionality and compatibility, so choose a well-reviewed and reputable extension to ensure a reliable experience.
Step 1: Install the Browser Extension
To begin the process of using a browser extension to remove your email signature in Gmail, you will first need to install the extension. Follow these steps:
- Search for a suitable browser extension
- Select and install the extension
- Follow the installation instructions
- Verify the successful installation
Open your web browser and search for a browser extension specifically designed to remove email signatures in Gmail. Some popular browser extensions for this purpose include “Gmail Signature Remover” and “Email Signature Blocker”.
Choose a browser extension that meets your requirements and preferences. Make sure to read the reviews and check its compatibility with your web browser. Once you have made your selection, click on the “Install” or “Add to Browser” button to initiate the installation process.
Depending on the browser and extension, you may be required to confirm the installation by clicking on additional prompts or permissions. Follow the on-screen instructions to complete the installation process.
After the installation is complete, you should see a confirmation message or icon indicating that the extension has been successfully installed. You may need to restart your browser for the extension to take effect.
By following these steps, you can easily install a browser extension that is specifically designed to remove email signatures in Gmail. Once the extension is installed, you can proceed to access the Gmail settings and configure the extension to remove your email signature.
Step 2: Access the Gmail Settings
After installing a browser extension to remove your email signature in Gmail, you will need to access the Gmail settings to configure the extension. Follow these steps to access the Gmail settings:
- Open your Gmail account
- Locate the gear icon
- Select the “Settings” option
- Explore the settings menu
- Access the extension settings
Launch your web browser and go to the Gmail website. Enter your email address and password to log in to your Gmail account.
In the top-right corner of the Gmail interface, you will see a small gear icon. Click on this icon to open the settings menu.
From the drop-down menu that appears after clicking on the gear icon, select the “Settings” option. This will take you to the Gmail settings page.
On the settings page, you will find a list of different categories on the left side. These categories include General, Labels, Inbox, etc. Take a moment to familiarize yourself with the settings menu options.
Look for the category or section related to the browser extension you installed to remove email signatures. It might be listed under an appropriate name like “Extension Settings” or “Signature Remover”. Click on this category or section to access the extension’s settings.
By following these steps, you can easily access the Gmail settings to configure the browser extension you installed for removing your email signature. Once you have accessed the extension settings, you can proceed to disable or adjust the extension as per your preferences.
Step 3: Disable the Extension
After accessing the Gmail settings and opening the extension settings for the email signature removal browser extension, you may need to disable or adjust the extension as necessary. Follow these steps to disable the extension:
- Locate the extension settings
- Disable the extension
- Save the changes
- Exit the settings
Within the Gmail settings page, navigate to the section or category that corresponds to the browser extension you installed for removing email signatures. Look for the specific settings related to the extension.
Once you have located the extension settings, find the option to disable or turn off the extension. This will temporarily deactivate the extension’s functionality within your Gmail account.
After disabling the extension, ensure that you save the changes made to the Gmail settings. Look for a “Save Changes” or similar button in the extension settings or within the overall Gmail settings page. Click on this button to save the changes.
Once the changes have been saved, exit the extension settings and return to your Gmail inbox. The email signature removal extension will now be disabled and will not modify or remove any email signatures from your outgoing emails.
By following these steps, you can easily disable the browser extension that you installed for removing email signatures in Gmail. It is important to note that you can enable or reconfigure the extension settings at any time if you change your mind or need to adjust the email signature removal functionality in the future.
Step 4: Test the Signature Removal
After disabling the browser extension that is used to remove email signatures in Gmail, it is important to test whether the signature removal function has been successfully deactivated. Follow these steps to verify the removal of your email signature:
- Compose a new email
- Check for the absence of the signature
- Send a test email
- Receive and inspect the test email
Click on the “Compose” button in Gmail to create a new email. This will open a blank email composition window.
In the email composition window, ensure that the email signature is no longer present at the bottom. If the extension is successfully disabled, you should not see any text or images related to the email signature.
To confirm that the email signature removal is functioning as intended, send the test email to yourself or another recipient.
Once you have sent the test email, go to your inbox and open the received email. Double-check that the email signature is not included at the bottom of the email. If the email is received without a signature, it means that the extension is successfully disabled and the removal function is not altering your outgoing emails.
By performing these steps and examining the test email, you can ensure that the email signature removal function provided by the browser extension is no longer active in your Gmail account. Congratulations! You have successfully disabled the signature removal feature.
Method 4: Removing the Signature on Mobile
If you primarily use your mobile device to access Gmail and want to remove your email signature, you can do so following these steps:
- Step 1: Open the Gmail app
- Step 2: Access the settings menu
- Step 3: Navigate to the settings
- Step 4: Edit or remove the signature
- Step 5: Modify or delete the signature
- Step 6: Save the changes
Unlock your mobile device and locate the Gmail app on your home screen or app drawer. Tap on the Gmail app icon to launch it.
Once you are in the Gmail app, tap on the menu icon, usually represented by three horizontal lines, located at the top left or right corner of the screen. This will open the Gmail menu.
In the Gmail menu, scroll down and find the “Settings” option. Tap on it to access the Gmail settings.
Within the settings, look for the option related to your email signature. It may be labeled as “Signature” or “Email Signature”. Tap on it to open the signature editor.
In the signature editor, you can make changes to your email signature. To remove the signature, delete the existing text or select and delete any images present in the signature.
Once you have made the necessary modifications to your email signature, tap on the “Save” or “Done” button to save the changes.
By following these steps, you can easily remove your email signature on the Gmail mobile app. It is important to note that the steps may vary slightly depending on the version of the app and operating system you are using. After removing the signature, you can compose new emails on your mobile device without the signature being appended.
Step 1: Open the Gmail app
To begin the process of removing your email signature in Gmail on your mobile device, follow these steps to open the Gmail app:
- Unlock your mobile device
- Locate the Gmail app
- Access your Gmail account
- Enter your password
- Tap on “Sign in”
Unlock your phone or tablet by entering your passcode, using your fingerprint, or utilizing any other unlock method that you have set up.
Locate the Gmail app on your device’s home screen or in the app drawer. The app icon usually features an envelope with the Gmail logo. Tap on the Gmail app icon to launch it.
Once the Gmail app is open, you will be presented with the login page. Enter your email address associated with your Gmail account and tap “Next” or the arrow button to proceed.
On the next screen, enter the password for your Gmail account. Ensure that you enter the correct password to successfully log in.
After entering your password, tap on the “Sign in” button to log in to your Gmail account. The Gmail app will then load your inbox and display your email messages.
Once you have successfully opened the Gmail app on your mobile device and have signed in to your account, you can proceed to the next steps to navigate to the settings menu and remove your email signature.
Step 2: Access the Settings Menu
Once you have opened the Gmail app on your mobile device, the next step is to access the settings menu where you can make changes to your email signature. Follow these steps to access the settings menu:
- Locate the menu icon
- Find the “Settings” option
- Navigate to the signature settings
- Access the signature editor
In the top-left or top-right corner of the Gmail app screen, you will see a menu icon. This icon is often represented by three horizontal lines or stacked dots. Tap on this icon to open the Gmail menu.
Within the Gmail menu, scroll down until you find the “Settings” option. Tap on it to enter the settings menu.
In the settings menu, scroll through the options until you find the category related to your email signature. It might be labeled as “Signature” or “Email Signature”. Tap on this category to access the signature settings.
Once you are in the signature settings, tap on the option that allows you to edit or manage your email signature. This will open the signature editor where you can modify or remove your existing email signature.
By following these steps, you can easily access the settings menu in the Gmail app on your mobile device. Once you have entered the settings menu, you can proceed to the next steps to edit or remove your email signature according to your preferences.
Step 3: Edit or Remove the Signature
After accessing the signature settings in the Gmail app on your mobile device, you can now proceed to edit or remove your email signature. Follow these steps to make the necessary modifications:
- Review your current email signature
- Edit the signature
- Remove the signature
- Customize the signature
- Save the changes
Within the signature editor, take a moment to review your current email signature. This will allow you to see the text, formatting, and any images or links that are included in your signature.
To modify your email signature, tap on the text area within the signature editor. This will bring up the keyboard on your device, allowing you to edit the existing text or add new content.
If you wish to remove your entire email signature, simply delete all the text and any accompanying images or links within the signature editor.
If you want to make specific changes to your email signature, such as updating contact details or adding a new design element, you can do so by editing the existing content or adding new elements as desired.
After making the necessary edits or removing the signature, tap on the “Save” or “Done” button within the signature editor to save the changes to your email signature.
By following these steps, you can easily edit or remove your email signature within the Gmail app on your mobile device. Once the changes are saved, any new emails you compose will no longer have the previous signature or will reflect the updated signature as per your modifications.
Step 4: Test the Signature Removal
After editing or removing your email signature in the Gmail app on your mobile device, it’s important to test whether the signature has been successfully removed. Follow these steps to ensure that the signature removal is effective:
- Compose a new email
- Check for the absence of the signature
- Send a test email
- Receive and inspect the test email
Tap on the “Compose” button within the Gmail app to start composing a new email. This will open a blank email composition window.
In the email composition window, verify that the email signature is no longer present at the bottom of the email. If the signature has been successfully removed, you will not see any text, images, or links related to the signature.
To confirm that the email signature has been removed, send a test email to yourself or another recipient. Make sure to include some sample content in the email body.
Once the test email is sent, navigate to your inbox and open the received email. Double-check that the signature is not included at the bottom of the email. If the email is received without a signature, it confirms that the email signature removal was successful on your mobile device.
By following these steps and thoroughly examining the test email, you can ensure that the email signature has been completely removed while composing new emails on your mobile device using the Gmail app.