
Why Update the Asus Motherboard BIOS
The Basic Input/Output System (BIOS) is a crucial component of your Asus motherboard. It is responsible for initializing the hardware and booting the operating system. However, like any software, the BIOS may have bugs or limitations that can affect the performance, stability, and compatibility of your system.
Updating the Asus motherboard BIOS can bring several benefits:
- Improved system stability: BIOS updates often include fixes for various stability issues. By updating the BIOS, you can eliminate crashes, freezes, and other instability problems.
- Enhanced compatibility: As new hardware and software are released, the older BIOS versions may not support them properly. Updating the BIOS ensures that your motherboard is compatible with the latest peripherals and components.
- Better performance: BIOS updates may include optimizations that can improve the overall performance of your system. This can result in faster boot times, improved memory support, and enhanced CPU or GPU performance.
- Fixed security vulnerabilities: Outdated BIOS versions may have security vulnerabilities that can be exploited by attackers. By updating the BIOS, you ensure that your system is protected against potential threats.
- Added features and functionality: BIOS updates often introduce new features, options, and improvements to the motherboard’s firmware. These additions can enhance the user experience and provide additional customization options.
It is important to note that updating the BIOS should be approached with caution. Incorrectly flashing the BIOS or using an incompatible update can lead to system malfunctions or even render your motherboard unusable. Therefore, it is crucial to carefully follow the instructions provided by Asus and ensure that you are using the correct BIOS update for your specific motherboard model.
In the following sections, we will guide you through the process of updating your Asus motherboard BIOS using various methods, taking all necessary precautions to ensure a successful update.
Check the Current BIOS Version
Before proceeding with a BIOS update, it is important to identify the current version of your Asus motherboard BIOS. This information will help you determine if a newer version is available and if an update is necessary.
There are a few ways to check the current BIOS version:
- Using BIOS Setup: Restart your computer and access the BIOS setup by pressing the designated key during the boot process (often Del, F2, or F10). Once in the BIOS setup, navigate to the “System Information” or “Main” section. Here, you should find the BIOS version listed.
- Using Windows System Information: If you can boot into Windows, you can use the System Information utility to find the BIOS version. Press Win + R to open the Run dialog, then type “msinfo32” and hit Enter. In the System Information window, navigate to “System Summary” and look for the BIOS Version/Date entry.
- Using third-party software: There are several third-party tools available, such as CPU-Z or Speccy, which can provide detailed hardware information, including the BIOS version.
Once you have identified the current BIOS version, compare it to the latest version available on the Asus website. Make sure to download the correct BIOS update file corresponding to your motherboard model and current BIOS version.
It is important to note that if your current BIOS version is already up to date and you are not experiencing any issues, it may not be necessary to update the BIOS. Updating the BIOS should only be done if there are specific reasons, such as system stability issues, compatibility problems, or the need for added functionality.
In the next sections, we will guide you through the process of downloading and updating the BIOS of your Asus motherboard using various methods. We will ensure that you take the necessary precautions to ensure a successful update without any potential risks.
Locate the Latest BIOS Version
Once you have determined the current version of your Asus motherboard BIOS, the next step is to locate the latest BIOS version available. Asus regularly releases BIOS updates to address bugs, improve performance, and add new features to their motherboards.
Follow these steps to find the latest BIOS version:
- Visit the Asus support website: Open your web browser and navigate to the Asus official support website (https://www.asus.com/support). Make sure to choose the correct region and product category for your motherboard.
- Search for your specific motherboard model: Use the search or navigation options on the Asus support website to find the webpage dedicated to your motherboard model. This page will provide information and support resources related to your motherboard.
- Navigate to the “Drivers & Tools” section: Once you have found your motherboard’s webpage, look for the “Support” or “Downloads” section. Locate the “Drivers & Tools” section, as this is where you will find the BIOS updates.
- Enter your operating system: Choose your operating system from the drop-down menu or select the appropriate version of Windows or other supported operating systems.
- Find the latest BIOS version: In the list of available drivers and software, look for the BIOS or UEFI updates. Locate the latest version released by Asus and take note of the version number and release date.
- Read the release notes: Click on the BIOS update link to access the download page. Take the time to read the release notes or any additional instructions provided by Asus. This will give you valuable information about the changes, fixes, and improvements in the new BIOS version.
Ensure that you download the correct BIOS update file for your specific motherboard model and the current BIOS version installed on your system. Downloading and using an incorrect BIOS update file can result in irreversible damage to your motherboard and system.
In the next sections, we will guide you through the process of downloading the BIOS update file and updating your Asus motherboard BIOS using different methods.
Download the BIOS Update
Once you have located the latest BIOS version for your Asus motherboard, the next step is to download the BIOS update file. Asus provides the necessary files on their official support website, making it easy to obtain the latest firmware for your motherboard.
Follow these steps to download the BIOS update:
- Visit the Asus support website: Open your web browser and go to the Asus official support website (https://www.asus.com/support). Make sure to choose the correct region and product category for your motherboard.
- Search for your specific motherboard model: Use the search or navigation options on the Asus support website to find the webpage dedicated to your motherboard model. This page will provide information and support resources related to your motherboard.
- Navigate to the “Drivers & Tools” section: Look for the “Support” or “Downloads” section on your motherboard’s webpage. From there, go to the “Drivers & Tools” section, where you will find various drivers and software updates.
- Select the BIOS update: In the list of available drivers and software, locate the BIOS or UEFI update related to your motherboard. Click on the download link for the latest BIOS version.
- Choose the download method: On the download page, you may have the option to download the BIOS update using different methods. Common options include downloading the file directly or using a utility provided by Asus to simplify the process.
- Download the BIOS update file: Follow the instructions on the download page to proceed with the download. Save the BIOS update file to a location on your computer that is easily accessible.
It is essential to download the correct BIOS update file that corresponds to your specific motherboard model and the current BIOS version installed on your system. Using an incorrect BIOS update file can result in irreversible damage to your motherboard.
Once you have successfully downloaded the BIOS update, you are now ready to proceed with the actual update process. The following sections will guide you through the necessary steps to update your Asus motherboard BIOS using various methods.
Prepare a USB Flash Drive
Before updating the BIOS on your Asus motherboard, it is necessary to prepare a USB flash drive to store the BIOS update file. The flash drive will serve as the medium through which the BIOS update is transferred to your motherboard.
Follow these steps to prepare a USB flash drive:
- Select a compatible USB flash drive: Ensure that you have a USB flash drive available that is compatible with your motherboard. Ideally, it should have sufficient storage capacity to hold the BIOS update file.
- Check the file system format: Open Windows Explorer and right-click on the USB flash drive. Select “Properties” and navigate to the “General” tab. Look for the “File system” information. The USB flash drive should be formatted in FAT32 for compatibility with most motherboards.
- Back up any important data: Before proceeding, it is recommended to back up any important data stored on the USB flash drive. Formatting the drive will erase all existing data.
- Format the USB flash drive: If the file system format of your USB flash drive is not FAT32, you will need to format it. Right-click on the USB flash drive in Windows Explorer, select “Format,” and choose FAT32 as the file system format. Follow the on-screen prompts to complete the formatting process.
- Create a folder on the USB flash drive: Once the USB flash drive is formatted, create a new folder on the drive and give it a descriptive name. This will help you later when you transfer the BIOS update file onto the flash drive.
- Copy the BIOS update file: Locate the downloaded BIOS update file on your computer. Copy the file and paste it into the folder you created on the USB flash drive. Ensure that you place the BIOS update file directly in the folder and not in any subfolders.
- Safely eject the USB flash drive: Right-click on the USB flash drive icon in Windows Explorer and select “Eject” to safely remove the drive from your computer. This step ensures that the data is properly written to the flash drive before removal.
With the USB flash drive prepared and the BIOS update file safely stored on it, you are now ready to proceed with updating the BIOS on your Asus motherboard. The following sections will guide you through the process using different methods.
Create a BIOS Update Disk
In some cases, updating the BIOS on your Asus motherboard requires creating a BIOS update disk. This method involves burning the BIOS update file onto a CD or DVD, which will be used to update the motherboard’s firmware.
Follow these steps to create a BIOS update disk:
- Gather the necessary materials: Make sure you have a blank CD or DVD and a compatible optical drive available to create the BIOS update disk.
- Locate the downloaded BIOS update file: Find the BIOS update file that you downloaded from the Asus website. Ensure that the file is easily accessible, as you will need to burn it onto the disk.
- Insert a blank CD/DVD: Insert the blank CD/DVD into your optical drive. Make sure it is properly seated and recognized by your computer.
- Burn the BIOS update file: Use a CD/DVD burning software of your choice to burn the BIOS update file onto the blank disc. Open the burning software, select the option to create a data disc, and choose the BIOS update file as the content to be burned.
- Check the burning settings: Before proceeding, verify that the burning settings are configured correctly. Make sure the file system is set to ISO 9660, and the writing speed is appropriate for your disc and drive.
- Start the burning process: Once you are satisfied with the settings, start the burning process. The software will create the BIOS update disk by writing the BIOS update file onto the disc.
- Label the BIOS update disk: After the burning process is complete, remove the disk from the optical drive and label it clearly. Include the motherboard model and BIOS version to easily identify it in the future.
With the BIOS update disk created, you are now ready to proceed with updating the BIOS on your Asus motherboard. The following sections will guide you through the update process using different methods.
Update the BIOS Using the Easy Flash Utility
The Easy Flash utility is a built-in feature in Asus motherboards that allows you to update the BIOS directly from the BIOS setup menu. This method is convenient and straightforward, as it eliminates the need for additional tools or software.
Follow these steps to update the BIOS using the Easy Flash utility:
- Restart your computer: Make sure your computer is powered on, then restart it to access the BIOS setup menu. Press the designated key (often Del, F2, or F10) during the boot process to enter the BIOS setup.
- Navigate to the Easy Flash utility: Once in the BIOS setup menu, navigate to the “Tools” or “EZ Flash” tab. Look for the Easy Flash utility option and select it.
- Locate the BIOS update file: The Easy Flash utility will scan the connected devices for the BIOS update file. Use the utility to locate the BIOS update file stored on a USB flash drive or other compatible storage devices. Navigate to the directory where the BIOS update file is located.
- Select the BIOS update file: After locating the BIOS update file, select it in the Easy Flash utility. Check that the displayed file corresponds to the actual BIOS update file you want to use for the update.
- Start the BIOS update: Once you have selected the correct BIOS update file, proceed with starting the update process. Follow the on-screen instructions provided by the Easy Flash utility to confirm the update and initiate the flashing process.
- Wait for the update to complete: The Easy Flash utility will update the BIOS automatically. During the process, avoid restarting or shutting down your computer, as this can interrupt the update and potentially cause issues.
- Restart your computer: Once the BIOS update is complete, the system will prompt you to restart your computer. Follow the on-screen instructions to restart the system.
- Verify the BIOS update: After restarting, enter the BIOS setup menu again and navigate to the “System Information” or similar section. Verify that the BIOS version matches the updated version you intended to install.
Updating the BIOS using the Easy Flash utility is a convenient and relatively safe method. However, it is essential to follow the instructions provided by Asus and ensure that the BIOS update file used is appropriate for your specific motherboard model.
In the next section, we will explore another method to update the BIOS on your Asus motherboard using the ASUS WinFlash utility.
Update the BIOS Using ASUS WinFlash
ASUS WinFlash is a utility provided by Asus specifically designed for updating the BIOS on Asus motherboards. It offers a user-friendly interface and provides a simple and efficient method to update the BIOS.
Follow these steps to update the BIOS using ASUS WinFlash:
- Download and install ASUS WinFlash: Visit the official ASUS support website and locate the page dedicated to your motherboard model. Download the latest version of ASUS WinFlash provided for your specific motherboard.
- Locate the downloaded ASUS WinFlash utility: Once the download is complete, locate the ASUS WinFlash utility file on your computer and double-click to launch it.
- Accept the license agreement: Read and accept the license agreement presented by ASUS WinFlash to proceed with the installation.
- Prepare the BIOS update file: Obtain the correct BIOS update file from the ASUS website. Ensure that the update file is compatible with your motherboard model and the current BIOS version.
- Launch ASUS WinFlash: After the utility is installed, launch ASUS WinFlash from the Windows Start menu or desktop shortcut.
- Select the BIOS update file: In the ASUS WinFlash utility interface, click on “Browse” or “Select” to locate the downloaded BIOS update file on your computer.
- Begin the BIOS update: Once the BIOS update file is selected, click on the “Update” or “Flash” button to initiate the BIOS update process.
- Follow the on-screen instructions: ASUS WinFlash will guide you through the update process, providing information and warnings as needed. Follow the instructions carefully to ensure a successful update.
- Wait for the update to complete: While the BIOS update is in progress, avoid interrupting the process or shutting down your computer. Allow the utility to complete the update process uninterrupted.
- Restart your computer: After the update is finished, ASUS WinFlash will prompt you to restart your computer. Follow the instructions to restart your system.
- Verify the BIOS update: After restarting, enter the BIOS setup menu and navigate to the “System Information” or similar section. Confirm that the BIOS version matches the updated version you intended to install.
Updating the BIOS using ASUS WinFlash is a straightforward process, but it is crucial to ensure that you have the correct BIOS update file and follow the instructions provided by Asus precisely. This will help avoid any potential issues and ensure a successful BIOS update.
In the next section, we will explore another method to update the BIOS on your Asus motherboard using the EZ Flash utility in UEFI BIOS.
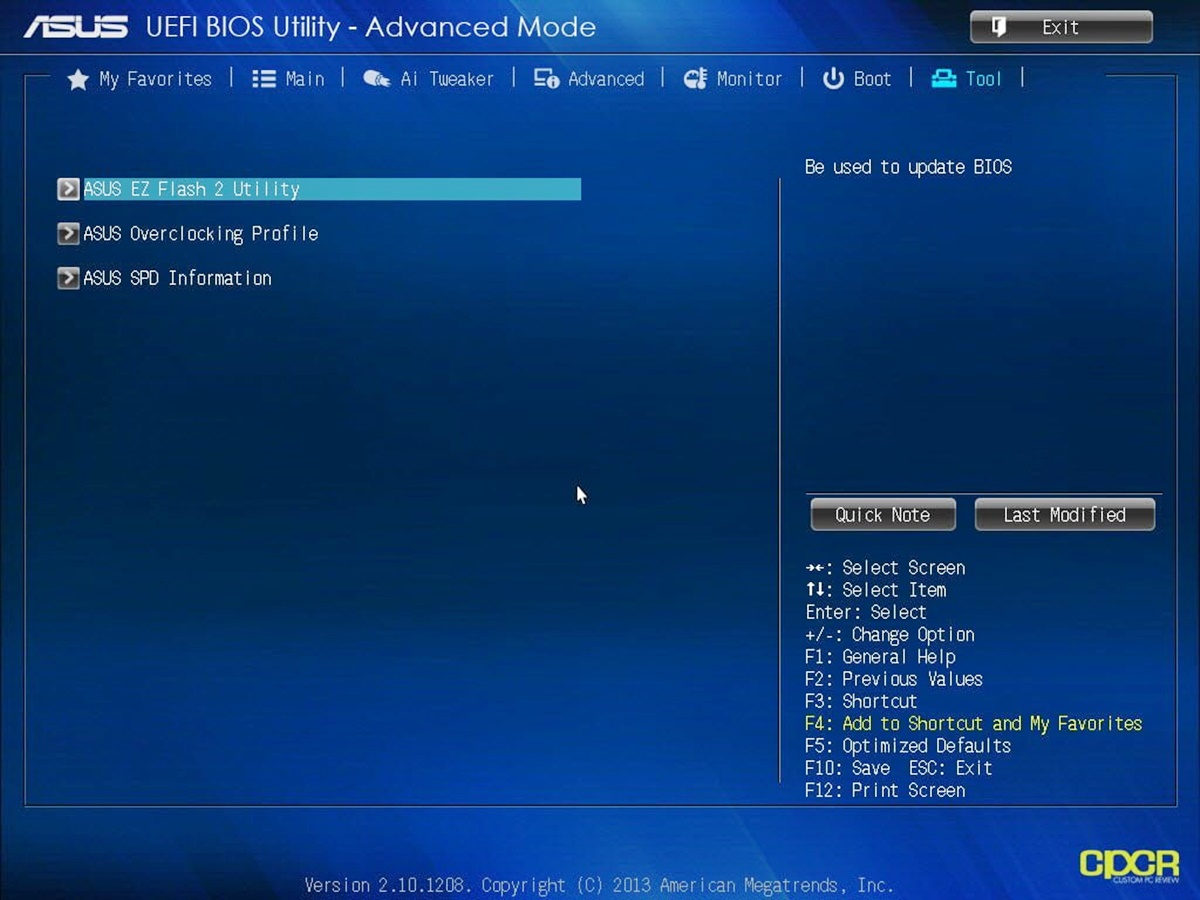
Update the BIOS Using EZ Flash Utility in UEFI BIOS
The EZ Flash utility is a built-in feature in UEFI BIOS, offered by Asus motherboards. It allows you to update the BIOS directly from the UEFI BIOS environment, providing a convenient and secure method to perform the update.
Follow these steps to update the BIOS using the EZ Flash utility:
- Restart your computer and access UEFI BIOS: Start your computer and press the designated key (often Del, F2, or F10) during the boot process to enter the UEFI BIOS setup.
- Navigate to the EZ Flash utility: Once in the UEFI BIOS setup, look for the “Tool” or “Advanced” tab. Navigate to the EZ Flash utility option.
- Locate the BIOS update file: The EZ Flash utility will automatically detect the connected devices. Use the utility to navigate to the directory where the BIOS update file is located. Ensure that the file has been properly transferred to a USB flash drive or other compatible storage devices.
- Select the BIOS update file: After locating the BIOS update file, select it in the EZ Flash utility. Confirm that the displayed file matches the actual BIOS update file you intend to use for the update.
- Start the BIOS update: Proceed with starting the update process by following the on-screen instructions provided by the EZ Flash utility. It may prompt you for confirmation before proceeding with the update.
- Wait for the update to complete: Allow the EZ Flash utility to update the BIOS automatically. During the process, refrain from restarting or shutting down your computer to avoid interrupting the update.
- Restart your computer: After the BIOS update is complete, the system will prompt you to restart your computer. Follow the on-screen instructions to restart your system.
- Verify the BIOS update: Once your computer has restarted, enter the UEFI BIOS setup again. Navigate to the “System Information” or similar section to confirm that the BIOS version matches the updated version you intended to install.
Updating the BIOS using the EZ Flash utility in UEFI BIOS is a straightforward and reliable method. However, ensure that you carefully follow the instructions provided by Asus and use the appropriate BIOS update file specifically designed for your motherboard model.
In the next section, we will explore another method to update the BIOS on your Asus motherboard using the ASUS Update utility and the BIOS renamer tool.
Update the BIOS Using BIOS renamer tool and ASUS Update
The ASUS Update utility, in combination with the BIOS renamer tool, provides an alternative method to update the BIOS on Asus motherboards. This method involves renaming the BIOS update file and using the ASUS Update utility to perform the update.
Follow these steps to update the BIOS using the BIOS renamer tool and ASUS Update:
- Download the ASUS Update utility and BIOS renamer tool: Visit the official ASUS support website and locate the page dedicated to your motherboard model. Download the latest version of the ASUS Update utility and the BIOS renamer tool.
- Locate the downloaded files: Once the downloads are complete, locate the ASUS Update utility and BIOS renamer tool on your computer and extract them if necessary.
- Obtain the correct BIOS update file: Visit the ASUS support website and download the appropriate BIOS update file for your specific motherboard model and the intended BIOS version.
- Launch the BIOS renamer tool: Open the BIOS renamer tool and select the BIOS update file you downloaded. Follow the on-screen instructions to rename the file. The BIOS renamer tool will append the necessary information to the file name.
- Copy the renamed BIOS update file: After renaming the BIOS update file, copy it to a USB flash drive or other suitable storage devices. Ensure that the file is placed in the root directory of the drive.
- Insert the USB flash drive: Insert the USB flash drive containing the renamed BIOS update file into your computer.
- Launch the ASUS Update utility: Open the ASUS Update utility from your computer and select the “Update” tab or similar option.
- Select the BIOS update file: In the ASUS Update utility, browse for the renamed BIOS update file on the USB flash drive and select it.
- Start the BIOS update: Once the BIOS update file is selected, proceed with the update process by following the instructions provided by the ASUS Update utility. Confirm the update and wait for the process to complete.
- Restart your computer: After the BIOS update is finished, restart your computer as prompted by the ASUS Update utility.
- Verify the BIOS update: Upon restarting, enter the BIOS setup menu and navigate to the “System Information” or similar section to confirm that the BIOS version matches the updated version you intended to install.
Updating the BIOS using the BIOS renamer tool and ASUS Update utility provides a reliable method to ensure a successful BIOS update. However, exercise caution to follow the instructions provided by Asus and use the correct BIOS update file specifically designed for your motherboard model.
In the next section, we will discuss precautions and tips to consider when updating the BIOS on your Asus motherboard.
Precautions and Tips for Updating BIOS
Updating the BIOS on your Asus motherboard is a delicate process that requires careful attention to ensure a successful update. To minimize any potential risks and maximize the chances of a smooth update, it is important to follow these precautions and tips:
- Read the documentation: Before proceeding with the BIOS update, thoroughly read the documentation provided by Asus. Familiarize yourself with the specific instructions, requirements, and potential risks associated with updating the BIOS.
- Use the correct BIOS update file: Ensure that you are using the correct BIOS update file specifically designed for your motherboard model and the intended BIOS version. Using an incorrect or incompatible update file can lead to serious issues.
- Backup your data: Prior to updating the BIOS, it is recommended to back up important data on your computer. While rare, there is a small chance that the update process could fail and result in data loss.
- Ensure stable power supply: During the BIOS update, it is crucial to have a stable power supply to prevent any interruptions. Make sure your computer is connected to a reliable power source or use a UPS (Uninterruptible Power Supply) if available.
- Do not interrupt the update process: Once the BIOS update has started, avoid restarting, shutting down, or disconnecting your computer from the power source. Interrupting the update process can lead to irreversible damage to your motherboard.
- Keep the computer cool: Prior to starting the BIOS update, ensure that your computer is adequately cooled. Excessive heat can cause instability during the update process. Ensure proper airflow and monitor temperatures if possible.
- Follow the on-screen instructions: During the BIOS update, carefully follow the on-screen instructions provided by the update utility. Do not deviate from the recommended steps to ensure a smooth and successful update.
- Be patient: The BIOS update process can take several minutes to complete. Be patient and allow the process to finish without interruption. Do not be tempted to force a restart or interrupt the process prematurely.
- Double-check before proceeding: Before initiating the BIOS update, double-check that you have followed all the necessary steps accurately. Take the time to confirm that you have selected the correct BIOS update file and that you are ready to proceed.
Following these precautions and tips will help minimize the risks associated with updating the BIOS on your Asus motherboard. Keeping a calm and cautious approach throughout the process can greatly increase the chances of a successful update without any complications.
In the following section, we will discuss some troubleshooting tips to address any issues that may arise during the BIOS update process.
Troubleshooting BIOS Update Issues
While updating the BIOS on your Asus motherboard is generally a straightforward process, there can be instances where issues may arise. If you encounter any problems during the BIOS update, consider the following troubleshooting tips:
- Check the BIOS update file: Ensure that you have downloaded the correct BIOS update file for your specific motherboard model and the intended BIOS version. Using an incompatible or incorrect file can cause issues during the update process.
- Verify the system requirements: Confirm that your system meets the necessary requirements for the BIOS update, such as sufficient free space, compatible hardware and software, and compatibility with the motherboard model.
- Reformat the USB flash drive: If you are using a USB flash drive to perform the update, reformat it to FAT32 before transferring the BIOS update file. Sometimes, formatting issues can prevent the motherboard from recognizing the file.
- Reset the BIOS settings: If you are experiencing issues after the update, try resetting the BIOS settings to the default values. This can help resolve compatibility issues or conflicts caused by incompatible settings.
- Ensure stable power supply: Interruptions in power supply during the BIOS update can lead to corruption or failure. Make sure your computer is connected to a stable power source or consider using a UPS (Uninterruptible Power Supply).
- Try a different USB port or flash drive: If the BIOS update is not recognized by the motherboard, try using a different USB port or a different USB flash drive. Some ports or drives may have compatibility issues.
- Remove unnecessary hardware: Disconnect any unnecessary hardware devices, such as additional hard drives, graphics cards, or external devices. This can help minimize potential conflicts during the BIOS update.
- Perform a CMOS reset: If the BIOS update has caused significant issues and your computer is not booting properly, try resetting the CMOS (complementary metal-oxide-semiconductor) by removing the CMOS battery temporarily. Refer to your motherboard manual for instructions.
- Consult Asus support: If you have followed the troubleshooting tips and are still experiencing issues, reach out to the Asus support team. They can provide specific guidance and assistance for your motherboard model and the BIOS update process.
Remember, it is crucial to exercise caution when troubleshooting BIOS update issues. If you are unsure or uncomfortable with any troubleshooting step, it is advisable to seek professional help or guidance rather than potentially risking further damage to your motherboard.
In the next section, we will explore the benefits of updating the BIOS on your Asus motherboard.
Benefits of Updating the BIOS
Updating the BIOS on your Asus motherboard can bring several benefits that enhance the performance, stability, and functionalities of your system. Let’s explore some of the key advantages:
- Improved system stability: BIOS updates often include bug fixes and stability improvements. By updating the BIOS, you can resolve issues like system crashes, freezes, and other stability-related problems.
- Enhanced hardware compatibility: As new hardware components and peripherals are released, BIOS updates ensure compatibility with the latest devices. By updating the BIOS, you can ensure proper functionality and seamless integration of new hardware.
- Optimized system performance: BIOS updates may include optimizations that improve the overall performance of your system. This can lead to faster boot times, improved memory management, and better utilization of system resources.
- Added features and functionalities: BIOS updates often introduce new features, options, and customization settings. These additions enhance the user experience by providing additional control and flexibility over various aspects of the system.
- Fixed security vulnerabilities: Outdated BIOS versions may have known security vulnerabilities that can expose your system to potential threats. By updating the BIOS, you can patch these vulnerabilities and ensure a more secure computing environment.
- Improved power efficiency: Some BIOS updates may include power management enhancements, allowing for better control and optimization of power usage. This can result in improved energy efficiency and potentially longer battery life for mobile systems.
- Resolved compatibility issues: If you are experiencing compatibility issues with specific software applications or drivers, a BIOS update may address these problems. Updated compatibility profiles can ensure smoother operation and better performance.
- Manufacturer support and warranty: Keeping your BIOS up to date ensures that you receive ongoing support and assistance from the manufacturer. If you encounter any issues, having the latest BIOS version installed allows you to utilize the warranty and customer support services effectively.
It is important to note that BIOS updates should be approached carefully and only executed when necessary. While they can bring numerous benefits, there is always a small risk associated with the update process. Therefore, it is recommended to consult the documentation provided by Asus, thoroughly read the release notes, and follow the instructions precisely to ensure a successful and safe update.
In the final section, we will summarize the important points covered in this guide on updating the BIOS for Asus motherboards.