
Software Tools for Adjusting CPU Voltage
Adjusting the CPU voltage is an essential task for advanced computer users looking to optimize their system’s performance and power consumption. Fortunately, there are two primary software interfaces that provide users with the ability to adjust the CPU voltage: the BIOS (Basic Input/Output System) and software utility programs.
The BIOS, a firmware embedded on the motherboard, is the most common interface used for adjusting CPU voltage. It is responsible for initializing hardware components during the boot-up process and providing low-level control over system settings. Most modern BIOS setups provide options to adjust the CPU voltage to achieve better performance or lower power consumption.
Software utility programs, on the other hand, are third-party tools designed specifically for adjusting CPU voltages and other hardware settings. These programs typically provide an intuitive and user-friendly interface that allows users to make real-time changes to the CPU voltage without needing to reboot the system. Some popular software utility programs for CPU voltage adjustment include CPU-Z, Intel XTU, and AMD Ryzen Master.
When deciding which software interface to use for adjusting CPU voltage, it’s important to consider the capabilities and limitations of each option. The BIOS interface offers a comprehensive set of settings for fine-tuning CPU voltage, but it requires a system reboot to apply changes. On the other hand, software utility programs provide real-time adjustments without the need for a reboot, making them more convenient for testing and experimentation.
Additionally, compatibility is a crucial factor to consider. While most modern motherboards support CPU voltage adjustment through the BIOS, not all CPUs or software utility programs may be compatible with every motherboard. It’s essential to ensure that the software you choose is compatible with your specific hardware configuration to avoid compatibility issues or potential instability.
Furthermore, it’s worth noting that adjusting CPU voltage carries some risks if not done properly. Incorrect voltage settings can result in system instability, overheating, or even permanent damage to the CPU. It’s highly recommended to research thoroughly, follow official guidelines or seek assistance from experienced users or professionals if you are not confident in making these adjustments yourself.
Interface 1: BIOS (Basic Input/Output System)
The BIOS interface is one of the most common and widely used tools for adjusting CPU voltage. It is a firmware embedded on the motherboard that initializes hardware components during the boot-up process and provides low-level control over various system settings, including CPU voltage. Accessing the BIOS interface requires pressing a specific key (such as F2 or Delete) during the system boot-up process.
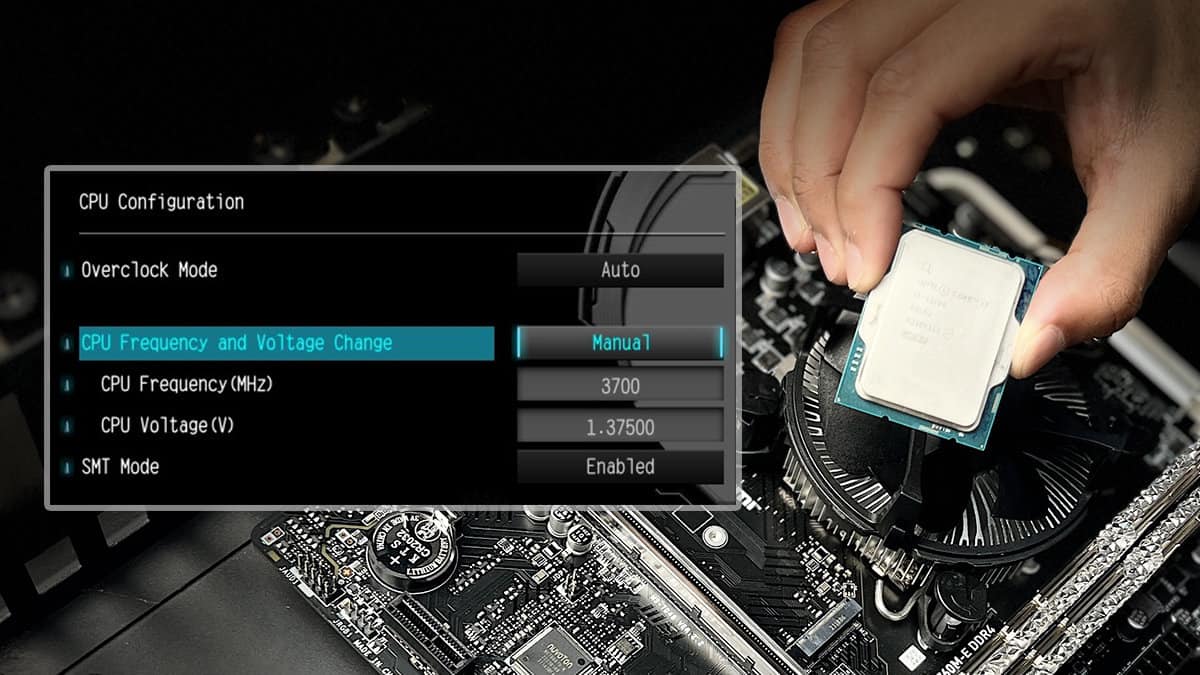
One of the main advantages of using the BIOS interface to adjust CPU voltage is its comprehensive range of settings. The BIOS offers a plethora of options to fine-tune CPU voltage, allowing users to optimize their system’s performance or reduce power consumption according to their specific needs. These voltage adjustment options are typically located under the “CPU Configuration” or “CPU Voltage” section of the BIOS setup menu.
Adjusting the CPU voltage through the BIOS interface involves a few simple steps. After entering the BIOS setup menu, navigate to the relevant section (as mentioned earlier) and locate the CPU voltage settings. Depending on the BIOS version and motherboard model, the available options may vary. Users should be cautious when making changes to the CPU voltage and should refer to the motherboard manufacturer’s documentation or online resources for recommended voltage ranges specific to their CPU model.
When adjusting the CPU voltage, it’s important to be mindful of the potential risks involved. Setting the voltage too high can lead to increased power consumption, heat generation, and system instability. Conversely, setting the voltage too low may result in system crashes or even failure to boot. It’s essential to find the right balance that ensures stable operation while maintaining optimal performance.
Once the desired CPU voltage has been set, save the changes and exit the BIOS setup menu. The system will reboot, and the new CPU voltage settings will take effect. It’s advisable to monitor the system’s temperature and stability after adjusting the CPU voltage to ensure that the changes have been successful and that the system is running smoothly.
Overview of BIOS and its Role in Adjusting CPU Voltage
The BIOS (Basic Input/Output System) is a fundamental component of every computer system. It is a firmware embedded on the motherboard that performs essential functions during the boot-up process and provides low-level control over system settings. One of the key roles of the BIOS is enabling users to adjust CPU voltage, which plays a crucial role in system performance and power management.
The CPU (Central Processing Unit) is the brain of the computer, responsible for executing instructions and performing calculations. Voltage adjustment is necessary because different CPUs have varying power requirements to function optimally. The BIOS allows users to modify the CPU voltage to either increase performance or reduce power consumption, depending on their specific needs.
The BIOS interfaces with the motherboard’s voltage regulator module (VRM) to control the supply of power to the CPU. By adjusting the CPU voltage, users can change the electrical potential difference provided to the CPU, which affects its processing speed, stability, and heat generation. Higher voltages can lead to faster processing speeds, but also increased power consumption and heat production. Conversely, lower voltages can reduce power consumption and heat, but may result in lower performance and potential instability.
The BIOS provides a comprehensive range of settings to adjust CPU voltage, typically located in the BIOS setup menu under the “CPU Configuration” or “CPU Voltage” section. These settings allow users to either manually enter specific voltage values or choose from pre-set voltage options. It’s important to note that the available options may vary depending on the BIOS version and motherboard model.
When adjusting CPU voltage through the BIOS, caution should be exercised. Incorrect voltage settings can lead to system instability, overheating, or even permanent damage to the CPU. It’s crucial to refer to the motherboard manufacturer’s guidelines or consult reliable sources to determine the recommended voltage ranges specific to the CPU model being used. Additionally, it’s recommended to monitor the system’s temperature and stability after modifying the CPU voltage to ensure that it is operating within safe parameters.
In addition to adjusting CPU voltage, the BIOS also allows users to modify other system settings, such as memory timings, boot device priority, and fan speeds. Its flexibility and low-level control make the BIOS an essential interface for advanced users looking to optimize their system’s performance and power management based on their specific requirements.
Steps for Adjusting CPU Voltage through the BIOS Interface
Adjusting CPU voltage through the BIOS interface is a straightforward process that requires accessing the BIOS setup menu and navigating to the relevant settings. Here are the steps to follow:
- Restart the computer: Begin by restarting the computer. As the system boots up, look for the key to access the BIOS setup menu. Common keys include F2, Delete, or F10, but they can vary depending on the motherboard manufacturer.
- Enter the BIOS setup menu: Once you have identified the correct key, press it repeatedly during the boot-up process. This will open the BIOS setup menu, giving you access to various system settings.
- Navigate to the CPU voltage settings: Use the arrow keys to navigate through the BIOS setup menu. Look for the section that corresponds to CPU or processor settings. Within this section, you should find options related to CPU voltage adjustment.
- Choose the desired CPU voltage: Depending on your motherboard and BIOS version, you will typically have the option to manually enter a specific voltage value or select from a list of pre-set voltage options. Consult your motherboard’s documentation or reliable sources to determine the recommended voltage range specific to your CPU model. Enter the desired voltage value or select the appropriate pre-set option.
- Save and exit the BIOS: Once you have adjusted the CPU voltage, it’s time to save the changes and exit the BIOS setup menu. Look for a “Save and Exit” or similar option. Confirm the changes and allow the system to reboot.
- Monitor system stability and temperature: After the system has rebooted, it’s important to monitor the system’s stability and temperature. Use reliable hardware monitoring software to keep track of CPU temperature and ensure that the system is running within safe parameters. Additionally, test the system’s stability through regular usage or stress testing to ensure that the new CPU voltage settings are optimal.
Remember that adjusting CPU voltage can have a significant impact on system performance and stability. It’s crucial to research recommended voltage ranges, consult reliable sources, and exercise caution when making adjustments. Incorrect voltage settings can lead to system instability, overheating, or damage to the CPU. If uncertain, seek guidance from experienced users or professionals to ensure the best results.
Interface 2: Software Utility Programs
In addition to BIOS, another interface for adjusting CPU voltage is through software utility programs. These programs are third-party tools specifically designed to provide users with a user-friendly interface for modifying CPU voltage and other hardware settings. Unlike the BIOS interface, software utility programs offer real-time adjustments without the need to reboot the system.
Software utility programs for adjusting CPU voltage are developed by various companies and cater to both novice and advanced users. These programs often come with additional features that allow users to monitor system performance, adjust fan speeds, and even overclock their CPU if desired.
When it comes to choosing a software utility program for adjusting CPU voltage, several popular options are available. CPU-Z is a widely used program that provides detailed information about the CPU as well as voltage adjustment capabilities. Intel XTU (Intel Extreme Tuning Utility) is another notable software utility specifically designed for Intel CPUs, offering extensive overclocking and voltage control options. Similarly, AMD Ryzen Master is a utility program tailored for AMD Ryzen CPUs, providing users with precise control over voltage settings.
Software utility programs offer several advantages compared to the BIOS interface. Firstly, they provide real-time adjustments, allowing users to apply changes without the need for a system reboot. This makes it convenient for users to experiment with various voltage settings and observe instant results. Additionally, software utility programs often provide a more intuitive and user-friendly interface, making them accessible to users with varying levels of technical expertise.
Before using a software utility program for CPU voltage adjustment, it is crucial to ensure compatibility with your motherboard and CPU. While most modern motherboards are compatible with popular software utility programs, it’s essential to double-check compatibility to avoid any issues or potential conflicts.
It’s important to note that the use of software utility programs for adjusting CPU voltage carries similar risks to adjusting via the BIOS interface. Incorrect voltage settings can lead to system instability, overheating, or damage to the CPU. Therefore, it is advisable to research recommended voltage ranges, follow guidelines provided by the software utility program, and monitor system temperature and stability after adjusting voltage settings.
Ultimately, the choice between using the BIOS interface or software utility programs for adjusting CPU voltage depends on personal preference, technical proficiency, and the specific needs of the user. Both options offer their unique advantages and considerations that should be taken into account when optimizing system performance and power management.
Popular Software Utility Programs for Adjusting CPU Voltage
When it comes to adjusting CPU voltage through software utility programs, several popular options stand out in terms of functionality, compatibility, and user-friendliness. These programs provide users with an intuitive interface and advanced features for precise control over CPU voltage settings. Here are some of the most widely used software utility programs for adjusting CPU voltage:
1. CPU-Z: CPU-Z is a popular and widely trusted utility program that not only provides detailed information about the CPU but also offers voltage adjustment capabilities. With its user-friendly interface, CPU-Z allows users to monitor CPU voltage in real-time and make adjustments to optimize performance and power consumption. It supports a wide range of CPUs and is compatible with most modern motherboards.
2. Intel XTU (Intel Extreme Tuning Utility): Developed specifically for Intel CPUs, Intel XTU is a powerful software utility program that offers extensive overclocking and voltage control options. It provides users with a user-friendly interface to adjust CPU voltage, clock speeds, and other parameters to achieve optimal performance. Intel XTU is particularly popular among gamers and enthusiasts looking to push their CPU to its limits.
3. AMD Ryzen Master: Tailored for AMD Ryzen CPUs, AMD Ryzen Master is a comprehensive utility program that enables users to fine-tune CPU voltage settings. It offers advanced control over various parameters, including voltage, clock speeds, and power consumption. With its intuitive interface, AMD Ryzen Master is an excellent choice for AMD Ryzen CPU users who want to optimize their system’s performance.
4. BIOS Utilities: Many motherboard manufacturers also provide their own utility programs for adjusting CPU voltage and other system settings through the BIOS interface. These utilities often come bundled with the motherboard’s drivers and provide a convenient way to make adjustments without directly accessing the BIOS setup menu. Examples include ASUS AI Suite, Gigabyte EasyTune, and MSI Command Center.
When choosing a software utility program for adjusting CPU voltage, it’s essential to consider compatibility and support. Ensure that the program is compatible with your specific CPU and motherboard model to avoid any potential issues. Checking the manufacturer’s website or user forums can provide valuable insights into compatibility and any known compatibility issues.
It’s important to note that adjusting CPU voltage carries risks if not done carefully. Incorrect voltage settings can lead to system instability, overheating, or damage to the CPU. Before making any changes, it’s crucial to research recommended voltage ranges, follow guidelines provided by the software utility program or the CPU manufacturer, and monitor system temperature and stability after adjusting voltage settings.
Overall, these software utility programs provide users with a convenient and user-friendly interface to fine-tune CPU voltage settings and achieve optimal system performance. Consider your specific hardware configuration and requirements to choose the software utility program that best suits your needs.
Comparison of BIOS and Software Utility Programs for Adjusting CPU Voltage
When it comes to adjusting CPU voltage, two main options are available: the BIOS (Basic Input/Output System) interface and software utility programs. Both options have their distinct advantages and considerations. Here is a comparison of BIOS and software utility programs in terms of functionality, convenience, and user-friendliness:
Functionality: The BIOS interface offers a comprehensive range of settings for adjusting CPU voltage. It provides low-level control over various system settings and is capable of fine-tuning voltage with precision. On the other hand, software utility programs offer real-time adjustments, allowing users to modify voltage settings without needing to reboot the system. Additionally, software utility programs often come with additional features, such as CPU monitoring and overclocking options, enhancing their functionality.
Convenience: BIOS adjustments typically require a system reboot to apply changes, which can be time-consuming and interrupt workflow. In contrast, software utility programs allow users to make real-time adjustments without the need for a system reboot. This makes software utility programs more convenient for testing and experimenting with different voltage settings.
User-Friendliness: The BIOS interface can be more complex and intimidating for novice users due to its low-level control and multitude of settings. However, with some research and guidance, adjusting CPU voltage through the BIOS can be mastered. Software utility programs, on the other hand, generally offer a more user-friendly and intuitive interface. They often provide visual representations of voltage levels, making it easier for users to understand and adjust the settings without prior technical knowledge.
Compatibility: The BIOS interface is universally available on all computer systems, as it is built into the system’s firmware. Software utility programs, however, may have compatibility limitations. Users need to ensure that the chosen software utility program is compatible with their specific CPU, motherboard model, and operating system.
Risks: Both BIOS and software utility programs carry risks if misused. Incorrect voltage settings in the BIOS can lead to system instability, overheating, or CPU damage. Similarly, software utility programs can have similar consequences if voltage adjustments are applied improperly. It is crucial to research recommended voltage ranges, consult manufacturer guidelines, and monitor system stability and temperature after making any changes.
Ultimately, the choice between using the BIOS interface or software utility programs for adjusting CPU voltage depends on personal preference, technical proficiency, and desired convenience. The BIOS interface offers extensive settings and fine-grained control, while software utility programs provide real-time adjustments and a more user-friendly experience. Users can evaluate their own requirements and skill level to determine which option best suits their needs.
Factors to Consider When Choosing Between BIOS and Software Utility Programs
When deciding between the BIOS interface and software utility programs for adjusting CPU voltage, there are several factors to consider. Each option has its own advantages and considerations. Here are some key factors to keep in mind:
Technical Proficiency: Consider your level of technical expertise. The BIOS interface is more complex and may require a deeper understanding of system settings and potential risks. If you are comfortable navigating BIOS menus and understand the consequences of adjusting voltage settings, the BIOS interface may be a suitable choice. However, if you prefer a more user-friendly and intuitive experience, software utility programs can provide a simpler way to adjust CPU voltage settings.
Convenience: Consider the convenience of adjusting CPU voltage. The BIOS interface generally requires a system reboot to apply changes, which can be time-consuming and interrupt workflow. Software utility programs, on the other hand, provide real-time adjustments without needing to reboot, making them more convenient for testing and experimenting with different voltage settings. If you need to make frequent adjustments or prefer a more seamless experience, software utility programs may be the preferred choice.
Functionality: Evaluate the functionality and features you require. The BIOS interface provides direct access to various system settings, enabling fine-tuning of CPU voltage and other parameters. It offers a comprehensive range of options, making it suitable for users who need precise control over their CPU voltage. Software utility programs often come bundled with additional features, such as real-time monitoring, overclocking, and fan control. If you require these additional functionalities, software utility programs may be more suitable for your needs.
Compatibility: Ensure compatibility between your CPU, motherboard, and the chosen option. The BIOS interface is universally available on all computer systems, as it is built into the firmware of the motherboard. However, software utility programs may have compatibility limitations. You must verify that the selected software utility program is compatible with your specific CPU model, motherboard, and operating system. Check the manufacturer’s website or user forums for compatibility information and any known issues.
Risks: Consider the potential risks associated with adjusting CPU voltage. Incorrect voltage settings can lead to system instability, overheating, or damage to the CPU. Both the BIOS interface and software utility programs carry these risks if used improperly. It is essential to research recommended voltage ranges, follow guidelines provided by the manufacturer, and monitor temperature and stability after adjusting voltage settings to ensure the system is functioning optimally and within safe parameters.
By considering your technical proficiency, convenience, required functionality, compatibility, and risks, you can make an informed decision about whether to use the BIOS interface or a software utility program for adjusting CPU voltage. Remember to weigh the advantages and considerations of each option to determine which one aligns best with your specific needs and preferences.