
Enable Undo Send in Gmail
Ever sent an email only to realize there was a mistake or forgot to include an important detail? With Gmail’s “Undo Send” feature, you can save yourself from embarrassing or regretful moments by enabling the option to unsend emails. This handy feature allows you to retrieve a sent email within a specific time window, giving you a second chance to correct any errors before they reach the recipient’s inbox.
To enable Undo Send in Gmail, follow these simple steps:
- Open your Gmail account and click on the gear icon located in the top-right corner. This will open the Settings menu.
- From the drop-down menu, select “Settings”.
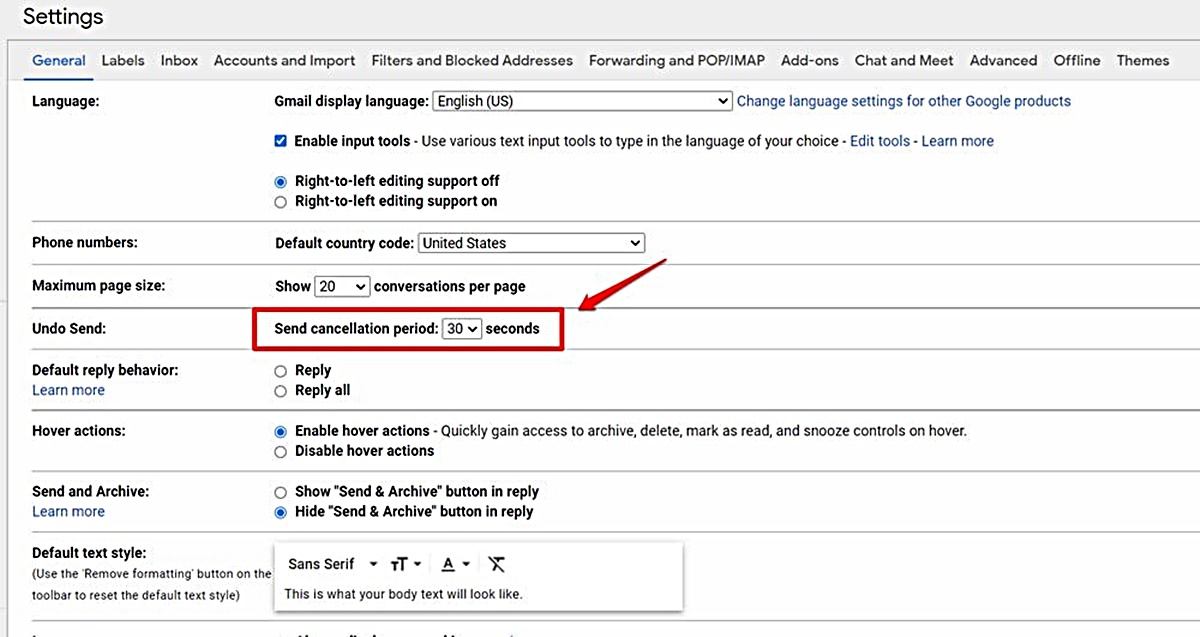
- In the Settings tab, scroll down to the “Undo Send” section.
- Check the box next to “Enable Undo Send”.
- Select the desired cancellation period from the drop-down menu. You can choose between 5, 10, 20, or 30 seconds. This specifies the time limit you’ll have to undo a sent email.
- Scroll to the bottom of the page and click “Save Changes”.
Once you’ve enabled Undo Send, Gmail will delay the delivery of your emails for the specified cancellation period, allowing you to retract them if needed. This additional buffer gives you the opportunity to review and make any necessary changes before the email is sent out.
It’s important to note that the Undo Send feature is only available for emails sent via Gmail’s web interface. Emails sent from mobile devices using the Gmail app may not have this option. Additionally, Undo Send does not guarantee that the email won’t be delivered. It simply holds the email for the chosen time period, giving you the chance to stop its delivery.
With Undo Send enabled in Gmail, you can now have peace of mind knowing that any last-minute edits or corrections can be made before your messages go out. Take advantage of this feature to ensure your emails are sent error-free and with the intended information.
Set the Time Limit for Undoing a Sent Email
When enabling the “Undo Send” feature in Gmail, you have the option to set the time limit for how long you can undo a sent email. This time limit determines the window of opportunity you have to recall or modify an email after hitting the send button. By customizing this setting to your preference, you can ensure that you have enough time to review and rectify any mistakes or omissions before the email is delivered.
To set the time limit for undoing a sent email in Gmail, follow these steps:
- Access your Gmail account and click on the gear icon in the top-right corner to open the Settings menu.
- Select “Settings” from the drop-down menu.
- Scroll down to the “Undo Send” section in the Settings tab.
- Check the box next to “Enable Undo Send” if it is not already checked.
- Choose your desired cancellation period from the drop-down menu. Gmail offers options of 5, 10, 20, or 30 seconds.
- Once you’ve selected your desired time limit, scroll down to the bottom of the page and click “Save Changes” to apply your settings.
It’s important to find a balance when choosing the cancellation period. Setting it too short may not give you enough time to catch errors, while setting it too long could result in unnecessary delays in sending emails. Consider your own workflow and the complexity of the emails you typically send to determine the ideal time limit for your needs.
Keep in mind that once the time limit has passed, the email will be sent and cannot be retrieved or modified. Therefore, it is crucial to review your emails thoroughly before the cancellation period expires. Take advantage of this valuable feature to minimize the risk of sending emails with mistakes or incomplete information.
By customizing the time limit for undoing a sent email in Gmail, you can have greater control and confidence in your email communications. It gives you the opportunity to rectify any errors or make any necessary last-minute changes, ensuring that your emails are professional, accurate, and effective.
Compose and Send an Email in Gmail
Gmail, the popular email service provided by Google, offers a user-friendly interface and a range of features to make composing and sending emails a breeze. Whether you’re sending a quick message or drafting a detailed email, Gmail provides a seamless experience that allows you to communicate efficiently and effectively. Here’s how you can compose and send an email in Gmail:
- Sign in to your Gmail account with your credentials.
- Click on the “Compose” button, typically located in the top-left corner of the Gmail web interface. This will open the email composition window.
- In the “To” field, enter the recipient’s email address. If you’re sending the email to multiple recipients, you can separate their addresses with commas.
- Add a relevant and concise subject line to give the recipient an idea of the email’s content.
- In the body section, type your message. You can format and customize your text using the formatting options provided by Gmail, such as bold, italic, bullet points, and numbered lists. You can also insert links, attach files, and add images using the respective icons in the toolbar.
- Once your email is ready, take a moment to review it for any spelling mistakes, grammar errors, or missing information.
- If you want to send a carbon copy (CC) or blind carbon copy (BCC) of the email to additional recipients, click on the respective buttons (if they are not already visible) and enter the relevant email addresses.
- When you are satisfied with your email, click on the “Send” button to deliver it to the recipient(s).
After sending the email, it will be stored in your “Sent” folder, allowing you to refer back to it if needed. Gmail also provides features such as conversation threading, recipient suggestions, and automatic saving of drafts, ensuring a seamless and organized email experience.
Remember to exercise proper email etiquette when composing and sending emails. Be concise, clear, and polite in your communication. Take into consideration the recipient’s perspective and ensure that your message is professional and appropriate for the context in which it will be received.
With Gmail’s user-friendly email composition and sending process, you can communicate efficiently and effectively, keeping your inbox organized and your messages well-structured.
Undo a Sent Email in Gmail
We’ve all been there – that sinking feeling when you realize you’ve sent an email with a mistake or to the wrong person. Fortunately, Gmail’s “Undo Send” feature allows you to retract a sent email within a specific time frame, giving you an opportunity to correct any errors or prevent the email from reaching its unintended recipient. Here’s how you can undo a sent email in Gmail:
- After sending an email, you will see a notification at the top of your Gmail screen that says “Your message has been sent.” Immediately following this notification, you will see an “Undo” button.
- Click on the “Undo” button to retract the email. This will redirect you back to the email composition window, allowing you to make edits or delete the email entirely.
- Take the necessary actions to correct any mistakes or omissions in the email. You can edit the content, update the recipients, or delete the email altogether if necessary.
- After making the required changes, review the email once again to ensure it is accurate and error-free.
- Click on the “Send” button to resend the corrected email to the intended recipients.
It’s important to note that the “Undo” option is only available for a limited time, depending on the cancellation period you set during the enabling process. Once this time period has passed, the email will be sent and cannot be retrieved or modified.
Undoing a sent email in Gmail is a lifesaver when it comes to catching mistakes in your emails or preventing them from reaching the wrong recipients. However, it’s essential to act quickly and double-check your emails before the cancellation period elapses.
If you find yourself frequently relying on the “Undo Send” feature, consider extending the cancellation period to give yourself more time to undo sent emails. You can easily adjust the time limit in the settings, allowing for a more comfortable buffer period to catch errors and make any necessary changes.
Overall, the ability to undo a sent email in Gmail provides a sense of control and reassurance, minimizing the consequences of those common email mishaps we all encounter from time to time.
Confirm that the Email was Successfully Unscheduled
After utilizing the “Undo Send” feature in Gmail to unschedule a sent email, you may want to verify that the retraction was successful. It’s essential to have confirmation that the email did not reach its intended recipients or any unintended recipients. Here are a few steps you can take to ensure the email was successfully unscheduled:
- Upon clicking the “Undo” button, you will be redirected back to the email composition window. Take a moment to review the email, ensuring that any necessary edits or changes have been made.
- Send the email again, but this time pay attention to any notifications or indicators that may indicate the status of the email.
- Check your “Sent” folder. If the email is successfully unscheduled, you will not find it in this folder. This is a clear indication that the email did not reach its intended recipients.
- Monitor any responses or lack thereof from the recipients. If you receive no responses or inquiries related to the email, it is likely that the email was not delivered due to the unscheduling.
- Double-check with any recipients if necessary. If you still have doubts about whether the email was successfully unscheduled, reach out to the intended recipients and confirm whether they received it or not.
It’s important to note that even though the email was unscheduled successfully, there may be instances where the email was already delivered to the recipient’s inbox. In this case, the unscheduling feature cannot retract the email from their inbox. Clear communication and follow-up with the intended recipients are crucial if you need to rectify any mistakes or clarify any confusion.
By taking these steps to confirm the successful unscheduling of your email, you can have peace of mind knowing that the email did not reach its intended recipients. This verification process allows you to maintain control over your email communications and ensures that you can rectify any errors or unintended messages promptly.
Change the Default Time Limit for Undoing a Sent Email
By default, Gmail offers a specific time limit for undoing a sent email. However, this default time limit may not always align with your personal preferences or workflow. Fortunately, Gmail allows you to customize and change the time limit for undoing a sent email according to your specific needs. Here’s how you can change the default time limit in Gmail:
- Sign in to your Gmail account and click on the gear icon located in the top-right corner. This will open the Settings menu.
- From the drop-down menu, select “Settings”.
- In the Settings tab, scroll down to the “Undo Send” section.
- Check the box next to “Enable Undo Send” if you haven’t already done so.
- Choose your desired cancellation period from the drop-down menu. Gmail provides preset options of 5, 10, 20, or 30 seconds. However, if you want a more customized time limit, you can click on “Custom” and input your preferred duration.
- After selecting your preferred time limit, scroll to the bottom of the page and click “Save Changes” to apply your new settings.
By changing the default time limit, you can ensure that you have enough time to undo a sent email before it is delivered. A longer time limit allows for a more extensive review of your emails, reducing the chances of errors or omissions slipping through.
It’s important to strike a balance when customizing the time limit. While a longer cancellation period provides you with more time to undo a sent email, it may also result in delayed email deliveries. Consider your workflow, email volume, and need for careful review when setting the new time limit.
Remember that once the set cancellation period expires, the email will be sent and cannot be unscheduled. Therefore, it’s crucial to review your emails promptly and thoroughly before the specified time limit elapses.
With the ability to customize the default time limit in Gmail, you can tailor the undo send feature to align with your specific requirements. This flexibility ensures that you have adequate time to review and rectify any mistakes or issues before your emails are sent out.