
Why Enable Automatic App Updates?
Keeping your apps up to date is crucial for ensuring optimal performance, security, and bug fixes. However, manually updating each app on your iPhone or iPad can be time-consuming and easily forgotten. This is where automatic app updates come in handy.
By enabling automatic app updates, you can ensure that your apps are always up to date without any effort on your part. This means you won’t have to constantly check for updates or manually download and install them. Instead, your device will take care of it for you, seamlessly and in the background.
There are several reasons why enabling automatic app updates is beneficial:
- Saves time and effort: Instead of manually updating apps one by one, automatic updates save you the hassle by handling all updates automatically. This gives you more time to focus on using your device rather than managing app updates.
- Enhances security: App updates often include important security patches that address vulnerabilities and protect your device from potential threats. By enabling automatic updates, you ensure that your apps are always equipped with the latest security features, keeping your device and personal information safe.
- Improves performance and stability: Developers regularly release updates to fix bugs and improve app performance. With automatic updates, you’ll always have the most recent versions of apps, resulting in a smoother and more stable user experience.
- Access to new features: App updates sometimes introduce new features, improvements, or compatibility enhancements. By enabling automatic updates, you won’t miss out on any exciting additions that developers make to their apps.
- Peace of mind: With automatic updates, you can have peace of mind knowing that your apps are always up to date. This ensures you have access to the latest features, security updates, and bug fixes, providing a seamless and worry-free user experience.
Overall, enabling automatic app updates on your iPhone or iPad offers convenience, saves time, enhances security, improves performance, and ensures you don’t miss out on new features and enhancements. It’s a simple setting that can greatly improve your overall app experience.
How to Turn On Automatic App Updates on iPhone
If you want to enable automatic app updates on your iPhone, follow these simple steps:
Step 1: Open the Settings app on your iPhone. It’s the gray icon with gears that can usually be found on the home screen.
Step 2: Scroll down and tap on “App Store” to access the settings related to the App Store.
Step 3: Find the option for “Automatic Downloads” and tap on it. This will take you to the settings related to automatic downloads.
Step 4: Toggle on the “Updates” switch. By doing this, your iPhone will automatically download and install updates for your installed apps whenever they become available on the App Store.
That’s it! You have successfully enabled automatic app updates on your iPhone. From now on, your device will take care of keeping your apps up to date without any extra effort from you.
It’s worth noting that enabling automatic app updates does not mean that your device will update the apps immediately as soon as an update becomes available. It simply means that your iPhone will download and install updates in the background, based on your device’s settings and connectivity.
If you want to check the status of app updates or manually update specific apps, you can still do so by visiting the “Updates” tab in the App Store. It will show you a list of available updates, and you can choose to update them manually if desired.
With automatic app updates enabled on your iPhone, you can ensure that you always have the latest versions of your installed apps, with all the bug fixes, performance improvements, and new features that come with them.
Step 1: Open the Settings app
The first step to turning on automatic app updates on your iPhone is to open the Settings app. This app allows you to access and customize various settings on your device.
To open the Settings app, locate the gray icon with gears on your home screen. It’s usually placed in a prominent position, often on the first page of your home screen or in a folder named “Utilities.”
Tap on the Settings icon to launch the app. This will bring you to the main settings screen where you can configure different aspects of your iPhone.
The Settings app is organized into sections, with each section containing specific settings related to various aspects of your device. You’ll find options for adjusting general settings, managing apps, configuring notifications, and more.
By opening the Settings app, you have taken the first step towards enabling automatic app updates on your iPhone. Now, you can proceed to the next step in the process.
Note that the appearance and layout of the Settings app may vary slightly depending on the version of iOS installed on your device. However, the general functionality and steps for enabling automatic app updates remain the same across different iOS versions.
Once you have successfully opened the Settings app, you’re ready to move on to the next step and continue with the process of turning on automatic app updates on your iPhone.
Step 2: Scroll down and tap on App Store
After you have successfully opened the Settings app on your iPhone, the next step is to scroll down and locate the option for “App Store.” This section contains settings specifically related to the App Store, including the option to enable automatic app updates.
To access the App Store settings, launch the Settings app and start scrolling downwards. You may need to swipe up on the screen or use your finger to scroll if there are many settings on the page.
As you scroll, you’ll notice various sections such as “General,” “Display & Brightness,” and “Privacy.” Keep scrolling until you find the section labeled “App Store.”
Once you’ve located the “App Store” section, tap on it to proceed. This will bring you to the settings screen where you can configure various options for the App Store on your iPhone.
The App Store settings screen allows you to customize settings such as automatic downloads, in-app purchases, and cellular data usage for the App Store. It’s where you can find the specific setting to enable automatic app updates.
By tapping on the “App Store” option in the Settings app, you have taken the second step towards turning on automatic app updates on your iPhone. Now, you’re ready to move on to the next step and continue with the process.
Remember, the appearance and organization of the Settings app may slightly differ depending on the iOS version you’re using. However, the location of the App Store settings and the steps to enable automatic app updates remain consistent.
Once you have tapped on the “App Store” option and accessed the settings page, you’re one step closer to enabling automatic app updates on your iPhone.
Step 3: Find the option for Automatic Downloads
After accessing the “App Store” section in the Settings app on your iPhone, the next step is to locate the option for “Automatic Downloads.” This is where you can find the setting to enable automatic app updates.
On the App Store settings screen, scroll down until you come across the section labeled “Automatic Downloads.” This section is specifically dedicated to managing automatic downloads for various types of content, including apps.
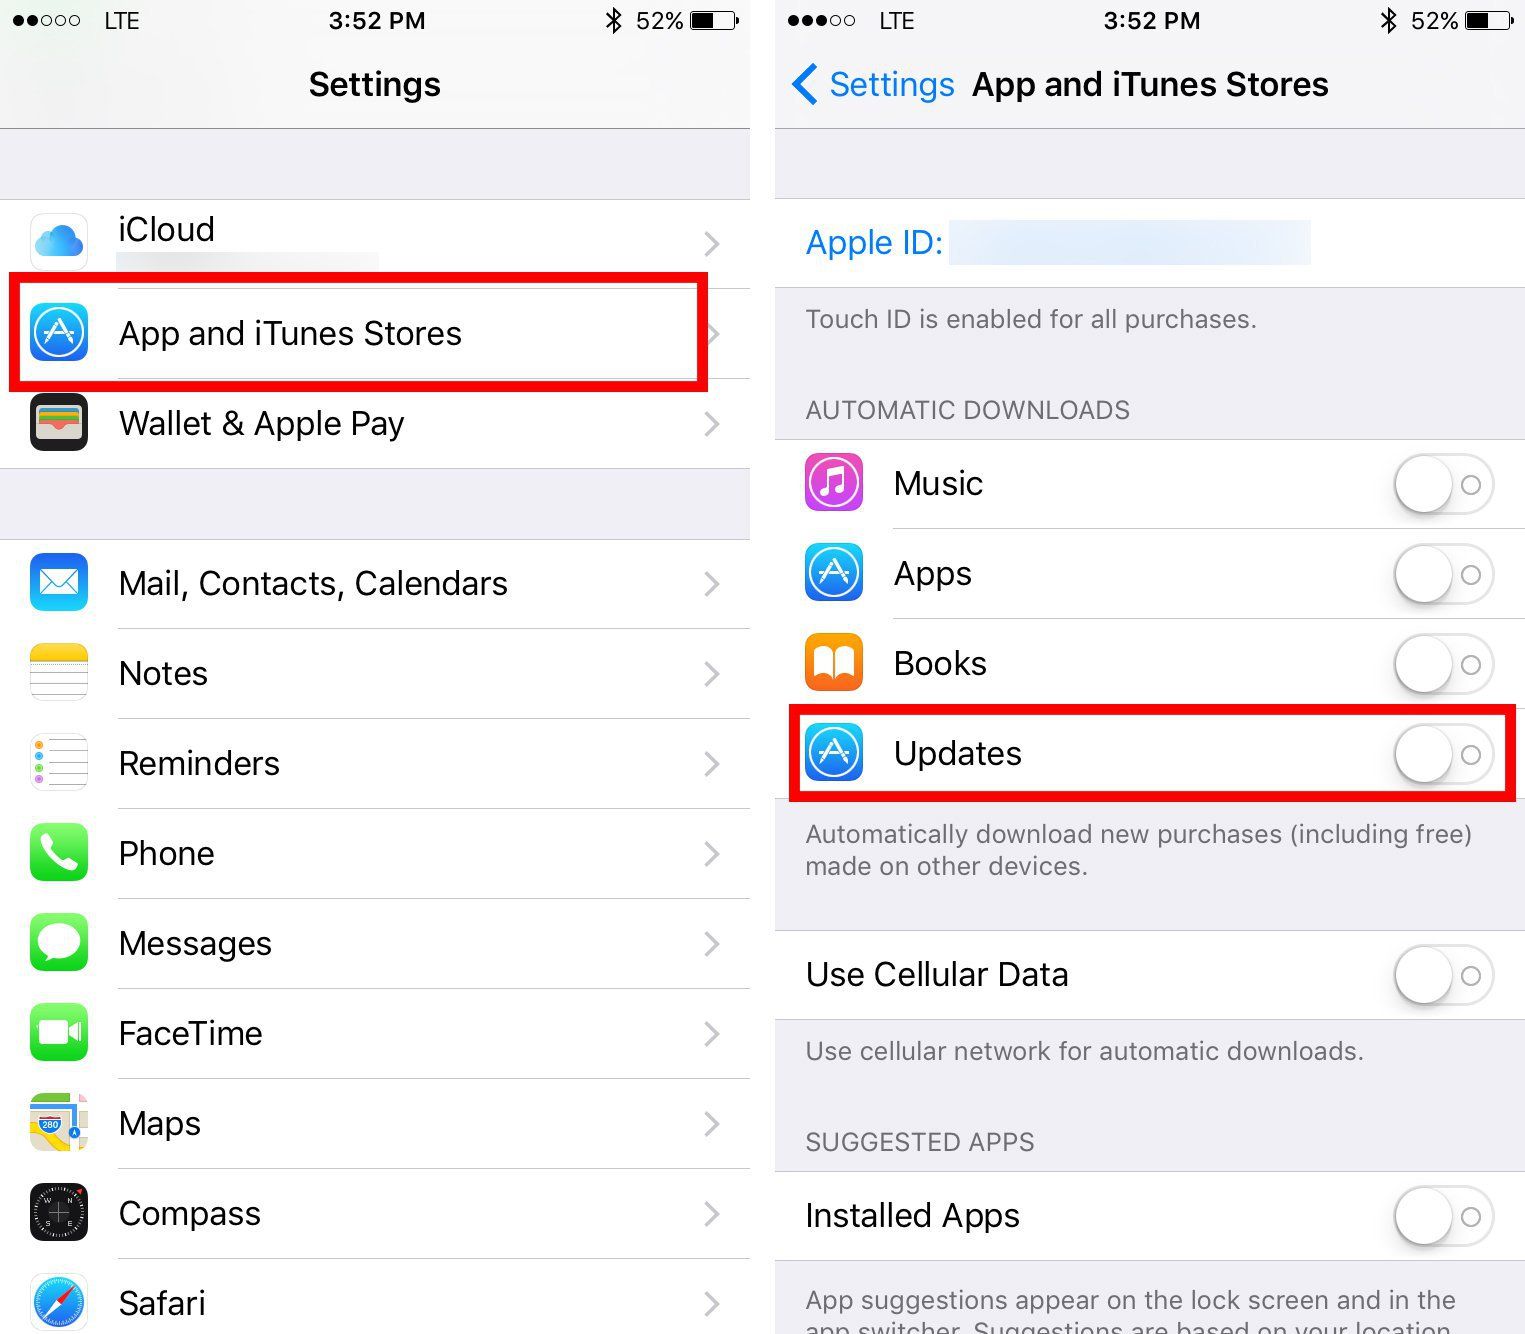
In the “Automatic Downloads” section, you’ll see a list of toggle switches for different types of content, such as Apps, Updates, Music, Books, and more. To enable automatic app updates, you need to find and toggle on the switch for “Updates.”
Scroll through the options until you locate the switch for “Updates.” It should be the first option in the “Automatic Downloads” section. Once you’ve found it, tap on the switch to turn it on.
Enabling the “Updates” switch means that your iPhone will automatically download and install updates for apps whenever they become available on the App Store. This ensures that you always have the latest versions of your installed apps without having to manually update them.
By finding and enabling the “Updates” switch in the “Automatic Downloads” section of the App Store settings, you have completed the third step towards turning on automatic app updates on your iPhone. With this setting enabled, your iPhone will take care of keeping your apps updated in the background.
Remember, the appearance and arrangement of settings in the Settings app may vary slightly depending on the version of iOS you’re using. However, the location of the “Automatic Downloads” section and the “Updates” switch remain consistent across different iOS versions.
Now that you have successfully located and enabled the “Updates” switch, you’re ready to move on to the final step and complete the process of enabling automatic app updates on your iPhone.
Step 4: Toggle on the Updates switch
Once you have located the “Automatic Downloads” section and accessed the settings for the App Store on your iPhone, the final step to turning on automatic app updates is to toggle on the “Updates” switch.
In the “Automatic Downloads” section of the App Store settings, you will find a list of toggle switches for different types of content. Look for the switch labeled “Updates,” which should be the first option in the list.
To enable automatic app updates, simply tap on the switch to toggle it on. When the switch is in the “on” position, it will appear green, indicating that automatic updates for app updates are now enabled.
By toggling on the “Updates” switch, your iPhone will automatically download and install updates for your installed apps whenever they become available on the App Store. This ensures that you always have the latest versions of your apps without having to manually update each one.
Once you have successfully turned on the “Updates” switch, you have completed all the necessary steps to enable automatic app updates on your iPhone. From now on, your device will take care of keeping your apps up to date in the background.
Remember to periodically check for updates manually if you want to see a list of available updates and their details. To do this, open the App Store, go to the “Updates” tab, and tap on the “Update All” button or individually update specific apps.
Now that you have successfully toggled on the “Updates” switch, your iPhone is set to automatically download and install app updates for you. Enjoy the benefits of having the latest features, bug fixes, and performance improvements for your apps without any additional effort or hassle.
How to Turn On Automatic App Updates on iPad
If you’re an iPad user and want to enable automatic app updates, follow these simple steps:
Step 1: Open the Settings app on your iPad. This can usually be found on your home screen, represented by the gray icon with gears.
Step 2: Scroll down and tap on “App Store” to access the settings related to the App Store on your iPad.
Step 3: Locate the section labeled “Automatic Downloads” on the App Store settings screen. This is where you’ll find the settings for automatic downloads on your iPad.
Step 4: Toggle on the “Updates” switch. By turning on this switch, your iPad will automatically download and install updates for your installed apps whenever they become available on the App Store.
That’s it! You have successfully enabled automatic app updates on your iPad. From now on, your device will handle the task of updating your apps in the background, freeing up your time and ensuring your apps are always up to date.
Please note that enabling automatic app updates doesn’t mean your iPad will immediately update the apps as soon as an update is available. It simply means your device will automatically download and install updates based on your settings and connectivity.
If you want to check the status of app updates or manually update specific apps, you can still do so by visiting the “Updates” tab in the App Store. This tab will display a list of available updates, and you can choose to update them manually if desired.
By following these steps, you can easily turn on automatic app updates on your iPad, ensuring that you always have the latest versions of your installed apps with the accompanying bug fixes, performance enhancements, and new features.
Step 1: Open the Settings app
To turn on automatic app updates on your iPad, the first step is to open the Settings app. This app allows you to access and customize various settings on your device.
Locate the Settings app icon on your iPad’s home screen. It is represented by a gray icon with gears and is typically found on the first page of your home screen.
Tap on the Settings app icon to launch it. This will bring you to the main settings screen, where you can adjust different aspects of your iPad.
Upon opening the Settings app, you’ll notice that it is organized into sections. Each section contains specific settings related to various features and functions of your device. These sections allow you to manage your iPad’s general settings, display preferences, privacy options, and more.
By opening the Settings app, you have taken the first step toward enabling automatic app updates on your iPad. Now, you can proceed to the next step in the process.
It’s important to note that the appearance and layout of the Settings app may vary slightly depending on the version of iOS installed on your iPad. However, the general functionality and steps for enabling automatic app updates remain consistent across different iOS versions.
Now that you have successfully opened the Settings app on your iPad, you’re ready to move on to the next step and continue with the process of turning on automatic app updates.
Step 2: Scroll down and tap on App Store
After opening the Settings app on your iPad, the next step is to scroll down and locate the option for “App Store”. This section contains settings specifically related to the App Store, including the option to enable automatic app updates.
Start scrolling down on the Settings screen to navigate through the various sections. Keep scrolling until you see the “App Store” option. It should be located after the initial sections like “Wi-Fi,” “Bluetooth,” and “Notifications.”
Once you find the “App Store” option, tap on it to access the settings specifically related to the App Store.
The “App Store” settings screen allows you to customize various options and preferences for the App Store on your iPad. This includes automatic downloads, in-app purchases, app updates, and more.
By tapping on the “App Store” option, you have successfully completed the second step towards turning on automatic app updates on your iPad. Now, you’re ready to proceed to the next step and continue with the setup process.
Keep in mind that the appearance and organization of settings in the Settings app may slightly differ depending on the iOS version you’re using. However, the location of the “App Store” section and the subsequent steps to enable automatic app updates remain consistent across different iOS versions.
Now that you have located and tapped on the “App Store” option, you have completed the second step in enabling automatic app updates on your iPad. You’re one step closer to ensuring your apps are always up to date, hassle-free.
Step 3: Locate the section labeled Automatic Downloads
After accessing the “App Store” settings in the Settings app on your iPad, the next step is to locate the section labeled “Automatic Downloads.” This is where you will find the specific settings related to automatic downloads, including automatic app updates.
On the “App Store” settings screen, start scrolling to explore the available options. Look for the section titled “Automatic Downloads.” This section is dedicated to managing automatic downloads for various types of content, such as apps, music, books, and more.
Continue scrolling until you find the “Automatic Downloads” section. It is usually located below the settings for your Apple ID and Password settings.
Once you have located the “Automatic Downloads” section, you will see a list of toggle switches for different types of content. Look for the switch labeled “Updates.” This switch specifically controls the automatic downloading and installation of app updates.
To enable automatic app updates, simply toggle on the “Updates” switch. When the switch is in the “on” position, it will appear green, indicating that automatic updates for apps are now enabled on your iPad.
By locating and toggling on the “Updates” switch in the “Automatic Downloads” section, you have completed the third step in enabling automatic app updates on your iPad. With this setting enabled, your iPad will automatically download and install updates for your installed apps whenever they become available on the App Store.
It’s important to note that enabling automatic app updates does not mean your iPad will update the apps immediately when an update becomes available. The updates will be downloaded and installed in the background, based on your iPad’s settings and connectivity.
With the “Updates” switch toggled on, you’re now ready to move on to the final step and complete the process of enabling automatic app updates on your iPad.
Step 4: Toggle on the Updates switch
The final step to enable automatic app updates on your iPad is to toggle on the “Updates” switch. This will ensure that your device automatically downloads and installs updates for your installed apps whenever they become available on the App Store.
After locating the “Automatic Downloads” section and accessing the settings related to the App Store, look for the switch labeled “Updates.” It should be located within the list of toggle switches in the “Automatic Downloads” section.
To enable automatic app updates, simply tap on the “Updates” switch to toggle it on. The switch will turn green, indicating that automatic updates for apps are now enabled on your iPad.
With the “Updates” switch toggled on, your iPad will handle the process of downloading and installing updates for your installed apps in the background, removing the need for manual updates.
Enabling automatic app updates provides several benefits. It saves you time and effort as you no longer have to manually update each individual app. It also ensures that your apps are always up to date with the latest features, bug fixes, and security patches.
Remember to periodically check the App Store’s “Updates” tab if you wish to see a list of available updates and their details. You can also choose to update specific apps manually if desired.
By successfully toggling on the “Updates” switch, you have completed all the necessary steps to enable automatic app updates on your iPad. Enjoy the convenience of having your apps automatically updated and stay up to date effortlessly.
Benefits of Automatic App Updates
Enabling automatic app updates on your iPhone or iPad offers several advantages that enhance your overall experience with your device. Here are some key benefits of automatic app updates:
- Saves time and effort: Automatic app updates eliminate the need for manual updates, saving you time and effort. You no longer have to individually check for updates or go through the process of manually updating each app.
- Keeps apps up to date: With automatic app updates, your apps are always up to date with the latest features, bug fixes, and performance improvements. You can enjoy the advantages of the latest app versions without delay.
- Enhances security: Automatic app updates are crucial for maintaining the security of your device. App updates often include important security patches that address vulnerabilities and protect your personal information from potential threats.
- Improves app performance: Developers frequently release updates to improve the performance and stability of their apps. By enabling automatic app updates, you ensure that you always have the most recent versions, resulting in smoother user experiences.
- Access to new features: App updates often introduce new features, enhancements, and functionality. With automatic app updates, you won’t miss out on exciting additions that developers introduce to their apps.
- Seamless user experience: Automatic app updates provide a seamless and hassle-free user experience. Your device handles the updates in the background, allowing you to focus on using your apps without interruptions or delays.
- Customizable settings: You have control over automatic updates with customizable settings. You can choose to enable or disable automatic app updates as per your preferences and specific needs.
By enabling automatic app updates, you enjoy the convenience of having your apps effortlessly updated in the background. It ensures you have the latest versions, enhances your device’s security, and improves the overall performance and user experience of your apps.
Keep in mind that while automatic app updates offer numerous benefits, it’s important to stay mindful of your device’s storage space and data usage. Regularly reviewing and managing your app updates can help optimize your device’s performance and ensure efficient use of resources.
Cons of Automatic App Updates
While automatic app updates offer convenience and several benefits, there are also some potential drawbacks to consider. Here are some cons of automatic app updates:
- Data usage: Automatic app updates require an internet connection to download and install updates. This can consume a significant amount of data, especially if you have limited mobile data or are connected to a limited Wi-Fi network.
- Battery drain: Automatic app updates can cause increased battery usage as your device actively downloads and installs updates in the background. This can result in faster battery drain, especially if you have numerous apps that frequently receive updates.
- Compatibility issues: In some cases, new app updates may introduce compatibility issues with certain devices or operating system versions. By enabling automatic updates, there is a slight risk that a problematic update may impact an app’s performance or functionality.
- Unwanted changes: Automatic updates can sometimes bring changes to app interfaces or features that you may not prefer. If you have specific preferences or rely on certain app functionalities, automatic updates may alter the app in ways you didn’t anticipate or want.
- Storage space: App updates can take up storage space on your device, especially if you have multiple apps installed. Automatic updates may rapidly consume available storage, requiring you to frequently manage your device’s storage to accommodate updates.
- Reduced control: With automatic app updates, you relinquish some control over when and how updates are installed. If you prefer manually reviewing and selecting updates, automatic updates may not align with your preferences.
It’s important to weigh the pros and cons of automatic app updates and consider your individual needs and circumstances. Depending on your available data, battery life, storage space, preferences, and desire for control, you may choose to enable or disable automatic app updates accordingly.
If you decide to enable automatic app updates, periodically checking for any compatibility issues or unexpected changes in app behavior can help mitigate potential drawbacks. Additionally, using Wi-Fi networks for updates and managing your device’s storage regularly can help optimize the performance and minimize any negative impacts of automatic app updates.
By carefully considering the cons and taking proactive measures, you can make informed decisions about whether automatic app updates are the right choice for your device and app management preferences.
Troubleshooting Automatic App Updates
While automatic app updates are designed to be seamless and hassle-free, there may be instances where issues arise. Here are some common troubleshooting steps to resolve problems with automatic app updates:
1. Check internet connectivity: Ensure that your device has a stable internet connection. Automatic app updates require an active internet connection, either through Wi-Fi or cellular data.
2. Enable Wi-Fi for larger app updates: If you are on a limited mobile data plan and have automatic app updates enabled, consider using Wi-Fi for larger app updates. This can help avoid excessive data usage and potential overage charges.
3. Restart your device: Sometimes, a simple restart can resolve minor software glitches and enable automatic app updates to function properly. Restart your iPhone or iPad by holding down the power button, sliding to power off, waiting a few seconds, and then turning it back on.
4. Update to the latest iOS version: Ensure that your device is running the latest version of iOS. Apple often releases updates with bug fixes and improvements that can address issues related to automatic app updates.
5. Check app settings: Verify that you have enabled automatic app updates in the Settings app. Open the Settings app, go to “App Store” or “iTunes & App Store,” and ensure that the toggle for “Updates” is enabled.
6. Free up storage space: Inadequate storage space can prevent automatic app updates from occurring. Delete unnecessary apps, photos, or videos to free up storage and ensure that there is sufficient space for new app updates to download and install.
7. Reset network settings: Resetting network settings can resolve connectivity issues that may be preventing automatic app updates. Go to the Settings app, tap on “General,” then “Reset,” and choose “Reset Network Settings.” Note that this will reset your Wi-Fi passwords and other network-related settings.
8. Disable and re-enable automatic app updates: If all else fails, try disabling and then re-enabling automatic app updates. Open the Settings app, go to “App Store” or “iTunes & App Store,” toggle off the switch for “Updates,” wait a few seconds, and then toggle it on again.
If you continue to experience difficulties with automatic app updates, contacting Apple Support or seeking assistance from an Apple Authorized Service Provider may be necessary to diagnose and rectify the issue.
By following these troubleshooting steps, you can troubleshoot and resolve common problems that may arise with automatic app updates on your iPhone or iPad.