
Common Causes of the Backup Error
Backing up your data is an essential part of keeping your iPhone or iPad secure. However, there are times when you may encounter an error message stating ‘The Last Backup Could Not Be Completed.’ This error can be frustrating and may leave you concerned about the safety of your data. Understanding the common causes of this backup error can help you troubleshoot and resolve the issue effectively.
1. Insufficient iCloud Storage: One of the most common reasons for the backup error is having insufficient iCloud storage. If your storage is full or nearing its limit, your device may not be able to complete the backup process. Ensure that you have enough space available in your iCloud account to accommodate the backup.
2. Unstable Internet Connection: A weak or unstable internet connection can also contribute to the backup error. If your internet connection is unreliable, there may be interruptions during the backup process, leading to incomplete backups or failed attempts. Make sure that you have a stable and strong Wi-Fi connection before initiating the backup.
3. Outdated iOS Version: Running an outdated version of iOS can sometimes cause compatibility issues with the backup process. Apple often releases updates to address bugs and improve system performance. Check for any available software updates and ensure that your device is running the latest iOS version.
4. Corrupted Backup File: Sometimes, the backup file itself may be corrupted, leading to the error message. This can happen due to various reasons, such as a sudden interruption during the backup process or a problem with the device’s storage. If you suspect a corrupted backup file, you may need to delete it and start a new backup.
5. Conflicting Third-Party Apps: Certain third-party apps installed on your device may interfere with the backup process, causing errors to occur. It is recommended to update or uninstall any apps that are known to cause conflicts when backing up your device.
6. Hardware or Software Issues: In rare cases, the backup error may be attributed to hardware or software issues. This could involve a malfunctioning USB cable, outdated device drivers, or other technical problems. If you have ruled out other potential causes and the backup error still persists, it may be necessary to seek assistance from Apple Support or visit an authorized service center.
By identifying the common causes of the backup error, you can take the necessary steps to resolve the issue. In the following sections, we will explore different troubleshooting methods to help you fix ‘The Last Backup Could Not Be Completed’ error on your iPhone or iPad.
Verify Backup Location and Settings
When encountering the ‘The Last Backup Could Not Be Completed’ error, one of the first steps to take is to verify the backup location and settings on your iPhone or iPad. Ensuring that everything is set up correctly can help prevent backup errors and ensure the safety of your data.
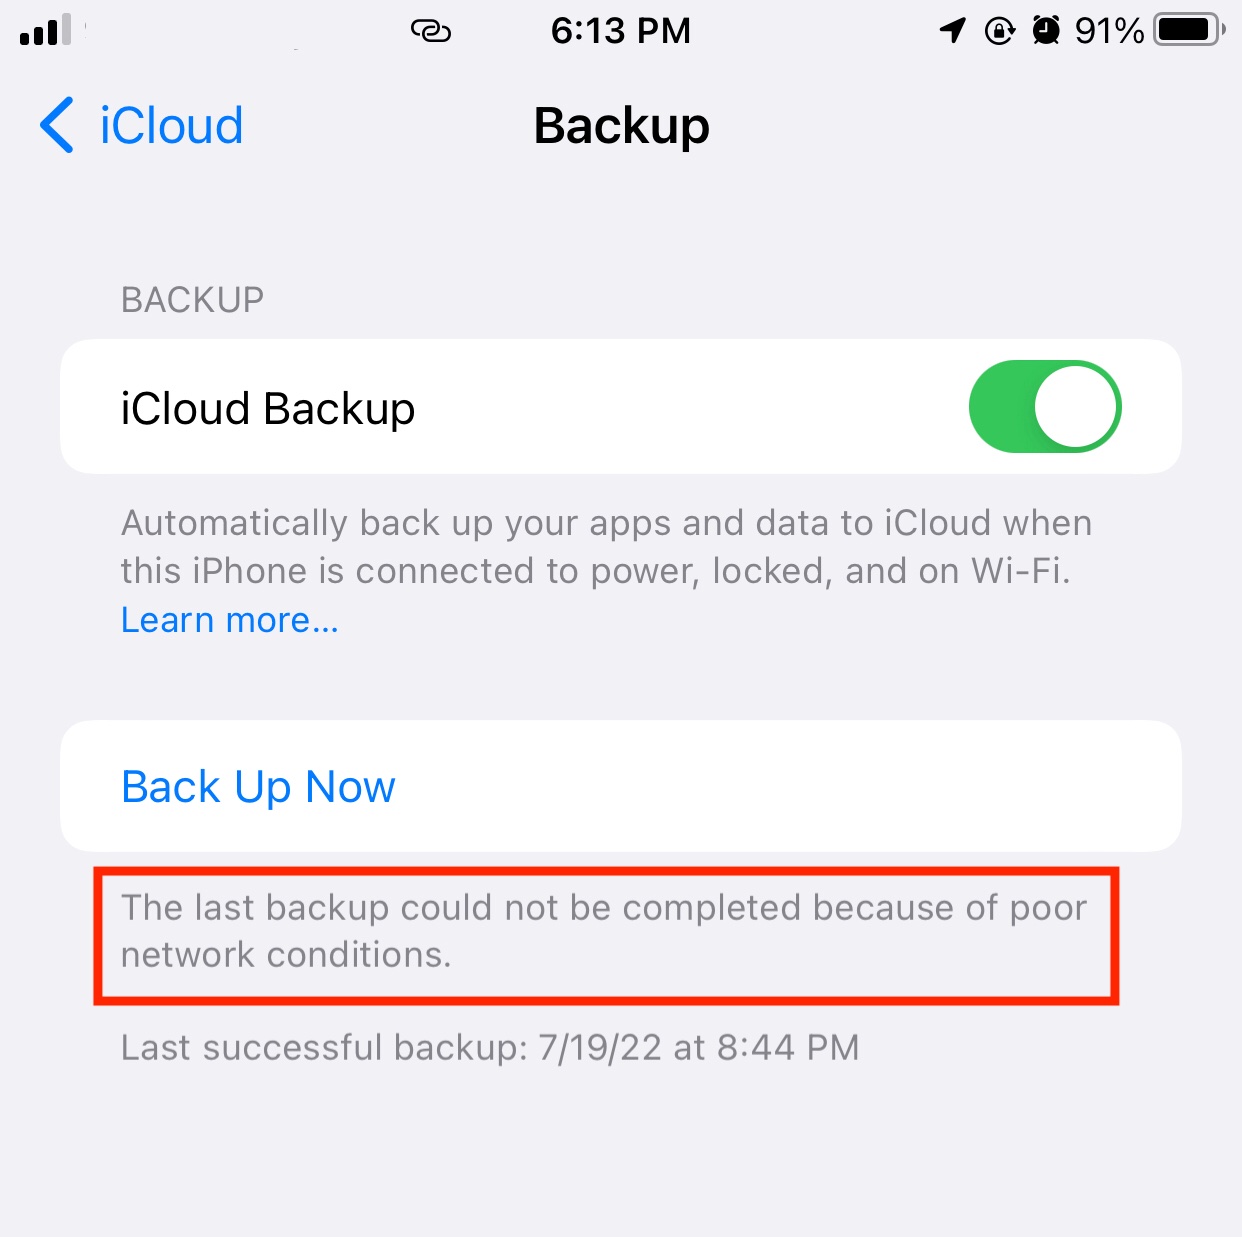
1. Check iCloud Backup Settings: Start by checking if iCloud Backup is enabled on your device. To do this, go to the Settings app, tap on your Apple ID at the top, navigate to iCloud, and select iCloud Backup. Ensure that the toggle switch is turned on. If it is already enabled, try disabling and re-enabling it to refresh the backup settings.
2. Check Wi-Fi Connection: A stable and reliable Wi-Fi connection is crucial for successful backups. Ensure that you are connected to a strong Wi-Fi network before initiating the backup. Avoid using cellular data as it may not provide a consistent and reliable connection for the backup process.
3. Verify iCloud Storage: It’s essential to have enough available space in your iCloud storage to complete the backup. To check your iCloud storage, navigate to the Settings app, tap on your Apple ID, go to iCloud, and select Manage Storage. Here, you can view the amount of available storage and manage your backups to free up space if necessary.
4. Connect to a Power Source: Keeping your device connected to a power source during the backup can prevent interruptions caused by low battery levels. Plug your iPhone or iPad into a power outlet or connect it to a computer to ensure a continuous power supply.
5. Restart your Device: Sometimes, a simple restart can resolve temporary software glitches that may be causing the backup error. Press and hold the power button until the slider appears, then swipe it to power off your device. Wait for a few seconds, then press and hold the power button again to turn it back on.
6. Disable VPN or Proxy Settings: If you have a VPN or proxy enabled on your device, try disabling them temporarily before initiating the backup. VPNs and proxies can sometimes interfere with the backup process, causing errors to occur. Once the backup is completed, you can re-enable them if needed.
7. Update iOS: Keeping your device’s operating system up to date is crucial not only for security reasons but also for ensuring compatibility with backup processes. Check for any available software updates by going to the Settings app, tapping on General, and selecting Software Update. If an update is available, follow the prompts to install it.
By verifying the backup location and settings on your device, you can eliminate any potential issues that may be causing the backup error. If the problem persists, continue with the next troubleshooting methods to resolve the ‘The Last Backup Could Not Be Completed’ error.
Check Available Disk Space
Another factor that can contribute to the ‘The Last Backup Could Not Be Completed’ error is insufficient disk space on your iPhone or iPad. When you run out of storage, your device may not be able to complete the backup process. Therefore, it’s essential to regularly check the available disk space and free up storage if needed.
1. Check Storage Usage: To check the amount of available disk space, go to the Settings app on your device, tap on General, and select iPhone/iPad Storage. Here, you will see a breakdown of the storage usage by different categories. Pay attention to the ‘Available’ or ‘Free’ space to determine if you have enough storage for the backup.
2. Manage Storage: If you find that your device’s storage is almost full, it’s time to manage your storage effectively. Start by reviewing the apps and data that are taking up the most space. You can offload unused apps, delete unnecessary photos and videos, and clear cache files for apps that consume a lot of storage.
3. Delete Unnecessary Apps and Data: Go through your apps and delete any applications that you no longer use. Additionally, consider removing old files, documents, and media that are no longer needed. This will free up valuable storage space and improve the chances of completing a successful backup.
4. Use Offloading Feature: If you are hesitant to delete apps entirely, you can utilize the ‘Offload Unused Apps’ feature available on iOS. This feature allows your device to automatically remove unused app data while keeping the app icon and documents intact. To enable this feature, go to the Settings app, tap on General, select iPhone/iPad Storage, and enable the ‘Offload Unused Apps’ option.
5. Use Cloud Storage Services: Consider moving some of your files, such as photos, videos, and documents, to cloud storage services like iCloud Drive, Google Drive, or Dropbox. This will help free up space on your device while still allowing you to access your files whenever needed.
6. Manage Messages and Attachments: Messages and their accompanying media can take up a significant amount of space on your device. Clear out old conversations or manually delete unnecessary text messages, photos, and attachments to reclaim valuable storage space.
By regularly checking the available disk space and managing storage effectively, you can ensure that there is enough room for the backup process to complete successfully. If the backup error persists even after freeing up storage, move on to the next troubleshooting methods to resolve the issue.
Restart the iPhone or iPad
When dealing with backup errors like ‘The Last Backup Could Not Be Completed,’ a simple solution that often resolves the issue is to restart your iPhone or iPad. Restarting your device can help clear any temporary software glitches or conflicts that may hinder the backup process.
1. Press and Hold the Power Button: To restart your iPhone or iPad, begin by pressing and holding the power button located on the side or top of your device. Hold it until the ‘Slide to Power Off’ slider appears on the screen.
2. Slide to Power Off: Once the slider appears, use your finger to slide it from left to right, turning off your device.
3. Wait for a Few Seconds: After your device is completely powered off, wait for a few seconds before proceeding to the next step. This brief pause allows any residual power or temporary software issues to dissipate.
4. Press and Hold the Power Button Again: After waiting for a few seconds, press and hold the power button again until the Apple logo appears on the screen. This signifies that your device is powering back on.
5. Enter Passcode (if applicable): If you have set a passcode for your device, you will be prompted to enter it after the Apple logo appears. Enter your passcode to unlock your device.
6. Initiate the Backup Process: Once your device has restarted, navigate to the Settings app and go to your Apple ID settings. Then, select iCloud and tap on iCloud Backup. Ensure that the toggle switch is turned on and initiate the backup process. The restart may have resolved any temporary issues that were causing the backup error.
If restarting your device did not resolve the backup error, continue with the remaining troubleshooting methods to address the issue. Sometimes, a more in-depth solution may be required to fix the problem.
Update iOS to the Latest Version
Keeping your iPhone or iPad’s operating system up to date is not only essential for security and performance improvements but also for resolving potential compatibility issues that may be causing the backup error. Updating to the latest iOS version can often fix any bugs or glitches that may interfere with the backup process.
1. Check for Updates: Start by checking if there is a new iOS update available for your device. To do this, go to the Settings app, tap on General, and select Software Update. Your device will automatically check for any available updates.
2. Download and Install the Update: If a new iOS update is found, follow the on-screen prompts to download and install it on your device. It is recommended to connect your device to a reliable Wi-Fi network and ensure that it has sufficient battery power or is connected to a power source during the update process.
3. Automatic Updates: To simplify the update process, you can enable the ‘Automatic Updates’ feature on your device. This feature will automatically download and install new iOS updates when your device is connected to Wi-Fi and charging. To enable this feature, go to the Settings app, tap on General, select Software Update, and enable the ‘Download iOS updates’ option.
4. Update Over iTunes: If you are unable to update your device over-the-air (OTA), you can try updating it using iTunes on your computer. Connect your device to the computer using a USB cable, open iTunes, and follow the instructions to update your device to the latest iOS version.
5. Clean Install: In some cases, a clean install of the latest iOS version may be necessary to resolve persistent backup errors. This involves restoring your device to factory settings and then installing the latest iOS version. It is essential to back up your device before performing a clean install, as it will erase all data on your device.
By updating your device to the latest iOS version, you can ensure that you have the latest bug fixes and improvements that may improve the backup process. If the backup error continues to occur after updating, proceed to the next troubleshooting methods to address the issue.
Reset Network Settings
Resetting the network settings on your iPhone or iPad can sometimes resolve connectivity issues that may be preventing the successful completion of backups. This troubleshooting step can help resolve any misconfigured network settings or conflicts with your device’s network connections.
1. Open Settings: Begin by opening the Settings app on your device. It is recognizable by the gear icon.
2. Go to General: Scroll down and tap on ‘General’ in the list of settings options.
3. Select Reset: Within the General settings, scroll down to find the ‘Reset’ option and tap on it.
4. Reset Network Settings: In the Reset menu, locate and tap on ‘Reset Network Settings.’ You may be prompted to enter your device passcode or Apple ID password for verification.
5. Confirm Reset: A pop-up message will appear, warning you that resetting network settings will erase all saved Wi-Fi networks, passwords, and VPN settings. Confirm the reset by selecting ‘Reset Network Settings.’
6. Restart Your Device: After the network settings reset is complete, it is recommended to restart your device. Press and hold the power button until the ‘Slide to Power Off’ slider appears, then slide it to power off your device. Wait a few seconds, then press and hold the power button again to turn it back on.
7. Reconnect to Wi-Fi: Once your device has restarted, navigate to the Settings app and reconnect to your Wi-Fi network. Enter the Wi-Fi password if prompted.
8. Initiate the Backup Process: After reconnecting to Wi-Fi, go to your Apple ID settings in the Settings app, select iCloud, and tap on iCloud Backup. Ensure that the toggle switch is turned on and initiate the backup process. Resetting the network settings may have resolved any network-related issues that were causing the backup error.
If resetting the network settings did not resolve the backup error, proceed with the next troubleshooting methods to address the issue and ensure a successful backup of your iPhone or iPad.
Reset All Settings
If you are still encountering the ‘The Last Backup Could Not Be Completed’ error on your iPhone or iPad, resetting all settings can be a helpful troubleshooting step. This option allows you to reset all customized settings on your device without deleting any data or media. It can resolve software conflicts or misconfigurations that may be causing the backup error.
1. Open Settings: Start by opening the Settings app on your device, which is represented by a gear icon on the home screen.
2. Go to General: Scroll down and tap on ‘General’ in the list of settings options.
3. Select Reset: Within the General settings, scroll down until you find the ‘Reset’ option and tap on it.
4. Reset All Settings: In the Reset menu, locate and tap on ‘Reset All Settings.’ You may be prompted to enter your device passcode or Apple ID password for verification.
5. Confirm Reset: A pop-up message will appear, informing you that resetting all settings will revert your device’s settings to their default values while preserving your data and media. Confirm the reset by selecting ‘Reset All Settings.’
6. Restart Your Device: After the reset is complete, it is recommended to restart your device. Press and hold the power button until the ‘Slide to Power Off’ slider appears, then slide it to power off your device. Wait a few seconds, then press and hold the power button again to turn it back on.
7. Reconfigure Settings: Once your device has restarted, you will need to reconfigure your settings. These include Wi-Fi, Bluetooth, notifications, wallpaper, and other personalized preferences. It’s essential to set up these options according to your preferences.
8. Initiate the Backup Process: After reconfiguring your settings, go to your Apple ID settings in the Settings app, select iCloud, and tap on iCloud Backup. Ensure that the toggle switch is turned on and initiate the backup process. Resetting all settings may have resolved any conflicts or misconfigurations that were causing the backup error.
By resetting all settings, you can eliminate any potential software-related issues that may be hindering the successful completion of backups on your iPhone or iPad. If the backup error persists, continue with the next troubleshooting methods to resolve the issue.
Reset and Restore from Backup
If you have tried the previous troubleshooting methods and are still unable to complete the backup due to the ‘The Last Backup Could Not Be Completed’ error, you may need to reset your iPhone or iPad and restore from a backup. This process will erase all data on your device, so it’s important to have a recent backup available to restore from.
1. Backup Your Device: Before proceeding, ensure that you have a recent backup of your iPhone or iPad. You can make a backup using iCloud or iTunes. If you have an iCloud backup, go to the Settings app, tap on your Apple ID, select iCloud, and choose iCloud Backup. If you prefer to use iTunes, connect your device to your computer and open iTunes. Select your device and click on ‘Back Up Now’ under the Summary tab.
2. Reset Your Device: To reset your device, open the Settings app, go to General, and select ‘Reset.’ Tap on ‘Erase All Content and Settings.’ You will need to enter your device passcode and Apple ID password to confirm the reset. This process will erase all data and settings on your device.
3. Set Up Your Device: After the reset is complete, your device will restart. Follow the on-screen prompts to set up your iPhone or iPad. Choose your preferred language and region, connect to a Wi-Fi network, and sign in with your Apple ID and password.
4. Restore from Backup: During the device setup process, you will be given the option to restore from a backup. Select the backup you made earlier from the list of available backups on iCloud or iTunes. Follow the on-screen instructions to complete the restoration process.
5. Initiate the Backup Process: Once your device has finished restoring from the backup, navigate to the Settings app, go to your Apple ID settings, select iCloud, and tap on iCloud Backup. Ensure that the toggle switch is turned on and initiate the backup process. The reset and restore process should have resolved any issues that were preventing the completion of backups.
It’s important to note that restoring from a backup will only retrieve the data and settings that were backed up. Any new data created after the backup was made will not be included. Ensure that you regularly make backups of your device to avoid data loss and to have a recent backup available for restoration if necessary.
Use iTunes to Backup and Restore
If you are encountering the ‘The Last Backup Could Not Be Completed’ error on your iPhone or iPad, an alternative option to consider is using iTunes to backup and restore your device. This method can be useful if you are unable to complete a backup using iCloud or if you prefer to have a direct connection to your computer.
1. Update iTunes: Ensure that you have the latest version of iTunes installed on your computer. If not, open iTunes and check for any available updates. Download and install them before proceeding.
2. Connect Your Device: Use a USB cable to connect your iPhone or iPad to your computer. Run iTunes if it does not open automatically when your device is connected.
3. Trust the Computer: If it is the first time you have connected your device to this computer, you may need to trust the computer. Unlock your device and follow the prompts on the screen to trust the computer connection.
4. Backup Your Device: In iTunes, select your connected device from the toolbar. Under the Summary tab, click on ‘Back Up Now’ to initiate the backup process. Ensure that you select the option to backup your device to your computer rather than iCloud.
5. Wait for Backup Completion: Allow iTunes to complete the backup process. The time required may vary depending on the amount of data on your device.
6. Restore Your Device: If you are still experiencing the backup error and need to restore your device, click on ‘Restore iPhone’ or ‘Restore iPad’ under the Summary tab in iTunes. This will erase all data on your device and restore it to the previous backup.
7. Follow the On-Screen Prompts: Follow the on-screen instructions in iTunes to confirm the restoration process. You may be prompted to select the backup you wish to restore from if multiple backups are available.
8. Wait for the Restore to Complete: Be patient as iTunes restores your device from the selected backup. Once the process is complete, your iPhone or iPad will reboot, and you can disconnect it from your computer.
9. Initiate the Backup Process: After the restoration is finished, go to the Settings app on your device, select your Apple ID settings, go to iCloud, and tap on iCloud Backup. Ensure that the toggle switch is turned on and initiate the backup process. Using iTunes to backup and restore your device may resolve any backup errors you were experiencing.
Using iTunes for backup and restoration provides an alternative method that can be helpful if you encounter any issues with iCloud backups. Remember to regularly backup your device to ensure the safety of your data and have a recent backup available for future restorations if needed.
Contact Apple Support
If you have tried the previous troubleshooting methods and are still unable to resolve the ‘The Last Backup Could Not Be Completed’ error on your iPhone or iPad, it may be necessary to contact Apple Support for further assistance. Apple Support has a team of experts who can provide you with personalized guidance and solutions to address your specific issue.
1. Visit the Apple Support website: Start by visiting the official Apple Support website (support.apple.com) on your computer or on another device. This website provides helpful resources, articles, and troubleshooting guides on a wide range of topics.
2. Select your device and issue: Navigate to the ‘Get Support’ section of the website and select your device from the available options. Next, choose the category and specific issue that you are encountering, which in this case would be related to the backup error.
3. Choose the support option: Apple offers various support options, including phone support, live chat, and email support. Select the option that is most convenient for you and provides the level of assistance you require.
4. Follow the prompts: Depending on the support option you choose, you will be guided through a series of prompts to initiate contact with an Apple Support representative. Provide them with the necessary details about your issue and follow their instructions accordingly.
5. Provide relevant information: When contacting Apple Support, be prepared to provide specific details about the backup error you are experiencing. This may include information about your device model, iOS version, any error codes or messages received, and the troubleshooting steps you have already taken.
6. Ask for guidance and solutions: Communicate your issue clearly and ask for guidance on how to resolve the backup error. Apple Support representatives are knowledgeable and experienced in troubleshooting Apple devices, and they will provide you with the appropriate solutions.
7. Follow their recommendations: Apple Support may provide you with troubleshooting steps or recommend specific actions to resolve the backup error. Be sure to follow their instructions carefully and ask for clarification if needed.
8. Follow up if needed: If the initial support provided does not resolve the issue, don’t hesitate to reach out to Apple Support again for further assistance. They will continue to work with you until the problem is resolved.
Contacting Apple Support ensures that you receive specialized assistance tailored to your specific situation. They have the knowledge and expertise to guide you through the resolution process, ensuring that you can successfully complete backups and maintain the security of your data.