
What is Windows Defender?
Windows Defender is a built-in antivirus and anti-malware program that comes pre-installed with Windows operating systems. It offers real-time protection against various types of security threats, including viruses, malware, spyware, and ransomware. Windows Defender continuously monitors your computer system, scans files, detects malicious software, and helps remove any potential threats to keep your device and data safe.
Unlike third-party antivirus software, Windows Defender is developed by Microsoft and is specifically designed to provide basic protection for Windows users. It integrates seamlessly with the Windows operating system, ensuring a minimal impact on system performance while delivering constant security updates.
Windows Defender offers a range of security features, including a robust firewall, regular virus definition updates, and automatic scanning of downloaded files and attachments. It also provides browser protection to safeguard against malicious websites and phishing attempts. With its user-friendly interface, Windows Defender makes it easy for users to manage their security settings and perform manual scans when needed.
Over the years, Windows Defender has significantly improved in terms of its effectiveness and reliability, earning a reputation as a solid security solution. While it may not have all the advanced features and customization options found in third-party antivirus software, Windows Defender serves as a reliable first line of defense for most users.
It’s important to note that Windows Defender is enabled by default on Windows systems, ensuring that users have at least basic protection as soon as they start using their devices. However, there may be situations where you may want to temporarily or permanently disable Windows Defender, such as when installing a different antivirus program or troubleshooting software compatibility issues.
Why would you want to turn off Windows Defender?
While Windows Defender offers solid protection for most users, there are several reasons why you may want to temporarily or permanently disable it. Here are a few common scenarios:
- Using a third-party antivirus software: Some users prefer to use a different antivirus program that they trust or have specific features they need. In such cases, disabling Windows Defender allows for the smooth operation of the preferred antivirus software without conflicts.
- Software compatibility issues: There may be instances where certain software applications are not compatible with Windows Defender and require it to be turned off temporarily to avoid conflicts or performance issues.
- System performance: While Windows Defender is designed with minimal impact on system performance, it may consume system resources during intensive tasks like gaming or resource-demanding applications. Disabling it temporarily can free up resources, potentially improving the overall performance of the system.
- Testing and troubleshooting: In some cases, you may need to turn off Windows Defender temporarily to perform specific tests or troubleshooting steps. For example, software developers or IT professionals may need to disable it to test the behavior of certain applications or diagnose compatibility issues.
- Specific security requirements: In rare cases, certain environments or industries have specific security requirements that necessitate the use of a different antivirus solution. In these situations, Windows Defender may need to be permanently disabled to comply with those requirements.
It’s important to note that disabling Windows Defender leaves your computer more vulnerable to security threats. Therefore, it is recommended to have an alternative antivirus solution in place or to disable Windows Defender temporarily for specific purposes and re-enable it once the task is complete.
Method 1: Temporarily disabling Windows Defender
If you need to temporarily disable Windows Defender on your Windows system, there are a few simple steps you can follow:
- Open the Windows Security app by clicking on the Start menu and searching for “Windows Security”.
- In the Windows Security app, click on the “Virus & threat protection” option.
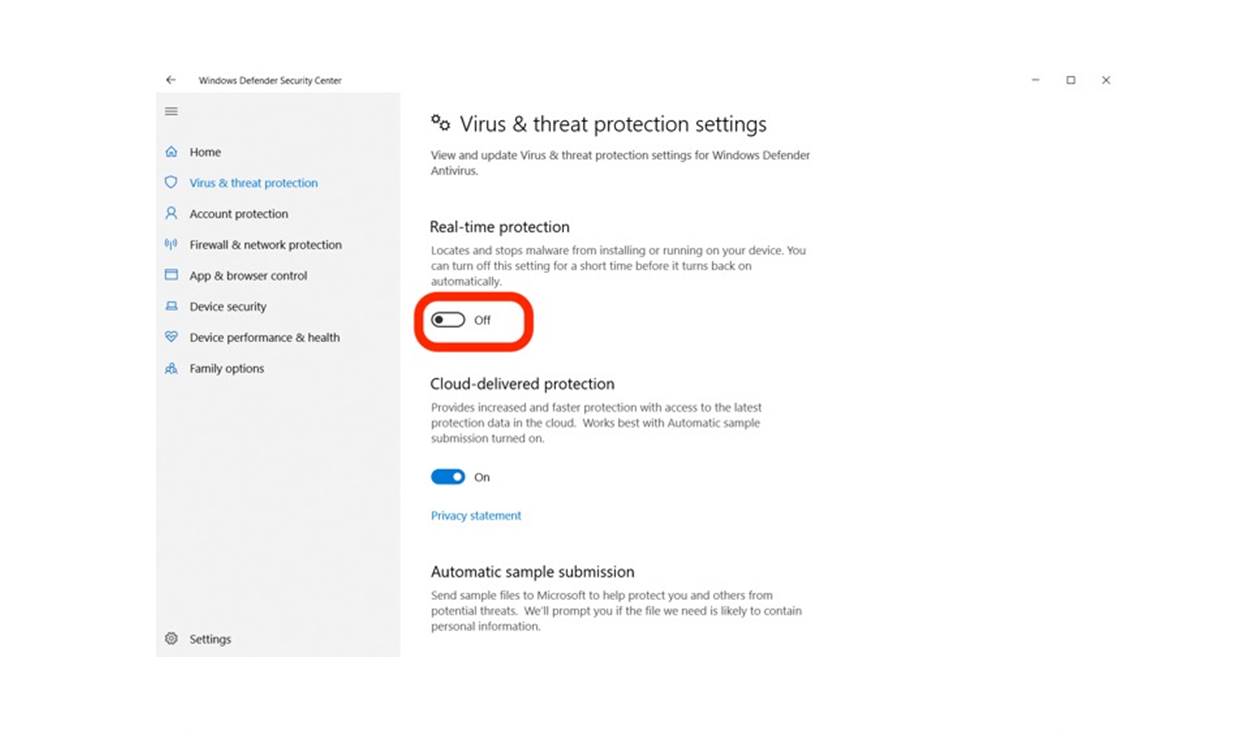
- Click on “Manage settings” under the “Virus & threat protection settings” section.
- In the next window, toggle off the “Real-time protection” option to temporarily disable Windows Defender.
- A warning prompt will appear, asking if you’re sure you want to disable real-time protection. Click on “Yes” to confirm.
- Windows Defender will now be temporarily disabled until you turn on the real-time protection again.
It’s important to note that disabling real-time protection temporarily leaves your computer vulnerable to threats. Therefore, it is recommended to re-enable Windows Defender as soon as you finish the specific task or troubleshooting step.
Temporarily disabling Windows Defender may be helpful in situations where you need to install software or perform certain actions that may be detected as potentially harmful by the antivirus program. Once you’re done with the task, make sure to turn on real-time protection again to ensure the ongoing security of your system.
Method 2: Using the Windows Security app
The Windows Security app provides a user-friendly interface to manage the security settings on your Windows system, including Windows Defender. Here’s how you can disable Windows Defender using the Windows Security app:
- Open the Windows Security app by clicking on the Start menu and searching for “Windows Security”.
- In the Windows Security app, click on the “Virus & threat protection” option.
- Under the “Virus & threat protection settings” section, click on “Manage settings”.
- In the next window, locate the “Real-time protection” option and toggle the switch to the off position.
- A confirmation prompt will appear, asking if you’re sure you want to turn off real-time protection. Click on “Yes” to confirm and disable Windows Defender.
- Windows Defender will now be disabled until you turn on real-time protection again using the same steps.
Using the Windows Security app is a straightforward method to disable Windows Defender temporarily. However, it’s important to remember that disabling real-time protection leaves your system vulnerable to potential threats. Therefore, make sure to re-enable Windows Defender when you’re done with the specific task or troubleshooting process.
The Windows Security app also provides other security-related features and tools, allowing you to manage firewall settings, perform scans, and access other security options. It serves as a comprehensive hub for maintaining the security of your Windows system.
Method 3: Using Group Policy Editor
If you have a Windows Pro, Enterprise, or Education edition, you can use the Group Policy Editor to disable Windows Defender. Here’s how:
- Open the Group Policy Editor by pressing the Windows key + R to open the Run dialog box. Type “gpedit.msc” and hit Enter.
- In the Group Policy Editor, navigate to “Computer Configuration” > “Administrative Templates” > “Windows Components” > “Windows Defender Antivirus”.
- Double-click on the “Turn off Windows Defender Antivirus” policy on the right-hand side.
- In the policy settings window, set the policy to “Enabled” to disable Windows Defender.
- Click “Apply” and then “OK” to save the changes.
- Restart your computer for the changes to take effect.
Using the Group Policy Editor provides a more permanent method to disable Windows Defender, as the policy settings will persist even after system restarts. It is important to note, however, that the Group Policy Editor is not available in Windows 10 Home edition.
If you ever decide to re-enable Windows Defender using the Group Policy Editor, simply follow the same steps and set the “Turn off Windows Defender Antivirus” policy to “Not configured” or “Disabled”.
Always exercise caution when modifying group policy settings, as it can affect other aspects of your system configuration. If you are not familiar with using the Group Policy Editor, it is recommended to seek assistance from a knowledgeable individual or IT professional.
Method 4: Using Registry Editor
If you’re comfortable making changes to the Windows registry, you can disable Windows Defender using the Registry Editor. Here’s how:
- Open the Registry Editor by pressing the Windows key + R to open the Run dialog box. Type “regedit” and hit Enter.
- In the Registry Editor window, navigate to the following path:
HKEY_LOCAL_MACHINE\SOFTWARE\Policies\Microsoft\Windows Defender. If the “Windows Defender” key doesn’t exist, you may need to create it. - In the “Windows Defender” key, right-click on the right-hand side and select “New” > “DWORD (32-bit) Value”. Name the new value
DisableAntiSpyware. - Double-click on the newly created
DisableAntiSpywarevalue and set its data to 1 to disable Windows Defender. - Click “OK” to save the changes.
- Restart your computer for the changes to take effect.
Using the Registry Editor allows for a more permanent method of disabling Windows Defender, as the registry settings will persist even after system restarts. However, it’s crucial to exercise caution when making changes to the registry, as incorrect modifications can adversely affect your system’s stability.
If you ever decide to re-enable Windows Defender using the Registry Editor, simply navigate back to the HKEY_LOCAL_MACHINE\SOFTWARE\Policies\Microsoft\Windows Defender key, locate the DisableAntiSpyware value, and either delete it or set its data to 0.
It’s advisable to create a backup of your registry before making any changes, and if you’re unsure or uncomfortable with the process, it’s best to seek assistance from a knowledgeable individual or IT professional.
Method 5: Disabling Windows Defender permanently through Command Prompt
If you want to permanently disable Windows Defender on your Windows system, you can use the Command Prompt to accomplish this. Here’s how:
- Open Command Prompt as an administrator. You can do this by searching for “Command Prompt” in the Start menu, right-clicking on it, and selecting “Run as administrator”.
- In the Command Prompt window, type the following command and press Enter:
sc config WinDefend start= disabled - You should receive a success message indicating that the configuration has been changed.
- Now, type the command
net stop WinDefendand press Enter. This will stop the Windows Defender service. - Windows Defender will now be disabled and will not start automatically on system startup.
It’s important to note that permanently disabling Windows Defender leaves your computer more vulnerable to security threats. Therefore, it’s recommended to have an alternative antivirus solution in place or to disable Windows Defender permanently only if you have a specific reason to do so.
If you ever decide to re-enable Windows Defender through the Command Prompt, you can use the command sc config WinDefend start= demand to set the service startup type back to its default configuration. Make sure to run the Command Prompt as an administrator when making these changes.
Using the Command Prompt provides a more advanced method to disable Windows Defender permanently, but it requires a good understanding of command-line operations. If you’re not comfortable working with the Command Prompt, it’s advisable to seek assistance from a knowledgeable individual or IT professional.
Method 6: Disabling Windows Defender permanently through PowerShell
If you prefer using PowerShell, you can disable Windows Defender permanently through a series of commands. Here’s how:
- Open PowerShell as an administrator. To do this, search for “PowerShell” in the Start menu, right-click on it, and select “Run as administrator”.
- In the PowerShell window, enter the following command and press Enter:
- This command disables real-time monitoring, which is a critical component of Windows Defender.
- Next, enter the following command and press Enter to stop the Windows Defender service:
- By stopping the service, you ensure that Windows Defender does not run on your system.
- With these commands, Windows Defender is now permanently disabled on your computer.
powershell
Set-MpPreference -DisableRealtimeMonitoring $true
powershell
Stop-Service -Name WinDefend
It’s important to note that permanently disabling Windows Defender renders your system more vulnerable to security threats. It’s recommended to have an alternative antivirus solution in place or to disable Windows Defender permanently only if you have a specific reason to do so.
If you decide to re-enable Windows Defender through PowerShell, you can use the following command to enable real-time monitoring and start the Windows Defender service:
powershell
Set-MpPreference -DisableRealtimeMonitoring $false; Start-Service -Name WinDefend
Using PowerShell provides a more advanced method to disable Windows Defender permanently, but it requires familiarity with PowerShell commands. If you’re unsure or uncomfortable using PowerShell, it’s advisable to seek assistance from a knowledgeable individual or IT professional.
Method 7: Disabling Windows Defender permanently by installing third-party antivirus software
If you prefer using a different antivirus solution and want to permanently disable Windows Defender, you can achieve this by installing a third-party antivirus software. Here’s how:
- Research and select a reputable third-party antivirus software that suits your needs. There are many options available, such as Norton, McAfee, Avast, or Bitdefender.
- Visit the official website of the selected antivirus software and download the installation executable file.
- Run the installer and follow the on-screen instructions to install the third-party antivirus software on your computer.
- During the installation process, you may be prompted to disable Windows Defender. Make sure to follow the instructions provided by the antivirus software to disable Windows Defender at the time of installation.
- Once the installation is complete, the third-party antivirus software will take over as the primary antivirus and anti-malware solution on your system.
- Windows Defender will be automatically disabled and will no longer run in the background.
Disabling Windows Defender by installing a third-party antivirus software provides a permanent solution for those who prefer using an alternative security solution. By doing so, you ensure that your computer is protected by the new antivirus software and avoid any potential conflicts between Windows Defender and the third-party software.
It’s important to remember that when using third-party antivirus software, it’s crucial to keep it up to date and regularly perform system scans to maintain the security of your computer.
If you decide to switch back to Windows Defender or change to another antivirus software in the future, it is recommended to follow the respective uninstallation instructions provided by the third-party software and re-enable Windows Defender or install the new antivirus software as required.