
Option 1: Disable microphone access for specific apps
One of the ways to turn off the microphone on an Android device is by disabling microphone access for specific apps. This allows you to control which apps can use the microphone and which cannot. Here’s how you can do it:
- Open the Settings app on your Android device.
- Scroll down and tap on “Apps” or “Applications”, depending on your device.
- Look for the app that you want to disable microphone access for and tap on it.
- Tap on “Permissions” or “App permissions” (the wording may vary).
- Find the “Microphone” option and toggle it off.
By following these steps, you can effectively disable microphone access for specific apps on your Android device. This means that those apps will no longer be able to use your device’s microphone to record audio.
This option is useful if you have certain apps that you don’t want to have access to your microphone, or if you simply want to have more control over which apps can use your device’s microphone.
It’s important to note that disabling microphone access for certain apps may affect their functionality. For example, if you disable microphone access for a voice recording app, you won’t be able to use the app to record audio. Therefore, it’s recommended to consider the implications before disabling microphone access for any app.
This method allows you to customize the microphone permissions for individual apps, giving you greater control over your privacy and the use of your device’s microphone.
Option 2: Mute microphone during phone calls
If you want to temporarily disable the microphone during phone calls, you can simply mute it. This can be useful if you need to have a private conversation or if you’re in a noisy environment. Here’s how you can mute the microphone during phone calls on your Android device:
- During a phone call, locate and tap on the microphone icon on the call screen. This will mute the microphone.
- The icon will typically change to indicate that the microphone is muted. It may appear as a crossed-out microphone symbol or a muted microphone symbol, depending on your device.
- To unmute the microphone and resume normal audio transmission, simply tap on the microphone icon again.
By muting the microphone during phone calls, you can ensure that your voice is not transmitted to the other party on the call. This can be helpful in situations where you want to listen without actively participating in the conversation, or when you need to maintain privacy and avoid background noise interference.
It’s worth noting that muting the microphone only affects the audio transmission during the phone call. It does not disable the microphone for other applications or functions on your Android device. Once the call ends, the microphone will automatically return to its normal state.
This option provides a convenient way to quickly mute and unmute the microphone during phone calls, allowing you to control the audio transmission according to your needs and preferences.
Option 3: Turn off microphone access for Google Assistant
If you prefer to disable microphone access specifically for Google Assistant, you can adjust the settings to restrict its access. Here’s how you can turn off microphone access for Google Assistant on your Android device:
- Open the Google Assistant app on your device. You can access it by either long-pressing the home button or saying “Hey Google” or “OK Google” if voice activation is enabled.
- Tap on the Explore icon located at the bottom-right corner of the Google Assistant interface. It usually appears as a compass-like icon.
- In the Explore screen, tap on your profile picture or initials at the top-right corner of the interface.
- Select “Assistant” from the drop-down menu.
- Scroll down and tap on “Assistant devices”.
- Tap on your device name.
- Toggle off the option for “Microphone”.
By turning off the microphone access for Google Assistant, you can ensure that it won’t actively listen or respond to voice commands. This can be useful if you want to temporarily disable Google Assistant’s functionality or if you have privacy concerns about voice-activated features.
It’s important to remember that disabling microphone access for Google Assistant will affect its voice recognition and response capabilities. If you want to use Google Assistant with voice commands again, you’ll need to re-enable the microphone access using the same steps mentioned above.
This option allows you to have more control over the microphone access specifically for Google Assistant, tailoring your device’s settings to your preferences and privacy requirements.
Option 4: Disable microphone access for system apps
In addition to specific apps, you can also disable microphone access for system apps on your Android device. This allows you to restrict microphone usage for core functions and services provided by the operating system. Here’s how you can disable microphone access for system apps:
- Go to the Settings app on your Android device.
- Scroll down and tap on “Apps” or “Applications”, depending on your device.
- Tap on the three-dot menu icon at the top-right corner of the screen and select “Show system” or “System apps” from the dropdown list.
- Scroll through the list and find the system app that you want to disable microphone access for.
- Tap on the app name to access its settings.
- Tap on “Permissions” or “App permissions”.
- Locate the “Microphone” option and toggle it off to disable microphone access for that system app.
By disabling microphone access for system apps, you have more control over the core functions and services that have access to your device’s microphone. This can help protect your privacy and prevent any unauthorized audio recording or usage.
It’s important to note that disabling microphone access for certain system apps may impact their intended functionality, so you should exercise caution and consider the implications before restricting access.
This option allows you to customize microphone permissions for system apps, giving you an added layer of control over your Android device’s microphone usage.
Option 5: Disable microphone permissions for third-party apps
Another way to turn off the microphone on your Android device is by disabling microphone permissions for specific third-party apps. This allows you to control which apps have access to your device’s microphone and prevent them from using it. Here’s how you can disable microphone permissions for third-party apps:
- Open the Settings app on your Android device.
- Scroll down and tap on “Apps” or “Applications”, depending on your device.
- Find and select the app for which you want to disable microphone access.
- Tap on “Permissions” or “App permissions”.
- Look for the “Microphone” option and toggle it off.
By following these steps, you can block third-party apps from accessing your device’s microphone, thus safeguarding your privacy and preventing unauthorized audio recording.
It’s important to note that disabling microphone permissions for certain apps may affect their functionality. For example, a voice recording app will no longer be able to record audio if microphone permissions are disabled. Therefore, it’s recommended to carefully consider the implications before disabling microphone access for any app.
This option allows you to have greater control over how third-party apps can use your device’s microphone, ensuring that only the apps you trust have access to this sensitive feature.
Option 6: Use a microphone blocker app or physical microphone block
If you want to ensure complete privacy and disable the microphone on your Android device, you can consider using a microphone blocker app or a physical microphone block. These methods provide an extra layer of protection by preventing any audio input from being picked up by the microphone. Here are the two options:
Microphone Blocker App:
You can download and install a microphone blocker app from the Google Play Store. These apps work by blocking microphone access for all apps on your device. They effectively disable the microphone, preventing any unauthorized audio recording. It’s important to choose a reputable and trusted app from a reliable developer to ensure the security and effectiveness of the microphone blocking functionality.
Physical Microphone Block:
Alternatively, you can physically block the microphone on your Android device. This can be done by using a small sticker or a piece of tape to cover the microphone opening. Make sure to position the sticker or tape carefully so as not to obstruct any other parts of the device. By physically blocking the microphone, you can rest assured that no audio will be recorded through it, providing an added level of privacy and security.
Both options effectively disable the microphone on your Android device, ensuring that no audio is captured or transmitted. However, it’s essential to weigh the pros and cons of each method. A microphone blocker app provides a software-based solution, while a physical microphone block offers a more tangible and foolproof approach. Choose the option that best suits your needs and preferences.
It’s important to note that disabling the microphone using a blocker app or physical block may affect certain functionalities that rely on audio input, such as voice recording or hands-free calling. Therefore, consider the implications and weigh the benefits against the potential restrictions before implementing any microphone blocking method.
Option 7: Enable privacy settings for microphone access
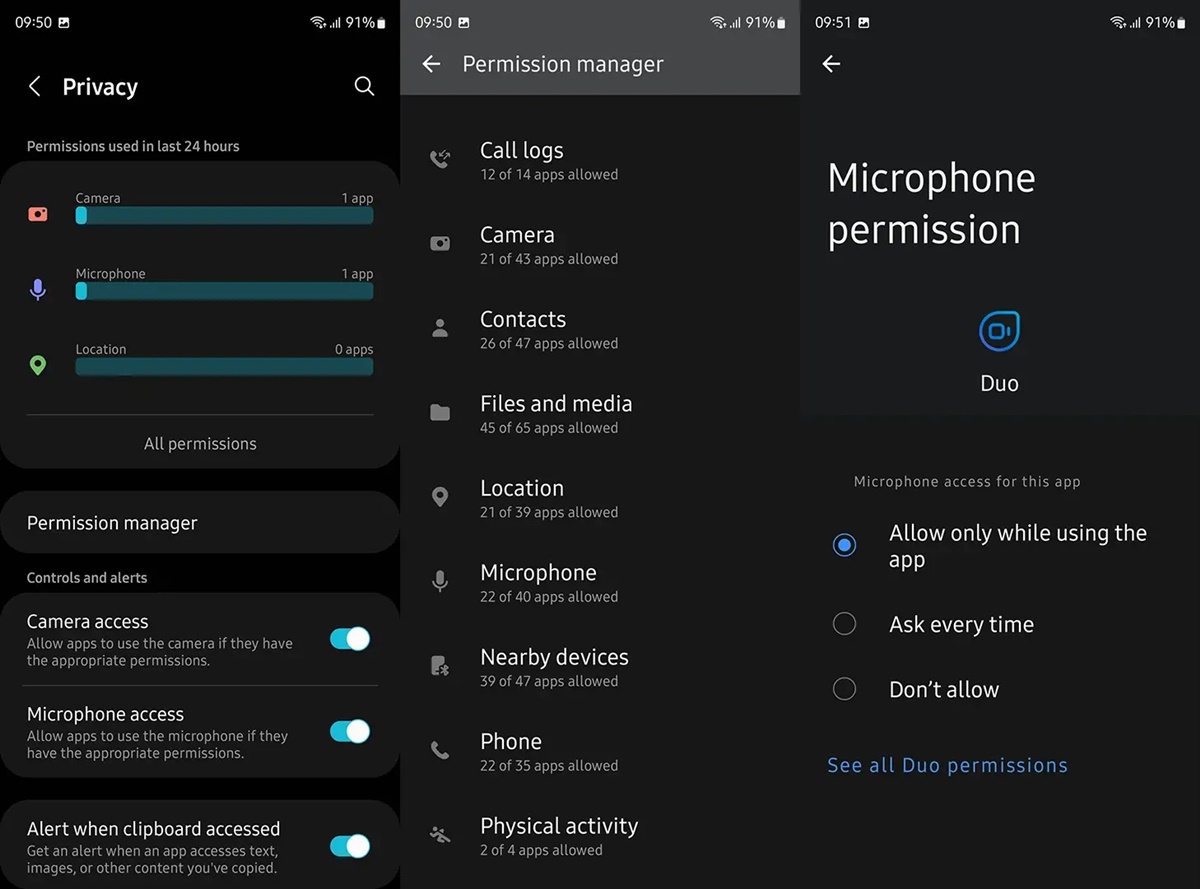
To enhance your privacy and have more control over microphone access on your Android device, you can enable privacy settings that provide additional security measures. These settings allow you to manage which apps can access the microphone and give you the ability to review and approve microphone permissions. Here’s how you can enable privacy settings for microphone access:
- Open the Settings app on your Android device.
- Scroll down and tap on “Privacy” or “Security & privacy”, depending on your device.
- Look for the option related to “App permissions” or “Permissions manager”.
- Tap on “Microphone” or “Audio”.
- You’ll see a list of apps that have requested microphone access.
- Review the list and toggle the switches to enable or disable microphone permissions for each app according to your preference.
Enabling privacy settings for microphone access allows you to understand and control which apps have access to your device’s microphone. This way, you can ensure that only the apps you trust can listen to or record audio.
By reviewing and managing microphone permissions, you can prevent unauthorized access and protect your privacy. This is particularly important for sensitive conversations or when you want to restrict certain apps from utilizing the microphone.
It’s worth noting that enabling privacy settings for microphone access may impact the functionality of certain apps that rely on audio input. Therefore, carefully consider the implications before modifying the microphone permissions for any app.
This option empowers you to have greater control over microphone access on your Android device, enhancing your privacy and allowing you to approve or deny microphone permissions on a per-app basis.
Option 8: Disable microphone access for camera apps
If you’re concerned about camera apps on your Android device accessing the microphone, you can disable microphone access specifically for those apps. This ensures that camera apps cannot use the microphone to record audio while you’re taking photos or videos. Here’s how you can disable microphone access for camera apps:
- Open the Settings app on your Android device.
- Scroll down and tap on “Apps” or “Applications”, depending on your device.
- Look for the camera app that you want to disable microphone access for and tap on it.
- Tap on “Permissions” or “App permissions”.
- Find the “Microphone” option and toggle it off.
By following these steps, you can prevent camera apps from utilizing the microphone while you’re capturing photos or recording videos. This can help protect your privacy and ensure that no audio is recorded without your consent.
It’s important to note that disabling microphone access for camera apps may affect certain features that rely on audio recording, such as video recording with sound. Therefore, consider the implications and make sure that disabling microphone access aligns with your specific needs and preferences.
This option allows you to have more control over microphone access specifically for camera apps, ensuring that you can capture visual content without any accompanying audio if desired.
Option 9: Check for hidden or active background apps using the microphone
If you suspect that there might be hidden or active background apps on your Android device using the microphone without your knowledge, you can take steps to identify and address these concerns. By checking for hidden or active background apps, you can ensure that your device’s microphone is not being utilized without your permission. Here’s how you can check for such apps:
- Open the Settings app on your Android device.
- Scroll down and tap on “Apps” or “Applications”, depending on your device.
- Tap on the three-dot menu icon at the top-right corner of the screen and select “Show system” or “System apps” from the dropdown list.
- Scroll through the list of apps.
- Look for any suspicious or unfamiliar apps that you do not recognize.
- Tap on the app to access its settings.
- Review the app’s permissions, particularly the microphone permissions.
- If you suspect that an app is using the microphone without your permission, you can either uninstall the app or disable its microphone access through the app’s settings.
By actively checking for hidden or active background apps using the microphone, you can ensure that no unauthorized audio recording is taking place on your Android device. This step is particularly important for maintaining your privacy and protecting yourself against potential spying or data breaches.
It’s crucial to stay vigilant and regularly monitor the apps on your device, especially if you notice any unusual behavior or suspect that your privacy may be compromised.
This option empowers you to take control and address any concerns about hidden or active background apps using the microphone on your Android device, ensuring that you have a secure and private user experience.
Option 10: Factory reset your Android device
If you have exhausted all other options and still suspect that there may be hidden or persistent microphone access on your Android device, performing a factory reset can be a last resort. Resetting your device to its factory settings erases all data and settings, essentially returning it to its original state when you first purchased it. Here’s how you can factory reset your Android device:
Note: Performing a factory reset will delete all data on your device, so it is crucial to back up any important files or data before proceeding.
- Open the Settings app on your Android device.
- Scroll down and tap on “System” or “System & updates”.
- Look for the option labeled “Reset” or “Reset options” and tap on it.
- Tap on “Factory data reset” or “Erase all data (factory reset)”.
- Review the information and tap on “Reset phone” or “Reset tablet”.
- If prompted, enter your device’s PIN, password, or pattern to confirm the reset.
- Tap on “Erase everything” or “Reset device” to initiate the factory reset process.
A factory reset wipes your device clean, including any hidden or persistent microphone access that may have been present. It can help restore your device to a state where you have full control over its settings and permissions.
After the factory reset, you can set up your device as new or restore it from a previous backup. Ensure that you reinstall apps and data only from trusted sources to minimize the possibility of reinstalling any malicious or privacy-invading apps.
This option should be considered as a last resort due to the extensive data loss and the time required to set up your device anew. However, it can provide a fresh start and peace of mind, knowing that any potential hidden microphone access has been completely removed.