
What is Tablet Mode?
Tablet mode is a feature found in operating systems like Windows, macOS, Android, iOS, and Chrome OS that optimizes the user interface for touch interaction. When you activate tablet mode on your device, it transforms your device into a more tablet-like experience, making it easier to navigate and interact with the system using touch gestures.
In tablet mode, the user interface elements are optimized for touch input, and the layout is often adjusted to make better use of the available screen space. This includes larger icons and buttons, virtual keyboards, and gesture-based navigation.
Tablet mode is particularly useful for devices that have a touchscreen, such as tablets, 2-in-1 laptops, and convertible devices. It allows users to seamlessly transition between traditional laptop mode and tablet mode, depending on their needs and preferences.
When in tablet mode, you can use your device without the need for a physical keyboard or mouse, as the touch screen becomes the primary input method. This can be beneficial for tasks that require a more intuitive and hands-on approach, such as browsing the web, playing games, or using touch-based apps.
However, tablet mode may not always be the preferred mode of operation for everyone. Some users may find it more comfortable to use their devices in the traditional desktop mode, especially for tasks that require precise mouse movements or extensive keyboard input.
Fortunately, most operating systems offer the flexibility to switch between tablet mode and desktop mode, allowing users to customize their experience based on their specific needs and preferences. In the following sections, we will guide you through the process of turning off tablet mode on various operating systems.
Reasons to Turn Off Tablet Mode
While tablet mode can be a convenient feature for touch-centric devices, there are several reasons why you might want to turn it off and switch back to the traditional desktop mode.
Firstly, some users may find the tablet mode interface to be less efficient for certain tasks. Activities such as content creation, document editing, and spreadsheet work often require precise input from a physical keyboard and mouse rather than touch gestures. By disabling tablet mode, you can easily switch to the desktop mode and take advantage of the greater precision and productivity that a traditional input setup provides.
Secondly, in tablet mode, the layout and appearance of certain applications may differ from their desktop version. This can lead to unfamiliarity and potential difficulties in navigating or using specific features. By switching to desktop mode, you can ensure a consistent user experience across applications.
Another reason to disable tablet mode is the potential for accidental touch input. When using a touchscreen device in tablet mode, accidental taps or swipes can occur, resulting in unintended actions or disruptions to your workflow. By switching back to desktop mode, you can mitigate the risk of accidental input and maintain a more controlled computing environment.
Furthermore, some users may simply prefer the familiar desktop interface. If you primarily use your device for tasks that are better suited to a traditional desktop setup, such as coding, graphic design, or multitasking with multiple windows, turning off tablet mode can provide a more comfortable and efficient working environment.
Lastly, disabling tablet mode can also help conserve battery life on portable devices. In tablet mode, certain features like background processes and display settings may be optimized for touch usage but consume more power. By switching to desktop mode when not requiring touchscreen interaction, you can potentially extend your battery runtime.
Overall, while tablet mode has its benefits for touch-driven tasks, there are valid reasons to turn it off and revert to the desktop mode for improved productivity, familiarity, and efficiency. In the following sections, we will outline the steps to disable tablet mode on various operating systems.
How to Turn Off Tablet Mode on Windows
If you’re using a Windows device with tablet mode enabled but prefer the traditional desktop experience, you can easily turn off tablet mode by following these steps:
Step 1: Open the Action Center
To access the Action Center, you can click on the notification icon located in the bottom-right corner of the taskbar. Alternatively, you can use the keyboard shortcut Windows key + A to open the Action Center.
Step 2: Toggle Off Tablet Mode
Once the Action Center is open, locate the tablet mode button. It is represented by a square icon with a pen and a pad on it. Click or tap on the tablet mode button to disable tablet mode. When the button is grayed out, it indicates that tablet mode is turned off, and you are now in desktop mode.
If the tablet mode button is not visible in the Action Center, it may be hidden in the expanded quick actions. In this case, you can click on the Expand button at the bottom of the Action Center to reveal more options and locate the tablet mode button.
Alternatively, you can go to the Windows settings to disable tablet mode:
Step 1: Open the Settings App
Click on the Start button, then select the gear-shaped Settings icon to open the Windows Settings app.
Step 2: Navigate to the System Settings
In the Settings app, click on “System” to access the system settings.
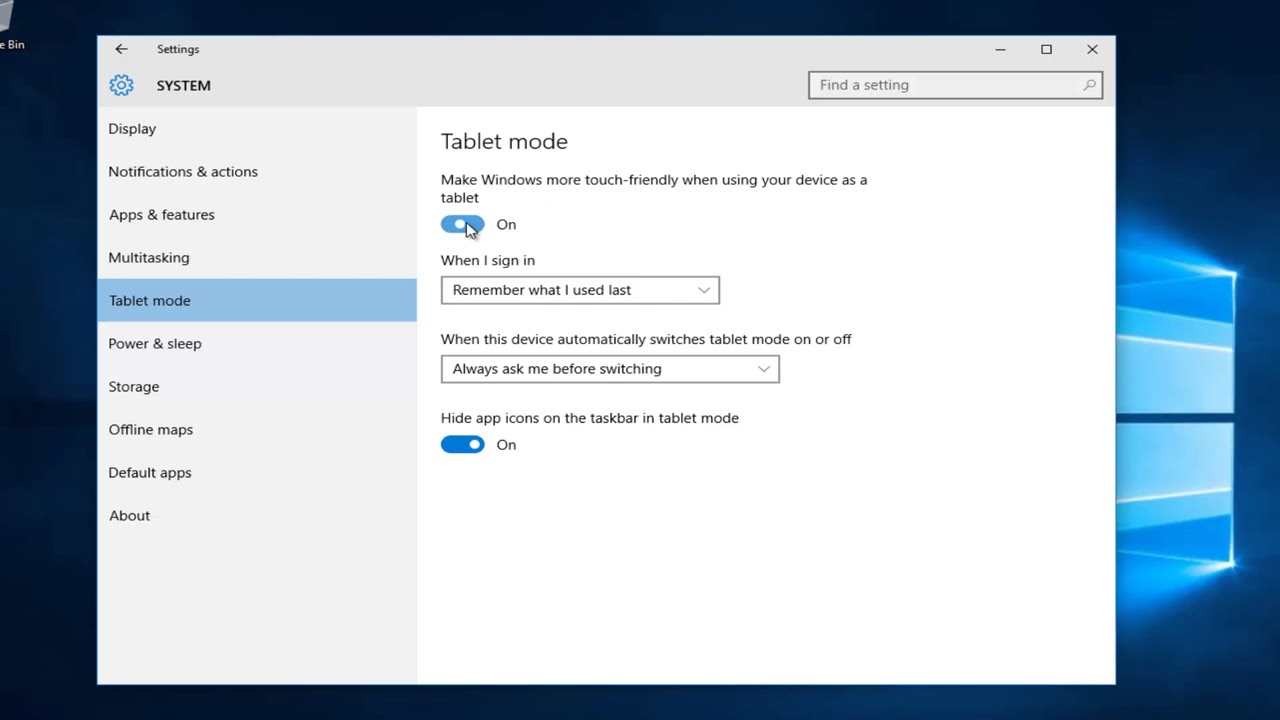
Step 3: Go to the Tablet Mode Settings
In the left sidebar of the System settings, click on “Tablet mode.” This will open the Tablet mode settings.
Step 4: Disable Tablet Mode
Under the Tablet mode settings, toggle the “Make Windows more touch-friendly when using your device as a tablet” option to the off position. This will disable tablet mode and switch to desktop mode.
Once you have disabled tablet mode, your Windows device will function in the traditional desktop mode, providing you with a more familiar interface and interaction style.
Now that you know how to disable tablet mode on Windows, you can easily toggle between tablet mode and desktop mode based on your preferences and work requirements.
Step 1: Open the Action Center
The Action Center is a centralized hub where you can access various system settings and notifications on your Windows device. To turn off tablet mode, you first need to open the Action Center. Here’s how:
Method 1: Click on the Notification Icon
The Notification icon is located on the right side of the taskbar, next to the clock. It looks like a small speech bubble. Simply click on this icon to open the Action Center.
Method 2: Use the Keyboard Shortcut
An alternative way to open the Action Center is by using a keyboard shortcut. Press the Windows key (the key with the Windows logo) and the letter “A” simultaneously. This will instantly open the Action Center.
Method 3: Swipe from the Right
If you’re using a touch screen device, you can swipe your finger from the right edge of the screen towards the center to open the Action Center. This gesture is particularly useful for tablets and 2-in-1 devices.
Method 4: Use the Taskbar Shortcut
If you’ve customized your taskbar, you can add a shortcut to the Action Center for quick access. Right-click on the taskbar, select “Taskbar settings,” and scroll down to the “Notification area” section. Click on “Turn system icons on or off” and toggle the switch for “Action Center” to the on position. You can now click on the Action Center icon directly from the taskbar.
Once you have successfully opened the Action Center using any of the above methods, you are ready to proceed to the next step and turn off tablet mode.
Keep in mind that the appearance and layout of the Action Center may vary slightly depending on your Windows version. However, the basic functionality and access to tablet mode settings remain consistent across different versions.
In the following step, we will guide you through the process of toggling off tablet mode within the Action Center.
Step 2: Toggle Off Tablet Mode
Once you have successfully opened the Action Center on your Windows device, you can proceed to turn off tablet mode by following these steps:
Method 1: Click on the Tablet Mode Button
Within the Action Center, you will find the tablet mode button. It is represented by a square icon with a pen and a pad on it. Simply click or tap on this button to toggle off tablet mode. When the button is grayed out, it indicates that tablet mode is turned off, and you have switched to desktop mode.
If you cannot locate the tablet mode button in the initial view of the Action Center, it might be hidden in the expanded quick actions. In that case, you can click or tap on the Expand button at the bottom of the Action Center to reveal additional options, including the tablet mode button.
Method 2: Use Windows Settings
If you prefer, you can also disable tablet mode through the Windows Settings app. Here’s how:
1. Open the Start menu and click on the gear-shaped Settings icon to open the Windows Settings app.
2. In the Settings app, select the “System” category.
3. On the left sidebar, choose “Tablet mode.”
4. In the Tablet mode settings, toggle the switch for “Make Windows more touch-friendly when using your device as a tablet” to the off position.
By following these steps either within the Action Center or the Windows Settings app, you can turn off tablet mode on your Windows device and switch back to the traditional desktop mode. Keep in mind that the exact layout and options may vary slightly depending on the version of Windows you are using.
Once you have disabled tablet mode, your device will no longer optimize the user interface for touch interactions, providing you with a more familiar and conventional desktop experience.
Now that you have successfully turned off tablet mode, you can enjoy the benefits of using your Windows device in desktop mode.
How to Turn Off Tablet Mode on macOS
If you’re using a macOS device and want to disable tablet mode to return to the traditional desktop experience, you can easily do so by following these steps:
Step 1: Open System Preferences
To access the necessary settings, first, click on the Apple menu located in the top-left corner of the screen. From the drop-down menu, select “System Preferences” to open the System Preferences window.
Step 2: Navigate to the Display Preferences
In the System Preferences window, find and click on the “Displays” icon. This will open the Display preferences panel, where you can make adjustments to various display-related settings.
Step 3: Disable the “Mirror Displays” Option
In the Display preferences panel, navigate to the “Arrangement” tab. Here, you will see a checkbox labeled “Mirror Displays.” Make sure this option is unchecked. Unchecking the “Mirror Displays” option will disable tablet mode and allow you to use your macOS device in desktop mode.
Step 4: Adjust Other Display Settings
If you wish to further customize your display settings, you can explore other options in the Display preferences panel. For example, you can adjust the resolution, display arrangement, and color profiles to suit your preferences and workflow.
By following these simple steps, you can easily disable tablet mode on your macOS device and switch to the traditional desktop mode. This will provide you with a more familiar interface, optimized for a keyboard and mouse interaction, improving your productivity and usability.
Remember that depending on the macOS version you are using, the appearance and navigation of the System Preferences window may vary slightly. However, the general process of disabling tablet mode remains consistent across macOS versions.
Now that you know how to turn off tablet mode on macOS, you can enjoy the full functionality and flexibility of the traditional desktop experience on your Mac.
Step 1: Open System Preferences
When it comes to turning off tablet mode on macOS and returning to the traditional desktop experience, the first step is to open the System Preferences. The System Preferences panel allows you to customize various settings on your Mac, including display preferences. Here’s how to access it:
Method 1: Using the Apple Menu
Click on the Apple menu icon located in the top-left corner of the screen. A drop-down menu will appear. From this menu, select “System Preferences” to open the System Preferences window.
Method 2: Using the Dock
If you have the System Preferences icon in your Dock (the bar with icons at the bottom of the screen), you can simply click on it to open the System Preferences window directly.
Method 3: Using Spotlight
Press the Command key (⌘) and the Space bar simultaneously to open Spotlight, a search feature on macOS. In the search bar that appears, type “System Preferences” and press Enter. This will open the System Preferences window.
Regardless of the method you choose, the System Preferences window will open and provide access to a wide range of settings and preferences that you can customize on your Mac.
Keep in mind that the appearance and organization of the System Preferences window may vary slightly depending on the macOS version you are using. However, the overall functionality and access to display preferences remain consistent.
Now that you have successfully opened the System Preferences window, you are ready to proceed to the next step and navigate to the display preferences to disable tablet mode.
Step 2: Navigate to the Display Preferences
Once you have opened the System Preferences on your macOS device, the next step is to navigate to the Display preferences. This is where you can make adjustments to various display settings, including disabling tablet mode. Here’s how:
Method 1: Using the Grid View
In the System Preferences window, you will see several icons representing different categories of settings. Look for the “Displays” icon, which resembles a computer monitor. Click on this icon to access the Display preferences.
Method 2: Using the Sidebar
An alternative way to navigate to the Display preferences is by using the sidebar in the System Preferences window. Click on the “Displays” option in the sidebar to open the Display preferences pane.
Once you have successfully accessed the Display preferences, you will be able to configure various settings related to your Mac’s display.
Keep in mind that the organization and appearance of the System Preferences window and the available options may vary slightly depending on the macOS version you are using. However, the Display preferences are a standard feature on macOS and can usually be found in a similar location.
In the next step, we’ll guide you through the process of disabling tablet mode by adjusting the display settings.
Now that you have navigated to the Display preferences, you can proceed to the next step to disable tablet mode and switch back to the traditional desktop experience on your macOS device.
Step 3: Disable the “Mirror Displays” Option
In order to turn off tablet mode and return to the traditional desktop experience on macOS, you will need to disable the “Mirror Displays” option in the Display preferences. Here’s how you can do it:
Method 1: Using the “Arrangement” Tab
Once you are in the Display preferences window, navigate to the “Arrangement” tab. This tab provides options for configuring the arrangement and settings of your displays.
Look for the checkbox labeled “Mirror Displays” within the “Arrangement” tab. By default, this option is checked, indicating that the displays are mirrored, which is typical of tablet mode.
To turn off tablet mode and disable the mirroring of displays, uncheck the “Mirror Displays” checkbox. This action will separate the displays and disable the tablet-like behavior, allowing you to use your macOS device in desktop mode.
Method 2: Disconnecting External Displays
If you have connected an external display to your Mac, disconnecting it can also effectively disable tablet mode. Simply unplug the display from your Mac, and it will revert to using only its built-in display, resulting in a desktop mode experience.
Disabling the “Mirror Displays” option or disconnecting external displays will switch your macOS device to the traditional desktop mode, enabling separate displays and returning to a more familiar computer setup.
Remember that the available settings and options might differ slightly depending on the macOS version you are using. However, the primary goal remains consistent: to disable tablet mode and transition to the standard desktop mode.
Now that you have successfully disabled the “Mirror Displays” option, you can enjoy the full benefits of using your macOS device in desktop mode.
Step 4: Adjust Other Display Settings
Once you have disabled tablet mode by turning off the “Mirror Displays” option in the Display preferences on macOS, you may want to explore and adjust other display settings to further customize your desktop experience. Here are some additional display settings you can consider:
Resolution: Adjusting the resolution allows you to change the clarity and size of the content displayed on your screen. Higher resolutions offer more detail but may make text and icons appear smaller, while lower resolutions may result in a larger display size but with less detail.
Orientation: You can experiment with the orientation of your display, switching between landscape and portrait modes. This is particularly useful if you’re using external monitors or have a flexible stand for your device.
Brightness: Control the brightness of your display to achieve optimal comfort and visibility. Higher brightness settings are suitable for well-lit environments, while lowering the brightness can help minimize eye strain in dark rooms or during nighttime usage.
Color Calibration: Adjust display colors and color profiles to ensure accurate representation of images and videos. You can calibrate the color temperature, saturation, and other color settings to match your personal preferences or to suit specific work requirements.
Display Arrangement: If you are using multiple displays, you can rearrange their positions and sizes to match your workspace configuration. This will allow you to seamlessly move windows and applications between monitors, enhancing productivity and workflow efficiency.
Night Shift: macOS also offers a feature called Night Shift, which can adjust the color temperature of your display to reduce the amount of blue light emitted. This can be particularly beneficial for nighttime usage, as it may help improve sleep quality.
By exploring and adjusting these additional display settings, you can optimize your desktop experience on macOS to better suit your preferences and needs.
Keep in mind that the exact options and appearance of the Display preferences may vary slightly depending on the macOS version you are using. However, the general concepts and functionality remain consistent across versions.
Now that you have disabled tablet mode and adjusted other display settings, you can enjoy a personalized, optimized desktop experience on your macOS device.
How to Turn Off Tablet Mode on Android
If you’re using an Android device and want to disable tablet mode to switch back to the traditional interface, you can easily do so by following these steps:
Step 1: Open the Settings App
On your Android device, locate the Settings app. You can usually find it in the app drawer or by swiping down from the top of the screen and tapping on the gear-shaped icon in the notification panel.
Step 2: Tap on “Display”
In the Settings app, scroll down or search for the “Display” option and tap on it. This will open the display settings for your Android device.
Step 3: Disable “Tablet Mode”
In the display settings, look for an option called “Tablet Mode” or “Smartphone Mode.” The exact wording may vary depending on your Android device and version. Tap on this option to access the tablet mode settings.
Now, you can toggle off the tablet mode by tapping on the switch associated with it. This will disable tablet mode and switch your Android device back to the traditional smartphone interface.
In some cases, instead of a dedicated tablet mode option, you may find a setting related to the default layout. If this is the case, you can switch the layout to the smartphone or default option to disable tablet mode.
Once you have disabled tablet mode, your Android device will function in the traditional smartphone interface, providing you with a more familiar and conventional user experience.
Keep in mind that the exact layout and options in the Settings app may vary depending on the Android version and device manufacturer. However, the basic process of disabling tablet mode remains consistent across most Android devices.
Now that you know how to turn off tablet mode on your Android device, you can easily switch back to the traditional interface and enjoy a smartphone-like experience on your device.
Step 1: Open the Settings App
If you’re using an Android device and want to disable tablet mode to return to the traditional interface, the first step is to open the Settings app. Here are a few methods to access the Settings app:
Method 1: App Drawer
Locate the Settings app icon in your app drawer. The app drawer can typically be accessed by swiping up from the home screen or tapping the “Apps” or “Menu” icon, depending on your device. Once you find the Settings app icon, tap on it to open the app.
Method 2: Quick Settings Menu
Swipe down from the top of your Android device’s screen to open the notification panel. Look for a gear-shaped icon or the word “Settings” in the quick settings menu. Tap on it to directly open the Settings app.
Method 3: Settings Icon
On certain Android devices, such as Samsung Galaxy phones, you may find a Settings app icon on the home screen or the navigation bar. Simply tap on the icon to open the Settings app.
Once you successfully open the Settings app using any of the above methods, you are ready to proceed to the next step and disable tablet mode on your Android device.
Remember that the appearance and organization of the Settings app may slightly vary depending on the Android version and the custom skin used by your device manufacturer. However, the general process of accessing the settings remains consistent across most Android devices.
In the following steps, we will guide you through the process of disabling tablet mode and switching back to the traditional smartphone interface.
Step 2: Tap on “Display”
Once you have successfully opened the Settings app on your Android device, the next step is to locate and tap on the “Display” option. Here’s how you can do it:
Method 1: Scroll and Locate
Scroll through the settings options until you find the “Display” option. Depending on your Android device and version, it may be listed under different categories such as “Device” or “Display & Sound.” Tap on the “Display” option to access the display settings.
Method 2: Search
If your Android device has a search function in the Settings app, you can directly search for “Display” by using keywords. Tap on the search bar at the top of the Settings app, type “Display,” and the relevant options will be displayed. Locate the “Display” option and tap on it to access the display settings.
By tapping on the “Display” option, you will enter the settings specifically related to the display and screen of your Android device.
It’s worth noting that the organization and layout of the Settings app may vary slightly depending on the Android version and the manufacturer’s custom skin. However, the “Display” option is a standard feature in Android settings and can typically be located with the methods mentioned above.
In the next step, we will guide you through the process of disabling tablet mode by adjusting the tablet mode settings within the “Display” options.
Now that you have tapped on “Display,” you are ready to proceed to the next step and disable tablet mode on your Android device.
Step 3: Disable “Tablet Mode”
After accessing the “Display” options in the Settings app on your Android device, the next step is to disable “Tablet Mode” to switch back to the traditional interface. Here’s how you can do it:
Method 1: Toggle the “Tablet Mode” Switch
Look for the “Tablet Mode” option within the display settings. Depending on your Android version and device manufacturer, it may be labeled as “Smartphone Mode” or something similar. Tap on the switch associated with this option to turn off tablet mode. In most cases, the switch will slide to the off position, indicating that tablet mode is disabled.
Method 2: Adjust Default Layout
In some Android devices and versions, rather than having a dedicated “Tablet Mode” switch, you may find a setting related to the default layout. Tapping on this option allows you to switch the layout from tablet to smartphone or default mode, effectively disabling tablet mode and returning to the traditional interface.
The exact wording and placement of the “Tablet Mode” or layout options may differ depending on your Android device. If you are unsure about the location of these settings, you can use the search function within the Settings app to locate them quickly.
Once you have disabled tablet mode by turning off the “Tablet Mode” switch or adjusting the default layout, your Android device will revert to the traditional smartphone interface, providing you with a more familiar and intuitive user experience.
Keep in mind that the specific options and appearance of the “Display” settings may vary slightly depending on the Android version and the custom skin used by your device manufacturer. However, the general process of disabling tablet mode remains consistent across most Android devices.
Now that you have successfully disabled tablet mode on your Android device, you can enjoy using it in the traditional interface.
How to Turn Off Tablet Mode on iOS
If you’re using an iOS device and want to turn off tablet mode to switch back to the standard interface, you can easily do so by following these steps:
Step 1: Open the Settings App
Locate the Settings app on your iOS device’s home screen. The Settings app icon resembles grey gears. Tap on it to open the app.
Step 2: Tap on “Display & Brightness”
In the Settings app, scroll down and tap on “Display & Brightness”. This option is usually located near the top of the settings list.
Step 3: Disable “Zoomed View” or “Standard View”
In the “Display & Brightness” settings, you will see two options: “Zoomed” and “Standard”. These options affect the display zoom level and can change the appearance of the user interface.
To disable tablet mode on iOS, tap on “View” or “View” near the top of the screen, depending on your iOS version. You’ll then see two options: “Zoomed View” and “Standard View”.
If “Zoomed View” is enabled, it means tablet mode is activated. Tap on “Standard View” to switch back to the standard interface.
If “Standard View” is already selected, it indicates that you are already using the standard interface, and tablet mode is disabled.
By disabling “Zoomed View” and selecting “Standard View,” you are effectively turning off tablet mode and returning to the traditional iOS interface.
Keep in mind that the exact wording and appearance of the settings may vary slightly depending on the iOS version you are using. However, the general process of disabling tablet mode through the “Display & Brightness” settings remains consistent.
Now that you know how to turn off tablet mode on your iOS device, you can enjoy using it in the standard interface.
Step 1: Open the Settings App
To turn off tablet mode on your iOS device and switch back to the standard interface, the first step is to open the Settings app. Here’s how to do it:
Method 1: Home Screen
Locate the Settings app icon on your iOS device’s home screen. It features a grey gear-shaped icon and is usually found on the first page or within a folder. Tap on the Settings app icon to open it.
Method 2: Spotlight Search
If you have a lot of apps on your device and can’t find the Settings app on the home screen, you can use the Spotlight Search feature. Swipe down on the home screen to reveal the search bar. Type “Settings” in the search bar, and the Settings app should appear in the search results. Tap on it to open the app.
Once you have successfully opened the Settings app using either method, you are ready to proceed to the next step and access the “Display & Brightness” settings.
Keep in mind that the appearance and organization of the Settings app may vary slightly depending on the iOS version you are using. However, the general functionality and access to settings remain consistent across most iOS devices.
In the following steps, we will guide you through the process of turning off tablet mode on your iOS device.
Now that you have opened the Settings app, you can proceed to the next step and access the necessary settings to disable tablet mode on your iOS device.
Step 2: Tap on “Display & Brightness”
After successfully opening the Settings app on your iOS device, the next step to turn off tablet mode is to tap on the “Display & Brightness” option. Here’s how you can do it:
Method 1: Scroll and Locate
Scroll through the settings options until you find the “Display & Brightness” option. On some iOS versions, it may be listed as “Display & Brightness” directly, while on others, you may need to tap on “General” first and then locate “Display & Brightness” within the General settings. Tap on “Display & Brightness” to enter the display settings.
Method 2: Search
If your iOS device has a search function within the Settings app, you can directly search for “Display & Brightness.”. Tap on the search bar at the top of the Settings app, type “Display & Brightness,” and the relevant result should be displayed. Tap on it to access the display settings.
By tapping on the “Display & Brightness” option, you will enter the settings specifically related to the display and screen appearance on your iOS device.
It’s important to note that the organization and layout of the Settings app may vary slightly depending on the iOS version you are using. However, the “Display & Brightness” option is a standard feature in iOS settings and can typically be found following the above methods.
In the next step, we will guide you through the process of disabling tablet mode within the “Display & Brightness” settings of your iOS device.
Now that you have tapped on “Display & Brightness,” you are ready to proceed to the next step and disable tablet mode on your iOS device.
Step 3: Disable “Zoomed View” or “Standard View”
After accessing the “Display & Brightness” settings on your iOS device, the next step is to disable “Zoomed View” or switch to “Standard View” to turn off tablet mode. Here’s how you can do it:
Method 1: Disable “Zoomed View”
Within the “Display & Brightness” settings, locate the “View” or “Display Zoom” option, depending on your iOS version. Tap on this option to access the view settings.
If “Zoomed View” is currently enabled, you will see two options: “Zoomed” and “Standard”. Tapping on “Zoomed” activates the tablet mode, which enlarges app icons and text on the screen. To disable tablet mode, tap on “Standard”.
Method 2: Adjust Default Layout
In some iOS versions, rather than having a specific “Zoomed View” option, you may find a layout option within the “Display & Brightness” settings. Tapping on this option allows you to switch between “Zoomed” and “Standard” layout settings. To disable tablet mode, select the “Standard” layout.
By disabling “Zoomed View” or selecting the “Standard” layout, you effectively turn off tablet mode on your iOS device and switch back to the standard interface.
Keep in mind that the wording and appearance of the settings may vary slightly depending on the iOS version you are using. However, the general process of disabling tablet mode within the “Display & Brightness” settings remains consistent.
Now that you have successfully disabled tablet mode on your iOS device, you can enjoy using it in the standard interface.
How to Disable Tablet Mode on Chrome OS
If you’re using a Chromebook or a device running Chrome OS and want to disable tablet mode to return to the traditional desktop experience, you can do so by following these steps:
Step 1: Open the Settings App
Click on the system tray located in the bottom-right corner of the screen. In the system tray, click on the gear-shaped icon to open the Settings app.
Step 2: Tap on “Display”
In the Settings app, scroll down or search for the “Display” option and tap on it. This will open the display settings for your Chrome OS device.
Step 3: Adjust Display Settings to Disable Tablet Mode
In the display settings, you will find options to adjust the display resolution, orientation, and other related settings. To disable tablet mode, perform the following actions:
- Disable the “Auto-rotate” option to prevent the screen from automatically rotating when you switch between laptop and tablet modes.
- Ensure that the “Enable on-screen keyboard” option is unchecked if you want to use an external keyboard instead of the on-screen keyboard.
- Adjust other display settings, such as changing the screen resolution or orientation, according to your preferences.
By adjusting these display settings, you can effectively disable tablet mode and switch back to the traditional desktop experience on your Chrome OS device.
Keep in mind that the exact layout and options within the display settings may vary slightly depending on the version of Chrome OS or the specific Chromebook you are using. However, the general process of disabling tablet mode remains consistent across most Chrome OS devices.
Now that you know how to disable tablet mode on your Chrome OS device, you can enjoy using it in the traditional desktop interface.
Step 1: Open the Settings App
To disable tablet mode on your Chromebook or device running Chrome OS, you’ll first need to open the Settings app. Here’s how you can do it:
Method 1: From the System Tray
Click on the system tray located in the bottom-right corner of the screen. The system tray icon resembles a series of vertical lines or dots. From the system tray menu, click on the gear-shaped icon to open the Settings app.
Method 2: From the Launcher
Click on the Launcher icon located in the bottom-left corner of the screen. The Launcher icon resembles a circle with a grid of dots inside. From the Launcher, scroll through the app list or use the search bar to find and click on the “Settings” app to open it.
Method 3: Using Keyboard Shortcut
Press the “Search” key or “Launcher” key (magnifying glass or circle icon) on your Chromebook’s keyboard. This key is typically located between the “Shift” and “Caps Lock” keys. With the search results displayed, type “Settings” and select the “Settings” app to open it.
Once you successfully open the Settings app using any of the methods above, you are ready to proceed to the next step and access the display settings.
Remember that the appearance and organization of the Settings app may vary slightly depending on the version of Chrome OS or the specific Chromebook model you are using. However, the general functionality of the Settings app remains consistent across most Chrome OS devices.
In the following steps, we will guide you through the process of disabling tablet mode on your Chrome OS device.
Now that you have opened the Settings app, you can proceed to the next step and access the necessary settings to disable tablet mode on your Chromebook or Chrome OS device.
Step 2: Tap on “Display”
After successfully opening the Settings app on your Chromebook or device running Chrome OS, the next step is to tap on the “Display” option. Here’s how you can do it:
Method 1: Navigate to the “Display” Category
Within the Settings app, scroll down or use the sidebar (if available) to locate the “Display” category. Depending on your version of Chrome OS or Chromebook model, you may need to click on “Display” directly, or it may be nested under another category like “Device” or “Advanced settings.”
Method 2: Search for “Display”
If your Chromebook or Chrome OS device has a search function within the Settings app, you can directly search for “Display”. Tap on the search bar at the top of the Settings app, type “Display,” and the relevant result should be displayed. Tap on it to access the display settings.
By tapping on the “Display” option or category, you will enter the settings specifically related to the display and screen on your Chromebook or Chrome OS device.
It’s important to note that the organization and layout of the Settings app may vary slightly depending on the version of Chrome OS or the specific Chromebook model you are using. However, the “Display” option is a standard feature in the Settings app and can typically be found following the above methods.
In the next step, we will guide you through the process of disabling tablet mode within the “Display” settings of your Chrome OS device.
Now that you have tapped on “Display,” you are ready to proceed to the next step and disable tablet mode on your Chromebook or Chrome OS device.
Step 3: Adjust Display Settings to Disable Tablet Mode
After accessing the “Display” settings on your Chromebook or device running Chrome OS, the next step is to adjust the display settings to disable tablet mode. Here’s how you can do it:
Method 1: Adjust Orientation and Display Mode
Within the “Display” settings, you may find options to adjust the screen orientation and display mode. Look for options like “Orientation” or “Display Mode”. By selecting the landscape orientation and the traditional desktop display mode, you can effectively disable tablet mode on your Chrome OS device.
Method 2: Adjust Touchscreen Settings
You can also adjust the touchscreen settings to disable tablet mode. Within the “Display” settings, look for options related to the touchscreen. Depending on your Chromebook or Chrome OS device, you may find options like “Touchscreen,” “Touchpad,” or “Input Devices”. By disabling specific touchscreen settings or adjusting them to the desired configuration, you can turn off tablet mode and switch back to the standard desktop interface.
Method 3: Adjust Other Display Preferences
Depending on your Chromebook or Chrome OS version, you may have additional display preferences that can help disable tablet mode. Explore the display settings for options such as screen resolution, screen zoom, or display scaling. By adjusting these preferences according to your preference, you can customize the display settings to match the traditional desktop experience.
By adjusting the display settings using any of the methods above, you can effectively disable tablet mode on your Chromebook or Chrome OS device and switch back to the standard desktop interface.
Keep in mind that the available display settings and their location may vary slightly depending on the version of Chrome OS or the specific Chromebook model you are using. However, the general process of disabling tablet mode remains consistent across most Chrome OS devices.
Now that you have successfully adjusted the display settings, you can enjoy using your Chromebook or Chrome OS device in the traditional desktop interface.