
Enable Voice Match
Voice Match is a feature of Google Assistant that allows you to personalize your experience and enable secure voice commands. By setting up Voice Match, you can ensure that only your voice can access certain functions and perform specific tasks through Google Assistant. Here’s how you can enable Voice Match on your device:
- Open the Google Assistant app on your device. It can usually be accessed by saying “Hey Google” or by tapping on the Assistant app icon.
- Tap on your account icon in the top-right corner of the screen. This will take you to the Assistant settings.
- Scroll down to find the “Voice Match” option and tap on it.
- Tap on “Add a device” to select the device you want to enable Voice Match on. If you have multiple devices connected to your Google account, choose the one you wish to set up.
- Follow the on-screen prompts to train the Voice Match feature. This involves repeating a set of phrases to teach Google Assistant to recognize your voice.
- Once the training is complete, you will see the “Voice Match” screen displaying your voice model. Make sure the toggle switch next to “Hey Google” is turned on.
- Tap on “Done” to save your settings.
Congratulations! You have successfully enabled Voice Match on your device. From now on, only your voice will be recognized and authorized to access Google Assistant using the “Hey Google” command. This provides an extra layer of security and ensures that your personal information remains protected.
Remember that Voice Match may not be available on all devices or in all regions. It is recommended to check the device and software requirements before attempting to enable this feature. Additionally, make sure to update your Google Assistant app to the latest version to take advantage of the latest improvements and enhancements.
Turn off Google Assistant
If you no longer wish to use Google Assistant or simply want to temporarily disable it, you have the option to turn it off. Here’s how you can do it:
- Open the Google Assistant app on your device. You can access it by saying “Hey Google” or by tapping on the Assistant app icon.
- Tap on your account icon in the top-right corner of the screen to go to the Assistant settings.
- Scroll down to find the “Assistant” section and tap on it.
- Select “Assistant” from the list of options.
- In the Assistant settings, scroll down to find the “Assistant devices” section.
- Tap on your device to expand the options.
- Toggle the switch labeled “Google Assistant” to the off position.
- A confirmation prompt will appear. Tap on “Turn off” to confirm and disable Google Assistant on your device.
Once you have completed these steps, Google Assistant will be turned off on your device, and it will no longer respond to the “Hey Google” command or perform any voice-activated tasks.
If you change your mind and want to enable Google Assistant again, simply follow the same steps outlined above and toggle the switch to the on position.
Keep in mind that turning off Google Assistant will disable its functionality, including voice commands, personalized recommendations, and other features that it offers. However, you can always re-enable it at any time by following the steps mentioned earlier.
Disable “Okay Google” Voice Detection
If you find that the “Okay Google” voice detection feature of Google Assistant is interfering with your device’s usage, or if you simply want to disable it for privacy reasons, here’s how you can do it:
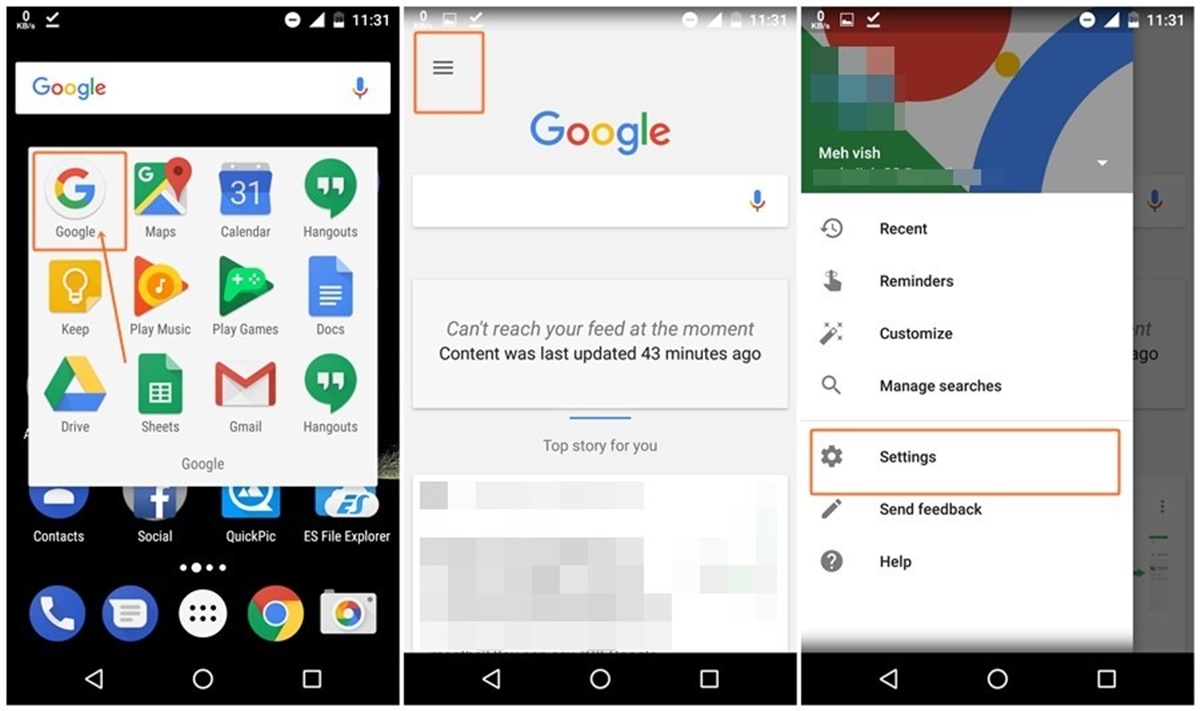
- Open the Google app on your device. This is the app with the multi-colored ‘G’ icon.
- Tap on the More tab at the bottom-right corner of the screen (three horizontal lines).
- Select “Settings” from the menu.
- Scroll down and tap on “Google Assistant”.
- Under the Assistant tab, tap on “Assistant” again.
- Scroll down to find the “Voice and speech” section and tap on it.
- Find the “Voice Match” option and tap on it.
- Toggle off the switch next to “Say ‘Okay Google’ any time” or “Say ‘Hey Google’ any time”.
- A confirmation prompt will appear. Tap on “Turn off” to confirm and disable the “Okay Google” voice detection feature.
Once you have completed these steps, the “Okay Google” voice detection feature will be disabled on your device, and Google Assistant will no longer respond to these wake phrases.
Disabling the “Okay Google” voice detection can help prevent accidental activations and improve privacy by limiting when Google Assistant is listening for voice commands.
If you ever want to re-enable the “Okay Google” voice detection feature, simply follow the same steps above and toggle the switch back to the on position.
Keep in mind that disabling “Okay Google” voice detection will not completely disable Google Assistant. You can still access Google Assistant by tapping the microphone icon in the search bar of the Google app or using other access methods specific to your device.
Adjust Google Assistant Sensitivity
If you find that Google Assistant is too sensitive and triggers unintentionally, or if it’s not responsive enough and fails to recognize your voice commands, you can adjust its sensitivity settings. Here’s how to do it:
- Open the Google Assistant app on your device. You can access it by saying “Hey Google” or by tapping on the Assistant app icon.
- Tap on your account icon in the top-right corner of the screen to go to the Assistant settings.
- Scroll down to find the “Assistant” section and tap on it.
- Select “Assistant” from the list of options.
- In the Assistant settings, scroll down to find the “Assistant devices” section.
- Tap on your device to expand the options.
- Look for the “Hey Google” sensitivity slider or a similar option.
- Adjust the sensitivity level according to your preference. Moving the slider to the left will make Google Assistant less responsive, while moving it to the right will make it more sensitive.
- Once you’ve adjusted the sensitivity, exit the settings screen and test Google Assistant to see if the changes have improved its responsiveness.
By adjusting the sensitivity settings, you can find the right balance that suits your needs and the environment you’re using Google Assistant in. Experiment with different sensitivity levels to determine what works best for you.
Keep in mind that some devices may have different settings or options to adjust sensitivity. If you can’t find the sensitivity slider or similar settings, consider checking the user manual or support resources specific to your device.
Remember, finding the optimal sensitivity for Google Assistant can greatly enhance your overall user experience, making voice commands more accurate and reliable.
Use a Different Voice Assistant
If you’re not satisfied with Google Assistant or if you want to explore other voice assistant options, you have the freedom to use a different voice assistant on your device. Here are some alternative voice assistants you can consider:
1. Amazon Alexa: Amazon’s voice assistant, Alexa, is available on devices like Echo speakers, Fire TV, and some smartphones. You can interact with Alexa to play music, control smart home devices, ask for information, and more.
2. Apple Siri: Siri is Apple’s voice assistant, exclusively available on iOS devices, including iPhones, iPads, Apple Watches, and Mac computers. It can perform various tasks, answer questions, and integrate with Apple’s ecosystem.
3. Microsoft Cortana: Cortana is Microsoft’s voice assistant used on Windows 10 devices, Xbox consoles, and some mobile phones. It can assist with tasks, search the web, provide weather updates, and more.
4. Samsung Bixby: Bixby is Samsung’s voice assistant found on their smartphones, smart TVs, and other connected devices. It offers voice control capabilities, personalized recommendations, and integration with Samsung apps and services.
5. Open-Source Voice Assistants: There are several open-source voice assistants available, such as Mycroft and Rhasspy, that allow users to have more control and customization over their voice assistant experience.
To start using a different voice assistant, you may need to download the corresponding app or activate it on your device. Each assistant has its own set of features and capabilities, so it’s recommended to explore their respective documentation or user guides to learn more about what they can do.
Keep in mind that some devices may have limitations or compatibility requirements when it comes to using different voice assistants. Additionally, certain voice assistants may be more integrated with specific ecosystems or offer unique features tailored to their respective platforms.
Remember to experiment with various voice assistants to find one that best meets your needs, preferences, and device compatibility.
Use Airplane Mode
If you want to temporarily disable Google Assistant or any voice assistant on your device, using Airplane Mode is an effective solution. Airplane Mode turns off all wireless communication on your device, including Wi-Fi, cellular data, and Bluetooth. Here’s how you can use Airplane Mode to disable voice assistants:
- Swipe down from the top of your device’s screen to access the Quick Settings menu.
- Look for the Airplane Mode icon, which is usually represented by an airplane symbol. Tap on it to activate Airplane Mode.
- You’ll see a confirmation message indicating that all wireless connections will be turned off. Confirm by tapping “OK” or “Turn On”.
- Once Airplane Mode is activated, all wireless communication on your device will be disabled, including the voice assistant functionality.
Using Airplane Mode is a temporary solution to disable voice assistants without uninstalling or permanently changing settings. When you’re ready to re-enable your device’s wireless connections and resume normal usage, simply follow the same steps outlined above to turn off Airplane Mode.
It’s important to note that while in Airplane Mode, you won’t be able to make or receive calls, access the internet, or connect to other devices via Bluetooth. If you only want to disable voice assistant functionality without affecting other wireless capabilities, you can manually disable the voice assistant settings or use other methods mentioned earlier.
Airplane Mode is a convenient option when you want to quickly disable voice assistants for specific situations, such as during meetings, flights, or when you need uninterrupted focus.
Remember to check your device’s user manual or support resources for specific instructions on how to activate and deactivate Airplane Mode, as the steps may vary depending on the device and operating system.
Disable Google Assistant on Android
If you no longer want Google Assistant on your Android device and prefer to disable it completely, here’s how you can do it:
- Open the Google app on your Android device. You can usually find it on your home screen or in the app drawer.
- Tap on the More tab at the bottom-right corner of the screen (three horizontal lines).
- Select “Settings” from the menu.
- Scroll down and tap on “Google Assistant”.
- Under the Assistant tab, tap on “Assistant devices”.
- Tap on your device from the list to access the device-specific settings.
- Toggle off the switch next to “Google Assistant”.
- A confirmation prompt will appear, warning you about the consequences of disabling Google Assistant. Tap on “Turn off” to confirm and disable it.
Once you have completed these steps, Google Assistant will be disabled on your Android device, and it will no longer be accessible through voice commands or other methods.
Disabling Google Assistant will remove its integration with various apps and services, and you won’t be able to use its voice-activated features or receive personalized recommendations anymore.
If you ever decide to enable Google Assistant again, simply follow the same steps mentioned above and toggle the switch back to the on position.
Keep in mind that the steps to disable Google Assistant may vary slightly depending on the Android device and version of the Google app you are using. If you can’t find the exact settings mentioned above, try exploring the settings menu of your device or consult the user manual for further guidance.
By disabling Google Assistant, you can reclaim resources and customize your device to suit your preferences and needs.
Clear Google Assistant Data
If you’re facing issues with Google Assistant or want to start fresh with its settings and preferences, you can try clearing its data. Clearing Google Assistant data will remove all stored information and personalized settings associated with your Google account. Here’s how you can do it:
- Open the Settings app on your Android device.
- Scroll down and tap on “Apps” or “Applications” (the name may vary depending on your device).
- Find and tap on “Google” from the list of installed apps.
- Tap on “Storage & cache” or “Storage”.
- Tap on “Clear storage” or “Clear data”.
- A warning message will appear, informing you that all data associated with this app will be deleted. Tap on “OK” to confirm.
Once you have completed these steps, Google Assistant’s data will be cleared on your Android device. This includes preferences, personalized settings, saved commands, and any other data associated with your Google account and Google Assistant usage.
Keep in mind that clearing Google Assistant data will reset the assistant to its default settings. You may need to reconfigure certain preferences, such as Voice Match or personalized routines, after clearing the data.
Clearing Google Assistant data can help resolve issues related to performance, responsiveness, or incorrect settings. It’s a useful troubleshooting step if you’re experiencing any problems with Google Assistant or if you want to start fresh with its settings.
Please note that the steps to clear data may vary slightly depending on your Android device model and operating system version. If you can’t find the exact settings mentioned above, you may need to explore the settings menu or consult your device’s user manual for further assistance.