
What is Dropbox?
Dropbox is a cloud storage service that allows you to store and access your files from anywhere, on any device. It provides a secure and convenient way to store and share your documents, photos, videos, and other files. With Dropbox, you can easily sync your files across different devices, collaborate with others, and keep your data safe.
One of the key advantages of Dropbox is its user-friendly interface. It is designed to be intuitive and simple to use, even for those who are not tech-savvy. Whether you are a student, a professional, or just someone who wants to keep their files organized and easily accessible, Dropbox can be a valuable tool.
When you upload a file to Dropbox, it is stored in the cloud, which means it is stored on remote servers rather than on your local device. This allows you to access your files from any device with an internet connection. You can sign in to your Dropbox account on a computer, smartphone, or tablet and instantly access all your files.
Dropbox also offers a range of features to help you manage your files effectively. You can create folders to organize your files, and you can easily search for specific files using the built-in search functionality. In addition, Dropbox allows you to preview files without downloading them, which can be a time-saver when you only need to quickly check the content of a document or image.
Another useful feature of Dropbox is file versioning. This means that Dropbox keeps a record of changes made to your files, allowing you to restore previous versions if needed. This can be especially handy if you accidentally delete or overwrite a file.
Overall, Dropbox is a reliable and user-friendly cloud storage service that provides a convenient way to store, access, and share your files. Whether you are a student, a professional, or just someone who wants to keep their files organized and easily accessible, Dropbox can be a valuable tool in your digital arsenal.
Why Share a Folder in Dropbox?
Sharing folders in Dropbox offers a multitude of benefits and can greatly improve collaboration and productivity. Whether you are working on a team project, sharing files with clients, or collaborating with friends or family members, here are some compelling reasons to share a folder in Dropbox:
- Easy file sharing: Sharing a folder in Dropbox allows you to quickly and conveniently share files with others. Instead of sending individual files via email or other file-sharing methods, you can simply give others access to the shared folder in Dropbox. This streamlines the sharing process and eliminates the need for multiple file attachments.
- Real-time collaboration: Dropbox enables real-time collaboration, allowing multiple people to work on the same files simultaneously. With shared folders, everyone with access to the folder can view and edit the files in real-time. This enhances teamwork and makes it easy to collaborate on projects without the hassle of sending files back and forth.
- Version control: When multiple people are collaborating on a project, it’s essential to have a system in place to manage different versions of files. Dropbox simplifies version control by automatically syncing changes made by each collaborator. In the event of accidental changes or mistakes, Dropbox allows you to restore previous versions, ensuring that valuable work is not lost.
- Centralized file management: By sharing a folder in Dropbox, all collaborators have access to the same set of files. This eliminates the confusion of having multiple copies of files stored in different locations and ensures that everyone is working with the most up-to-date versions. It also provides a centralized location where all project-related files can be stored and accessed by authorized individuals.
- Secure file sharing: Dropbox offers robust security features to protect your shared files. You can set specific permissions for each collaborator, determining whether they can view, edit, or comment on the shared files. Additionally, Dropbox encrypts your data during transmission and storage, providing a secure environment for file sharing and collaboration.
Sharing folders in Dropbox is an efficient and effective way to collaborate with others, streamline file sharing, and maximize productivity. Whether you are working on a business project, academic assignment, or personal endeavor, sharing a folder in Dropbox can revolutionize how you collaborate and share files with others.
How to Create a Folder in Dropbox?
Creating a folder in Dropbox is a straightforward process that allows you to organize your files and keep them neatly categorized. Follow these steps to create a folder in Dropbox:
- Sign in to your Dropbox account. If you don’t have an account, you can easily create one for free on the Dropbox website.
- Once you are logged in, you will be taken to the Dropbox dashboard. This is the main screen where you can manage your files and folders.
- In the Dropbox dashboard, navigate to the location where you want to create your folder. This can be the main directory or any existing folder.
- Once you have selected the desired location, click on the “New Folder” button. This button is usually located near the top of the screen and is represented by a folder icon. Alternatively, you can right-click on the screen and select “New Folder” from the context menu.
- A pop-up window will appear asking you to enter a name for the folder. Choose a descriptive and easily recognizable name for your folder, as this will help you locate and organize your files in the future.
- After entering the folder name, click the “Create” button. Your new folder will be instantly created in the selected location.
- You can now start adding files to your newly created folder. Drag and drop files from your computer into the folder, or use the “Upload” button in the Dropbox dashboard to select and upload files.
- You can create subfolders within your main folder by following the same steps. Simply select the main folder as the location, and then click “New Folder” to create a subfolder.
Creating folders in Dropbox allows you to keep your files organized and easily accessible. Whether you want to categorize files by project, client, or topic, folders provide a hierarchical structure that simplifies file management. By following these simple steps, you can create folders in Dropbox and start organizing your files efficiently.
How to Share a Folder in Dropbox?
Sharing a folder in Dropbox allows you to collaborate and share files with others. It’s a convenient way to work on projects together, share resources, and streamline communication. Follow these steps to share a folder in Dropbox:
- Sign in to your Dropbox account. If you don’t have an account, you can easily create one for free on the Dropbox website.
- In the Dropbox dashboard, navigate to the folder you want to share. You can either select the folder from the main directory or navigate through your existing folders.
- Once you’ve located the folder, hover your mouse over it to reveal the contextual options.
- Click on the “Share” button that appears when you hover over the folder. This will open the sharing options for the selected folder.
- In the sharing options window, enter the email addresses of the people you want to share the folder with. You can separate multiple email addresses with commas.
- Select the permission level for each collaborator. You can choose between “Can view,” “Can edit,” or “Can comment” for each person. The default permission level is usually set to “Can edit,” allowing collaborators to make changes to the files in the shared folder.
- Optionally, you can include a personalized message to provide additional context or instructions to the collaborators.
- Click on the “Share” button to send the invitation to the selected individuals.
- The invited collaborators will receive an email notification with a link to the shared folder. They need to click on the link to accept the invitation and gain access to the shared folder.
Once the folder is shared, all invited collaborators will be able to access and interact with the files within the folder. They can make edits, add new files, leave comments, or download the files for offline use. Dropbox’s real-time sync feature ensures that any changes made by collaborators will be instantly updated for everyone in the shared folder.
Sharing folders in Dropbox is an efficient way to collaborate with others and simplify file sharing. Whether you’re working on a team project, sharing resources with clients, or collaborating with friends and family, the sharing feature in Dropbox streamlines collaboration and enhances productivity.
How to Share a Dropbox Folder with Others?
Sharing a Dropbox folder allows you to collaborate and share files with others, giving them access to the same set of files and allowing for seamless collaboration. Follow these steps to share a Dropbox folder with others:
- Sign in to your Dropbox account. If you don’t have an account, you can easily create one for free on the Dropbox website.
- In the Dropbox dashboard, locate the folder you want to share. You can either select the folder from the main directory or navigate through your existing folders.
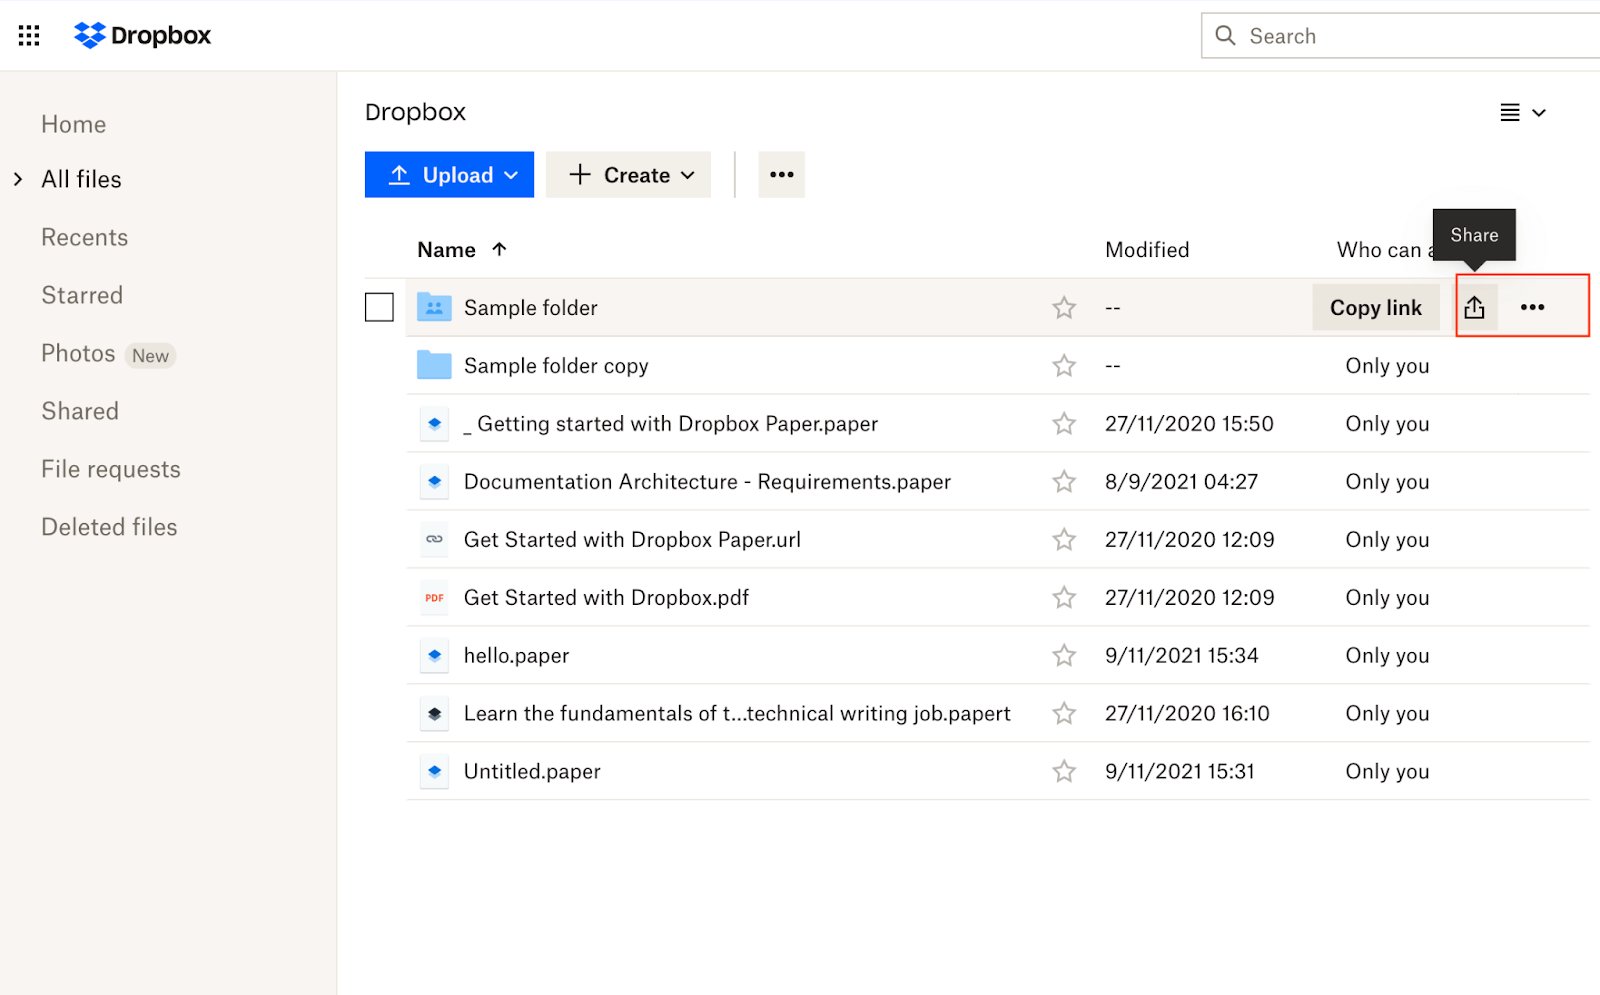
- Once you have located the folder, hover your mouse over it to reveal the contextual options.
- Click on the ellipsis (…) that appears when you hover over the folder. This will open a menu with additional options.
- In the menu, select the “Share” option. This will open the sharing settings for the selected folder.
- On the sharing settings page, you will see the current list of collaborators who have access to the folder (if any). To share the folder with additional people, click on the “Invite members” button.
- In the “Invite members” section, enter the email addresses of the people you want to invite to the folder. You can separate multiple email addresses with commas.
- Choose whether you want the collaborators to have editing permissions (can edit) or view-only permissions (can view) for the files in the folder.
- Optionally, you can include a personalized message to provide additional context or instructions to the collaborators.
- Click on the “Invite” button to send the invitation to the selected individuals.
- The invited collaborators will receive an email notification with a link to the shared folder. They need to click on the link to accept the invitation and gain access to the shared Dropbox folder. If they don’t have a Dropbox account, they will be prompted to create one.
Once the folder is shared, all invited collaborators will be able to access and interact with the files within the folder. They can make edits, add new files, leave comments, or download the files for offline use. Dropbox’s synchronization feature ensures that any changes made by collaborators will be instantly updated for everyone sharing the folder.
Sharing a Dropbox folder with others is an effective way to collaborate on projects, share resources, and streamline file sharing. Whether you are working on a team project, sharing documents with clients, or collaborating with friends and family, sharing a Dropbox folder simplifies collaboration and enhances productivity.
How to Invite People to Collaborate on a Dropbox Folder?
Inviting people to collaborate on a Dropbox folder is a simple process that allows you to work together on files and projects. Whether you are collaborating with colleagues, clients, or friends, here are the steps to invite people to collaborate on a Dropbox folder:
- Sign in to your Dropbox account. If you don’t have an account, you can easily create one for free on the Dropbox website.
- In the Dropbox dashboard, locate the folder that you want to invite others to collaborate on. You can either select the folder from the main directory or navigate through your existing folders.
- Once you have located the folder, hover your mouse over it to reveal the contextual options.
- Click on the ellipsis (…) that appears when you hover over the folder. This will open a menu with additional options.
- In the menu, select the “Share” option. This will open the sharing settings for the selected folder.
- On the sharing settings page, you will see the current list of collaborators who have access to the folder (if any). To invite new collaborators, click on the “Invite members” button.
- In the “Invite members” section, enter the email addresses of the people you want to invite to collaborate on the folder. You can separate multiple email addresses with commas.
- Choose whether you want the collaborators to have editing permissions (can edit) or view-only permissions (can view) for the files in the folder.
- Optionally, you can include a personalized message to provide additional context or instructions to the collaborators.
- Click on the “Invite” button to send the invitation to the selected individuals.
- The invited collaborators will receive an email notification with a link to the shared folder. They need to click on the link to accept the invitation and gain access to the collaborative Dropbox folder. If they don’t have a Dropbox account, they will be prompted to create one.
Once the invitation is accepted, the invited collaborators will have access to the shared folder and can start collaborating on the files within it. They can make edits, add new files, leave comments, or download the files for offline use. The collaborative features of Dropbox ensure that all changes are synchronized and visible to everyone sharing the folder.
Inviting people to collaborate on a Dropbox folder is a convenient way to work together on projects, share ideas, and streamline collaboration. Whether you are collaborating on business documents, creative projects, or personal endeavors, inviting others to collaborate on a Dropbox folder enhances teamwork and boosts productivity.
How to Set Permissions for a Shared Dropbox Folder?
Setting permissions for a shared Dropbox folder allows you to control what actions collaborators can perform on the files within the folder. By setting appropriate permissions, you can maintain control over your files and ensure that collaborators have the right level of access. Here’s how you can set permissions for a shared Dropbox folder:
- Sign in to your Dropbox account and navigate to the shared folder for which you want to set permissions.
- Hover your mouse over the shared folder to reveal the contextual options.
- Click on the ellipsis (…) that appears when you hover over the folder. This will open a menu with additional options.
- Select the “Share” option from the menu. This will open the sharing settings for the folder.
- In the sharing settings page, you will see a list of collaborators who have access to the folder.
- Next to each collaborator’s name, you will see their current permission level. To change the permission level for a collaborator, click on the dropdown menu next to their name.
- In the dropdown menu, you can choose from different permission levels. The available options typically include “Can view,” “Can comment,” and “Can edit.”
- Can view: Collaborators with this permission level can only view files and folders. They cannot make any changes or edits to the shared files.
- Can comment: Collaborators with this permission level can view files and folders, as well as leave comments on the files. They cannot make direct changes to the files themselves.
- Can edit: Collaborators with this permission level have full access to the shared files and can edit, add, or delete them. They can also invite others and change permissions for the shared folder.
- Choose the appropriate permission level for each collaborator by selecting the desired option from the dropdown menu.
- Once you have set the permissions for all collaborators, click the “Done” or “Save” button to apply the changes.
By setting permissions for a shared Dropbox folder, you can ensure that collaborators have the appropriate level of access to the files. It allows you to maintain control over your files while enabling collaboration and efficiency. Take time to review and adjust permissions as needed to protect the integrity of your shared Dropbox folder.
How to Add Files to a Shared Dropbox Folder?
Adding files to a shared Dropbox folder is a quick and easy process that allows you to contribute to a collaborative project or share important files with others. When you add files to a shared folder, all collaborators with the appropriate permissions can access and work on the files. Here’s how you can add files to a shared Dropbox folder:
- Sign in to your Dropbox account and navigate to the shared folder where you want to add files.
- In the Dropbox dashboard, locate the shared folder either in the main directory or within a specific folder.
- Once you have located the folder, click on it to open it in your Dropbox interface.
- There are several ways to add files to the shared folder:
- Drag and drop: Open a File Explorer (Windows) or Finder (Mac) window to locate the files on your computer. Select the files you want to add to the shared folder, then drag and drop them into the opened Dropbox folder.
- Upload button: In the Dropbox interface, click on the “Upload” button, usually found near the top of the screen. This will open a file browser window. Navigate to the location of the files on your computer, select the files, and click “Open” to start uploading them to the shared folder.
- Right-click context menu: Right-click on the shared Dropbox folder and select “Upload files” or “Upload folder” from the context menu. Then, locate and select the files or folder you want to add, and click “Open” to start the uploading process.
- Once you have added the files, Dropbox will begin uploading them to the shared folder. The time required will depend on the size and number of files. You can monitor the progress of the upload in the Dropbox interface.
- After the upload is complete, the added files will be visible and accessible to all collaborators who have the appropriate permissions for the shared folder. They will be able to view, edit, and interact with the files as needed.
Adding files to a shared Dropbox folder allows you to contribute to collaborative projects, share important documents, and streamline file sharing. Whether you are working on a team project, sharing resources with clients, or collaborating with friends and family, adding files to a shared Dropbox folder provides a seamless and efficient way to collaborate and share files with others.
How to Edit Files in a Shared Dropbox Folder?
Editing files in a shared Dropbox folder allows you and your collaborators to make changes to documents, spreadsheets, presentations, and other files within the folder. Dropbox’s collaborative features ensure that all changes are synchronized across all collaborators, allowing for seamless teamwork. Here’s how you can edit files in a shared Dropbox folder:
- Sign in to your Dropbox account and navigate to the shared folder where the file you want to edit is located.
- In the Dropbox dashboard, locate the shared folder either in the main directory or within a specific folder.
- Once you have located the folder, click on it to open it in your Dropbox interface.
- Browse through the folder to find the file you want to edit. Depending on the file type, you can double-click on it to open it in the appropriate application, or you can right-click on it and choose “Open” or “Edit” from the context menu.
- The file will open in the corresponding application, such as Microsoft Word, Excel, Google Docs, or any other compatible software you have set up to handle that file type.
- Make the necessary changes to the file. You can edit the content, format the text, add or remove elements, or perform any other modifications required.
- As you edit the file, Dropbox will automatically save the changes in real-time. This means that collaborators can see the changes you make immediately, and you can see the changes they make as well.
- Once you have finished editing the file, close the application or document. The changes will be synchronized and visible to all collaborators who have access to the shared folder.
- If needed, you can continue editing the file at any time. Simply access the shared folder, locate the file, and open it in the appropriate application again.
Editing files in a shared Dropbox folder allows for seamless collaboration and teamwork. By editing files directly in the shared folder, everyone with access to the folder can work on the most up-to-date version of the file. This streamlines the editing process, eliminates the need for multiple versions of the same file, and ensures that everyone is working on the latest changes. Whether you are working on a team project or collaborating with others, editing files in a shared Dropbox folder enhances productivity and facilitates effective collaboration.
How to Remove Someone from a Shared Dropbox Folder?
Removing someone from a shared Dropbox folder allows you to revoke their access to the files and resources within the folder. Whether you need to remove a collaborator who no longer needs access or if you want to restrict permissions, Dropbox provides a simple process to remove someone from a shared folder. Here’s how you can remove someone from a shared Dropbox folder:
- Sign in to your Dropbox account and navigate to the shared folder from which you want to remove someone.
- In the Dropbox dashboard, locate the shared folder either in the main directory or within a specific folder.
- Once you have located the folder, hover your mouse over it to reveal the contextual options.
- Click on the ellipsis (…) that appears when you hover over the folder. This will open a menu with additional options.
- Select the “Share” option from the menu. This will open the sharing settings for the shared folder.
- In the sharing settings page, you will see a list of collaborators who have access to the folder.
- Locate the name or email of the person you want to remove from the shared folder.
- Next to their name, you will see a dropdown menu with their current permissions or a remove option (-). Click on the dropdown menu.
- From the dropdown menu, select the “Remove” option. This will remove the person from the shared folder.
- A confirmation dialog may appear asking if you’re sure you want to remove the person. Confirm the removal by clicking on the “Remove” button.
Once the removal is confirmed, the person will no longer have access to the shared Dropbox folder and its contents. They will no longer be able to view or edit the files within the folder, and their ability to collaborate will be revoked.
Removing someone from a shared Dropbox folder allows you to maintain control over who has access to your files and resources. It provides the flexibility to manage team members, clients, or collaborators as needed. Whether you no longer require their contribution or need to adjust permissions, removing someone from a shared Dropbox folder is a simple and effective way to control access and maintain the security of your shared files.
How to Leave a Shared Dropbox Folder?
Leaving a shared Dropbox folder is a straightforward process that allows you to discontinue your collaboration and remove yourself from a shared project or group. Whether you no longer need access to the shared files or want to reduce clutter in your Dropbox account, here’s how you can leave a shared Dropbox folder:
- Sign in to your Dropbox account and navigate to the shared folder you want to leave.
- In the Dropbox dashboard, locate the shared folder either in the main directory or within a specific folder.
- Once you have located the folder, hover your mouse over it to reveal the contextual options.
- Click on the ellipsis (…) that appears when you hover over the folder. This will open a menu with additional options.
- Select the “Share” option from the menu. This will open the sharing settings for the shared folder.
- In the sharing settings page, you will see a list of collaborators who have access to the folder.
- Locate your own name or email in the list of collaborators.
- Next to your name, you will see a dropdown menu with your current permissions. Click on the dropdown menu.
- From the dropdown menu, select the “Remove” or “Leave” option. This will remove you from the shared folder.
- A confirmation dialog may appear asking if you’re sure you want to leave the shared folder. Confirm the action by clicking on the “Remove” or “Leave” button.
Once you confirm the leave action, you will no longer have access to the shared Dropbox folder and its contents. The folder will be removed from your Dropbox account, and you will no longer be able to view or edit the files within the folder.
Leaving a shared Dropbox folder allows you to personalize your Dropbox account by removing folders that are no longer relevant to you. It keeps your Dropbox organized and lets you focus on the files and projects that are important to you. Whether you have completed your collaboration or want to streamline your Dropbox account, leaving a shared Dropbox folder is a simple and effective way to manage your shared files and resources.
How to Unshare a Folder in Dropbox?
If you no longer wish to share a folder with others or want to revoke access, you can unshare the folder in Dropbox. Unsharing a folder removes collaborator permissions and restricts access to the shared files. Here is how you can unshare a folder in Dropbox:
- Sign in to your Dropbox account and navigate to the folder you want to unshare.
- In the Dropbox dashboard, locate the folder either in the main directory or within a specific folder.
- Once you have located the folder, hover your mouse over it to reveal the contextual options.
- Click on the ellipsis (…) that appears when you hover over the folder. This will open a menu with additional options.
- Select the “Share” option from the menu. This will open the sharing settings for the folder.
- In the sharing settings page, you will see a list of collaborators who have access to the folder.
- Review the list of collaborators and identify who you want to remove from the shared folder.
- Next to each collaborator’s name, you will see a dropdown menu with their current permissions. Click on the dropdown menu.
- Select the “Unshare” or “Remove” option from the dropdown menu for the collaborators you want to remove.
- You may be prompted to confirm the unshare action. Confirm the action by clicking on the “Unshare” or “Remove” button.
- Repeat the process for each collaborator you want to remove from the shared folder.
Once you have unshared the folder, the collaborators you removed will no longer have access to the shared folder and its contents. They will no longer be able to view, edit, or synchronize files within the folder.
Unsharing a folder in Dropbox allows you to control who has access to your files and resources. It enables you to revoke access when collaboration is complete or when you want to limit sharing to specific individuals. By unsharing a folder, you maintain control over your files and ensure that confidential information remains private. Unsharing a folder in Dropbox is a simple process that can help you protect your data and manage sharing permissions effectively.