
Setting up Dropbox
Dropbox is a powerful cloud storage platform that allows you to store, organize, and share your files and folders. Setting up Dropbox is a straightforward process that will enable you to access your files from anywhere at any time. Here’s how to get started:
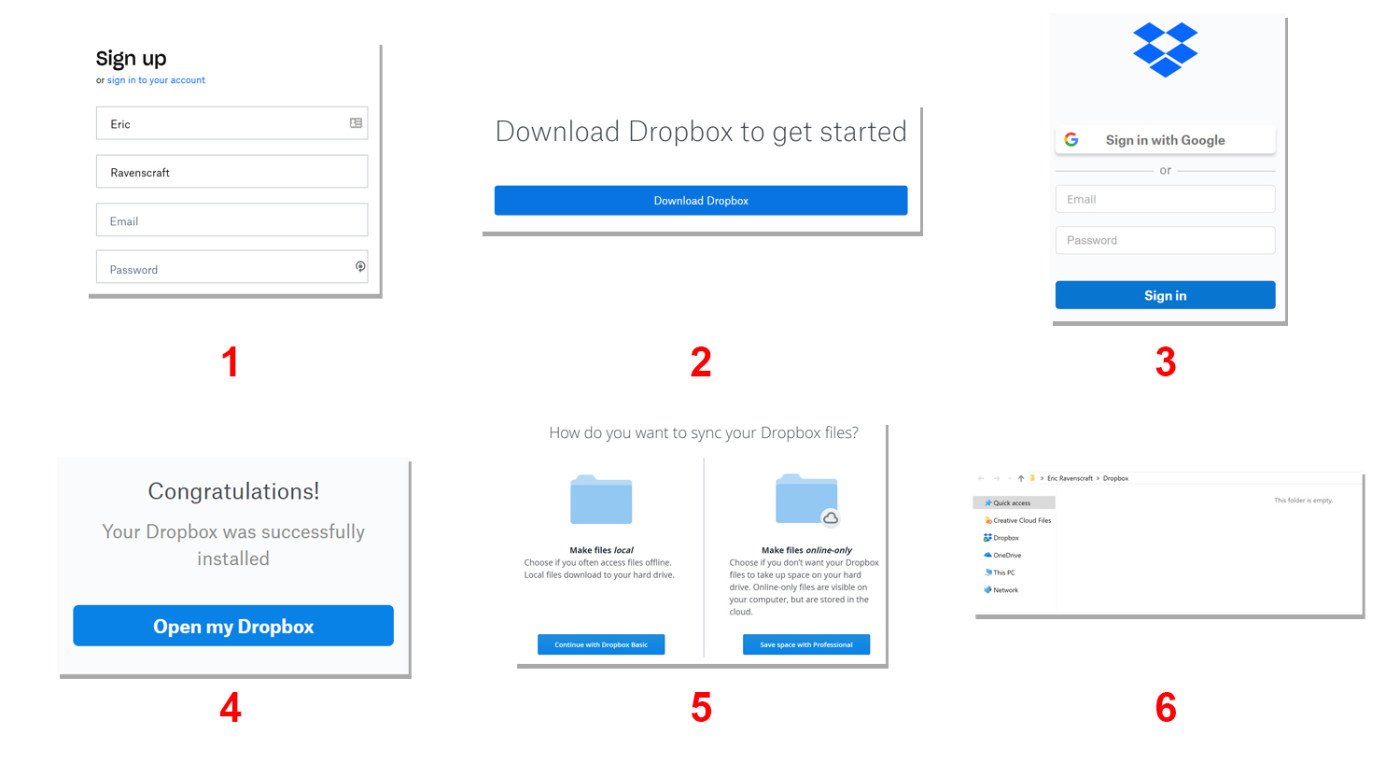
1. Visit the Dropbox website and sign up for an account. You can choose a free basic plan or upgrade to a paid plan for additional storage and features.
2. Once you have signed up, download and install the Dropbox desktop app on your computer. This app will create a Dropbox folder on your computer where you can store your files and folders.
3. After installing the desktop app, sign in with your Dropbox account credentials. This will sync your files and folders from the cloud to your computer, allowing you to access them offline.
4. In addition to the desktop app, you can also download the Dropbox mobile app on your smartphone or tablet. This will enable you to access your files on the go and easily share them with others.
5. Once you have set up the Dropbox app on your devices, any files or folders you save in your Dropbox folder will automatically sync across all your devices. This ensures that you always have the latest version of your files available.
6. To access your files from the Dropbox website, simply log in to your Dropbox account using a web browser. From there, you can view, download, and upload files directly from the website interface.
By following these steps, you can set up Dropbox and start utilizing its powerful features for storing and accessing your files and folders. Whether you are an individual user or part of a team, Dropbox offers a seamless and efficient way to collaborate and share files securely.
Installing the desktop and mobile app
To make the most of Dropbox, it’s essential to install the desktop and mobile app on your devices. These apps provide a convenient way to access your files and folders from anywhere. Here’s how to install them:
Desktop App:
1. Visit the Dropbox website and click on the “Download” button to get the Dropbox installer for your operating system.
2. Once the download is complete, run the installer and follow the on-screen instructions to install Dropbox on your computer.
3. After installation, sign in to your Dropbox account using your credentials. This will link your Dropbox folder on your computer to your online storage.
4. The Dropbox app will create a sync folder on your computer where you can easily drag and drop files and folders to upload them to your Dropbox account.
5. Any changes made to the files within the Dropbox folder will automatically sync with your account, ensuring that you have the latest version of your files available on all devices.
Mobile App:
1. Open the App Store or Google Play Store on your smartphone or tablet.
2. Search for the Dropbox app and tap on the “Install” button to download and install it on your device.
3. Once the installation is complete, launch the Dropbox app and sign in with your Dropbox account.
4. The app will provide you with access to all your files and folders stored in Dropbox. You can preview, download, and upload files directly from the app.
By installing the desktop and mobile app, you can easily sync and access your files across devices. This enables you to work seamlessly between your computer and mobile device, ensuring that your files are always up to date and accessible no matter where you are.
Syncing files and folders
One of the key advantages of Dropbox is its seamless file and folder syncing capability. This feature ensures that your files are always up to date across all your devices. Here’s how to sync files and folders using Dropbox:
1. After installing Dropbox on your computer and signing in to your account, you will notice a Dropbox folder on your desktop. Any files or folders you place in this folder will automatically sync with your Dropbox account in the cloud.
2. To sync files and folders, simply drag and drop them into the Dropbox folder on your computer. Alternatively, you can right-click and select “Copy” or “Cut” and then paste them into the Dropbox folder.
3. As soon as the files or folders are added to the Dropbox folder, they will start syncing to the cloud. You will see a small syncing icon next to each file to indicate the progress.
4. Once the syncing is complete, the files and folders will be available on all your other devices that have the Dropbox app installed. They will automatically update with any changes made to the files or folders.
5. Similarly, any changes made to files or folders within the Dropbox folder on any device will be synced across all your devices. This ensures that you have the most recent version of the files available on all devices.
6. It is important to note that large files or a large number of files may take some time to sync completely, especially if you have a slow internet connection. Dropbox will continue syncing in the background, even if you close the app or shut down your computer.
By using Dropbox’s syncing feature, you can access and work on your files from multiple devices seamlessly. Whether you edit a document on your computer or smartphone, the changes will be saved and synced across all devices, allowing for effortless collaboration and productivity.
Sharing files and folders
Dropbox makes it incredibly easy to share files and folders with others, whether they have a Dropbox account or not. This feature is ideal for collaboration, sharing large files, or simply sending files to friends and family. Here’s how to share files and folders using Dropbox:
1. In your Dropbox folder on your computer or in the Dropbox app, locate the file or folder you want to share. Right-click on it and select the “Share” option.
2. A window will appear, giving you the option to enter the email addresses of the people you want to share with. You can also generate a link to the file or folder and share it via email, messaging apps, or social media.
3. If the person you are sharing with has a Dropbox account, you can enter their email address, and they will receive a notification that a file or folder has been shared with them. They can then access and edit the shared file or folder directly from their Dropbox account.
4. If the person does not have a Dropbox account, you can still share files with them. Simply enter their email address, and they will receive an email with a link to access the shared file or folder. They can view and download the file or folder without needing a Dropbox account.
5. Dropbox also allows you to set permissions for shared files and folders. You can choose whether the recipient can only view the file or folder or has the ability to edit and make changes to it. This ensures that you have control over who can access and modify your shared files.
6. Additionally, Dropbox provides a convenient feature called “Shared folders.” This allows you to create a shared folder with multiple people, providing a central location for collaborating on files. Any changes made to files within the shared folder will be synced to all participants automatically.
By utilizing Dropbox’s file and folder sharing capabilities, you can collaborate effectively with others, share large files effortlessly, and ensure that everyone has access to the most up-to-date version of files. Whether for work projects or personal use, sharing files and folders with Dropbox is a breeze.
Organizing and managing files
Keeping your files and folders organized is essential for efficient workflow and easy access. Dropbox offers a range of features that allow you to organize and manage your files effectively. Here’s how you can organize and manage your files in Dropbox:
1. Create folders: To organize your files, create separate folders for different projects, categories, or departments. Right-click within your Dropbox folder or in the Dropbox app, select “New Folder,” and give it a meaningful name.
2. Move and copy files: To move files into specific folders, simply drag and drop them from one location to another within your Dropbox folder. If you want to keep a file in multiple folders, use the “Copy” or “Duplicate” option instead.
3. Use subfolders: To further organize your files, create subfolders within existing folders. Right-click on a folder, select “New Folder,” and nest it under the parent folder. This hierarchical structure can help you keep track of files belonging to different projects or categories.
4. Sort and filter files: Dropbox allows you to sort files by name, date modified, or file size. Click on the respective column header in the file view to arrange files in ascending or descending order. Additionally, use the search bar to filter files by specific file names or extensions.
5. Add file and folder descriptions: Make it easier to identify and understand your files by adding descriptions. Right-click on a file or folder, select “Properties,” and add a short description or summary. This can be especially useful for shared folders when collaborating with others.
6. Use file and folder labels: Dropbox enables you to add labels or tags to files and folders to further categorize and organize them. Right-click on a file or folder, select “Add Labels,” and assign relevant labels based on the content, priority, or status.
7. Utilize the “Favorites” feature: The Favorites feature allows you to mark specific files and folders as favorites, making them easily accessible from the left sidebar in the Dropbox app or website. Right-click on a file or folder and select “Add to Favorites” to access important files with a single click.
8. Archive or delete files: To declutter your Dropbox, consider archiving or deleting files that are no longer needed. Archived files are still stored in your Dropbox but won’t appear in regular file views. Before deleting any files, ensure they are no longer needed, as deleted files cannot be retrieved.
By leveraging these organizational and management features, you can maintain a tidy and efficient file structure within Dropbox. This allows you to quickly locate files, collaborate seamlessly, and streamline your workflow.
Restoring deleted files
Accidentally deleting a file can be a stressful experience, but with Dropbox, you have an opportunity to restore deleted files and recover your valuable data. Here’s how you can restore deleted files in Dropbox:
1. Accessing the deleted files: Dropbox keeps a record of deleted files for a certain period of time, depending on your account type. To access these deleted files, log in to your Dropbox account from a web browser.
2. Locating deleted files: In the Dropbox web interface, navigate to the folder where the deleted file was located. Once you’re within the folder, click on the “Show deleted files” option at the top of the page. This will display all the deleted files within that folder.
3. Restoring deleted files: Locate the file you want to restore from the list of deleted files. Right-click on the file and select the “Restore” option. Dropbox will move the file back to its original location, restoring it to its previous state.
4. Restoring deleted folders: If you have accidentally deleted an entire folder, the process is similar. Locate the deleted folder, right-click on it, and select “Restore.” Dropbox will restore the entire folder and all its contents.
5. Permanent deletion: It’s important to note that deleted files and folders will only be available for restoration within a specific time frame. Once this time period elapses, the files will be permanently deleted and cannot be recovered. Therefore, it is crucial to act promptly if you need to retrieve deleted files.
6. Dropbox rewind (for paid plans): If you have a Dropbox paid plan, you can take advantage of the Dropbox Rewind feature. This feature allows you to restore your entire Dropbox account to a previous date and time, effectively rolling back changes and recovering deleted files from a specific point in time.
By following these steps and utilizing the available features, you can restore deleted files and folders in Dropbox, ensuring that accidental deletions do not lead to permanent data loss.
Using the Dropbox Paper feature
Dropbox Paper is a collaborative document editing and sharing feature that allows teams to work together in real-time. With Dropbox Paper, you can create and edit documents, brainstorm ideas, make to-do lists, and more. Here’s how to use the Dropbox Paper feature:
1. Creating a Paper document: To create a new document in Dropbox Paper, click on the “Create new file” button and select “Paper” from the options. Alternatively, you can also create a new Paper document directly from the Dropbox website or mobile app.
2. Editing and formatting: Once you have created a Paper document, you can start editing and formatting it. Paper offers a range of formatting options such as headings, bullet points, numbered lists, and text formatting (bold, italic, underline). Simply highlight the desired text and use the formatting toolbar to apply the desired formatting.
3. Collaborating in real-time: One of the main advantages of Dropbox Paper is the ability to collaborate with others in real-time. You can invite team members to view and edit the document by clicking on the “Share” button and entering their email addresses. All collaborators can simultaneously edit and make changes to the document, with their changes being reflected in real-time.
4. Adding comments and feedback: Dropbox Paper allows you to leave comments on specific sections of the document or on the document as a whole. It is a convenient way to provide feedback, ask questions, or engage in discussions with your team members. To add a comment, simply highlight the text or section and click on the comment icon that appears.
5. Assigning tasks and creating to-do lists: You can turn any line of text in a Dropbox Paper document into a task by adding a checkbox to it. This enables you to create to-do lists or assign tasks to team members. When a task is completed, simply check the box to mark it as done.
6. Integrating media and files: Dropbox Paper allows you to embed various types of media into your documents, including images, videos, and audio files. You can simply drag and drop the media files into the document or use the “Insert” menu to add them. This feature makes Dropbox Paper a versatile tool for content creation and collaboration.
7. Version history and document recovery: Dropbox Paper automatically saves versions of your document as you make changes. You can access the version history and view or restore previous versions of the document if needed. This ensures that you can revert back to an earlier state of the document if required.
By utilizing the Dropbox Paper feature, you can streamline team collaboration, enhance productivity, and create dynamic and interactive documents that foster creativity and efficient workflow.
Collaborating with others on Dropbox
Dropbox provides a robust platform for collaboration, allowing team members to work together on files and projects seamlessly. With its sharing and collaboration features, Dropbox facilitates effective teamwork and enhances productivity. Here’s how you can collaborate with others on Dropbox:
1. Sharing files and folders: One of the fundamental aspects of collaboration on Dropbox is sharing files and folders. You can easily share files or entire folders with individuals or groups by generating a link or inviting them directly through their email addresses. Collaborators can then access and edit the shared files or folders, making collaborative work more efficient.
2. Assigning roles and permissions: When sharing files or folders, you can specify the roles and permissions for each collaborator. Dropbox offers various permission levels, such as view-only, edit, or full access. This allows you to control who can make changes to files, ensuring that everyone has the appropriate level of access based on their role in the project.
3. Real-time collaboration: Dropbox enables real-time collaboration on shared files through its Microsoft Office integration and Dropbox Paper features. Multiple team members can work on the same document simultaneously, making edits, leaving comments, and discussing changes in real-time. This fosters effective communication and ensures that everyone is on the same page.
4. Commenting and feedback: Collaborators can leave comments and provide feedback on specific sections or throughout the document. These comments can be addressed, discussed, and resolved within the Dropbox interface, simplifying the communication process and eliminating the need for separate email threads or messaging platforms.
5. Version control and file history: Dropbox keeps a record of versions and changes made to shared files. This makes it easy to track the progress of a project, revert back to previous versions if needed, and view the history of edits made by collaborators. The version control feature ensures that everyone is working with the latest version of the file and provides a valuable backup in case of accidental changes or deletions.
6. Integration with productivity tools: Dropbox integrates seamlessly with various productivity and collaboration tools, such as project management software, communication platforms, and document editing tools. These integrations allow you to streamline your workflow and enhance collaboration by accessing third-party apps directly from Dropbox.
7. Mobile collaboration: With the Dropbox mobile app, you and your team can collaborate on the go. The mobile app allows you to access, view, and edit shared files, respond to comments, and stay connected with your team, enabling flexible collaboration regardless of your location.
By harnessing Dropbox’s collaboration features, you can effectively collaborate with team members, streamline communication, and ensure seamless project coordination. Dropbox provides the tools necessary to foster teamwork and enhance productivity within your organization or across different teams.
Troubleshooting common issues
While Dropbox is a reliable and user-friendly platform, occasional issues and challenges may arise. Understanding how to troubleshoot common problems can help you quickly resolve issues and minimize disruptions to your workflow. Here are some common issues and their solutions:
1. Syncing issues: If files or folders are not syncing properly, ensure that you have a stable internet connection. Restart the Dropbox app or computer to re-establish the connection. If the issue persists, check if you have sufficient storage space in your Dropbox account or if there are any conflicts with the file names.
2. Slow performance: If Dropbox is running slowly, check if there are any background processes or other applications consuming significant resources on your computer. Additionally, ensure that your Dropbox app is up to date by regularly checking for updates. You can also selectively sync folders to reduce the load on your system.
3. Missing files or folders: If you cannot find specific files or folders in your Dropbox, firstly, check the Deleted Files section and restore them if necessary. If they are not there, ensure that they have not been mistakenly moved or deleted. Use the search feature within Dropbox to locate the missing items by their names or keywords.
4. Authentication errors: If you face issues with signing in to your Dropbox account, double-check your username and password for accuracy. Reset your password if needed and ensure that your account is not being blocked by any security settings. Clearing your browser cache or trying a different browser can also help resolve authentication errors.
5. Sharing problems: If you encounter difficulties while sharing files or folders, confirm that you have the correct email addresses of the recipients. Check the sharing permissions and ensure that the recipients’ email addresses are associated with valid Dropbox accounts. If recipients cannot access the shared files, revoke the sharing and re-share with them.
6. File conflicts: In collaborative settings, conflicts can occur when multiple team members make changes to the same file simultaneously. Dropbox will create conflicted copies of the file to avoid data loss. To resolve conflicts, review the conflicted files, merge the changes manually, and rename or delete the conflicting copies as necessary.
7. Error messages: When encountering error messages, carefully read and understand the error description. Consult the Dropbox Help Center or search for specific error codes to find troubleshooting steps or recommended solutions. Reinstalling the Dropbox app or updating your operating system may also resolve some error messages.
If you encounter persistent issues that cannot be resolved through troubleshooting, consider reaching out to Dropbox customer support for further assistance. They can provide personalized solutions and guidance based on your specific situation.
By familiarizing yourself with common troubleshooting techniques, you can quickly address and resolve issues that may arise while using Dropbox. This ensures a smooth and uninterrupted experience, allowing you to efficiently manage and collaborate on your files and projects.
Configuring advanced settings in Dropbox
While Dropbox works seamlessly with default settings, customizing advanced settings can enhance your experience and tailor the platform to your specific needs. Here are some advanced settings you can configure in Dropbox:
1. Selective sync: Dropbox allows you to choose which folders and files to sync to your device. By enabling selective sync, you can save storage space by only syncing the folders that are necessary for your current work. To configure selective sync, go to the Dropbox settings and choose the folders you want to sync on each device.
2. LAN sync: If you have multiple devices connected on the same local area network (LAN), enabling LAN sync can improve sync speeds. This feature allows devices within the same network to sync files directly with each other, reducing the need for data transfer through the internet. To enable LAN sync, go to the Dropbox settings and check the LAN sync option.
3. Bandwidth control: Dropbox offers the ability to manage the bandwidth allocation for uploads and downloads. This is useful if you want to limit the impact that Dropbox has on your internet connection. In the Dropbox settings, you can configure the upload and download rate limits to prevent Dropbox from utilizing all available bandwidth.
4. Two-factor authentication (2FA): Strengthen the security of your Dropbox account by enabling two-factor authentication. This adds an extra layer of protection by requiring a verification code in addition to your password when logging in. Enable 2FA in the security settings of your Dropbox account and follow the instructions to set it up.
5. Version history: Dropbox keeps a record of previous versions of files, allowing you to retrieve and restore older versions if needed. In the Dropbox settings, you can configure how long version history is retained. Keep in mind that retaining extensive version history may consume more storage space in your Dropbox account.
6. Link expiration: When sharing files or folders via links, you can control how long those links remain active. In the sharing settings, set an expiration date or disable link access after a certain period of time. This enhances the security of your shared files and prevents unauthorized access after a specific timeframe.
7. Camera uploads: If you frequently take photos or videos on your mobile device, enabling camera uploads can automatically sync your media files to your Dropbox account. You can configure the camera uploads settings to specify the location where the files should be stored and whether to upload only when connected to Wi-Fi.
8. Third-party app integrations: Dropbox integrates with various third-party applications, allowing you to further customize and expand its functionality. In the Dropbox settings, explore the available app integrations to connect Dropbox with project management tools, document editors, communication platforms, or other apps that may enhance your productivity.
By configuring these advanced settings in Dropbox, you can optimize the platform to better suit your workflow, preferences, and security requirements. Take advantage of these options to make the most out of your Dropbox experience and tailor it to your specific needs.