
Why Set Up Parental Controls on Your Router
As a parent in the digital age, ensuring the online safety of your children is of utmost importance. With the proliferation of internet-enabled devices and the vast amount of information easily accessible online, it becomes crucial to establish proper safeguards to protect your children from potential risks and inappropriate content. One effective way to do this is by setting up parental controls on your router.
Parental controls provide you with the ability to regulate and manage your children’s online activities, allowing you to create a safer and more suitable internet environment for them. By implementing these controls, you can have peace of mind knowing that your children are protected while using the internet, whether it’s for educational purposes or leisure.
By setting up parental controls on your router, you can:
- Filter inappropriate content: Parental controls enable you to restrict access to websites or block specific content categories that may be unsuitable or harmful for your children. This ensures that they are not exposed to explicit or age-inappropriate content.
- Control screen time: Excessive screen time can have detrimental effects on your children’s well-being. With parental controls, you can set time limits, allowing you to manage and regulate the amount of time your children spend online. This encourages a healthy balance between screen time and other activities like sports, homework, and family interactions.
- Monitor internet usage: Parental controls provide insight into your children’s online activities. You can track the websites they visit, the applications they use, and even view their search history. This helps you identify any potential issues and have meaningful conversations with your children about responsible internet usage.
- Protect against online threats: The internet is filled with various online threats, such as malicious websites, phishing scams, and cyberbullying. With parental controls, you can enhance your children’s online safety by blocking access to potentially harmful websites and protecting them from cyberbullying incidents.
- Customize settings for different devices and users: Parental controls allow you to set up unique profiles for each child, tailoring the restrictions and permissions based on their age and maturity level. This flexibility ensures that your rules and guidelines are suitable for each individual child, enabling a personalized internet experience.
By setting up parental controls on your router, you can create a safer online environment where your children can explore and learn while being protected from potential dangers lurking on the internet.
Step 1: Accessing Your Router’s Settings
To set up parental controls on your router, the first step is to access your router’s settings. This can be done by following these simple steps:
- Connect to your router: Ensure that your device, whether it’s a computer, laptop, or smartphone, is connected to your home Wi-Fi network. You need to be connected to the same network as your router to access its settings.
- Open a web browser: Launch your preferred web browser (such as Google Chrome, Mozilla Firefox, or Safari) and type in the IP address of your router in the address bar. The IP address is typically located on the back or bottom of your router or can be found in the user manual. Common router IP addresses include 192.168.1.1 or 192.168.0.1.
- Enter your router’s login credentials: Once you enter the IP address in the browser, you will be redirected to the login page of your router. Here, you will need to enter the login credentials. If you haven’t changed them before, the default username and password may be mentioned on the router or in its user manual. Common default credentials are “admin” for both the username and password.
- Navigate to the router settings: After successfully logging in, you will be directed to the router’s dashboard or settings page. The layout and organization of the settings may vary depending on the router manufacturer, but you should be able to find the parental controls section.
It’s worth noting that the steps mentioned above are general guidelines, and the specific process may vary depending on your router model and firmware version. If you encounter any difficulties or are unsure about the process, consult your router’s user manual or visit the manufacturer’s website for detailed instructions.
Once you have accessed your router’s settings, you are ready to proceed to the next step of configuring and enabling parental controls.
Step 2: Logging In to Your Router’s Dashboard
After accessing your router’s settings, the next step is to log in to your router’s dashboard. This will give you access to the various configuration options, including the parental controls settings. Here’s how you can do it:
- Navigate to the router settings page: Once you have entered the IP address of your router in the web browser, and you’ve arrived at the login page, enter your username and password to proceed. If you haven’t changed the credentials before, refer to the router manual or check the label at the back of your router for the default username and password.
- Enter the router login credentials: In most cases, the default username is “admin,” and the default password is either “admin” or “password.” However, keep in mind that some routers may have different default credentials, so consult your router’s documentation if you’re unsure.
- Click on the “Login” or “Sign In” button: After entering the correct username and password, click on the corresponding button to log in to your router’s dashboard. If the credentials are correct, you will be granted access to the main configuration page.
- Confirm successful login: Once you’re logged in, you should see the router’s dashboard or main configuration page. This page provides you with an overview of your router’s settings and options for customization.
If you encounter any issues during the login process, double-check that you have entered the correct IP address, username, and password. It’s possible that you may have changed the default credentials in the past, so try any alternative login information you may have set up.
In some cases, if you have forgotten your router’s login credentials or are having trouble accessing the dashboard, you may need to perform a factory reset. This will restore the router to its default settings, including the default username and password. However, keep in mind that performing a factory reset will erase any custom configurations you have made, so use this option as a last resort.
Once you have successfully logged in to your router’s dashboard, you can move on to the next step of navigating to the parental controls section to configure and enable the necessary settings.
Step 3: Navigating to the Parental Controls Section
After logging in to your router’s dashboard, the next step is to locate and navigate to the parental controls section. Here’s how you can do it:
- Explore the router’s settings menu: Look for a navigation menu or sidebar on the dashboard interface. This menu typically organizes various router settings into different categories.
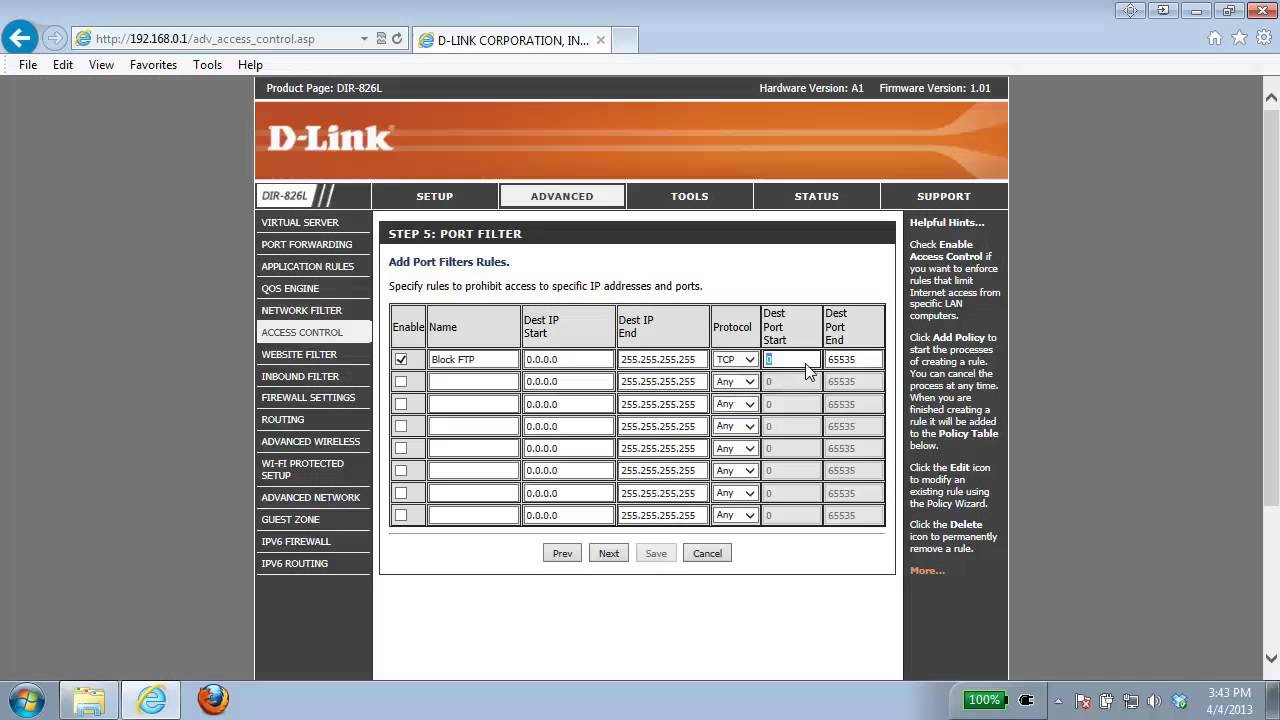
- Find the “Parental Controls” or “Access Control” option: In the settings menu, search for a category or sub-menu labeled “Parental Controls” or “Access Control.” The terminology may vary depending on your router’s manufacturer and firmware.
- Click on the “Parental Controls” section: Once you have located the relevant option, click on it to access the parental controls section of the router’s settings. This section will contain all the necessary configurations and options for setting up and managing parental controls.
- Explore the available features: Upon entering the parental controls section, take some time to familiarize yourself with the features and settings available. Different routers offer various options, such as website filtering, time restrictions, and device-specific controls. Evaluate the options and decide which ones you want to enable for your children’s online safety.
It’s important to note that the location and terminology of the parental controls section may differ depending on the router model and firmware version. If you’re having trouble locating the section, refer to your router’s user manual or visit the manufacturer’s website for specific instructions.
Once you have successfully navigated to the parental controls section, you’re ready to proceed to the next step of enabling and configuring the desired parental control settings.
Step 4: Enabling Parental Controls
Now that you have accessed the parental controls section of your router’s settings, it’s time to enable the parental controls and customize the desired restrictions for your children’s online activities. Follow these steps to enable parental controls on your router:
- Locate the enable/disable option: Look for a toggle switch or checkbox labeled “Enable Parental Controls” or something similar. Enabling this option will activate the parental control feature on your router.
- Select the devices or users: Determine whether you want to apply the parental controls to specific devices or to all devices connected to the network. Some routers allow you to select individual devices or apply the settings universally to all devices.
- Set time restrictions: If you want to control when your children can access the internet, configure the time restrictions feature. Specify the hours or time frames during which they are allowed to go online, and set specific limits for weekdays and weekends.
- Configure website filtering: To block access to inappropriate websites, look for the website filtering option. You can manually enter specific websites to block, or select website categories (such as adult content, violence, or gambling) that you want to be automatically filtered.
- Customize other restrictions: Depending on your router, you may have additional options to customize the parental control settings. This could include limiting access to certain applications, devices, or online services. Explore the available features and tailor them to your specific requirements.
- Save and apply the settings: Once you have configured the desired restrictions and settings, save the changes and apply them to your router. This ensures that the parental controls are in effect and will be enforced for the designated devices or users.
Keep in mind that each router may have a slightly different interface and terminology for enabling parental controls, so refer to your router’s user manual or online documentation for accurate instructions.
Enabling parental controls on your router is a crucial step in creating a safer online environment for your children. By customizing the restrictions and settings, you can ensure that they are protected from inappropriate content and have a balanced and responsible internet usage experience.
Step 5: Creating User Profiles
Once you have enabled parental controls on your router, the next step is to create user profiles for each of your children. User profiles allow you to customize the restrictions and settings based on their individual needs and age groups. Follow these steps to create user profiles on your router:
- Access the user profile settings: Within the parental controls section of your router’s settings, search for an option like “User Profiles” or “Device Management.” Click on this option to access the user profile settings.
- Select “Add New Profile” or similar: Look for a button or link that allows you to add a new user profile. Click on it to begin creating a profile for one of your children.
- Assign a name and device: Give the user profile a descriptive name, such as your child’s name, and associate it with the appropriate device. Some routers automatically detect and list the devices connected to your network, making it easy for you to select the device for each user profile.
- Customize restrictions: Set the desired restrictions and settings for the user profile. This can include time limits, website filtering, and other parental control options. Adjust these restrictions based on your child’s age, maturity level, and specific requirements.
- Save the user profile: Once you have configured the restrictions for the user profile, save the changes. Repeat these steps for each of your children to create individual user profiles for each child.
- Review and modify user profiles: After creating the user profiles, take the time to review and adjust the settings as necessary. You may find it helpful to periodically review and modify the restrictions to accommodate changes in your child’s needs or circumstances.
Creating user profiles allows you to tailor the parental controls to each child’s requirements. It ensures that the restrictions are age-appropriate and align with their individual internet usage habits and responsibilities.
Remember to regularly communicate with your children about the purpose of the parental controls and the boundaries set by them. By involving your children in the process and explaining the reasons behind the restrictions, you can foster a sense of accountability and responsible digital citizenship.
Step 6: Setting Time Limits
One crucial aspect of parental controls is setting time limits to manage and regulate your children’s screen time. By establishing clear boundaries, you can ensure a healthy balance between online activities and other aspects of their lives. Follow these steps to set time limits on your router:
- Access the time management settings: Within the parental controls section of your router’s settings, locate the option for time management or time limits. This may be labeled as “Time Restrictions,” “Schedule,” or something similar.
- Select the appropriate user profile: Choose the user profile for which you wish to set time limits. This allows you to customize the restrictions based on each child’s specific needs and age groups.
- Define the allowed hours: Specify the time periods during which your child is allowed to access the internet. This can include weekdays and weekends. You can set different time limits for different days to suit your family’s routine.
- Restrict access outside of allowed hours: Determine what happens when your child exceeds the allotted time or tries to access the internet during restricted hours. Some routers allow you to block internet access completely, while others may provide a warning or notification.
- Save the time limits: Once you have customized the time limits for the selected user profile, save the changes. Repeat these steps for each child’s user profile if you want to set different time limits for each child.
- Regularly review and adjust: It’s essential to periodically review and adjust the time limits based on your children’s needs and circumstances. As they grow older or their responsibilities change, you may need to modify the time limits accordingly.
Setting time limits helps promote a healthy balance between online activities and other aspects of your children’s lives, such as schoolwork, physical activity, and family time. It encourages them to develop a well-rounded lifestyle and foster responsible digital habits.
Remember to have open and ongoing discussions with your children about the importance of managing their time online and the reasons behind the set time limits. By involving them in the process and explaining the purpose, you can help them understand the need for balance and responsible internet usage.
Step 7: Blocking Specific Websites or Categories
Along with setting time limits, blocking specific websites or categories is an important aspect of parental controls. By restricting access to certain websites or content categories, you can ensure that your children are protected from inappropriate or potentially harmful online content. Follow these steps to block specific websites or categories on your router:
- Access the website filtering settings: Within the parental controls section of your router’s settings, find the option for website filtering or blocking. This may be labeled as “URL Filtering,” “Website Restrictions,” or something similar.
- Choose the appropriate user profile: Select the user profile for which you wish to block websites or content categories. This allows you to customize the restrictions based on the individual needs and age groups of your children.
- Add specific websites: If there are specific websites that you want to block, enter their URLs or domain names in the designated field. Some routers allow you to add multiple websites to the block list.
- Block content categories: Instead of blocking individual websites, you can opt to block entire categories of content. Common categories include adult content, gambling, violence, or social media platforms. Check the available options and select the categories you want to block.
- Customize content filtering: Some routers offer additional customization options for content filtering. You may have the ability to create whitelists (allowing access only to specified websites) or blacklists (blocking access to specific websites while allowing access to others).
- Save the website blocking settings: After configuring the website blocking or content filtering options, save the changes. Repeat these steps for each child’s user profile if you want to have different website restrictions for each child.
- Regularly review and update the block list: It’s important to periodically review and update the list of blocked websites or categories based on your children’s needs and circumstances. You may need to add new websites to the block list or remove restrictions as they grow older and their internet requirements change.
Blocking specific websites or content categories ensures that your children are not exposed to inappropriate or harmful content while browsing the internet. It helps create a safer online environment, giving you peace of mind knowing that they are protected from potential risks or distractions.
Remember, effective communication with your children is key. Explain to them why certain websites or categories are blocked and encourage them to come to you with any concerns or questions they may have. By fostering an open dialogue, you can help your children develop responsible online behavior and make informed choices while using the internet.
Step 8: Monitoring Internet Usage
In addition to implementing parental controls, it’s important to monitor your children’s internet usage to ensure they are staying safe and following the established guidelines. Monitoring allows you to keep track of their online activities and address any potential concerns or issues that may arise. Follow these steps to monitor internet usage on your router:
- Access the monitoring settings: Within the parental controls section of your router’s settings, locate the option for monitoring or activity logs. This may be labeled as “Internet History,” “Logs,” or something similar.
- Choose the appropriate user profile: Select the user profile for which you wish to monitor internet usage. This allows you to focus on the activities of each child individually.
- Review the activity logs: The monitoring settings will provide you with logs or reports of your child’s internet activities. This can include the websites they visited, the applications they used, and the duration of their online sessions. Take the time to review these logs to ensure their online behavior aligns with the established guidelines and expectations.
- Identify potential issues: Monitoring allows you to identify any potential issues or red flags that may arise. This could include accessing inappropriate websites, spending excessive time online, or engaging in harmful online behavior like cyberbullying. If you notice any concerning activity, address it promptly and have open conversations with your child.
- Communicate with your child: Regularly communicate with your child about the purpose of monitoring and emphasize that it is not about violating their privacy, but rather ensuring their safety. Encourage them to come to you with any concerns or questions they may have regarding online activities.
- Adjust monitoring settings as needed: If your router allows customization, you may have options to adjust the level of monitoring and the specific activities or details that are monitored. Consider your child’s age and maturity level when determining the appropriate level of monitoring.
- Maintain an ongoing dialogue: Monitoring is not a one-time activity; it should be an ongoing process. Regularly review the logs and have conversations with your child about responsible internet usage. As they grow older, encourage them to take more responsibility for their online behavior while still providing guidance and support.
Monitoring internet usage is an essential component of ensuring your child’s online safety. By being proactive and staying informed, you can identify potential issues early on and guide your child towards responsible digital citizenship.
Remember, trust and open communication are key. Let your child know that you are monitoring their internet activities to keep them safe, and encourage them to make responsible choices online. By fostering a supportive and trusting environment, you can promote a healthy and positive online experience for your children.
Step 9: Customizing Parental Control Settings
Customizing parental control settings allows you to fine-tune and tailor the restrictions and configurations according to your specific requirements. Each family is unique, and by customizing these settings, you can ensure the parental controls align with your values and your children’s individual needs. Follow these steps to customize the parental control settings on your router:
- Explore the available options: Within the parental controls section of your router’s settings, examine the various options and features that are available. This can include website filtering, time restrictions, application controls, or device-specific settings.
- Assess your family’s needs: Consider your family’s specific needs and circumstances. Think about the appropriate level of internet access, time limits, and content filtering that aligns with your values and provides a safe and balanced online environment for your children.
- Adjust time restrictions: If the default time limits don’t suit your family’s schedule, customize them accordingly. You can set specific hours or time ranges for both weekdays and weekends, ensuring the time restrictions align with your child’s routine and other activities.
- Review website filtering: Evaluate the available website filtering options and customize them based on your standards. You may want to block specific websites that are not covered by default filtering options or allow access to certain websites that are mistakenly categorized as inappropriate.
- Personalize application controls: Some routers provide the ability to control access to particular applications or services. Customize these settings based on your child’s age and the apps you deem appropriate or inappropriate for their usage.
- Consider device-specific settings: If your children use different devices, such as smartphones, tablets, or gaming consoles, explore the device-specific settings available on your router. Tailor the restrictions and configurations for each device to ensure consistent and appropriate access across all devices.
- Regularly review and update settings: As your family’s needs and circumstances change, revisit the parental control settings and make necessary adjustments. Stay involved and engaged in your child’s online activities, keeping an open line of communication and adjusting the settings to reflect their growth and maturity.
Customizing parental control settings allows you to adapt and refine the restrictions and configurations according to your family’s unique requirements. By personalizing these settings, you can promote a safe and responsible online environment that aligns with your values and supports your children’s healthy digital habits.
Remember, the goal of customization is not to restrict your child excessively but to provide guidance and protect them from potential online risks. Strive for a balance between freedom and safety, fostering a positive relationship with technology and promoting responsible internet usage.
Step 10: Testing and Adjusting Your Settings
Once you have configured the parental control settings on your router, it’s important to test them to ensure they are working effectively and meeting your expectations. Testing allows you to identify any potential issues and make necessary adjustments to refine the settings. Follow these steps to test and adjust your parental control settings:
- Verify the restrictions: Test the time restrictions, website blocking, and other configured settings to ensure they are functioning as intended. Check if your child is unable to access blocked websites or if they are restricted during the designated time periods.
- Check for false positives/negatives: Occasionally, there may be false positives or negatives in the website filtering, where certain websites are erroneously blocked or allowed. Verify that the filtering is accurately capturing inappropriate content and not generating false positives by blocking harmless websites.
- Monitor any bypass attempts: Monitor your child’s behavior to see if they are attempting to bypass the parental control settings or find workarounds. Address any such attempts promptly and reinforce the importance of responsible internet usage.
- Adjust time limits and restrictions: Based on your observations during testing, make adjustments to the time limits and restrictions as needed. For example, if a specific website is incorrectly blocked, add it to the whitelist, or extend or shorten the time limits to better align with your child’s activities.
- Communicate with your child: Communicate with your child regularly about the purpose of the parental controls and any adjustments you make to the settings. Explain why certain restrictions are in place and address any concerns or questions they may have.
- Stay informed about new risks: Keep yourself informed about the latest online risks and challenges faced by children. Stay updated with new websites, applications, or trends that may require additional monitoring or adjustments to the parental control settings.
- Regularly review and refine your settings: Parental controls should be an ongoing process. It’s essential to regularly review and refine your settings based on your child’s age, maturity level, and evolving online needs. Make adjustments as necessary to ensure a safe and age-appropriate internet environment.
Testing and adjusting your parental control settings allows you to fine-tune their effectiveness and address any issues or limitations. By actively monitoring and adjusting the settings, you can provide a safer and more tailored online experience for your child.
Remember, parental controls are not a substitute for parental involvement and communication. It’s important to maintain open lines of communication with your child, discuss responsible internet usage, and address any concerns or questions they may have regarding the parental control settings.