
Choosing the Right Router
When it comes to setting up a router, one of the first and most important steps is choosing the right device for your needs. With so many options available in the market, it can be overwhelming to find the perfect router that fits your requirements. But don’t worry, we got you covered. In this article, we will guide you through the process of selecting the right router for your home or office setup.
Before diving into the technical specifications and features, it’s essential to understand your specific needs. The first question you should ask yourself is, “What is the purpose of the router?” Is it for basic internet browsing, streaming videos, online gaming, or multiple devices connecting simultaneously?
Once you have clarified your requirements, consider the following factors:
- Speed: Look for a router that offers a high-speed connection to meet your bandwidth demands. Consider the internet speed provided by your ISP and choose a router that supports those speeds.
- Range: Determine the coverage area you need for your home or office. If you have a large space, look for a router with strong and reliable coverage to ensure a seamless connection throughout the premises.
- Number of Antennas: A router with multiple external antennas tends to offer better signal strength and coverage compared to those with internal antennas.
- Security: Ensure that the router has robust security features like WPA2 encryption and guest network support to protect your data from unauthorized access.
- Ports and Connectivity: Check the number of Ethernet ports available on the router. If you have wired devices, make sure there are enough ports to accommodate them. Additionally, consider if you need USB ports for printer or file sharing.
- Brand and Reputation: Stick to reputable brands that have a good track record in terms of reliability, customer support, and firmware updates. Reading reviews and customer feedback can provide valuable insights.
Once you have narrowed down your options based on these factors, it’s time to compare the specifications of the shortlisted routers. Look for features like dual-band support (2.4GHz and 5GHz), Quality of Service (QoS) for bandwidth prioritization, and parental controls if you have children.
Finally, consider your budget. Routers vary in price range, so determine how much you are willing to invest. Remember that a good router is a long-term investment, so it’s worth considering spending a bit more for better performance and features.
By considering your specific needs, important features, and comparing different models, you will be well-equipped to choose the right router to set up your network. Remember, a well-chosen router will not only ensure a stable and reliable internet connection but also enhance your overall online experience.
Gathering Your Equipment
Setting up a router requires a few essential pieces of equipment to ensure a smooth and hassle-free installation process. Before diving into the technical aspects, make sure you have the following items ready:
- Router: Of course, the most crucial piece of equipment is the router itself. Refer to the manufacturer’s instructions to choose the appropriate router for your setup.
- Modem: A modem is necessary to establish an internet connection. Ensure that your modem is compatible with your ISP and supports the required internet speeds.
- Ethernet Cables: Ethernet cables are used to connect the router to your modem and other devices. Make sure you have enough cables of appropriate length for your setup.
- Power Adapter: The router will typically come with a power adapter. Check if it matches the power requirements of your local electrical system.
- Computer, Laptop, or Mobile Device: You will need a device to access the router’s settings and complete the setup process. Make sure your device is connected to either the router or modem during the configuration.
- Username and Password: Some routers come with a default username and password printed on the device. If not, it’s a good practice to have a unique username and strong password in mind before starting.
Once you have gathered all the necessary equipment, you are ready to proceed with connecting the router to your modem.
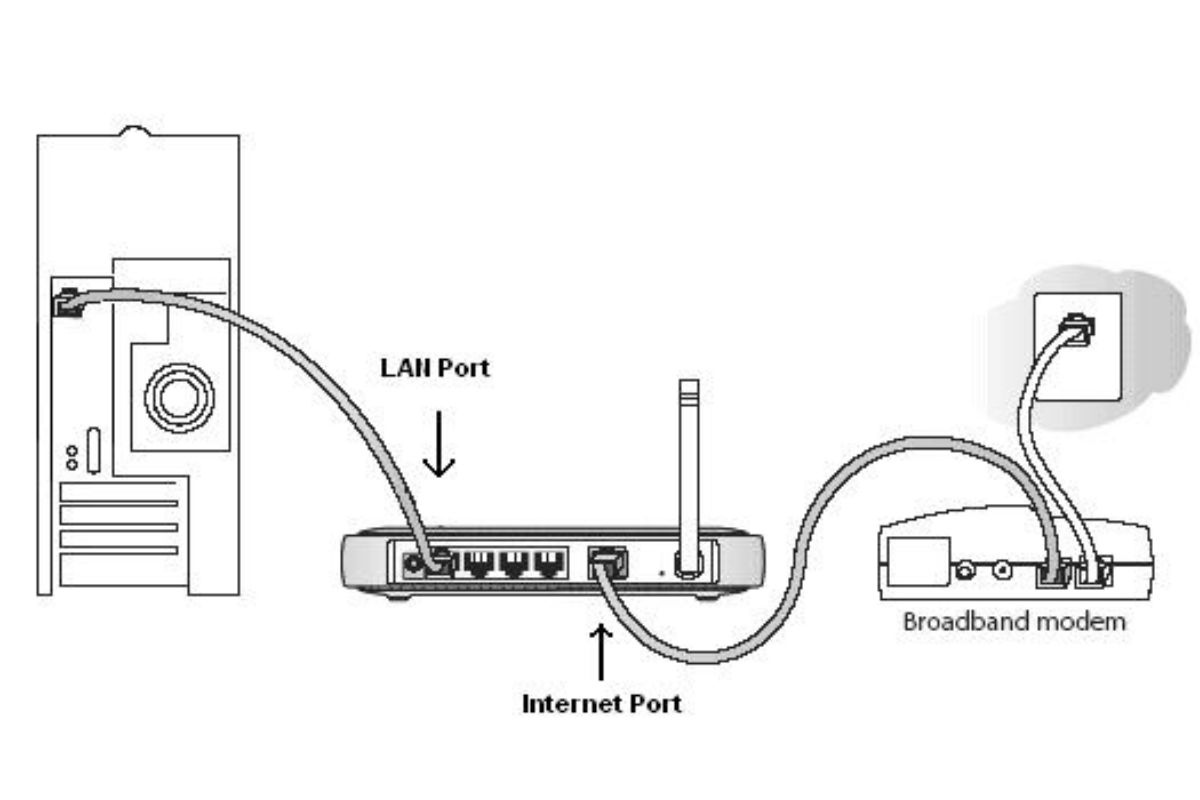
Connecting the Router to Your Modem
Connecting your router to the modem is a crucial step in setting up your network. Follow these steps to establish a connection:
- Ensure that your modem is turned off and unplugged from the power source.
- Locate the Ethernet port on your modem. It is usually labeled as “Ethernet” or “WAN.”
- Take one end of the Ethernet cable and plug it into the Ethernet port on the modem.
- Now, locate the WAN or Internet port on your router. It is typically labeled in a different color or has special markings.
- Take the other end of the Ethernet cable and insert it into the WAN or Internet port on the router.
- Ensure that the connection is secure by gently tugging on the Ethernet cable.
- Now, connect the router to a power source using the provided power adapter.
- Turn on the modem and let it complete its booting process. This may take a few minutes.
- Once the modem has fully booted up, turn on the router.
- Wait for the router to establish a connection with the modem. This process may also take a few minutes.
At this point, your router should be successfully connected to the modem, and you are ready to proceed with the configuration process. Connecting the router to the modem allows the router to receive the internet signal from the modem and distribute it to your connected devices. Keep in mind that if you have any wired devices, you can connect them to the available Ethernet ports on the router.
In the next section, we will explore how to set up a username and password for your router to ensure a secure network.
Setting Up a Username and Password
Securing your router with a username and password is essential to protect your network and prevent unauthorized access. Follow these steps to set up a username and password:
- Open a web browser on your computer or mobile device that is connected to the router’s network.
- Type the default IP address of the router in the URL bar. The default IP address can usually be found in the router’s documentation or on a sticker attached to the device.
- Press Enter to access the router’s login page.
- Enter the default username and password for your router. If you don’t know the default credentials, consult the router’s documentation or check the manufacturer’s website.
- Once logged in, look for the section that allows you to change the login information or settings. This may be located under “Administration,” “Security,” or a similar tab.
- Choose a unique and strong username for your router. Avoid using common usernames or personal information that could be easily guessed.
- Create a strong password that includes a combination of uppercase and lowercase letters, numbers, and special characters. It should be at least eight characters long.
- Save the changes and log out of the router’s settings page.
Remember to keep your username and password in a secure location. Do not share this information with anyone you do not trust.
With a username and password set up, you have taken an important step in securing your network. In the next section, we will explore how to customize your router settings to optimize your network’s performance.
Customizing Your Router Settings
Once you have set up a username and password for your router, it’s time to customize its settings to optimize your network’s performance. Here are some important settings you should consider:
- Wireless Network Name (SSID): Change the default SSID to a unique name that is easy for you to identify. Avoid using personal information or easily guessable names.
- Wireless Password (WPA2 Encryption): Enable WPA2 encryption and choose a strong password to secure your wireless network. This will prevent unauthorized access and ensure that only authorized devices can connect.
- Channel Selection: Select the optimal wireless channel to minimize interference from other nearby networks. The router’s settings page may provide an option to automatically choose the best channel or allow manual selection.
- Quality of Service (QoS): If your router supports QoS, prioritize specific devices or applications that require a higher bandwidth. This can ensure a smoother experience for activities like video streaming or online gaming.
- Port Forwarding: If you run certain applications or games that require port forwarding, configure the necessary ports on your router to allow incoming connections.
- DNS Settings: Consider using a third-party DNS server for improved performance and security. Services like Google DNS or OpenDNS are popular choices.
- Guest Network: Enable a guest network to provide internet access for visitors without granting them access to your main network.
- MAC Filtering: Use MAC filtering to allow or block specific devices based on their unique MAC addresses. This adds an extra layer of security to your network.
- Firewall Settings: Review and adjust the settings of your router’s built-in firewall to protect your network from potential threats.
- VPN Configuration: If you use a Virtual Private Network (VPN), configure your router to allow VPN connections for enhanced privacy and security.
These are just a few of the many settings you can customize on your router. Explore the options available on your router’s settings page and adjust them according to your specific needs and preferences.
By customizing your router settings, you can enhance your network’s performance, security, and overall user experience. In the next section, we will delve into enabling wireless connectivity on your router.
Enabling Wireless Connectivity
Enabling wireless connectivity on your router allows you to connect wireless devices such as laptops, smartphones, and tablets to your network. Here are the steps to enable wireless connectivity:
- Access your router’s settings page by typing the default IP address in a web browser on a device connected to the router’s network.
- Enter your username and password to log in to the router’s settings.
- Look for the “Wireless” or “Wireless Settings” option in the router’s settings menu.
- Make sure the wireless network is enabled. If it is already enabled, you can proceed to customize the wireless settings. Otherwise, enable the wireless network and save the changes.
- Set the wireless network name (SSID) to a unique and easily identifiable name. Avoid using personal information in the SSID for security reasons.
- If desired, change the wireless network password to enhance security. Use a strong and unique password that combines alphanumeric characters and special symbols.
- Choose the appropriate wireless channel. If you experience interference or slow connectivity, you may need to change the channel to a less crowded one. Generally, channels 1, 6, and 11 are recommended in most regions.
- Save the changes and exit the router’s settings page.
- On your wireless devices, search for available Wi-Fi networks and locate the name (SSID) of your wireless network.
- Select your network and enter the wireless password when prompted.
- Once connected, your wireless devices will be able to access the internet and communicate with other devices on the network.
Make sure to keep your wireless network password secure and periodically change it to maintain the highest level of security for your network.
With wireless connectivity enabled, you can now enjoy the freedom of connecting multiple devices to your network wirelessly. In the next section, we will discuss securing your wireless network to prevent unauthorized access.
Securing Your Wireless Network
Securing your wireless network is crucial to protect your data and prevent unauthorized access. By following these steps, you can enhance the security of your wireless network:
- Change the Default Login Credentials: It’s important to change the default username and password of your router to prevent unauthorized access. Choose a strong, unique password that combines uppercase and lowercase letters, numbers, and special characters.
- Enable Network Encryption: Use WPA2 encryption, the most secure option available, to protect your wireless network. Avoid using outdated encryption protocols like WEP, as they are easily compromised.
- Choose a Unique Network Name (SSID): When selecting a network name, avoid using personal information or easily guessable names. A unique and distinct name makes it more difficult for unauthorized users to identify and target your network.
- Disable SSID Broadcasting: Disabling SSID broadcasting hides your network from being visible to nearby devices. This adds an extra layer of security by making your network less likely to be detected by potential attackers.
- Set Strong Wireless Password: Create a strong wireless network password that is different from the router’s login password. Aim for a lengthy password that includes a combination of uppercase and lowercase letters, numbers, and special characters.
- Enable MAC Address Filtering: MAC address filtering allows you to specify which devices are allowed to connect to your network based on their unique MAC addresses. By enabling this feature, only authorized devices can join your network.
- Keep Firmware Up to Date: Regularly update your router’s firmware to ensure you have the latest security patches and bug fixes. Check the manufacturer’s website for firmware updates and follow the instructions for installation.
- Disable Remote Management: Unless necessary, disable remote management of your router to prevent unauthorized access from the internet. This reduces the chances of remote attackers gaining control over your network.
- Regularly Check Connected Devices: Periodically review the list of devices connected to your network. If you notice any unfamiliar devices, investigate and take appropriate action to secure your network.
- Consider Using a VPN: Using a Virtual Private Network (VPN) adds an additional layer of encryption and security to your internet connection. It protects your data and helps keep your online activities private, even when connected to a public Wi-Fi network.
By implementing these security measures, you can significantly reduce the risk of unauthorized access to your wireless network and protect your valuable data. Remember to review and update your security settings periodically to stay one step ahead of potential threats.
Next, we will explore how to set up parental controls on your router to manage and monitor internet usage for your household.
Setting Up Parental Controls
Setting up parental controls on your router allows you to manage and monitor internet usage for your household, ensuring a safe and controlled online environment for children. Follow these steps to set up parental controls:
- Access your router’s settings page by typing the default IP address in a web browser on a device connected to the router’s network.
- Enter your username and password to log in to the router’s settings.
- Look for the “Parental Controls” or “Access Control” section in the router’s settings menu.
- Enable parental controls and choose the devices or users you want to apply them to.
- Set up time limits to control when internet access is allowed. You can specify specific time periods, such as blocking access during late-night hours or limiting usage during school hours.
- Block or restrict specific websites or categories of content. Most routers provide options to block adult content, violence, or social media websites.
- Set up a list of allowed or blocked websites. You can manually add specific websites that you want to allow or block for your connected devices.
- Configure keyword filters to prevent access to websites containing certain keywords or phrases.
- Save the changes and exit the router’s settings page.
- Test the parental control settings by accessing restricted websites or testing time limits on the devices you have applied the controls to.
Keep in mind that parental controls may not be foolproof, and it’s important to have open communication with your children about internet safety and responsible online behavior. Regularly review and update the settings as needed to adapt to your family’s changing needs.
With parental controls in place, you can have peace of mind knowing that your children are using the internet in a safe and controlled environment. In the next section, we will discuss managing device prioritization on your router to optimize network performance.
Managing Device Prioritization
Managing device prioritization on your router allows you to allocate bandwidth to specific devices or applications, ensuring optimal network performance for essential tasks. Follow these steps to manage device prioritization on your router:
- Access your router’s settings page by typing the default IP address in a web browser on a device connected to the router’s network.
- Enter your username and password to log in to the router’s settings.
- Look for the “Quality of Service (QoS)” or “Bandwidth Control” section in the router’s settings menu.
- Enable QoS or prioritize bandwidth control.
- Identify the devices or applications that require higher priority or bandwidth.
- Assign higher priority to specific devices or applications by setting their priority levels accordingly. This will ensure that they receive a larger share of the available bandwidth.
- Save the changes and exit the router’s settings page.
- Test the device prioritization by running applications or tasks that require different levels of bandwidth and monitor the performance.
By managing device prioritization, you can ensure a smooth and uninterrupted network experience, especially during activities that demand higher bandwidth, such as video streaming or online gaming. It allows you to allocate resources effectively and prevent certain devices or applications from overwhelming the network.
Keep in mind that the effectiveness of device prioritization may vary depending on the capabilities of your router. Some routers offer more advanced QoS features, allowing you to fine-tune the bandwidth allocation based on specific requirements.
With device prioritization set up, you can optimize network performance for important tasks and ensure a reliable and efficient network experience for all devices on your network.
In the next section, we will discuss the importance of updating firmware and troubleshooting common issues to maintain a stable and secure network.
Updating Firmware and Troubleshooting Common Issues
Regularly updating your router’s firmware and troubleshooting common issues are crucial to maintain a stable and secure network. Follow these steps to update firmware and troubleshoot common issues:
- Updating Firmware:
- Visit the manufacturer’s website or check the router’s settings page for firmware update notifications.
- Download the latest firmware version for your router model.
- Access the router’s settings page and navigate to the firmware update section.
- Follow the manufacturer’s instructions to upload the downloaded firmware file.
- Allow the router to update its firmware, which may take a few minutes.
- After the update is complete, restart the router to ensure the changes take effect.
- Troubleshooting Common Issues:
- No Internet Connection: Check if the modem and router are properly connected and powered on. Restart both devices if necessary. Verify that the router’s WAN or Internet status indicator light is on and not blinking.
- Slow Internet Speed: Check if other devices on the network are experiencing slow speeds. If so, restart the router and modem, and ensure no background processes are consuming excessive bandwidth.
- Intermittent Connectivity: Check for nearby devices that may be causing interference, such as cordless phones or microwaves. Move your router to a central location and away from potential sources of interference.
- Connection Drops: Ensure that the router’s firmware is up to date. Check if any network cables are loose or damaged. Reset the router to factory settings and reconfigure it if necessary.
- Wi-Fi Signal Weakness: Adjust the router’s antennas for optimal coverage. Consider using Wi-Fi range extenders or access points to extend the network’s reach.
- Router Overheating: Ensure that the router is placed in a well-ventilated area and not covered. If necessary, use a cooling pad or fan to prevent overheating.
- Forgotten Router Password: If you forget your router’s login password, perform a factory reset. Refer to the router’s documentation or the manufacturer’s website for instructions.
By keeping your firmware up to date and troubleshooting common network issues, you can maintain a stable and secure network environment. However, if you encounter persistent or complex issues, it may be necessary to consult the manufacturer’s support or contact a professional for further assistance.
With firmware updated and common issues resolved, you can enjoy a reliable and secure network for all your online activities.
Remember, ensuring regular maintenance and staying vigilant about security are vital to keeping your router and network functioning optimally.