
Why You Should Change Your Wireless Router Password
When it comes to setting up a wireless network, many people tend to overlook the importance of changing their router’s default password. However, leaving the default password unchanged can expose your network to various security risks. In this article, we will discuss why it is crucial to change your wireless router password and provide step-by-step instructions on how to do it.
The default password that comes with your router is often generic and widely known. This makes it easier for hackers to gain access to your network, as they can try common default passwords across multiple networks. By changing your password, you effectively eliminate this vulnerability and make it much more difficult for unauthorized individuals to break into your network.
Furthermore, changing your router’s password helps protect your personal information and sensitive data. Hackers who gain access to your network can potentially intercept your online activities, steal your login credentials, or access files stored on connected devices. By setting up a strong, unique password, you reduce the risk of these privacy breaches and ensure the security of your personal data.
Another reason to change your wireless router password is to prevent others from using your network without your permission. By default, most routers have no restrictions on who can connect to them. This means that neighbors or even strangers passing by can use your internet connection, potentially slowing down your network speed and consuming your monthly data limit. By changing your password and enabling secure authentication, you ensure that only authorized devices can connect to your network.
Changing your wireless router password is also a proactive measure in guarding against malware and other online threats. Some hackers use malware to gain control over routers, allowing them to redirect internet traffic, perform phishing attacks, or even launch distributed denial-of-service (DDoS) attacks. By changing your password, you reduce the chances of falling victim to these attacks and enhance the overall security of your network.
Step 1: Accessing Your Router’s Web Interface
To change your wireless router password, the first step is to access your router’s web interface. This can be done by following these simple steps:
- Ensure that your computer or device is connected to your router’s network. You can do this by connecting your device to the router using an Ethernet cable or by connecting to the router’s Wi-Fi network.
- Open your preferred web browser (such as Google Chrome or Mozilla Firefox) and type in the IP address of your router. Common IP addresses for routers include 192.168.0.1, 192.168.1.1, or 192.168.2.1. If none of these addresses work, refer to your router’s manual or the manufacturer’s website for the correct IP address.
- Press Enter, and you should see a login page for your router’s web interface. You may be prompted to enter a username and password. If you haven’t changed these from the default, check the router’s manual or the manufacturer’s website for the default credentials. Alternately, you may have set up a custom username and password when you initially set up your router.
- Enter the login credentials and click on the Login or Sign In button to access the web interface of your router.
Once you have successfully logged in to your router’s web interface, you are ready to proceed to the next step of changing your wireless router password. It is important to note that the steps may vary slightly depending on the make and model of your router. Refer to your router’s manual or the manufacturer’s website for specific instructions if needed.
Step 2: Locating the Security Settings
Once you have accessed your router’s web interface, the next step is to locate the security settings section. Here’s how you can find it:
- Look for a tab or menu option labeled “Wireless” or “Wi-Fi” in the router’s web interface. This is where you can manage the settings related to your wireless network.
- Navigate to the wireless settings page, which may be referred to as “Wireless Settings,” “Wireless Setup,” or something similar.
- Within the wireless settings page, you should see various options related to your wireless network, including the SSID (network name) and the security settings.
- Locate the security settings. Common security settings options include WEP, WPA, or WPA2. It is recommended to choose WPA2 as it provides the highest level of security.
- Take note of the current security settings, as you may need this information during the password change process.
Remember that the location of the security settings may vary depending on the router’s make and model. If you’re having trouble finding them, consult your router’s manual or the manufacturer’s website for specific instructions.
Once you have located the security settings, you are now ready to proceed to the next step of choosing a strong password for your wireless router.
Step 3: Choosing a Strong Password
When changing your wireless router password, it’s essential to choose a strong and secure password that will help protect your network from being compromised. To ensure the strength of your password, follow these guidelines:
- Make it lengthy: Use a password that consists of at least 12 characters. The longer the password, the harder it is for hackers to crack.
- Include a mix of characters: Use a combination of uppercase and lowercase letters, numbers, and special characters such as @, $, or #. This helps increase the complexity of the password.
- Avoid common phrases or personal information: Don’t use easily guessable passwords such as “password123” or personal information like your birthday or name.
- Don’t reuse passwords: Use a unique password for your wireless router that is not used for any other online accounts. Reusing passwords increases the risk of multiple accounts being compromised if one password is exposed.
- Consider using a password manager: If you have trouble remembering complex passwords, consider using a password manager application. These tools can help generate strong passwords and securely store them for you.
Remember, the stronger your password, the more secure your wireless network will be. Take the time to create a password that meets the above criteria and is easy for you to remember.
Once you have chosen a strong password, you are now ready to move on to the next step of actually changing your wireless router password.
Step 4: Changing Your Router’s Password
Now that you have chosen a strong password, it’s time to change your wireless router password. Follow these steps:
- Within the router’s web interface, navigate to the wireless settings or security settings page, as mentioned in the previous steps.
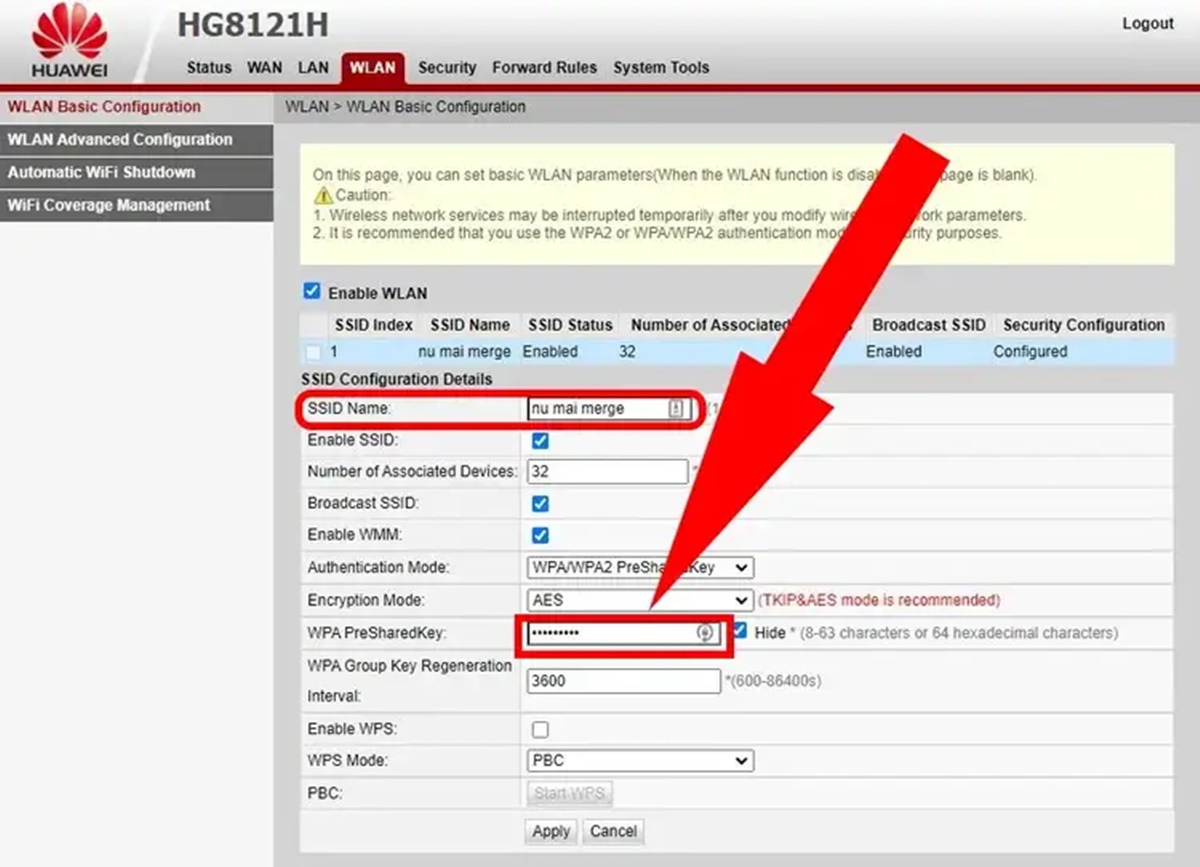
- Locate the section where you can change the password or passphrase for your wireless network. It may be labeled as “Password,” “Passphrase,” or “Pre-shared Key.”
- Enter your new password in the designated field. Make sure to type it accurately and remember it for future use.
- Some routers may require you to enter the new password twice for confirmation. This helps prevent any typing errors.
- Once you have successfully entered the new password, save the changes to apply them to your router.
It’s important to note that during this process, you may encounter additional options related to the wireless security settings. Familiarize yourself with these options and adjust them as per your preference. For example, you may want to enable network encryption (such as WPA2) and disable any older and less secure security options.
After saving the changes, your router will apply the new password, which may take a few moments. Be patient as the changes take effect.
Congratulations! You have successfully changed your wireless router password. The next step is to restart your router to ensure the changes are fully implemented. We will cover this step in the next section.
Step 5: Restarting Your Router
After changing your wireless router password, it’s advisable to restart your router to ensure that the changes take effect. Restarting your router helps in the following ways:
- Activating the new password: When you restart your router, it refreshes the settings and activates the new password you have just set. This ensures that all devices connecting to your network will now require the updated password for access.
- Refreshing network connections: Restarting your router helps clear any existing network connections and establishes fresh connections with your devices. This can resolve any connection issues and ensure a smoother experience.
- Security updates: Rebooting your router also allows it to apply any necessary security updates or firmware patches. These updates protect your router from known vulnerabilities and keep it up-to-date with the latest security features.
To restart your router, simply follow these steps:
- Locate the power button or power switch on your router.
- Press the power button or flip the power switch to turn off your router.
- Wait for around 10 seconds to ensure that the router fully powers down.
- Press the power button again or flip the power switch to turn your router back on.
After restarting your router, give it a few minutes to fully boot up and establish connections. Once it is up and running, you can proceed to the next step of reconnecting your devices to the network.
Step 6: Reconnecting Your Devices
After restarting your router, it’s time to reconnect your devices to your wireless network using the new password you set. Follow these steps:
- On the devices you want to connect, navigate to the Wi-Fi settings or network connections menu. This can usually be found in the settings or control panel of your device.
- Search for available Wi-Fi networks and locate your network in the list of available options.
- Select your network and click on the “Connect” or “Join” button.
- When prompted, enter the new password you set for your wireless network. Make sure to type it correctly, as passwords are case-sensitive.
- Once you have entered the password, click on the “Connect” or “Join” button to establish a connection with your network.
- Repeat these steps for all devices that need to connect to your network, including smartphones, tablets, laptops, and smart home devices.
After reconnecting your devices, they should be able to access the internet and communicate with each other through your updated wireless network.
If you encounter any issues during the reconnection process, double-check that you have entered the correct password and ensure that your device’s Wi-Fi settings are properly configured. If problems persist, you may need to contact your router’s manufacturer or refer to its documentation for further troubleshooting steps.
Now that your devices are reconnected, it’s important to take one final step to ensure the overall security of your wireless network. Let’s move on to the last step.
Step 7: Ensuring Your Network is Secure
Once you have changed your wireless router password and reconnected your devices, it’s important to take a few additional steps to ensure that your network remains secure. Here are some measures to consider:
- Regularly update your router’s firmware: Manufacturers often release firmware updates that contain security enhancements and bug fixes. Check the manufacturer’s website periodically to ensure that you have the latest firmware installed on your router.
- Enable network encryption: Make sure your wireless network is using strong encryption, such as WPA2, to protect your data as it travels wirelessly. Avoid using older and less secure encryption methods like WEP.
- Change the default username and password: In addition to changing the wireless password, it’s a good practice to change the default login credentials of your router’s web interface. This adds an extra layer of protection against unauthorized access.
- Disable remote administration: Unless you specifically need remote access to your router’s settings, it’s best to disable remote administration. This prevents anyone from accessing your router’s settings from outside your network.
- Regularly monitor your network: Keep an eye on the devices connected to your network and watch for any unfamiliar devices or suspicious activities. Consider using network monitoring tools to help detect and prevent unauthorized access.
- Use a strong firewall: Ensure that your router’s built-in firewall is enabled and properly configured. This helps to protect your network from potential intrusions and unauthorized access attempts.
- Change passwords periodically: To further enhance your network security, it’s recommended to change both your wireless router password and other important passwords (such as those for online accounts) periodically.
By following these additional steps, you can maintain the security of your wireless network and minimize the risk of unauthorized access or data breaches.
Congratulations! By completing these steps, you have successfully changed your wireless router password, secured your network, and protected your devices and data.