
Benefits of Changing the Default SSID
When setting up a wireless router, one of the most overlooked aspects is changing the default Service Set Identifier (SSID). The SSID is the name that appears when users search for available wireless networks. While it may be tempting to leave the default SSID as is, there are several compelling reasons to change it to something more personalized. In this section, we will explore the benefits of customizing the SSID for your wireless router.
1. Increased Security: Routers with default SSIDs are more vulnerable to unauthorized access. Cyber attackers can easily identify the make and model of a router based on its default SSID and exploit known vulnerabilities. Changing the SSID adds an extra layer of security by making it harder for potential threats to identify your network.
2. Avoiding Confusion: If multiple networks in your area have the same default SSID, it can become confusing for users trying to connect to the right one. By changing the SSID to a unique and memorable name, you can eliminate this confusion and ensure that your network is easily identifiable.
3. Personalization: Customizing the SSID allows you to add a personal touch to your network. You can choose a name that reflects your personality, interests, or the theme of your home or business. It’s a small but impactful way to make your Wi-Fi network feel more personalized and unique to you.
4. Unique Identification: If you have multiple wireless networks in the same location, changing the SSID helps distinguish between them. This is particularly useful in offices or houses with guest networks or networks for different purposes (e.g., work and personal use). By assigning specific SSIDs to each network, it becomes easier to connect to the desired one without confusion.
5. Hiding Network Identity: If you want to enhance the privacy of your network, changing the SSID can be advantageous. While it doesn’t completely hide your network, it makes it less conspicuous to casual users scanning for available networks. This can deter potential unauthorized users from attempting to connect to your network.
By changing the default SSID, you can experience these benefits that contribute to a more secure and personalized wireless network. However, before making this change, it’s essential to consider a few factors discussed in the next section.
Increased Security
One of the primary reasons to change the default SSID of your wireless router is to enhance your network’s security. Leaving the default SSID unchanged makes it easier for potential attackers to identify the make and model of your router, which can lead to targeted attacks exploiting known vulnerabilities. By customizing the SSID, you can add an extra layer of protection and make it more difficult for unauthorized users to access your network.
When attackers search for vulnerable networks, they often rely on the default SSID to identify specific router models that may be susceptible to known security flaws. Changing the SSID prevents them from easily identifying your router, making it less likely that they will target your network.
Furthermore, changing the SSID can also deter casual attackers who are scanning for networks to exploit. When faced with a customized SSID, these attackers may assume that the network’s owner has taken additional security measures, which could make them move on to an easier target.
Another aspect of increased security is minimizing the risk of unauthorized access to your network. If a would-be attacker has already identified your router’s make and model through the default SSID, they can use that information to search for potential vulnerabilities specific to that router. By changing the SSID, you disrupt this process and make it more challenging for attackers to pinpoint potential weaknesses.
In addition to changing the SSID, it is advisable to strengthen other security settings on your wireless router, such as enabling password authentication, using a strong encryption method, and regularly updating your firmware. By implementing these security measures in combination with a customized SSID, you create a more secure environment for your wireless network.
Remember: Changing the SSID alone is not a foolproof security solution. It is just one part of an overall strategy to protect your network from unauthorized access and potential threats. Nonetheless, it is a simple and effective step that any user can take to enhance their network’s security.
Avoiding Confusion
Choosing a unique and personalized SSID for your wireless router can help you avoid confusion, especially in areas where multiple networks are available. When networks have identical default SSIDs, it can become challenging for users to determine which one they should connect to.
By customizing the SSID to something distinct and memorable, you make it easier for both yourself and your guests to identify your network among others. Instead of relying on generic names like “Linksys” or “Netgear,” you can choose a name that reflects your household or business.
When guests visit your home or office, they can quickly identify your network by its unique name. This eliminates the need for them to guess or ask you for the network details, making the connection process seamless and efficient.
Additionally, customizing the SSID can prevent your devices from connecting to unintended networks. For example, if you have a laptop that automatically connects to any available network with the same default SSID, it could potentially connect to an insecure or malicious network without your knowledge. By changing the SSID to something specific to your network, you ensure that your devices connect only to the intended network, reducing the risk of accidentally connecting to unsecured networks.
Even in crowded areas with numerous neighbors’ networks, having a unique and recognizable SSID can be helpful. It allows you to identify and connect to your network quickly, without confusion or accidentally connecting to someone else’s network with a similar default SSID.
When choosing a customized SSID to avoid confusion, it’s best to strike a balance between uniqueness and simplicity. While you want your SSID to stand out, making it overly complicated or long may make it harder for guests or visitors to remember. Finding a middle ground where it’s distinctive but still easy to identify and remember will ensure a smooth and hassle-free experience for everyone connecting to your network.
Remember: Customizing the SSID to avoid confusion is particularly relevant in high-density areas or situations where multiple networks are present. By choosing a unique and personalized name, you can simplify the connection process for yourself, your guests, and ensure that your devices connect to the intended network.
Personalization
One of the advantages of changing the default SSID of your wireless router is the opportunity to personalize your network. Instead of settling for a generic name assigned by the manufacturer, customizing the SSID allows you to add a personal touch that reflects your personality, interests, or the theme of your home or business.
Personalizing the SSID can make your Wi-Fi network feel more like an extension of your identity. Whether you choose a name related to your favorite hobby, a reference to a beloved movie or book, or something that showcases your creativity, it adds a unique character to your network.
Furthermore, a personalized SSID helps you easily recognize and identify your network when multiple networks are available in your vicinity. Instead of having to distinguish between generic names like “Belkin” or “D-Link,” a customized SSID stands out and makes it clear which network is yours.
The personalization of your SSID can also make it easier for guests to identify your network when visiting your home or office. A custom name that is meaningful to you can serve as a conversation starter and may spark interest or curiosity from your guests.
By making your network personal, you can also inject a sense of fun or creativity into an otherwise technical aspect of your home or business. It can create a more welcoming and engaging atmosphere, making your Wi-Fi network stand out as a distinct feature rather than just another functional utility.
However, when personalizing your SSID, it is essential to strike a balance between creativity and clarity. While you want your SSID to be unique and interesting, it should still be easily recognizable and understood by those who need to connect to your network. Avoid using highly obscure or cryptic names that may confuse or frustrate users.
Ultimately, by personalizing the SSID of your wireless router, you can make your network feel more like your own and add a touch of uniqueness and flair.
Unique Identification
Changing the default SSID of your wireless router allows for easy and unique identification of your network. This is particularly useful when you have multiple wireless networks in the same location, such as in offices or homes with separate networks for different purposes.
By customizing the SSID for each network, you eliminate any confusion or ambiguity that may arise from multiple networks sharing the same default name. Assigning specific SSIDs to different networks helps distinguish between them, making it easier for users to connect to the desired one without any confusion.
For example, in an office setting, you may have a main network for employees and a separate guest network for visitors. By giving each network a distinct SSID, you make it clear which network is intended for internal use and which one is for guest access. This helps ensure that sensitive data and resources are only accessible to authorized personnel.
In a similar vein, in a residential setting, you may have separate networks for personal use and smart home devices. By customizing the SSIDs, you can easily identify and manage each network, allowing for efficient troubleshooting and administration.
By using unique SSIDs, you also avoid potential conflicts and interference with neighboring networks. In dense urban areas or apartment complexes, where multiple networks can coexist in close proximity, having unique SSIDs prevents any confusion in connecting to the desired network. It minimizes the chances of mistakenly connecting to a neighboring network with the same default SSID.
In addition to improving connectivity and reducing confusion, unique SSIDs can also provide a sense of professionalism and organization. Particularly in business environments, having clearly distinguished networks can lend an air of professionalism to the workplace.
When defining unique SSIDs, consider using descriptive names that reflect the purpose or location of the network. For example, “AcmeOfficeMain” and “AcmeOfficeGuest” or “SmithResidenceFamily” and “SmithResidenceSmartHome.” By using clear and concise naming conventions, you ensure that each network is easily identifiable to both yourself and others.
Overall, customizing the SSID of your wireless router allows for easy and unique identification of networks, reducing confusion and enhancing the efficiency of network management and connectivity.
Hiding Network Identity
Changing the default SSID of your wireless router can be a beneficial step in enhancing the privacy and security of your network by hiding its identity from casual users and potential attackers. While it doesn’t provide complete invisibility, it makes your network less conspicuous and less likely to be targeted.
By customizing the SSID, you make it more challenging for casual users who are simply scanning for available networks to identify your network among others. Instead of a generic name that reveals the make and model of your router, a personalized SSID gives little information about your network, making it less attractive to those seeking to exploit common vulnerabilities associated with specific router models.
Additionally, changing your SSID can deter potential attackers who specifically search for networks with default settings. Attackers often target networks with default SSIDs because they are more likely to have lax security measures in place. By customizing the SSID, you signal to potential attackers that you have taken additional steps to secure your network, making them more likely to move on to an easier target.
While hiding the SSID can deter casual users and some attackers, it is important to note that it does not provide foolproof protection against determined and skilled attackers. Advanced attackers can still identify hidden networks through various techniques, such as sniffing wireless network traffic or using specialized tools.
Moreover, hiding the SSID can create inconvenience for legitimate users who need to connect to your network. Devices will not automatically detect the hidden SSID when searching for available networks, requiring users to manually enter the SSID to connect. This can be particularly challenging for guests or temporary users who may not be aware of the hidden network’s name. To mitigate this inconvenience, you may need to share the SSID with trusted users through a secure communication channel.
If you choose to hide the SSID, it is important to remember that it is just one element of a comprehensive security strategy. Other security measures such as using a strong password, implementing encryption protocols, and regularly updating firmware are essential to protect your network from potential threats.
Considerations Before Changing the Default SSID
Before you jump into changing the default SSID of your wireless router, it’s important to consider a few factors to ensure a smooth transition and optimal network performance. Below are some key considerations to keep in mind:
1. Compatibility Issues: Some older devices may not support certain characters, special symbols, or long SSIDs. Before choosing a custom SSID, check the compatibility of your devices to ensure they can connect without any issues.
2. Difficulty Remembering the New SSID: If you have numerous devices connected to your network or frequently have guests connecting, choosing a complex or difficult-to-remember SSID could cause inconvenience. Consider using a combination of words or phrases that are meaningful and easy for both you and your guests to recall.
3. Impact on Connected Devices: Changing the SSID will cause all connected devices to lose their connection temporarily. Although devices should automatically reconnect using the new SSID, you might need to manually reconnect some devices, especially older ones. Be prepared to update the SSID on all devices, including laptops, smartphones, tablets, gaming consoles, and IoT devices.
4. Configuring a New SSID: To change the SSID, you’ll need to access your router’s settings. This requires knowing the router’s IP address, username, and password. If you’re not familiar with router configuration, consult the router’s user manual or contact the manufacturer for guidance to avoid any potential issues.
5. Additional Router Settings to Consider: While changing the SSID, it’s a good idea to review and update other essential settings for optimum security. These may include changing the router’s default login credentials, enabling network encryption (WPA2 or WPA3), disabling remote management, and configuring a strong Wi-Fi password. Enhancing these settings will help protect your network from unauthorized access.
6. Documenting SSID Changes: It’s recommended to keep a record of the old and new SSIDs along with their corresponding passwords. This documentation will assist you in managing and troubleshooting your network, especially if you have multiple networks or guest networks.
7. Notify Users of SSID Changes: If you’re changing the SSID in a shared environment or an office setting, inform all users of the new SSID and ensure they update their devices accordingly. Clear communication will minimize confusion and ensure a seamless transition for all users.
By taking these considerations into account, you can avoid potential compatibility issues, minimize disruptions, and ensure a successful transition to a new SSID that better suits your needs.
Compatibility Issues
Before changing the default SSID of your wireless router, it’s crucial to consider compatibility issues that may arise. Not all devices are capable of connecting to networks with certain characters, special symbols, or excessively long SSIDs. Understanding the compatibility limitations will help ensure that all of your devices can connect seamlessly to your network with the new SSID.
Firstly, some older devices, such as older laptops, smartphones, or game consoles, may not support certain characters or special symbols in the SSID. For example, if you include spaces, underscores, or emojis in your SSID, some devices may not recognize or properly display the SSID. It’s best to stick to alphanumeric characters and simple punctuation marks to avoid compatibility issues with older devices.
Furthermore, SSID length can also impact compatibility. While most modern devices should have no problem connecting to networks with lengthy SSIDs, it’s a good practice to keep the SSID reasonably short. Some older devices may have limitations on the maximum length they can handle, and exceeding this limit may cause connectivity issues. Aim for an SSID that is concise, informative, and easily identifiable without being excessively long.
It’s important to note that while compatibility issues can arise, they are relatively rare for most mainstream devices. However, it’s always better to check for compatibility before implementing the change to avoid any unforeseen complications.
To ensure compatibility, consider testing the new SSID on a range of devices you frequently use or have in your network. Connect devices with different operating systems, such as Windows, macOS, Android, and iOS, to verify that they can detect and connect to the new SSID without any problems.
In the event that you encounter compatibility issues, there are a few workarounds you can try. One option is to create a guest network with a simpler, more compatible SSID specifically for older or less flexible devices. This way, you can maintain compatibility for all devices while still having a customized SSID for most of your network.
If compatibility issues persist, you may need to consider finding a middle ground for your SSID that balances personalization and compatibility. Opt for a unique yet straightforward name that avoids special characters and excessive length.
Remember, compatibility issues are generally minimal, and most modern devices should handle a wide range of SSID configurations without any problem. However, it’s always wise to be aware of potential compatibility constraints and take necessary precautions to ensure a smooth transition when changing your default SSID.
Difficulty Remembering the New SSID
When changing the default SSID of your wireless router, it’s important to consider the potential difficulty in remembering the new SSID, especially if you have numerous devices connected to your network or frequently have guests connecting.
Opting for a complex or difficult-to-remember SSID can lead to inconvenience and frustration when connecting devices to your network. Devices that are not regularly connected may require manual reconfiguration, which can be time-consuming and cumbersome. Guests, too, may find it challenging to remember and enter a complex SSID when connecting to your network.
To avoid these difficulties, it’s recommended to choose a new SSID that strikes a balance between being memorable and secure. Consider selecting a combination of words or phrases that are meaningful to you but also easy to remember. Avoid using overly complicated or obscure names that may be hard for you or others to recall.
If you find it challenging to come up with a memorable SSID, you can consider using an acronym or a familiar phrase that has personal significance to you. For example, you could use the first letter of each word in a memorable phrase to create a unique SSID that is easier to remember.
An important consideration is ensuring that the new SSID does not compromise the security of your network. Avoid using personal information such as your name, address, or phone number as part of the SSID, as this information can be easily guessed or exploited by attackers.
It’s also a good practice to keep a record of the new SSID and its corresponding password. This documentation will come in handy if you need to provide the SSID to guests or if you have devices that require manual configuration. Keeping your network information organized and easily accessible will save you time and prevent potential frustration in the future.
Lastly, if you have a large number of devices connected to your network or frequently have guests connecting, it may be beneficial to periodically review and update the SSID to ensure that it remains memorable and easy to use. As technology and connectivity evolve, it’s essential to maintain a network that is efficient and user-friendly.
By considering the difficulty in remembering the new SSID and implementing strategies to mitigate potential issues, such as choosing a memorable name and keeping documentation, you can ensure a smooth and hassle-free experience when connecting devices to your network.
Impact on Connected Devices
When changing the default SSID of your wireless router, it’s important to consider the potential impact on the devices that are already connected to your network. Changing the SSID will temporarily disrupt the connection between your devices and the router, requiring you to reestablish the connection with the new SSID.
While most modern devices are designed to automatically reconnect to a known network, there may still be instances where manual intervention is required. Here are some factors to consider regarding the impact on connected devices:
1. Temporary Loss of Connection: When you change the SSID, all devices currently connected to your network will lose their connection temporarily. This means that you may experience a brief period of internet downtime until the devices reconnect.
2. Automatic Reconnection: After changing the SSID, most devices should automatically detect the updated network and reconnect without any action required from your end. However, this may not be the case for all devices, particularly older ones or those with outdated software. It’s a good practice to verify that all your devices have successfully reconnected to the new SSID after the change.
3. Manual Reconnection for Some Devices: In some cases, you may need to manually reconnect certain devices to the new SSID. This could be because the device did not automatically detect the updated network or because the device’s settings require manual intervention for any network changes. Examples of such devices may include IoT devices, network printers, smart TVs, or gaming consoles. Make sure to update the SSID settings for these devices to ensure seamless connectivity.
4. Updating Network Settings: Changing the SSID presents an opportunity to review and update other network settings on your devices, including Wi-Fi passwords, security protocols, and DNS settings. Take advantage of this time to ensure that all devices are properly configured with the latest network settings for optimal performance and security.
5. Informing Users: If you share your network with others, such as family members or colleagues, it’s important to communicate the SSID change and provide instructions on reconnecting devices to the updated network. This prevents confusion or frustration among users who may experience connectivity issues after the SSID change.
By considering the potential impact on connected devices and taking necessary steps to ensure a smooth transition, you can minimize disruptions and ensure that all devices are properly reconnected to the updated SSID.
Configuring a New SSID
When changing the default SSID of your wireless router, it is necessary to access and configure your router’s settings. This process may vary depending on the make and model of your router, but the general steps remain similar. Here is a general guide to help you configure a new SSID:
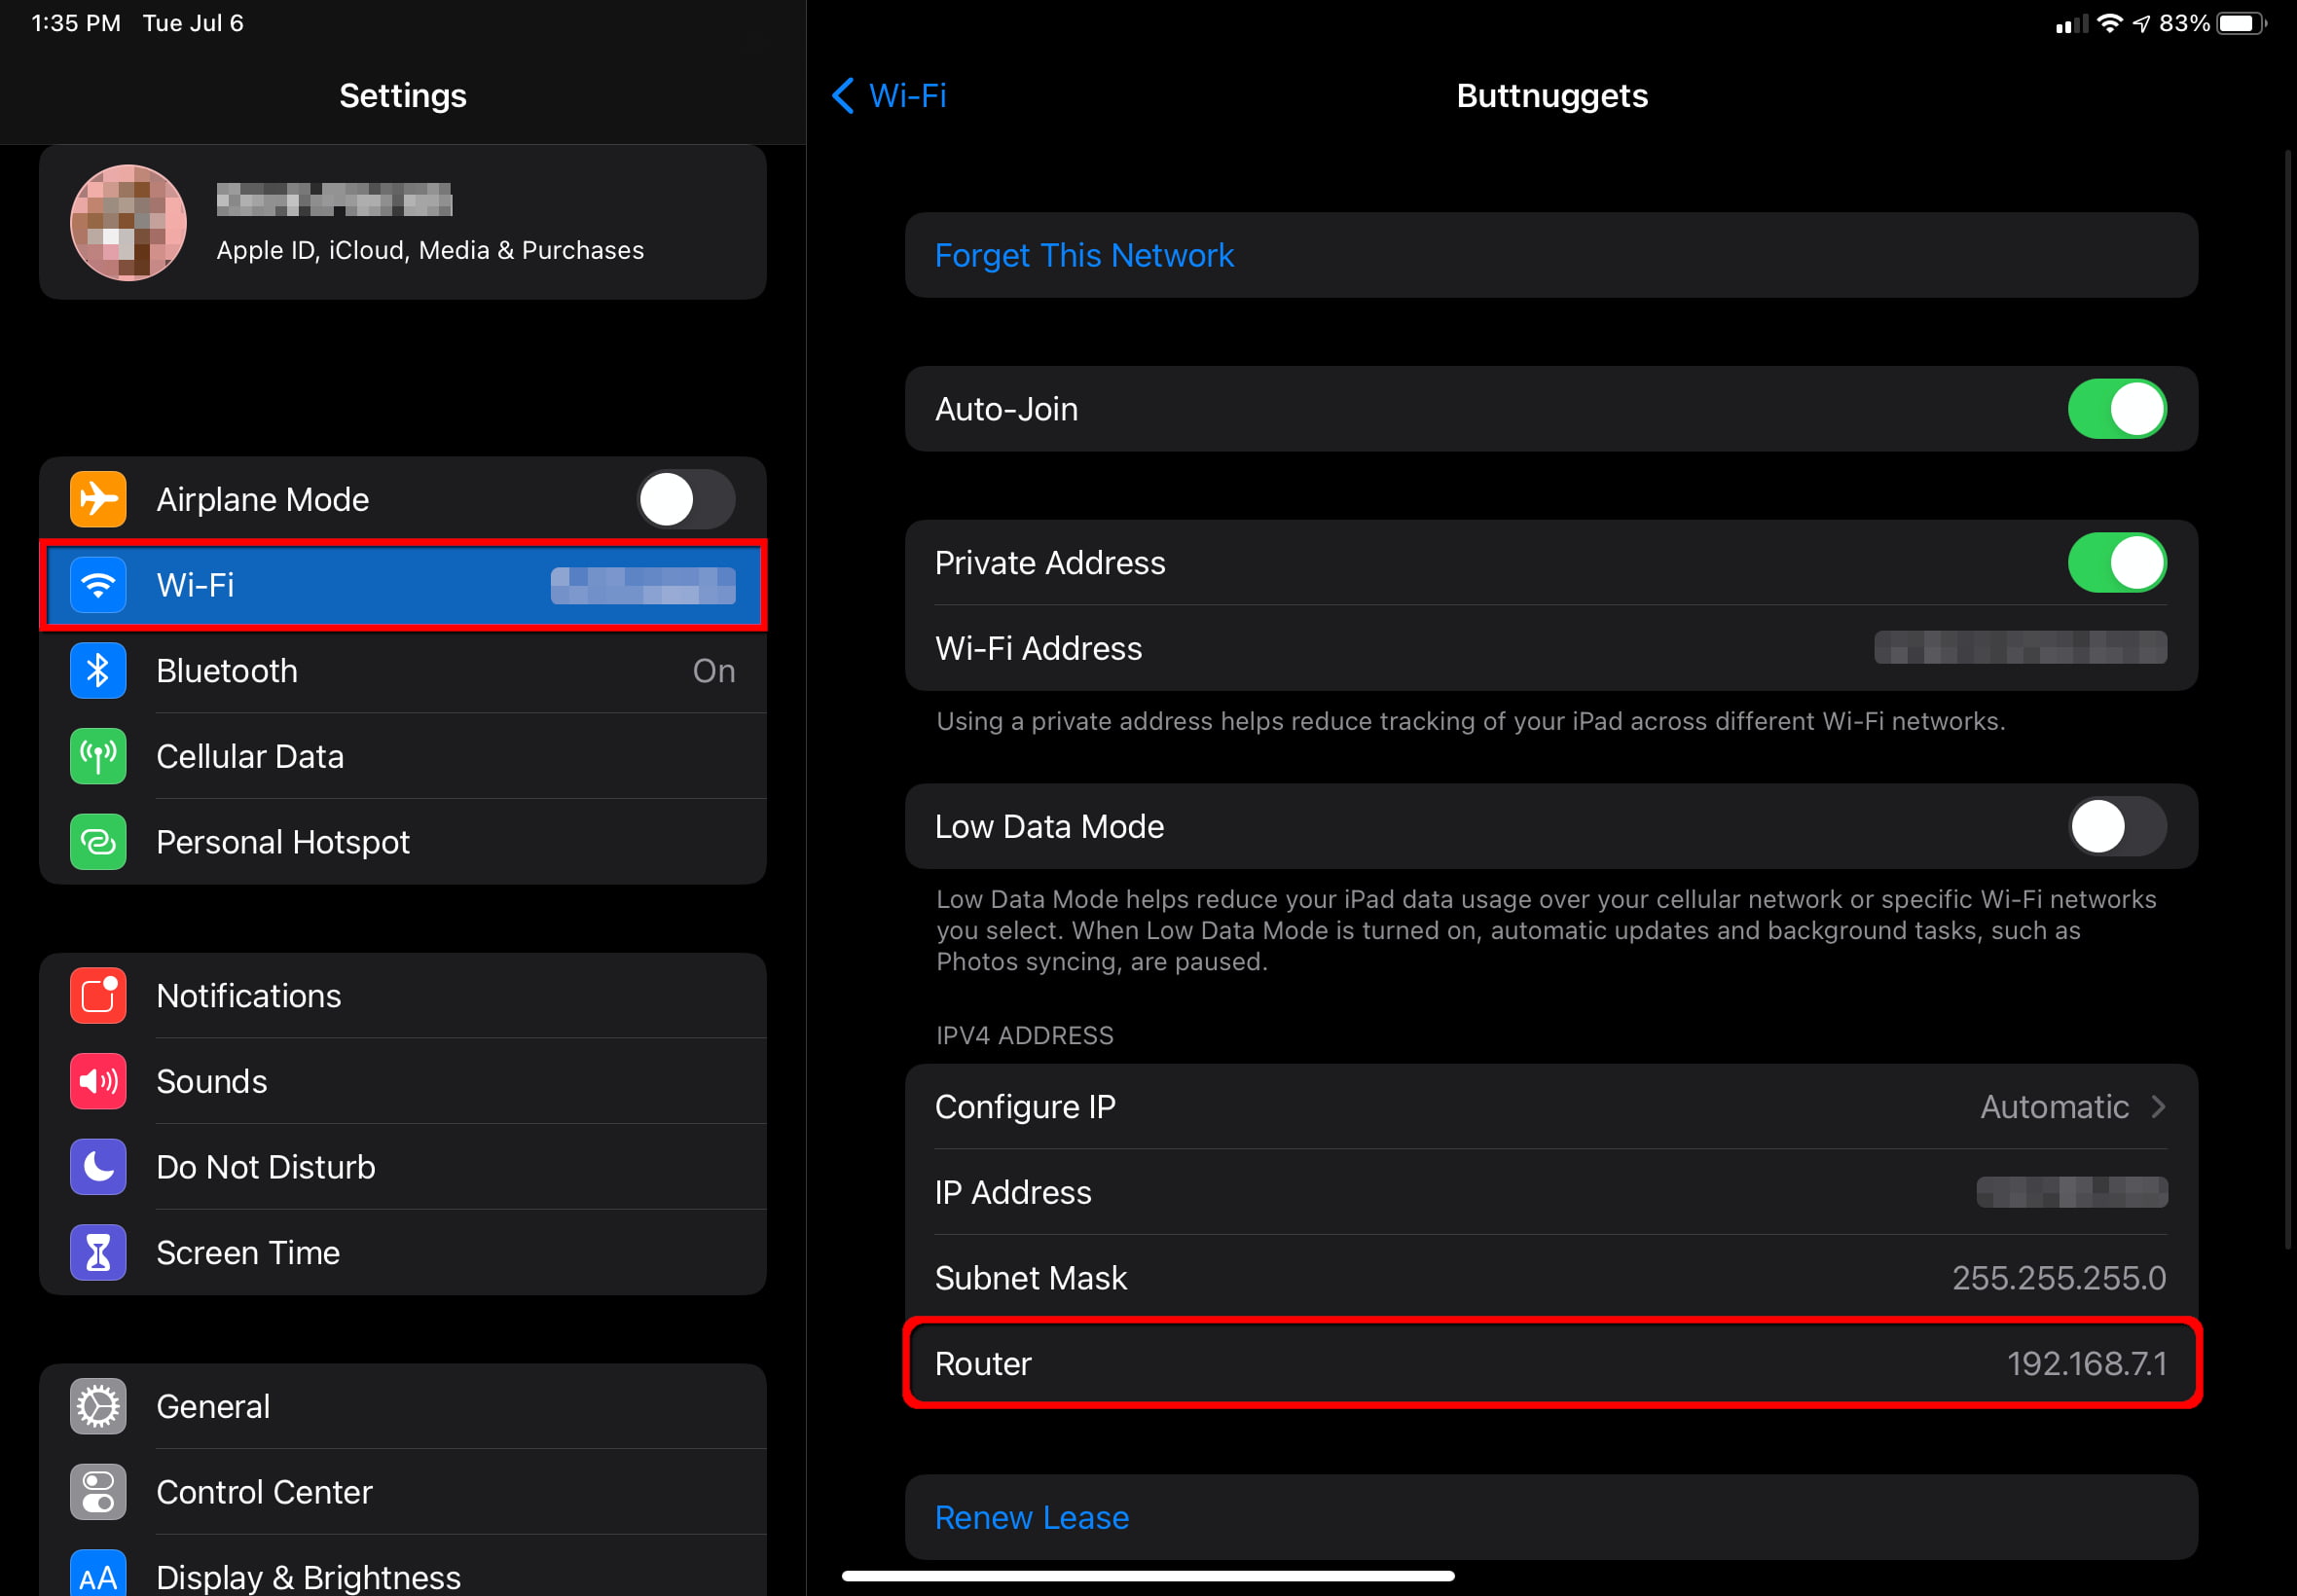
1. Accessing the Router’s Settings: To begin, you need to access your router’s administration interface. Open a web browser and enter the router’s IP address in the address bar. The default IP address is often printed on the router or mentioned in the user manual. Alternatively, you can try using “192.168.0.1” or “192.168.1.1” as common default IP addresses for routers.
2. Logging In: After entering the router’s IP address, you will be prompted to log in to the router’s settings. Enter the administrator username and password. If you have never changed these credentials, you can find the default login details in the router’s user manual or online documentation provided by the manufacturer.
3. Locating Wireless Settings: Once logged in, navigate to the wireless settings or Wi-Fi settings section. The exact location of these settings may vary depending on the router’s interface, but it is typically easily accessible from the main dashboard or menu.
4. Changing the SSID: Look for the field or option where you can modify the SSID. It is usually labeled as “Network Name,” “SSID,” or something similar. Enter the new SSID of your choice. Take note of any character limitations or restrictions mentioned in the router’s settings.
5. Applying the Changes: After setting the new SSID, save or apply the changes. The router will typically prompt you to confirm the changes before proceeding. Once confirmed, the router will restart or refresh the network settings, and the new SSID will take effect.
6. Reconnecting Devices: After the router’s settings have been updated and the SSID has been changed, you will need to reconnect your devices to the network using the new SSID. On each device, search for available networks, locate the newly named SSID, and select it. Enter the Wi-Fi password if prompted, and the device should connect to the network.
7. Verifying Connectivity: Once you have reconnected all devices to the new SSID, verify that they are successfully connected to the network and can access the internet. Test the connectivity on multiple devices to ensure that everything is functioning as expected.
It’s important to note that the steps provided above are a general guideline, and the exact process may vary depending on your specific router model and firmware. If you encounter any difficulties or have specific questions about configuring your router’s settings, refer to the manufacturer’s documentation or seek assistance from their support channels.
With a new SSID properly configured, you can enjoy your personalized network while maintaining a secure and well-functioning connection.
Accessing the Router’s Settings
In order to change the default SSID of your wireless router, you need to access the router’s settings through a web-based administration interface. This interface allows you to configure various aspects of your router’s operation, including the SSID. Here is a general guide on how to access the router’s settings:
1. Determine the Router’s IP Address: The first step is to identify the IP address of your router. This information is necessary to access the router’s settings. The default IP address is often printed on the router itself or can be found in the user manual. Common default IP addresses for routers are “192.168.0.1” or “192.168.1.1”.
2. Open a Web Browser: Once you have identified the router’s IP address, open a web browser on a device that is connected to the same network as the router. This device can be a computer, laptop, or even a smartphone or tablet.
3. Enter the Router’s IP Address: In the address bar of the web browser, enter the router’s IP address. Make sure to type it correctly, including the dots between the numbers. Press Enter or click Go to proceed.
4. Login to the Router’s Settings: After entering the router’s IP address, you will be directed to a login page. Here, you need to enter the administrator username and password to access the router’s settings. If you have never changed the login credentials, refer to the router’s manual or check the manufacturer’s website for the default username and password. It is highly recommended to change the default login credentials for better security.
5. Navigate to the Wireless Settings: Once logged in, you will be presented with the router’s administration interface. The exact layout and options may vary depending on the make and model of your router. Look for a section related to wireless settings or Wi-Fi settings. It may be labeled as “Wireless,” “Wi-Fi,” or something similar.
6. Access the SSID Configuration: Within the wireless settings section, you will find options to modify the SSID. Look for a text field or input box labeled “SSID” or “Network Name.” Click on it to enter a new name for your network. Some routers may also have additional settings for customizing the SSID, such as enabling or disabling broadcasting, specifying a wireless mode, or adjusting transmission power. Explore these options as needed.
7. Save the Changes: After entering the new SSID or making any desired adjustments, locate the save or apply button. Click on it to save the changes and apply the new settings. The router may take a few seconds to save the changes and may restart or refresh the wireless network during this process. Avoid interrupting the router’s operation until the changes are fully applied.
8. Reconnect to the Network: Once the router has saved the changes and restarted, you will need to reconnect any devices that were previously connected to the old SSID. Search for available Wi-Fi networks on each device, locate the new SSID, and select it. If prompted, enter the Wi-Fi password to establish the connection. Repeat this process for all devices that need to connect to the network.
It’s important to note that the steps provided above are general guidelines. The exact process of accessing the router’s settings may vary depending on the router’s manufacturer, model, and firmware version. If you encounter any difficulties or confusion, refer to the router’s manual or contact the manufacturer’s support for specific instructions pertaining to your router.
By following these steps, you will be able to access the router’s settings and make changes to the SSID, allowing you to personalize your wireless network and enhance its security and identification.
Changing the SSID
Once you have accessed the router’s settings, you can change the default SSID to a custom name of your choice. The SSID is the name that will be displayed when users search for available wireless networks. Here is a step-by-step guide on how to change the SSID:
1. Locate the SSID Field: Within the wireless settings section of the router’s administration interface, look for a text field or input box labeled “SSID” or “Network Name.” This is where you can enter the new name for your network.
2. Enter the New SSID: Click on the SSID field and type in the desired name for your wireless network. Be creative and choose a name that is meaningful, memorable, and reflective of your personal preference or the purpose of the network. Ensure that the name adheres to any character limitations or restrictions mentioned in the router’s settings.
3. Save the Changes: After entering the new SSID, find the save or apply button in the router’s settings interface. Click on it to save the changes and apply the new SSID. The router may take a few seconds to save the changes and restart or refresh the wireless network. Allow the router to complete this process uninterrupted.
4. Reconnect to the Network: Once the router has saved the changes and restarted, you will need to reconnect your devices to the network using the new SSID. On each device, search for available Wi-Fi networks and locate the newly named SSID. Select it and enter the Wi-Fi password if prompted. The device should then establish a connection to the new network.
5. Verify the SSID Change: After reconnecting your devices, verify that they are successfully connected to the network with the updated SSID. Test the internet connectivity on multiple devices to ensure that everything is functioning as expected.
It’s important to note that the process of changing the SSID may differ slightly depending on the make and model of your router. Some routers may have additional settings related to the SSID, such as enabling or disabling broadcasting, specifying security protocols, or adjusting transmission power. Explore these options as necessary, while keeping in mind the desired balance of security and convenience.
Remember to keep a record of the new SSID and its corresponding passwords for future reference. Additionally, if you share your network with others, inform them of the new SSID so they can update their devices accordingly.
By following these steps, you can easily change the default SSID of your wireless router to a customized name that adds a personal touch to your network while maintaining a secure and well-functioning connection.
Additional Router Settings to Consider
When changing the SSID of your wireless router, it’s a great opportunity to review and update other essential settings that contribute to the overall security and performance of your network. Here are some additional router settings to consider:
1. Login Credentials: Changing the default username and password used to access the router’s settings is essential for maintaining the security of your network. Create a strong, unique password that combines letters, numbers, and special characters to protect against unauthorized access.
2. Network Encryption: Ensure that your router is using the latest encryption protocol, such as WPA2 or WPA3, to secure your wireless network. Choose a strong, complex passphrase that is difficult to guess to further enhance security. Avoid using personal information in your passphrase.
3. Firmware Updates: Check for and install the latest firmware updates for your router. These updates often include important bug fixes, security patches, and performance enhancements. Regularly updating your router’s firmware minimizes the risk of potential vulnerabilities being exploited.
4. MAC Filtering: MAC filtering allows you to control which devices can connect to your network by specifying their unique MAC addresses. Consider enabling MAC filtering and configuring a whitelist of devices that are allowed to connect to your network. This provides an extra layer of security by blocking unauthorized devices from accessing your network.
5. Guest Network: If you frequently have guests or visitors who require internet access, consider setting up a separate guest network. This network provides a designated and isolated connection for guests, keeping your main network more secure. Enable a unique SSID and password for the guest network, and ensure that it has limited access to your local network resources.
6. Quality of Service (QoS): QoS settings allow you to prioritize certain types of network traffic to optimize performance. Consider configuring QoS to prioritize bandwidth for activities such as streaming, gaming, or video conferencing, ensuring smooth and uninterrupted connectivity for critical applications.
7. Firewall Settings: Review and customize the firewall settings of your router to block potentially malicious incoming traffic and protect your network from external threats. Configure the firewall to allow only the necessary network services and block others to improve security.
8. DNS Settings: Consider modifying the router’s DNS settings to use a reliable and secure DNS provider. This can enhance network performance, improve browsing speeds, and provide additional security against phishing or malware attacks.
It’s important to note that these additional router settings may vary depending on the make and model of your router. Consult your router’s user manual or the manufacturer’s website for detailed instructions specific to your device.
By reviewing and optimizing these additional settings alongside changing the SSID, you can bolster the security, performance, and overall functionality of your wireless network.