
Check the Router’s Power Status
Before proceeding with any troubleshooting steps, it’s important to ensure that your Netgear router has a stable power connection. This will help eliminate any power-related issues that may be causing connectivity problems.
To check the power status of your router, follow these steps:
- Locate the power cord connected to your router and verify that it is securely plugged into a power outlet.
- Check if the power LED on the router is illuminated. In most Netgear routers, this LED is typically located on the front panel and is labeled “Power”.
- If the power LED is not lit, try plugging the router into a different power outlet. Ensure that the power outlet is working properly by testing it with another electrical device.
- If the power LED still does not light up, try using a different power cord or adapter (if available) to rule out any issues with the current power supply.
- Wait for a few seconds to see if the power LED turns on. If it doesn’t, there may be a hardware issue with your router that requires further assistance.
By checking the power status of your Netgear router, you can ensure that it is receiving the necessary power supply to function properly. If the power LED is not illuminated or if it continues to flicker, it may indicate a power-related problem that needs to be addressed.
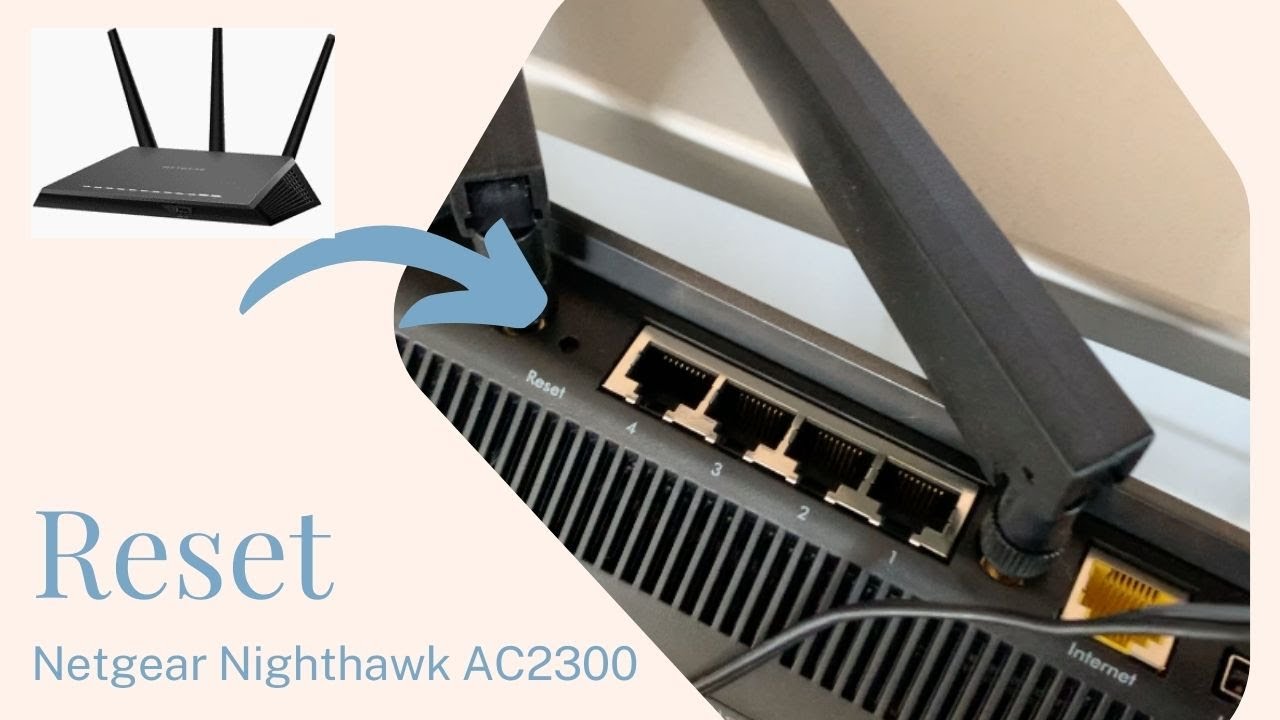
Locate the Reset Button
The reset button on your Netgear router is a small, recessed button that is typically located on the back or bottom panel of the device. This button allows you to reset the router to its factory default settings, which can help resolve various issues such as forgotten passwords or network connectivity problems.
To locate the reset button on your Netgear router, follow these steps:
- Take a close look at the back or bottom panel of your Netgear router. You will see a small hole labeled “Reset” or a button with the word “Reset” near it.
- Using a pointed object like a paperclip or pen, gently press and hold the reset button for about 10 seconds.
- You may notice the router’s lights flicker or turn off briefly as the reset process takes place.
- Release the reset button after 10 seconds.
It’s important to note that performing a reset will erase all customized settings on the router, including Wi-Fi network names, passwords, and any other personalized configurations. Therefore, it is advised to record any important settings before proceeding with the reset.
The location of the reset button may vary depending on the model of your Netgear router. If you are unable to locate the reset button using the instructions above, refer to your router’s user manual for specific guidance.
Once you have located the reset button, you are ready to proceed with either a soft reset or a hard reset, depending on the extent of the issues you are experiencing with your Netgear router.
Perform a Soft Reset
A soft reset is a simple and quick way to troubleshoot minor issues with your Netgear router. This method is recommended if you are experiencing intermittent connectivity problems or if your router is not responding as expected.
To perform a soft reset on your Netgear router, follow these steps:
- Ensure that your router is powered on and connected to a stable power source.
- Locate the reset button on the back or bottom panel of your router.
- Using a pointed object like a paperclip or pen, gently press and hold the reset button for about 10 seconds.
- Release the reset button after 10 seconds.
- Wait for the router’s lights to stabilize. This may take a few minutes as the router restarts.
During the soft reset process, the router will retain your personalized settings, such as your Wi-Fi network name and password. However, it will refresh its internal system and may resolve any temporary issues that were affecting its performance.
After the soft reset is complete, check if your connectivity issues have been resolved. If not, you may need to perform a more extensive hard reset to restore your router to its factory default settings.
Remember to reconnect any devices that were previously connected to your network after the router has restarted. If necessary, you may also need to reconfigure any specific settings that were previously customized on your router.
Performing a soft reset is a simple yet effective troubleshooting method that can often resolve minor problems with your Netgear router. Give it a try before proceeding to more advanced troubleshooting steps.
Perform a Hard Reset
If you are experiencing persistent issues with your Netgear router that cannot be resolved through a soft reset, performing a hard reset is the next step. This process will restore your router to its factory default settings, effectively erasing all personalized configurations.
To perform a hard reset on your Netgear router, follow these steps:
- Ensure that your router is powered on and connected to a stable power source.
- Locate the reset button on the back or bottom panel of your router.
- Using a pointed object like a paperclip or pen, press and hold the reset button for approximately 20 seconds.
- Continue holding the reset button even if the router’s lights flicker or turn off momentarily.
- After 20 seconds, release the reset button.
Once the hard reset process is complete, your router will restart and return to its original factory settings. This means that any personalized configurations, including Wi-Fi network names, passwords, and custom settings, will be erased.
After the hard reset, you can set up your Netgear router from scratch. Follow the manufacturer’s instructions to configure your network settings, establish a new Wi-Fi network name and password, and apply any other desired customizations.
Performing a hard reset should be considered a last resort when all other troubleshooting methods have failed. It is advisable to document any important settings or configurations before proceeding with the hard reset, as you will need to manually reconfigure them afterwards.
Remember that a hard reset will completely erase all personalized settings on your router. Only perform this reset if you are certain that it is necessary to resolve your connectivity issues or other router-related problems.
Wait for the Router to Reboot
After performing a soft reset or a hard reset on your Netgear router, it is crucial to allow sufficient time for the router to reboot. This process ensures that the changes you made during the reset are applied and the router’s internal system is fully restored.
Here are a few things to keep in mind as you wait for the router to reboot:
- When you perform a reset, the router’s lights may flicker or turn off temporarily. This is normal as the reset process is taking place.
- The duration of the reboot may vary depending on your router model and the complexity of the previous settings. Typically, it takes a couple of minutes for the router to fully reboot.
- During the reboot, avoid any actions that may interrupt the process, such as unplugging the router or pressing the reset button again.
- Monitor the router’s lights to see if they stabilize. Once the lights remain steady or return to their normal state, it indicates that the router has successfully rebooted.
While waiting for the router to reboot, you can take this time to perform additional troubleshooting steps or prepare for the next steps in the process, such as accessing the router’s configuration page.
If, after waiting for a reasonable amount of time, the router does not seem to have completed the reboot process, you may want to double-check the power connection and repeat the reset procedure.
By allowing the router sufficient time to reboot, you ensure that the reset has taken effect and that the router is ready for the next steps. Patience is key during this phase, as rushing or interrupting the reboot process can cause further issues.
Access the Router’s Configuration Page
Once your Netgear router has successfully rebooted after a soft or hard reset, you can access its configuration page to customize settings and further troubleshoot any remaining issues. The router’s configuration page, also known as the administration interface, allows you to manage various aspects of your router’s functionality.
Here’s how you can access the router’s configuration page:
- Ensure that your computer or device is connected to the same network as the Netgear router. You can connect either via an Ethernet cable or through a Wi-Fi connection to access the router’s configuration page.
- Open a web browser on your computer or device. Commonly used web browsers, such as Google Chrome, Mozilla Firefox, or Microsoft Edge, are suitable for this purpose.
- In the address bar of the web browser, type the default IP address of your Netgear router. The default IP address is often “192.168.1.1” or “192.168.0.1.” If you’re unsure of the default IP address, refer to your router’s documentation or check the manufacturer’s website for the specific model.
- Hit the enter key or press the “Go” button in the web browser to proceed.
- A login page will appear, prompting you to enter your router’s username and password. The default login credentials can typically be found on the router’s label or in the user manual. If you have changed the login credentials in the past and can’t remember them, you may need to perform a hard reset to restore the default username and password.
- Once you have entered the correct login credentials, click on the “Login” or “Submit” button.
After successfully logging in, you will have access to the router’s configuration page. From here, you can customize settings such as network name and password, parental controls, port forwarding, wireless channels, and much more depending on the capabilities of your specific Netgear router.
Exploring and adjusting these settings can help optimize your network’s performance and resolve any remaining issues you may be experiencing. Take care when making changes to avoid unintended consequences. If you are unsure about specific settings, it is recommended to consult the router’s documentation or seek assistance from Netgear’s support resources.
Remember to save any changes you make on the router’s configuration page to ensure they are applied and take effect on your network.
Update Firmware and Network Settings
Updating the firmware and network settings on your Netgear router is crucial for maintaining optimal performance and security. Firmware updates often include bug fixes, stability improvements, and new features, while network settings adjustments can help enhance your network’s compatibility and speed.
Here’s how you can update the firmware and network settings on your Netgear router:
- Access the router’s configuration page by following the steps outlined in the previous section.
- Once logged in, navigate to the “Administration” or “Advanced” section of the configuration page. The exact location of these settings may vary depending on your router model.
- Look for the “Firmware Update” or “Router Update” option. Click on it to check for any available firmware updates.
- If an update is available, follow the on-screen prompts to download and install the latest firmware version. This process may take a few minutes, and it is crucial not to interrupt it to avoid causing any issues.
- After the firmware update is complete, restart your router to ensure that the changes take effect.
- Once your router has rebooted, return to the configuration page and navigate to the network settings section.
- Review the current network settings and consider making adjustments based on your specific needs. This may include modifying the network name (SSID), changing the Wi-Fi password, enabling or disabling guest networks, or adjusting other related settings.
- Save any changes you make in the network settings section and wait for the router to apply the modifications.
Regularly updating the firmware and adjusting network settings on your Netgear router helps ensure that you are benefiting from the latest enhancements and security measures. It is recommended to check for firmware updates periodically to stay up to date with the latest advancements.
Remember to keep the router’s firmware and network settings updated to maintain a stable and secure network environment. By doing so, you can optimize your router’s performance and enjoy a reliable internet connection.