
What are Apple Mail Rules?
Apple Mail rules are a powerful feature of the Apple Mail application that allow users to automate and organize their email. With rules, you can set up specific conditions and actions, allowing your email to be sorted and handled automatically according to your preferences. This saves you time and effort, as you no longer need to manually perform repetitive tasks.
When a new email arrives in your inbox, Apple Mail rules can be configured to perform various actions. These actions can include moving the email to a specific mailbox, deleting it, marking it as read or flagged, forwarding it to another recipient, or applying specific formatting to the message. Apple Mail rules provide a customizable and flexible way to manage your email workflow.
By creating and setting up rules, you can prioritize and filter your incoming messages based on criteria such as sender, subject, keywords, recipients, or attachments. This allows you to automatically handle different types of emails in specific ways. For example, you can create a rule that moves all emails sent by a particular client to a designated folder or automatically forwards emails containing specific keywords to another team member.
Moreover, Apple Mail rules are not restricted to manual triggers. You can also set up rules that are triggered by events such as receiving an email or sending a message. This opens up a vast array of possibilities for automating your email management process and ensuring that your inbox remains organized and clutter-free.
It is worth noting that Apple Mail rules are specific to the Apple Mail application and are not transferable to other email clients. Therefore, if you switch to a different email client in the future, you may need to recreate your rules using the available features in that client.
Why Use Apple Mail Rules?
Apple Mail rules offer several benefits that can greatly improve your email management experience. Here are some compelling reasons why you should consider using Apple Mail rules:
1. Time-saving automation: By setting up rules, you can automate repetitive tasks associated with email management. Instead of manually organizing or deleting emails, rules can perform these actions automatically based on your specified criteria. This frees up valuable time for you to focus on more important tasks.
2. Streamlined inbox: With the ability to sort and filter incoming emails, Apple Mail rules can help you achieve a clutter-free inbox. By automatically categorizing emails into specific folders or marking them as read, you can quickly locate and prioritize important messages without getting overwhelmed by unnecessary clutter.
3. Improved productivity: By efficiently sorting and organizing your emails, you can stay focused and avoid distractions. Rules allow you to prioritize emails from specific senders, clients, or projects, ensuring that important messages are promptly addressed while less urgent ones can be dealt with later.
4. Customizable email handling: Apple Mail rules give you the flexibility to personalize how your emails are handled. You can specify specific actions for different types of emails based on criteria such as subject, sender, recipient, or keywords. This allows you to tailor your email management to meet your unique needs and preferences.
5. Effective email routing: Rules enable you to automatically forward or redirect emails to the appropriate recipients or team members. This is particularly useful for collaborative projects where certain emails need to be shared with specific individuals or departments. With rules in place, you can ensure that the right people receive the right messages without manual intervention.
6. Enhanced organization: By creating rules to sort and categorize your emails, you can maintain a well-organized mailbox. You can create folders for different clients, projects, or subjects, and have rules automatically move relevant emails into their respective folders. This makes it easier to locate and retrieve specific messages when needed.
7. Consistent email management: By using rules, you can apply consistent actions to incoming emails. This helps in establishing a standardized email management process and ensures that specific actions are taken on emails based on predetermined criteria. This can be particularly useful for adhering to company policies or maintaining a consistent workflow.
8. Flexibility and customization: Apple Mail rules offer a wide range of conditions and actions that can be customized to suit your specific needs. Whether you want to filter emails based on keywords, sender domains, or attachment types, you have the flexibility to create rules that align with your desired email management strategy.
Overall, Apple Mail rules provide a powerful toolset for automating and effectively managing your email. By leveraging this feature, you can save time, boost productivity, and maintain a well-organized inbox, ultimately enhancing your overall email management experience.
How to Access Apple Mail Rules?
Accessing Apple Mail rules is a straightforward process that can be done within the Apple Mail application. Follow the steps below to access and manage your rules:
1. Open Apple Mail: Launch the Apple Mail application on your Mac computer. Ensure that you are logged into your email account.
2. Navigate to the Preferences: In the top menu bar, click on “Mail” and select “Preferences” from the drop-down menu. Alternatively, you can use the keyboard shortcut “Command + ,” to open the Preferences window.
3. Open Rules: In the Preferences window, click on the “Rules” tab. This will open the Rules section, where you can view, create, edit, and manage your Apple Mail rules.
4. View Existing Rules: Here, you will see a list of your existing rules, if any. You can select a rule to view its conditions and actions. You can also rearrange the order of rules by dragging and dropping them in the list.
5. Create New Rules: To create a new rule, click on the “+” (plus) button located below the list of rules. This will open the Rule Edit window, where you can specify the conditions and actions for the new rule.
6. Edit or Delete Rules: To edit an existing rule, select it from the list and click on the “-” (minus) button. This will open the Rule Edit window, where you can modify the conditions and actions. To delete a rule, select it from the list and click on the “-” (minus) button.
7. Prioritize Rules: You can prioritize rules by rearranging them in the list. The topmost rule will be evaluated first, followed by the subsequent rules. To prioritize a rule, select it from the list and click on the up or down arrow buttons.
8. Apply Changes: After making any modifications to your rules, be sure to click on the “OK” button to save your changes and apply them to your Apple Mail settings.
By accessing the Apple Mail preferences and navigating to the Rules section, you can easily create, edit, and manage your rules. It’s important to regularly review and optimize your rules to ensure they align with your evolving email management needs.
Basic Rule Set Up
Setting up basic rules in Apple Mail allows you to automate the handling of your email based on specific conditions and actions. Here is a simple guide to help you set up basic rules in Apple Mail:
1. Open Apple Mail: Launch the Apple Mail application on your Mac computer and ensure you are logged into your email account.
2. Access Rules: Click on “Mail” in the top menu bar and select “Preferences” from the drop-down menu. In the Preferences window, click on the “Rules” tab.
3. Create a New Rule: To create a new rule, click on the “+” (plus) button below the list of existing rules. This will open the Rule Edit window.
4. Set the Conditions: In the Rule Edit window, define the conditions that the email must meet for the rule to be applied. For example, you can specify conditions such as sender, subject, body content, or whether the email has attachments.
5. Choose an Action: Once the conditions are set, choose the action you want the rule to perform on matching emails. Actions can include moving the email to a specific mailbox, deleting it, marking it as read or flagged, forwarding it to another recipient, or applying specific formatting.
6. Customize the Rule: Modify additional options to tailor the rule to your requirements. You can choose whether the rule applies to incoming or outgoing messages, whether it applies to all or any conditions, and whether subsequent rules should be evaluated after this rule.
7. Apply the Rule: Click on the “OK” button to save the rule and apply it to your Apple Mail settings. The rule will now be active and applied to incoming or outgoing emails that meet the specified conditions.
8. Test the Rule: Send or receive an email that matches the conditions of the rule to verify its functionality. Make any necessary adjustments to the rule in the Preferences window if the desired outcomes are not achieved.
9. Review and Modify: Regularly review and modify your rules as your email management needs evolve. Delete unnecessary rules and update existing ones to ensure they continue to meet your requirements.
By following these steps, you can easily set up basic rules in Apple Mail to automate the handling of your email. Basic rules provide a foundation for more advanced rule configurations, allowing you to efficiently manage your inbox and enhance your email organization.
Setting Up Rule Conditions
Setting up rule conditions in Apple Mail allows you to specify the criteria that an email must meet for the rule to be applied. By defining precise conditions, you can ensure that the rule is triggered only for emails that match your specified criteria. Here are the steps to setting up rule conditions in Apple Mail:
1. Open Apple Mail: Launch the Apple Mail application on your Mac computer and ensure you are logged into your email account.
2. Navigate to Rules: Click on “Mail” in the top menu bar and select “Preferences” from the drop-down menu. In the Preferences window, click on the “Rules” tab to access the rule settings.
3. Create or Select a Rule: To create a new rule, click on the “+” (plus) button below the list of existing rules. Alternatively, select an existing rule from the list that you want to modify.
4. Define the Conditions: In the Rule Edit window, click on the drop-down menu beside “If any” or “If all” to specify the logic for evaluating multiple conditions. Selecting “If any” means that the rule will be triggered if any one of the conditions is met, while selecting “If all” means that the rule will only be triggered if all conditions are met.
5. Add Conditions: Click on the “Add Condition” button to specify the criteria for triggering the rule. A dialog box will open, allowing you to choose from a range of condition options. These options include criteria such as sender, subject, body content, recipients, account, attachments, and more.
6. Customize Conditions: Depending on the condition you select, you will be provided with additional customization options. For example, if you choose the “Sender” condition, you can specify a specific email address, domain, or group of senders. If you choose the “Subject” condition, you can enter specific keywords or phrases to match.
7. Add More Conditions: To add multiple conditions, click on the “Add Condition” button again and repeat the process. Each additional condition can refine the trigger criteria for the rule further.
8. Reorder or Delete Conditions: To adjust the order in which conditions are evaluated, use the up or down arrows beside each condition. To delete a condition, click on the “-” (minus) button beside it.
9. Apply the Conditions: Once you have defined all the desired conditions, click on the “OK” button to save the rule and apply the conditions to your Apple Mail settings.
By setting up rule conditions in Apple Mail, you can create precise criteria for triggering rules based on sender, subject, content, recipients, and more. This allows you to automate email management tasks based on specific conditions, streamlining your workflow and improving your email organization.
Setting Up Rule Actions
Setting up rule actions in Apple Mail allows you to define the actions that should be performed when an email meets the specified conditions. By specifying precise actions, you can automate email management tasks and streamline your workflow. Here’s a step-by-step guide to setting up rule actions in Apple Mail:
1. Open Apple Mail: Launch the Apple Mail application on your Mac computer and ensure you are logged into your email account.
2. Access Rules: Click on “Mail” in the top menu bar and select “Preferences” from the drop-down menu. In the Preferences window, click on the “Rules” tab.
3. Create or Select a Rule: To create a new rule, click on the “+” (plus) button below the list of existing rules. Alternatively, select an existing rule from the list that you want to modify.
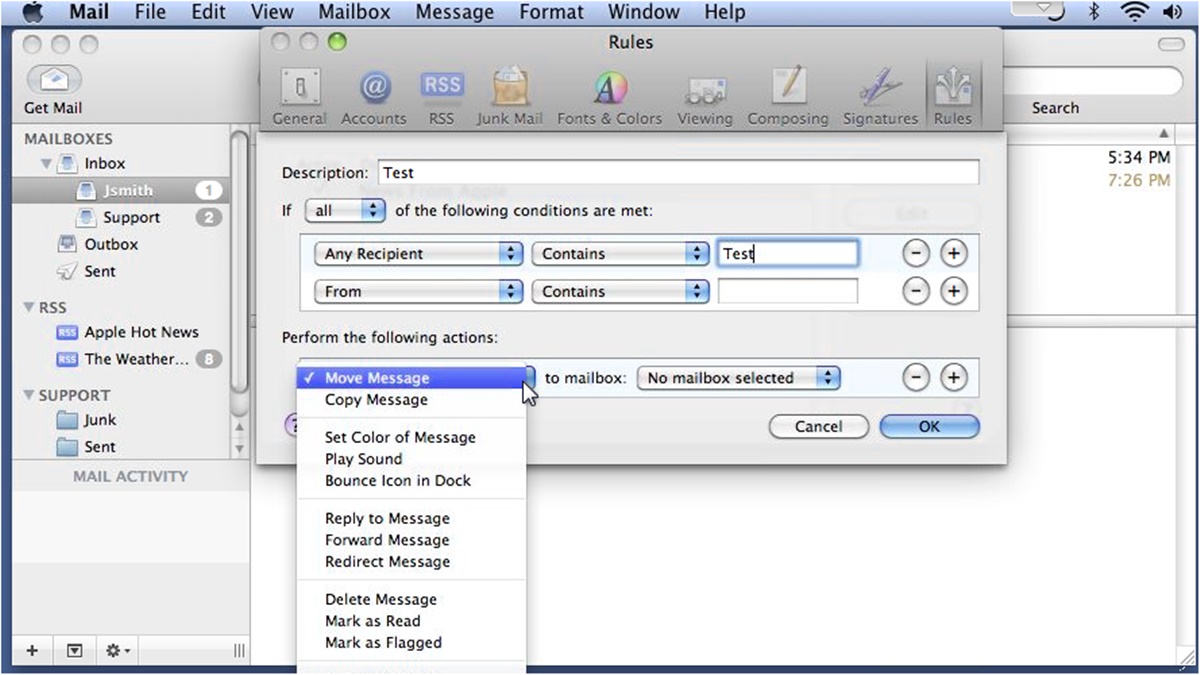
4. Set the Actions: In the Rule Edit window, click on the drop-down menu next to “Perform the following actions” to view the available actions you can apply to the email.
5. Choose an Action: Select the appropriate action from the list that best suits your email management needs. Actions can include moving the email to a specific mailbox, deleting it, marking it as read or flagged, forwarding it to another recipient, or applying specific formatting.
6. Customize the Action: Depending on the action you select, you may have additional options to customize the action. For example, if you choose to move the email to a specific mailbox, you can select the destination mailbox from a list of existing mailboxes or create a new one.
7. Add Multiple Actions: To perform multiple actions for a rule, click on the “+” (plus) button next to the selected action. This allows you to chain together multiple actions, such as moving the email to a specific mailbox and marking it as read.
8. Reorder or Delete Actions: To adjust the order of actions, use the up and down arrows next to each action. To delete an action, click on the “-” (minus) button next to it.
9. Apply the Actions: Once you have set up the desired actions, click on the “OK” button to save the rule and apply the actions to your Apple Mail settings.
By setting up rule actions in Apple Mail, you can automate the handling of incoming and outgoing emails. This allows you to efficiently manage your inbox, improve productivity, and ensure consistent email management practices.
Examples of Rule Set Up
Setting up rules in Apple Mail allows you to automate various email management tasks based on specific conditions. Here are some examples of how you can set up rules to streamline your email workflow:
1. Organizing Emails by Sender: Create a rule that automatically moves emails from specific senders to designated mailboxes. For example, you can set up a rule to move all invoices from a specific vendor to a “Financials” mailbox or all newsletters to a “Newsletters” folder.
2. Filtering Messages by Subject: Set up a rule to automatically mark emails with specific keywords or phrases in the subject line as important or high priority. For instance, you can create a rule that marks any email with the subject “Urgent” as flagged or moves all emails with the subject “Meeting Request” to a “Meetings” mailbox.
3. Categorizing Emails by Recipients: Create a rule that automatically labels emails sent to specific recipients. For example, you can set up a rule that assigns the label “Clients” to all emails sent to clients or assigns the label “Team” to emails sent to your team members.
4. Managing Emails Based on Attachments: Set up a rule to handle emails with attachments differently. For instance, you can create a rule that moves all emails with documents attached to a “Documents” folder or automatically saves attached images to a designated folder.
5. Auto-Forwarding Important Messages: Create a rule to automatically forward emails from a specific sender or with specific keywords to another recipient. For example, you can set up a rule to forward all emails from your manager to your assistant or forward emails containing the keyword “Meeting Notes” to your team members.
6. Archiving Old or Low-Priority Emails: Set up a rule to automatically move older or low-priority emails to archive folders. This helps to keep your inbox clean and organized. For instance, you can create a rule that moves emails older than 30 days to an “Archive” mailbox.
7. Flagging Important Emails: Create a rule to automatically flag important emails based on specific criteria. For example, you can set up a rule to flag emails from your boss or emails sent with high importance.
8. Setting Vacation Auto-Reply: Create a rule that automatically enables or disables your vacation auto-reply based on specified start and end dates. This ensures that your contacts are notified of your absence without the need for manual activation and deactivation.
By utilizing these examples and customizing them according to your specific needs, you can make the most of Apple Mail rules to automate and efficiently manage your email workflow.
Organizing Email with Apple Mail Rules
Organizing your email can be a time-consuming task, especially when dealing with a high volume of messages. Fortunately, Apple Mail rules provide a powerful toolset for automating email organization and streamlining your workflow. Here’s how you can effectively organize your email with Apple Mail rules:
1. Create Specific Mailboxes: Before setting up rules, create specific mailboxes or folders to serve as destinations for organizing your email. For example, you can create folders for different clients, projects, or categories.
2. Identify Key Patterns: Take some time to analyze your email patterns and identify common criteria that can be used as a basis for organizing your messages. This could include sender, subject, keywords, recipients, or attachment types.
3. Create Rules: Access the Rules section in Apple Mail preferences and start creating rules based on the patterns you’ve identified. For each rule, define the conditions that match your desired email criteria.
4. Specify Actions: After setting the conditions, specify the actions that should be performed when an email matches the criteria. These actions can include moving the email to a specific mailbox, marking it as read or flagged, or applying labels or colors.
5. Prioritize Rules: Arrange your rules in order of priority to ensure that emails are processed in the desired sequence. The topmost rule will be evaluated first, followed by subsequent rules.
6. Test and Refine: Send test emails or receive new messages to verify that your rules are working as expected. Make any necessary adjustments to fine-tune or expand your rules based on the outcomes.
7. Regularly Review and Modify: As your email patterns and needs evolve, it’s important to regularly review and modify your rules. Delete unnecessary rules, update existing ones, or create new rules to accommodate changes in your email management requirements.
8. Combine with Folder Hierarchies: Take advantage of Apple Mail’s folder hierarchies to further organize your email. Create subfolders within your main mailboxes to create a more granular level of organization.
9. Utilize Smart Mailboxes: Smart Mailboxes in Apple Mail dynamically organize your email based on specified criteria, such as unread messages, flagged items, or emails from VIP senders. Combine smart mailboxes with rules to automate email organization further.
By effectively utilizing Apple Mail rules, you can save valuable time and maintain a well-organized email inbox. Whether it’s categorizing emails by sender, subject, or recipient, or automatically filing messages into specific folders, rules can significantly enhance your email management experience.
Combining Multiple Rules
Combining multiple rules in Apple Mail allows you to create sophisticated email management workflows by applying different conditions and actions to incoming or outgoing messages. By combining rules, you can achieve more precise and comprehensive automation. Here’s how you can effectively combine multiple rules in Apple Mail:
1. Evaluate Rule Order: Arrange your rules in the preferred order of evaluation. The topmost rule will be evaluated first, followed by subsequent rules. Ensure that the order reflects your desired workflow and avoids conflicts or contradictions between rules.
2. Use “Stop Evaluating Rules” Action: To prevent further rule evaluation after a specific condition is met, add the “Stop Evaluating Rules” action. This is useful when you want to prioritize certain rules and prevent subsequent rules from triggering actions that could override the initial condition.
3. Create Rule Groups: Group related rules together by using the same conditions or actions. This helps organize and manage your rules more efficiently. To create a group, simply arrange the rules in close proximity to each other or use a naming convention to identify the grouped rules.
4. Utilize Different Conditions: Combine different rule conditions to create more targeted automation. For example, you can create one rule that moves emails with specific keywords from a particular sender and another rule that forwards emails from a specific domain. By combining conditions, you can achieve more precise email sorting.
5. Leverage Logical Operators: Use logical operators such as “any” or “all” to control how multiple conditions within a rule are evaluated. The “any” operator triggers the rule if any of the specified conditions are met, while the “all” operator requires all conditions to be met for the rule to trigger.
6. Avoid Rule Redundancy: Check your rules to avoid redundancy. If you have one rule that already handles a specific condition, there is no need to create another rule for the same condition unless you want to apply a different action or modification.
7. Test and Refine: After combining multiple rules, thoroughly test their interactions and outcomes. Send test emails or receive new messages to ensure that the rules work as intended and don’t conflict with each other. Refine or adjust the rules as necessary to achieve the desired automation and organization.
8. Regularly Review and Update: Review your combined rules periodically to ensure they align with your evolving email management needs. As your needs change, modify or create new rules to accommodate the changes and maintain an efficient workflow.
By combining multiple rules in Apple Mail, you can create complex and customized email management workflows. This allows you to achieve highly automated and personalized email organization, saving time and improving productivity.
Managing and Editing Rules
Managing and editing rules in Apple Mail is a crucial aspect of maintaining an efficient email management system. With the ability to modify existing rules and manage their order, you can ensure that your rules continue to align with your changing needs. Here’s how you can effectively manage and edit rules in Apple Mail:
1. Access the Rules Section: Open Apple Mail and click on “Mail” in the top menu bar. Select “Preferences” from the drop-down menu and navigate to the “Rules” tab.
2. View Existing Rules: In the Preferences window’s Rules section, you will see a list of your existing rules. Review these rules to familiarize yourself with their conditions, actions, and order of evaluation.
3. Edit a Rule: To edit a rule, select it from the list and click the “Edit” button. The Rule Edit window will open, allowing you to modify the conditions, actions, or other settings of the selected rule.
4. Adjust Rule Order: Change the order in which rules are evaluated by clicking and dragging them into the desired position within the list. The topmost rule will be evaluated first, followed by subsequent rules.
5. Add a New Rule: To create a new rule, click on the “+” (plus) button located below the list of rules. The Rule Edit window will open, and you can specify the conditions and actions for the new rule.
6. Delete a Rule: To remove a rule, select it from the list and click the “-” (minus) button. Confirm the deletion if prompted. Be cautious when deleting rules, as this will permanently remove their respective conditions and actions.
7. Test and Refine: After making changes to your rules, send test emails or receive new messages to ensure that the modifications produce the desired outcomes. Adjust and refine the rules as necessary to achieve the desired automation and organization.
8. Regularly Review and Update: It’s important to regularly review and update your rules to adapt to changes in your email management needs. As your workflow evolves or new patterns emerge, modify existing rules or create new ones to accommodate the changes.
9. Backup or Export Rules: Consider backing up or exporting your rules to ensure that you have a copy of your configurations. This can be helpful when migrating to a new device or when reinstalling Apple Mail.
By effectively managing and editing rules in Apple Mail, you can maintain an organized and automated email management system. Regularly reviewing, adjusting, and expanding your rules will help optimize your workflow and ensure that your email remains organized and efficient.
Troubleshooting Apple Mail Rules
While Apple Mail rules are generally reliable, you may encounter issues or unexpected behavior from time to time. Troubleshooting these issues can help ensure that your email management remains efficient and effective. Here are some common troubleshooting steps for Apple Mail rules:
1. Check Rule Order: Verify the order in which your rules are evaluated. Rules are processed from top to bottom, so make sure that the desired rule is placed higher in the list than conflicting or overriding rules.
2. Verify Rule Conditions: Double-check the conditions defined in your rules. Ensure that they accurately reflect the criteria you want to apply and that they are not conflicting with each other. Adjust conditions as needed to match the expected email patterns.
3. Review Rule Actions: Examine the actions specified in your rules. Make sure they align with your desired email management outcomes. Adjust actions or add additional actions to ensure that emails are being handled as intended.
4. Test with Sample Emails: Send test emails or use sample messages to evaluate the behavior of your rules. This can help identify any unforeseen conflicts or issues that arise when applying rules to real-life scenarios.
5. Deactivate and Reactivate Rules: Temporarily deactivate rules to identify if a particular rule is causing conflicts or unexpected behavior. Activate them one by one to isolate the problematic rule. This approach can help pinpoint the rule causing the issue.
6. Remove or Edit Duplicate Rules: Be cautious of accidentally creating duplicate rules with similar conditions and actions. Duplicate rules can cause conflicts and unpredictable results. Remove or edit duplicated rules to eliminate any potential problems.
7. Update Apple Mail: Ensure that you are using the latest version of Apple Mail. Software updates often include bug fixes and performance improvements that can resolve issues related to rules and email management.
8. Rebuild Mailboxes: If the application behaves unexpectedly or rules seem to have no effect, it may be necessary to rebuild your mailboxes. This process can help resolve issues related to mailbox corruption or inconsistencies.
9. Reset Apple Mail Preferences: As a last resort, you can reset Apple Mail preferences to their default settings. This action will remove all customized settings, including rules, so it should only be done if other troubleshooting steps do not resolve the issue.
By following these troubleshooting steps, you can address common issues with Apple Mail rules and ensure that your email management system functions smoothly. Remember to regularly review and optimize your rules to adapt to changing needs and maintain efficient email organization.