
Overview
Sending an email with a different “From:” address in Outlook can be a useful feature in various situations. Whether you want to send an email on behalf of someone else, use a generic team or department email address, or simply change the sender name for personalization purposes, this capability can save you a lot of time and effort.
By default, Outlook uses the email address associated with your account as the “From:” address when sending emails. However, with a few simple steps, you can customize the sender name and address to suit your needs.
In this article, we will guide you through the process of sending an email with any “From:” address in Outlook. This method works for both Outlook on the web and the desktop application, allowing you to send emails with a personalized touch.
Whether you’re a business professional, a freelancer, or an individual who wants to streamline their email communication, this feature can help you maintain a professional image and improve the effectiveness of your emails.
While it’s important to note that this feature may not be available for all Outlook account types, most users will have access to the necessary settings to customize the “From:” address.
So, if you’re ready to take control of your emails and send them with a different “From:” address, let’s dive into the step-by-step process of enabling and customizing this feature in Outlook.
Step 1: Enable the Developer tab in Outlook
To begin customizing the “From:” address in Outlook, you need to enable the Developer tab in the application. This tab contains the necessary tools and options to modify the sender details of your emails.
Follow these steps to enable the Developer tab in Outlook:
- Open Outlook and click on the “File” tab located in the upper-left corner of the window.
- From the File menu, click on “Options”.
- A new window titled “Outlook Options” will appear. Here, select “Customize Ribbon” from the options on the left-hand side.
- In the “Customize the Ribbon” section, you’ll find a list of tabs. Check the box for “Developer” to enable it.
- Click “OK” to save the changes and close the Outlook Options window.
With the Developer tab now enabled, you can proceed to the next step to create a new email where you can customize the “From:” address.
Step 2: Create a new email
Once you have enabled the Developer tab in Outlook, you can start creating a new email where you will customize the “From:” address to your desired sender details. Follow these steps:
- Open Outlook and click on the “Home” tab located in the top ribbon of the application.
- From the toolbar, click on the “New Email” button to create a new email.
- A blank email message window will open, ready for you to compose your email.
- In the email window, you will find the “Options” tab in the top ribbon. Click on it to reveal additional settings.
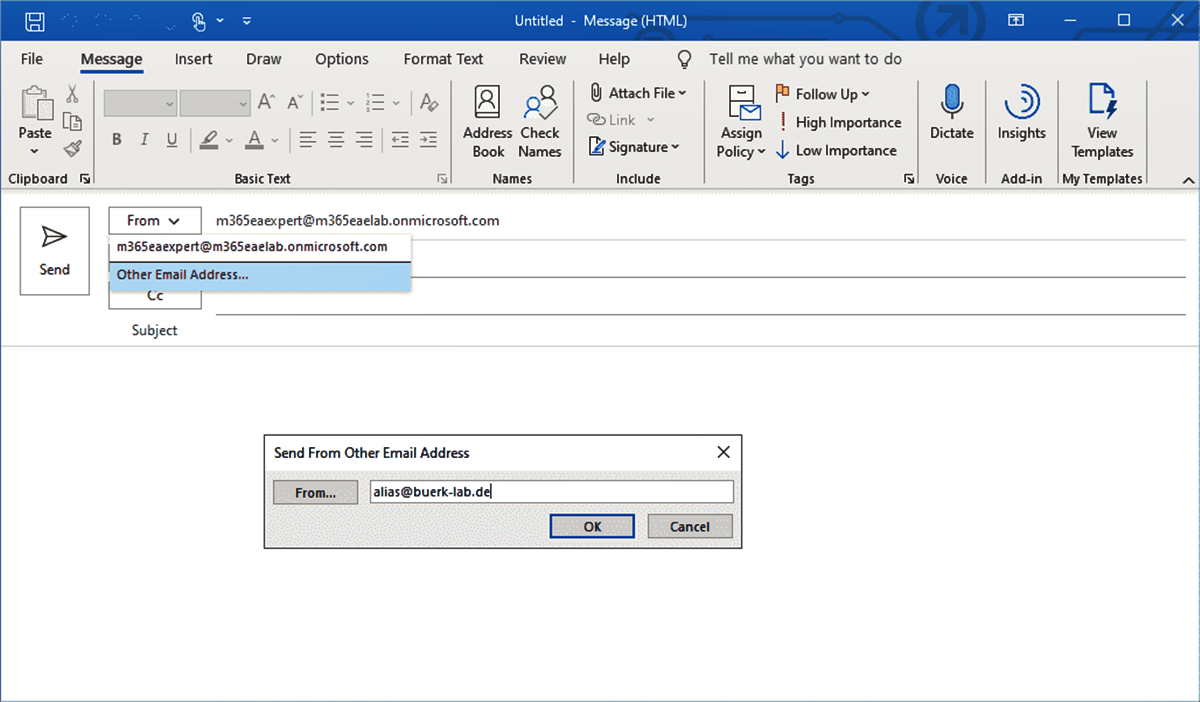
- Under the “Options” tab, you will find a section labeled “Show Fields”. In this section, click on the “From” button.
After clicking the “From” button, a dialog box will appear, allowing you to specify the sender details for the email. Here, you can enter any email address that you have access to. It can be a personal email, a company email, or even a generic department address.
Keep in mind that some email providers may require authentication for using certain email addresses as the “From” address. Make sure you have the necessary credentials or permissions to use the chosen email address.
Once you have entered the desired email address, click “OK” to confirm your selection. The email window will now display the customized “From” address, ready for you to proceed with composing your email.
Now that you have created a new email with the desired sender details, it’s time to move on to the next step and customize the “From” address.
Step 3: Customize the From: address
With a new email created and the desired email address set as the sender, you now have the option to further customize the “From” address. This step involves changing the display name associated with the email address.
- In the email window, locate the field that shows the customized “From” address.
- Click on the email address to activate the editing mode.
- Edit the display name associated with the email address to your preferred name or the name you want recipients to see as the sender.
By editing the display name, you can personalize the sender information even further. For example, if you are using a generic department email address, you can change the display name to reflect the specific team or purpose of the email.
Ensure that the display name you choose aligns with the professional and appropriate tone you want to convey to recipients.
Once you have customized the display name, you can move on to the final step of sending the email with the desired “From” address.
Keep in mind that the actual email address itself should remain unchanged, as altering the actual email address may result in delivery issues or the email being marked as spam.
Now that you have customized the “From” address, you’re ready to send the email with the personalized sender details.
Step 4: Send the email with the desired From: address
After customizing the “From” address and ensuring that the display name is personalized to your liking, it’s time to send the email with the desired sender details. Follow these steps to complete the process:
- Compose your email message, including the subject, body, and any attachments you want to include.
- Review the email content to ensure it is accurate and meets your requirements.
- Before clicking the “Send” button, double-check that the customized “From” address and display name are correct.
- If you need to make any last-minute adjustments to the sender details, you can click on the “Options” tab in the top ribbon and select “From” to modify them.
- Once you are satisfied with the email and the customized “From” address, click the “Send” button to deliver the email to the recipient(s).
By following these steps, you can successfully send an email with a different “From” address in Outlook. The recipient(s) will see the customized “From” details and the personalized display name you specified.
Remember, when using this feature, it’s essential to maintain professionalism and adhere to any relevant email guidelines or company policies. Always ensure that you have the necessary permissions to use the email address you select as the “From” address.
Now that you have sent the email with the desired sender details, you can continue leveraging this feature whenever you need to communicate with various “From” addresses, providing increased flexibility in your email correspondence.
Congratulations! You have successfully customized and sent an email with a different “From” address in Outlook.
Feel free to explore other features and capabilities within Outlook to enhance your email management and communication experience.