
Choose a Calendar Event
When it comes to sending a Google Calendar invite, the first step is to choose the appropriate calendar event. Whether it’s a business meeting, a social gathering, or a personal appointment, selecting the right event will ensure that the invitation is relevant and tailored to the occasion.
Start by accessing your Google Calendar and locating the specific event you want to invite others to. This can be an existing event that you created earlier or a new event that you’re about to set up. Remember to consider the date, time, and purpose of the event to determine if it is appropriate to invite others.
If you’re creating a new event, click on the “+ Create” button or the “+ ” sign on your calendar view. This will open up a new event creation form where you can input all the necessary details for the invitation.
On the other hand, if you’re choosing an existing event, simply click on the event on your calendar to access its details. Once you’ve selected the appropriate event, it’s time to move on to the next step – editing or creating the invitation.
Click on “Edit” or “Create”
After you’ve chosen the calendar event you want to send an invitation for, the next step is to click on the “Edit” or “Create” button to begin customizing your invitation.
If you’re working with an existing event, look for the “Edit” button usually located in the top-right corner of the event details. Clicking on this button will open up the editing interface where you can modify the event’s details and add the guest list.
On the other hand, if you’re creating a new event from scratch, click on the “+ Create” button or the “+ ” sign on your calendar view. This will open a new event creation form where you can enter the necessary information for the invitation.
Once you’ve clicked on “Edit” or “Create,” you’ll be able to access and customize the various fields of the invitation. These fields typically include:
- Title: Provide a concise and descriptive title for your event.
- Date and Time: Specify the date, start time, and end time of the event.
- Location: Enter the physical or virtual location of the event.
- Description: Add a brief description of the event or any important details.
In addition, you may find other customization options such as setting reminders, marking the event as recurring, or attaching any relevant documents or links.
Take your time to fill in all the necessary details accurately. Double-check the information to ensure it is correct and easy to understand for your guests. Once you’re satisfied with your edits or have completed filling out the fields on the event creation form, it’s time to move on to the next step – filling in the guest list.
Fill in the Event Details
When sending a Google Calendar invite, it’s essential to provide thorough and accurate event details to ensure that your guests have all the necessary information. This step involves entering the specific details and options related to your event.
Start by entering the event title, which should be clear and descriptive to give guests an idea of what the event is about. Be concise, yet informative, in order to catch their attention.
Next, input the date and time of the event. Select the appropriate date on the calendar and specify the start and end times. If it’s an all-day event, make sure to toggle the “All-day” option.
Specify the location of the event, whether it’s a physical address or an online platform. If it’s a physical location, you can even include additional details like room number or specific instructions on how to get there.
In the description field, provide additional information about the event. This can include agenda, important instructions, and any special requirements. Make sure to communicate any necessary details to help your guests prepare accordingly.
Furthermore, you may have additional options to customize your event, such as setting reminders, adjusting the privacy settings, or adding attachments. Take advantage of these features to enhance the overall experience for your guests.
Remember, the more detailed and organized your event details are, the better your guests will understand and respond to the invitation. Double-check all the information before moving on to the next step of adding guests.
Add Guests
One of the key steps in sending a Google Calendar invite is to add guests. This allows you to invite specific individuals or groups to your event and enables them to receive all the necessary details and updates.
To add guests, start by entering their email addresses in the designated field. You can add multiple guests by separating their email addresses with commas or adding them one by one. As you type, you may also see suggestions from your contacts or previous invites.
Additionally, you can take advantage of Google Calendar’s integration with your contacts or address book. Simply click on the “Guests” field and select the desired contacts from your list.
Another useful feature is the “Guest permissions” options. You can choose whether guests have the ability to modify, invite others, or see the guest list. Consider the nature of your event and the level of control you want to grant to your guests when selecting these options.
When you add a guest, you can also choose to send them an email notification. This is the default setting and ensures that guests receive an email with all the event details and an option to RSVP. However, if you prefer not to send email notifications, you can uncheck the “Send” box – just keep in mind that your guests might miss the invitation if they don’t regularly check their calendars.
Lastly, remember to review the guest list to ensure that all the intended recipients have been added before proceeding. You can easily add or remove guests as needed.
By adding the appropriate guests to your Google Calendar invite, you ensure that the right people are notified and able to RSVP for your event, fostering better communication and attendance.
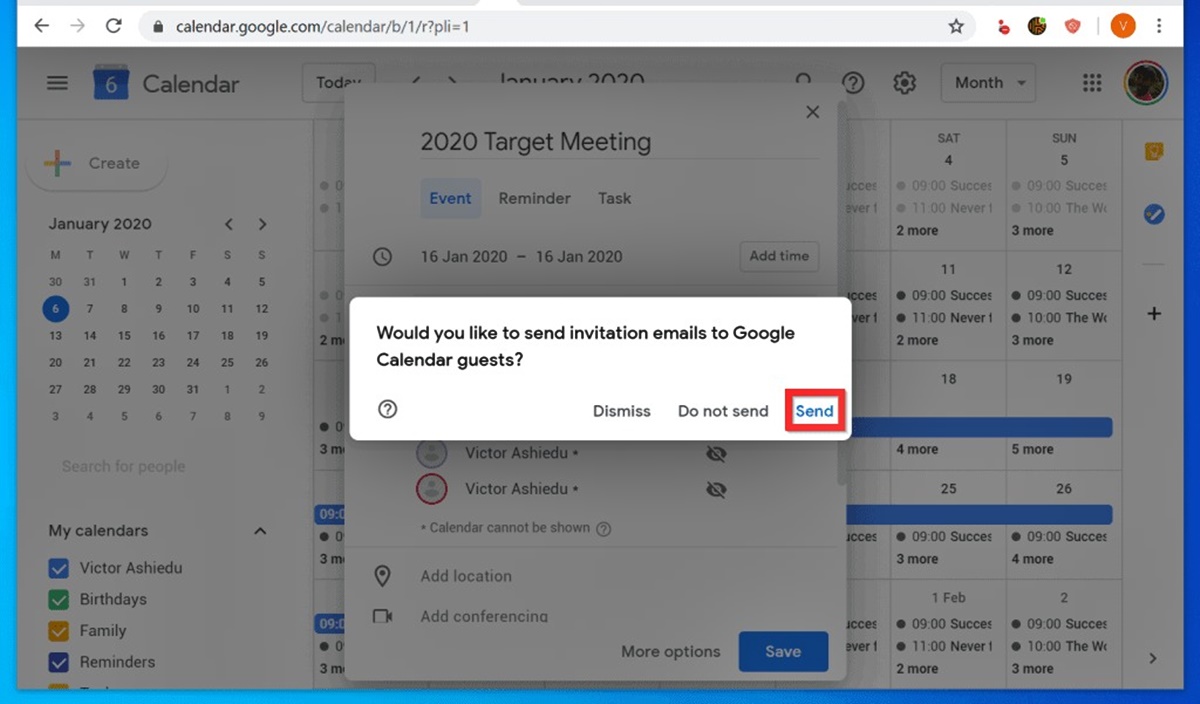
Select the “Save” or “Send” Button
Once you’ve filled in the event details and added the desired guests to your Google Calendar invite, the final step is to select the “Save” or “Send” button. This action will either save the invitation as a draft or send it to the added guests.
If you’re editing an existing event, clicking on the “Save” button will update the event details and save your changes. This is helpful if you’re making modifications to an event that already had guests or if you need to update the event without triggering a new invitation email to the guests.
On the other hand, if you’re creating a new event, clicking on the “Save” button will save the event as a draft. This allows you to review and make any additional adjustments before sending the invitation to the guests.
If you’re ready to send the invitation immediately, click on the “Send” button. This action will send the invitation to all the added guests, along with the event details and an option to RSVP.
Once the invitation is sent, Google Calendar will update the event status accordingly. Guests will receive an email notification with all the event details, and their responses will be tracked within the event on your calendar.
It’s important to note that after sending the invitation, any modifications made to the event details will trigger an update notification to the guests. Therefore, it’s best to finalize and review all the details before selecting the “Send” button.
By selecting the appropriate “Save” or “Send” button, you ensure that your Google Calendar invite is saved or sent to the intended guests, allowing for seamless communication and organization of your event.