
Using the Search Bar
The search bar in Gmail is a powerful tool that allows you to search for specific emails or messages within your inbox. It is located at the top of your Gmail interface, making it easily accessible for quick and efficient searches.
To use the search bar effectively, simply follow these steps:
- Click on the search bar to activate the search function.
- Type in the keywords or phrases that you want to search for. Be as specific as possible to narrow down the results.
- Press Enter or click on the search button to initiate the search.
Once you have initiated the search, Gmail will display a list of emails or messages that match your search criteria. The search results will be sorted chronologically, with the most recent emails appearing at the top.
Additionally, the search bar in Gmail supports various search operators that can help you refine your search even further. For example, you can use quotation marks to search for an exact phrase, such as “project update”. You can also use the minus sign (-) to exclude specific words from your search results, or the OR operator to search for emails that contain any of the specified keywords.
By utilizing the search bar in Gmail, you can quickly locate specific emails, conversations, or contacts, saving you time and effort when managing your inbox.
Remember to make use of keywords and phrases that are relevant to the emails or messages you are searching for. This will ensure that the search results are accurate and tailored to your specific needs. Experiment with different search queries and operators to find the best results for your search.
Refining Your Search with Operators
While the search bar in Gmail is powerful on its own, you can further refine your search using operators. These operators are special characters or commands that allow you to specify certain criteria for your search. By using operators, you can narrow down your results and find exactly what you’re looking for.
Here are some commonly used operators in Gmail:
- AND operator: Use the “AND” operator (or simply leave a space between keywords) to search for emails that contain all of the specified keywords. For example, searching for “meeting AND agenda” will display emails that include both the words “meeting” and “agenda”.
- OR operator: Use the “OR” operator to search for emails that contain any of the specified keywords. For example, searching for “vacation OR travel” will show emails that mention either “vacation” or “travel”.
- NOT operator: Use the minus sign (-) or the “NOT” operator to exclude specific words from your search results. For example, searching for “marketing -newsletter” will display emails related to marketing but exclude any that mention “newsletter”.
- Quotation marks: Use quotation marks to search for an exact phrase. For example, searching for “project update” will only show emails with the exact phrase “project update”.
- Wildcard operator: Use an asterisk (*) as a wildcard operator to search for variations of a word. For example, searching for “market*” will show emails that include words like “market”, “marketing”, or “marketplace”.
Experimenting with different combinations of operators can help you refine your search and find the exact information you’re looking for. Remember to use parentheses to group different operators and keywords to create more complex search queries.
By using these search operators, you can narrow down your search results and save time by focusing only on the emails that are most relevant to your needs.
Take some time to familiarize yourself with these search operators, as they can greatly enhance your search capabilities in Gmail.
Searching Specific Mail Categories
In Gmail, you can search within specific mail categories to quickly find emails that are categorized under different tabs or labels. This allows you to sort and locate emails based on their classification, making it easier to manage your inbox and focus on specific types of messages.
Here’s how you can search within specific mail categories:
- Click on the search bar to activate the search function.
- Enter the keyword or phrase you want to search for.
- Next, add a category-specific search operator to narrow down your search. Here are some common category-specific operators:
- category:inbox – This operator allows you to search within your inbox for emails that are currently unread or have been read.
- category:social – Use this operator to search for emails that have been categorized as social, such as notifications from social media platforms.
- category:promotions – This operator is helpful if you want to search for emails categorized as promotions, which typically include deals, offers, and marketing emails.
- category:updates – Use this operator to search for emails that contain important updates, such as receipts, confirmations, or notifications from services you’ve signed up for.
- category:forums – This operator allows you to search for emails from online forums or discussion boards.
For example, if you’re looking for a specific email within the promotions category, you can enter the keyword followed by “category:promotions” in the search bar.
Searching within specific mail categories can help you quickly find relevant emails and declutter your inbox. It’s especially useful when you’re dealing with a large volume of emails and want to focus on specific types of messages.
Remember to use the correct category-specific operator along with your search query to ensure accurate results.
Take advantage of the mail category search feature in Gmail to streamline your email management process and easily locate emails based on their specific category or label.
Searching Within Specific Time Frames
Gmail allows you to search for emails within specific time frames, making it easier to locate messages that were sent or received within a certain period. This can be particularly useful when you need to find emails from a specific time period or when you want to narrow down your search to recent messages.
Here’s how you can search within specific time frames in Gmail:
- Click on the search bar to activate the search function.
- Enter the keyword or phrase you want to search for.
- Next, use the time frame search filters to refine your search. Here are the available time frame operators:
- before: Use the “before:” operator followed by a date to search for emails that were sent or received before that specific date. For example, “before:2022/01/01” will display emails that were sent or received prior to January 1, 2022.
- after: Use the “after:” operator followed by a date to search for emails that were sent or received after that specific date. For example, “after:2022/01/01” will show emails that were sent or received starting from January 1, 2022.
- older_than: Use the “older_than:” operator followed by a time frame to search for emails that are older than the specified duration. For example, “older_than:2y” will display emails that are older than 2 years.
- newer_than: Use the “newer_than:” operator followed by a time frame to search for emails that are newer than the specified duration. For example, “newer_than:1m” will show emails that are newer than 1 month.
By using these time frame operators, you can easily filter and search for emails based on a specific date range or within a certain time frame. Whether you are looking for recent emails or trying to locate messages from a particular period, this feature can save you time and effort.
Remember to use the correct time frame operator along with your search query to ensure accurate results.
Take advantage of the time frame search filters in Gmail to quickly find emails based on when they were sent or received. This can be especially helpful when you need to locate specific messages within a specific time frame or want to focus on recent correspondence.
Searching by File Type
In Gmail, you can search for emails based on the file types of attachments they contain. This feature allows you to filter and locate specific emails that have attachments of a particular file type, making it convenient when you’re looking for specific documents, images, or other file formats.
Here’s how you can search by file type in Gmail:
- Click on the search bar to activate the search function.
- Enter the keyword or phrase you want to search for.
- Next, add the file type operator to specify the type of attachments you’re looking for. Use the following search operators:
- has:attachment – This operator will show all emails that have attachments.
- filename:extension – Use this operator to search for emails with attachments that have a specific file extension. Replace “extension” with the desired file extension, like .pdf, .doc, .jpg, etc. For example, searching for “filename:pdf” will display emails with PDF attachments.
By using these file type search operators, you can easily find emails that contain attachments of specific file formats. This is especially useful when you’re trying to locate a particular document or image among a large number of emails.
Remember to use the correct file type operator along with your search query to ensure accurate results.
Take advantage of the file type search feature in Gmail to quickly locate emails with specific file attachments. This can save you time and effort when you’re searching for particular documents, images, or other file formats that are important to you.
Searching by Label
In Gmail, labels are a useful way to organize and categorize your emails. They act as virtual folders that allow you to group related messages together. Searching by label can help you quickly find emails that have been assigned a specific label, making it easier to locate and manage your messages.
Here’s how you can search by label in Gmail:
- Click on the search bar to activate the search function.
- Enter the keyword or phrase you want to search for.
- Add the label operator followed by the name of the label you want to search within. Use the following format: label:labelname
For example, if you have a label called “Work” and you want to find emails related to a specific project within that label, you can enter the keyword followed by label:Work in the search bar.
Searching by label allows you to easily locate emails that are categorized under specific labels, making it efficient to find and manage messages related to a particular topic, project, or contact.
Remember to use the correct label operator and the name of the label you want to search for to ensure accurate results.
Take advantage of the label search feature in Gmail to organize and retrieve emails based on their assigned labels. This can help you stay organized and easily find messages that are associated with specific topics, projects, or contacts.
Searching the Trash Folder
The Trash folder in Gmail is where deleted emails are temporarily stored before they are permanently deleted. Although it is often overlooked, the Trash folder can hold valuable information that you may need to retrieve. Thankfully, Gmail allows you to search within the Trash folder, making it easier to locate and recover deleted emails.
Here’s how you can search the Trash folder in Gmail:
- Click on the search bar to activate the search function.
- Enter the keyword or phrase you want to search for.
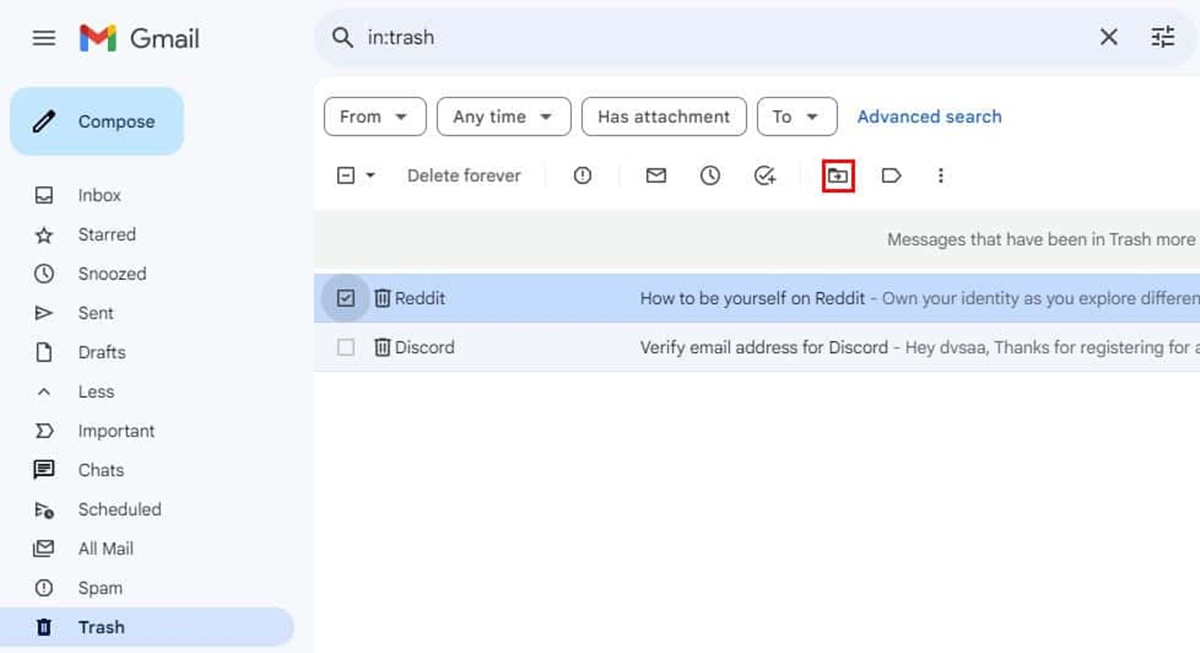
- Add the in:trash operator to specify that you want to search within the Trash folder. For example, if you’re looking for an email related to a specific project, you can enter the keyword followed by in:trash in the search bar.
Gmail will then display a list of deleted emails that match your search criteria within the Trash folder. From there, you can select the email(s) you want to recover and choose to move them back to your inbox or to any other desired destination.
Searching the Trash folder is particularly useful when you accidentally delete an important email or need to retrieve a message that you thought you no longer needed.
Remember to use the in:trash operator along with your search query to ensure that Gmail searches specifically within the Trash folder.
Make sure to check your Trash folder regularly and use the search function to locate and recover any accidentally or intentionally deleted emails that you may need to retrieve.
Restoring Deleted Emails
Accidentally deleting important emails can be a stressful experience. However, Gmail provides a simple process to restore deleted emails and recover them back to your inbox or other folders. By following a few steps, you can retrieve deleted emails and ensure that no valuable information is lost.
Here’s how to restore deleted emails in Gmail:
- Open your Gmail account and navigate to the left-hand side of the interface.
- Locate and click on the “More” option in the left-hand menu. This will expand the list of additional options.
- Click on the “Trash” option to access the Trash folder.
- In the Trash folder, browse through the list of deleted emails and locate the email(s) you want to restore.
- Select the email(s) you wish to restore by checking the box next to each email.
- Once you have selected the email(s), click on the “Move to” button located at the top of the Trash folder.
- A drop-down menu will appear with several options. Choose the desired destination folder, such as “Inbox” or any other label you wish to move the email(s) to.
By following these steps, Gmail will restore the selected emails from the Trash folder and move them back to the designated destination. This ensures that you regain access to the previously deleted emails.
It’s important to note that deleted emails are moved to the Trash folder, where they remain for approximately 30 days. After this period, Gmail automatically deletes them permanently. Therefore, it’s recommended to check your Trash folder periodically to ensure that there are no important emails that need to be restored.
By utilizing the simple process provided by Gmail, you can restore deleted emails and prevent the loss of valuable information.
Using Advanced Search Filters
Gmail offers advanced search filters that allow you to further refine your search and find specific emails based on various criteria. These advanced search filters enable you to search for emails from particular senders, messages with specific attachments, emails with a certain size, and more. By using these filters, you can quickly and accurately locate the emails you need.
Here are some commonly used advanced search filters in Gmail:
- From: Use the “from:” filter to search for emails sent from a specific sender. For example, “from:example@gmail.com” will display emails received from the sender with the email address “example@gmail.com”.
- To: Use the “to:” filter to search for emails sent to a specific recipient. For instance, “to:recipient@example.com” will show emails sent to the recipient with the email address “recipient@example.com”.
- Subject: Use the “subject:” filter to search for emails with a specific subject line. For example, “subject:meeting” will display emails with the word “meeting” in the subject line.
- Has the words: Use the “has the words:” filter to search for emails that contain specific words or phrases within the email body. For instance, “has the words:invoice” will show emails containing the word “invoice”.
- Attachment: Use the “has:attachment” filter to search for emails that have attachments. For example, “has:attachment” will display emails with any type of attachment.
- Size: Use the “size:” filter to search for emails within a specific size range. For instance, “size:larger_than:5mb” will display emails larger than 5 megabytes.
These advanced search filters can be used individually or in combination to narrow down your search results and find specific emails more efficiently. By utilizing the appropriate filters based on your search criteria, you can save time and quickly locate the emails you need.
Remember to use the correct filter syntax and the desired search term to ensure accurate results.
Take advantage of Gmail’s advanced search filters to customize your search and find emails based on specific criteria like senders, recipients, subject lines, attachments, and more.
Utilizing Search Modifiers
In addition to search operators and filters, Gmail also offers search modifiers that allow you to further enhance your search capabilities. These modifiers enable you to customize and adjust your search parameters to find emails with specific characteristics or attributes. By utilizing search modifiers, you can fine-tune your search queries and obtain more precise and relevant results.
Here are some commonly used search modifiers in Gmail:
- “Quotes”: By using quotation marks, you can search for an exact phrase within emails. For example, searching for “project update” will display emails that include the exact phrase “project update”.
- AND: Using the “AND” modifier (or leaving a space) between keywords allows you to search for emails that contain all of the specified keywords. For example, searching for “meeting AND agenda” will display emails that contain both the words “meeting” and “agenda”.
- OR: Using the “OR” modifier allows you to search for emails that contain any of the specified keywords. For example, searching for “vacation OR travel” will display emails that mention either “vacation” or “travel”.
- MINUS (-): By using the minus sign (-), you can exclude specific words from your search results. For example, searching for “marketing -newsletter” will display emails related to marketing but exclude any that mention “newsletter”.
- Parentheses ( ): Using parentheses allows you to group search terms and create more complex search queries. For example, searching for “(project OR assignment) AND deadline” will display emails that mention either “project” or “assignment” and also include the word “deadline”.
By incorporating these search modifiers into your search queries, you can refine your search and obtain more accurate and targeted results. It allows you to search for specific phrases, combine keywords, exclude certain terms, and create complex search conditions.
Remember to use these modifiers in combination with other search operators or filters to further enhance your search capabilities and obtain the most relevant emails.
By utilizing search modifiers effectively, you can customize your search queries in Gmail to precisely find the emails you’re looking for, saving time and effort in the process.
Searching for Attachments
Searching for emails with specific attachments can be incredibly useful when you’re looking for a particular document, image, or file that you received or sent. Gmail provides a straightforward way to search for attachments, allowing you to quickly locate emails that contain specific file types or attachments.
Here’s how you can search for attachments in Gmail:
- Click on the search bar to activate the search function in Gmail.
- Enter the keyword or phrase you want to search for.
- Add the has:attachment operator to specify that you’re looking for emails with attachments. For example, if you’re searching for an email related to a project, you can enter the keyword followed by has:attachment.
Gmail will then display a list of emails with attachments that match your search criteria. From there, you can select the email(s) you need and access the attachments within them.
In addition, you can further refine your attachment search by using file type filters. For example:
- filename:extension – Use this operator to search for specific file extensions. Replace “extension” with the desired file type, such as .pdf, .docx, .jpg, etc. For instance, “filename:pdf” will display emails with PDF attachments.
By combining the has:attachment operator with file type filters, you can narrow down your search specifically to emails with attachments of a certain file type.
Searching for attachments is a powerful feature that allows you to find and access specific files quickly. It’s particularly helpful when you need to retrieve important documents or refer back to images or files that were shared via email.
Make use of the attachment search function in Gmail to efficiently locate emails with specific attachments, ensuring that you can retrieve and access the files you need without hassle.
Searching for Spam or Junk Mail
Spam or junk mail can clutter your inbox and make it challenging to locate important emails. However, Gmail provides a search function specifically designed to help you find emails classified as spam or junk. By utilizing this feature, you can quickly identify and manage unwanted emails.
Here’s how you can search for spam or junk mail in Gmail:
- Click on the search bar to activate the search function in Gmail.
- Enter the keyword or phrase you want to search for.
- Add the in:spam or in:junk operator to specify that you want to search within the spam or junk mail folder. For example, if you’re searching for an email related to a specific promotion that you suspect might be treated as spam, you can enter the keyword followed by in:spam.
Gmail will then display a list of emails from the spam or junk mail folder that match your search criteria. From there, you can review and manage the unwanted emails as needed.
Searching for spam or junk mail is particularly useful when you’re expecting an email that might have been mistakenly marked as spam or when you want to ensure that no important emails have been filtered into these folders.
It’s important to note that Gmail’s spam filter is designed to automatically detect and divert unsolicited or unwanted emails to the spam or junk mail folder. Therefore, regularly checking these folders and using the search function can help you identify and recover any legitimate emails that might have been incorrectly classified or filtered.
Make use of the search function in Gmail to efficiently locate and manage emails that have been flagged as spam or junk, ensuring that important messages don’t go unnoticed or unanswered.
Searching for Drafts
In Gmail, drafts are unfinished or unsent emails that are saved for future editing or completion. Locating specific drafts can be helpful when you want to resume working on an email or find an unfinished message that you previously saved. Gmail provides a search feature that allows you to easily search for drafts based on keywords or other criteria.
Here’s how you can search for drafts in Gmail:
- Click on the search bar to activate the search function in Gmail.
- Enter the keyword or phrase you want to search for within the draft email.
- Add the is:draft operator to specify that you want to search for drafts. For example, if you’re searching for an unfinished email related to a project, you can enter the keyword followed by is:draft.
Gmail will then display a list of draft emails that match your search criteria. From there, you can select the draft email you need and continue editing or make it ready for sending.
This feature becomes convenient when you work on multiple drafts or have a long list of unfinished emails. By searching for drafts, you can focus on finding the specific email you need, saving time and effort.
Additionally, you can combine the is:draft operator with other search operators to further refine your search. For example, you can search for drafts by sender, recipient, subject line, or attachment using their respective operators.
Utilize the draft search function in Gmail to quickly locate and resume working on unfinished emails. This ensures that you effectively manage your drafts and don’t overlook any important messages that need to be completed and sent.
Saving and Reusing Search Queries
In Gmail, you have the ability to save and reuse search queries, allowing you to quickly access frequently used search filters or complex search queries. This feature is particularly useful when you have specific search criteria that you frequently use to find particular emails or messages.
Here’s how you can save and reuse search queries in Gmail:
- Click on the search bar to activate the search function.
- Enter the desired keyword(s) or search query that you would like to save.
- Once you have entered the search query, click on the “Create filter” button.
- In the dialog box that appears, you can further customize the filter options and criteria if needed.
- Finally, click on the “Create filter” button to save the filter and search query.
Once you have saved a search query, you can access it again by following these steps:
- Click on the search bar to activate the search function.
- Click on the “Show search options” button located on the right side of the search bar.
- In the drop-down menu that appears, you will see the list of saved search queries under the “Saved searches” section.
- Simply click on the saved search query that you want to reuse, and Gmail will display the corresponding results.
By saving and reusing search queries, you can easily access specific filtered search results without having to manually enter the search criteria each time. This saves you time and effort, especially when you frequently perform the same searches.
It’s worth noting that you can manage and delete saved search queries by clicking on the “Manage saved searches” option in the search options menu. From there, you can edit or remove any saved search queries as needed.
Take advantage of this feature to streamline your email management process and quickly access frequently used search queries, making it easier to find specific emails that match your predefined criteria in Gmail.
Using Search Operators on Mobile Devices
Gmail provides the same powerful search operators on mobile devices as it does on desktop. These search operators allow you to refine your searches and find specific emails with ease, even when you’re using Gmail on your smartphone or tablet.
Here’s how you can use search operators on mobile devices:
- Open the Gmail app on your mobile device and tap on the search bar to activate the search function.
- Enter the keyword or phrase you want to search for in the search bar.
- Next, add the desired search operator to refine your search. Use the same operators mentioned earlier in this article, such as from:, to:, subject:, and has:attachment, among others.
Gmail on mobile devices will interpret and execute the search operators in the same way as it does on desktop. This means you can perform advanced searches and use specific operators to find the desired emails on your mobile device as well.
One advantage of using search operators on mobile devices is that Gmail offers suggestions and auto-complete functionality, making it easier to enter complex search queries with less typing.
Remember to use the correct operator syntax and keywords to ensure accurate search results on your mobile device.
Whether you’re using Gmail on your desktop or mobile device, harnessing the power of search operators allows you to effectively search and locate specific emails, saving time and effort in the process. With Gmail’s consistent search functionality across different devices, you can enjoy a seamless searching experience on both desktop and mobile.
Troubleshooting Common Search Issues
While Gmail’s search functionality is powerful, there are instances when you may encounter issues or have difficulties finding specific emails. Here are some common search issues that users face and steps you can take to troubleshoot them:
1. No search results: If you’re not getting any search results, double-check that you’re using the correct search terms and operators. Ensure that you’ve spelled the keywords correctly and that you’re using the appropriate syntax for the search operators.
2. Unreliable search results: If your search results aren’t consistent or seem incomplete, try clearing your browser cache or refreshing the Gmail app on your mobile device. Sometimes, outdated cache or temporary glitches can affect the search results. Additionally, ensure that you’re connected to the internet to access Gmail’s full search functionality.
3. Missing emails: If you’re certain that an email should appear in your search results, but it’s not showing up, check the other folders in Gmail, such as Spam, Trash, or other labels. The email might have been diverted or mislabeled. Also, verify that the email is not archived or deleted unintentionally.
4. Incorrectly categorized emails: If Gmail is misclassifying emails or sorting them into the wrong category, review your filters and labels. In some cases, an email might not appear in the expected category because it has been automatically labeled or filtered based on your settings. Adjust your filters and labels accordingly to ensure accurate organization and categorization.
5. Limited search results: If you’re not seeing the expected number of search results, try broadening your search criteria. Use fewer search operators or remove specific filters to ensure that you’re not unintentionally limiting the scope of the search. It’s also important to check the date range and ensure that you’re searching within the appropriate timeframe.
6. Advanced search not available: If you’re using a legacy version of Gmail or accessing Gmail through a third-party email client, the advanced search options may be limited or unavailable. Consider upgrading to the latest version of Gmail or accessing it directly through a web browser for full access to the advanced search features.
If you continue to experience issues with the search feature in Gmail, consult the Gmail Help Center or reach out to the Gmail support team for further assistance. They can provide guidance based on your specific situation and help troubleshoot any technical difficulties you may encounter.
By troubleshooting these common search issues, you can ensure a smoother search experience in Gmail and effectively find the emails you’re looking for.