
Why Schedule a Text Message on Android?
Scheduling a text message is a handy feature that can greatly benefit Android users. Whether you want to send a birthday wish to a friend, set a reminder for an important appointment, or even express your love to your significant other at the right moment, scheduling a text message allows you to stay organized and ensure your messages are delivered at the perfect time.
Here are a few reasons why scheduling text messages on Android can be a game-changer:
- Convenience: Life can get hectic, and keeping track of important dates and times can be challenging. By scheduling text messages, you can save time and stress by getting your messages ready in advance and ensuring they are sent out when needed.
- Time zone compatibility: If you have friends or family members in different time zones, scheduling text messages allows you to send them at a suitable time without interrupting their sleep or daily routines. It’s a thoughtful way to stay connected without inconveniencing anyone.
- Professionalism: In a professional setting, sending a well-timed text message can make a lasting impression. Whether you’re scheduling a reminder for an important meeting or following up with a client, scheduling a text message ensures that your communication is timely and polished.
- Accuracy: Have you ever forgotten to send a birthday message or an anniversary wish? By scheduling text messages, you can avoid such mishaps and ensure you never miss an important occasion again. It’s a simple yet effective way to maintain your personal and professional relationships.
- Privacy: Sometimes, you may want to send a sensitive or personal message but prefer not to disturb the recipient at odd hours. By scheduling the text message, you can choose the most appropriate time to ensure privacy and consideration for the other person’s schedule.
As you can see, the ability to schedule text messages on your Android device offers a range of advantages. Whether you’re trying to streamline your communication, maintain important relationships, or simply make life a little easier, this feature is definitely worth exploring.
Method 1: Using the Default Messaging App
Android devices come with a default messaging app that allows you to send and receive SMS and MMS messages. Fortunately, many of these default apps also include the option to schedule text messages. Here’s a step-by-step guide on how to schedule a text message using the default messaging app:
- Open the messaging app on your Android device. The app icon is usually a speech bubble or a messaging symbol.
- Tap on the “Compose” or “New Message” button to start a new conversation.
- Enter the recipient’s name or phone number in the “To” field. You can either type it manually or select a contact from your address book.
- Type your message in the text field provided.
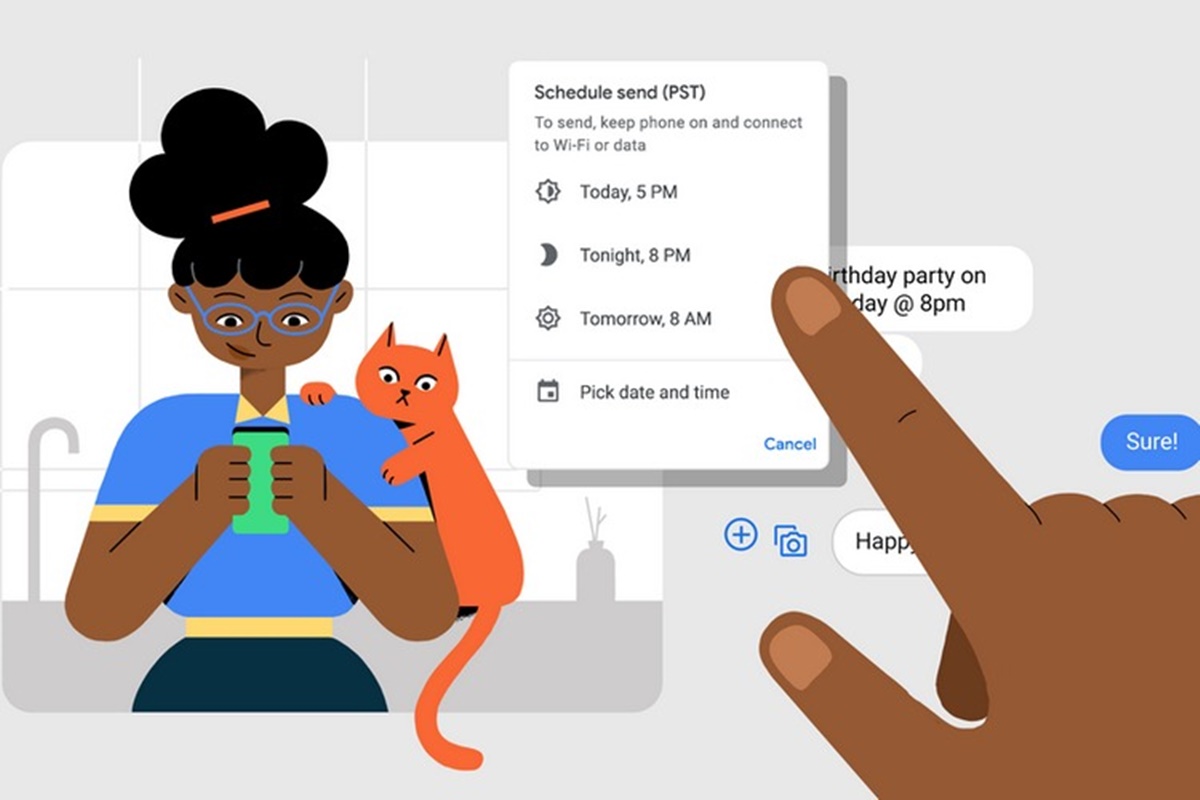
- Look for the option to schedule the message. It might be represented by a clock icon or labeled as “Schedule” or “Send later.”
- Select the date and time you want the message to be sent. Some apps allow you to pick a specific time, while others may offer preset options like “Tomorrow morning” or “Next week.”
- Review the scheduled message to ensure it’s accurate.
- Tap on the “Send” or “Schedule” button to save and schedule the text message.
Once the message is scheduled, it will be stored in the app’s queue and sent automatically at the specified time. It’s important to note that the app must be running in the background for the scheduled message to be sent successfully.
Using the default messaging app to schedule text messages is a straightforward and convenient option. However, it’s worth keeping in mind that the availability and features of this function may vary depending on the device’s manufacturer and the version of Android you’re using. If your default messaging app doesn’t offer scheduling capabilities or you’re looking for more advanced features, you can explore third-party apps specifically designed for text message scheduling.
Method 2: Using a Third-Party App
If your default messaging app doesn’t have the scheduling feature or you’re looking for more advanced options, you can turn to third-party apps that specifically cater to text message scheduling. These apps provide a range of features and customization options to suit your needs. Here’s a step-by-step guide on how to schedule a text message using a third-party app:
- Go to the Google Play Store on your Android device.
- Search for text message scheduling apps. Some popular options include “SMS Scheduler,” “Textra SMS,” and “Pulse SMS.”
- Choose and install the app of your choice. Make sure to read the app’s descriptions, reviews, and ratings to ensure its reliability and functionality.
- Once the app is installed, open it and grant the necessary permissions it requires, such as accessing your contacts or sending SMS messages.
- Tap on the “Compose” or “New Message” button within the app.
- Enter the recipient’s name or phone number in the “To” field.
- Type your message in the text field provided.
- Look for the scheduling option within the app’s interface. It may be represented by a clock icon or labeled as “Schedule” or “Send later.”
- Select the date and time you want the message to be sent.
- Review the scheduled message to ensure all the details are correct.
- Tap on the “Send” or “Schedule” button to save and schedule the text message.
By using a third-party app, you can enjoy additional features like recurring messages, personalized templates, and the ability to schedule messages across multiple platforms. These apps often provide a user-friendly interface and offer seamless integration with your Android device’s messaging system.
Before choosing a third-party app, it’s recommended to read user reviews, check for frequent updates, and ensure that the app has good security measures in place to protect your personal information. Additionally, some third-party apps may offer both free and premium versions with advanced features, so it’s important to consider your specific needs and preferences.
With a reliable third-party app for scheduling text messages on Android, you can take full control of your messaging and ensure that your important messages are delivered at the right time.
Step-by-Step Guide: Scheduling a Text Message with the Default Messaging App
Scheduling a text message using the default messaging app on your Android device is a simple process. Follow these step-by-step instructions:
- Open the default messaging app on your Android device. You can usually find it in your app drawer or on your home screen.
- Tap on the “Compose” or “New Message” button to start a new conversation.
- In the recipient field, enter the name or phone number of the person you want to send the scheduled text message to. You can manually type in the information or select a contact from your address book.
- Type your desired message in the text field provided. Feel free to customize it with emojis or other formatting options.
- Look for the scheduling option within the messaging app’s interface. It might be represented by a clock icon or labeled as “Schedule” or “Send later.”
- Tap on the scheduling option and select the date and time you want the message to be sent. You may be able to choose a specific time or select from pre-set options like “Tomorrow morning” or “Next week.”
- Double-check the scheduled message to ensure all the details are accurate, including the recipient and the content of the message. Make any necessary adjustments if needed.
- Once you’re satisfied with the scheduled message, tap on the “Send” or “Schedule” button to save it. The message will be added to the app’s queue and sent automatically at the specified time.
It’s important to keep the default messaging app running in the background for the scheduled message to be sent successfully. If you close the app or turn off your device before the scheduled time, the message may not be delivered as intended. Therefore, it’s a good habit to ensure that your device is powered on and the messaging app remains active.
By following these steps, you can easily schedule text messages using the default messaging app on your Android device. This feature allows you to stay organized, keep in touch with loved ones, and send important messages at the most convenient times.
Step-by-Step Guide: Scheduling a Text Message with a Third-Party App
If you’re using a third-party app to schedule text messages on your Android device, here’s a step-by-step guide to help you through the process:
- Open the third-party app that you have chosen for scheduling text messages. You can locate it on your home screen or in your app drawer.
- Tap on the “Compose” or “New Message” button within the app to start creating a new text message.
- In the recipient field, enter the name or phone number of the person you want to send the scheduled text message to. You can type it in manually or select a contact from your address book.
- Type the desired message in the text field provided. You can use emojis, add media files, or customize the text as per your preference.
- Look for the scheduling option within the app’s interface. It may be denoted by a clock icon or labeled as “Schedule” or “Send later.”
- Select the date and time when you want the message to be sent. Depending on the app, you may have options like choosing a specific time or selecting from preset intervals such as “In 15 minutes” or “Tomorrow morning.”
- Take a moment to review the scheduled message and ensure that all the details are correct, including the recipient and the content. Make any necessary edits if required.
- Once you have confirmed the scheduled message, tap on the “Send” or “Schedule” button to save it. The app will add the message to its queue and send it automatically at the specified time.
Make sure that the third-party app you’re using has the necessary permissions, such as accessing your contacts or sending SMS messages, to ensure a seamless experience. It’s also advisable to keep the app updated to access any improvements or bug fixes.
By following these steps, you can effectively schedule text messages using a third-party app on your Android device. These apps often offer additional features such as recurring messages, personalized templates, or the ability to schedule messages across various platforms, giving you more flexibility and control over your communication.
Experiment with different third-party apps to find the one that best suits your preferences and needs. Ensure that the app you choose has good user reviews, regular updates, and strong security measures to protect your data and privacy. With the right third-party app, you can schedule messages effortlessly and enhance your overall messaging experience on Android.
Recommendations: Best Third-Party Apps for Scheduling Text Messages
If you’re looking for more advanced features and customization options for scheduling text messages on your Android device, consider using one of the following top-rated third-party apps:
- SMS Scheduler: This popular app allows you to schedule text messages with ease. It offers various scheduling options, including specific dates and times, as well as recurring messages. SMS Scheduler also allows you to use templates and provides a user-friendly interface.
- Textra SMS: Known for its sleek design and user-friendly interface, Textra SMS offers a wide range of features, including text message scheduling. With Textra SMS, you can schedule messages, set reminders, and even customize the appearance of your messages with different themes and styles.
- Pulse SMS: Offering cross-platform integration, Pulse SMS is a feature-rich messaging app that includes the ability to schedule text messages. It allows you to schedule messages across multiple devices, including smartphones, tablets, and computers, ensuring that your messages are sent regardless of the device you’re using.
- Do It Later: This versatile app not only provides text message scheduling but also offers scheduling options for emails, calls, and social media posts. Do It Later allows you to have a comprehensive scheduling experience in one app, saving you time and keeping all your scheduled tasks organized.
- QKSMS: With its clean and minimalistic design, QKSMS is a popular choice for scheduling text messages. It offers various customization options and a straightforward scheduling feature. QKSMS also provides a unified inbox for managing all your messages in one place.
When choosing a third-party app for scheduling text messages, consider your specific needs and preferences. It’s important to read user reviews, check for frequent updates, and ensure the app has a reliable track record. Additionally, pay attention to the security measures implemented by the app to protect your personal information.
Remember, the availability and functionality of these apps may vary based on your Android device’s manufacturer and the version of Android you’re using. Explore these apps and find the one that suits your requirements best, giving you a seamless and efficient text message scheduling experience on your Android device.