
Understanding Text Rotation in Word
When working with documents in Microsoft Word, you may come across situations where you need to rotate text for better presentation or formatting purposes. Rotating text in Word allows you to change the orientation of the text, giving you more flexibility in designing your document. There are several methods you can use to rotate text in Word, each offering its own advantages and unique features.
Rotating text can be helpful when you want to create a vertical title or a label that needs to be placed horizontally within a document. It can also be used to enhance the visual appeal of your document by adding a creative touch to headings, captions, or text boxes. Whether you want to rotate a single word or an entire paragraph, Word provides different options to achieve the desired text rotation effect.
In the following sections, we will explore various methods that you can use to rotate text in Word. These methods include using a text box, adjusting the text direction, utilizing the Rotate Text tool, working with table cells, and incorporating text boxes in the header or footer section.
By understanding these different methods, you will have the flexibility to rotate text in Word to meet your specific needs. Whether you want to create eye-catching flyers, design unique labels, or format tables, knowing how to rotate text in Word will allow you to present your content in a visually appealing and professional manner.
Method 1: Rotating Text using Text Box
One of the easiest ways to rotate text in Word is by using a text box. Adding a text box enables you to have more control over the placement and orientation of the text within your document. Here’s how you can rotate text using a text box in Word:
- Create a text box by going to the “Insert” tab and selecting “Text Box” from the “Text” group. Choose either a predefined text box style or select “Draw Text Box” to create a custom shape.
- Once the text box is inserted, click on it to activate the text box tools.
- Type or paste the text that you want to rotate inside the text box.
- To rotate the text, click on the “Rotation” handle, which is located at the top of the text box. Drag the handle left or right to rotate the text to the desired angle.
- Adjust the text box size and position as needed to fit the rotated text within your document.
- Note: You can also apply additional formatting to the text within the text box, such as changing the font, size, color, and alignment, to further enhance the appearance of the rotated text.
Using a text box is a versatile method for rotating text in Word, as it allows you to easily move, resize, and customize the orientation of the text. You can place the text box anywhere in your document and adjust it to fit seamlessly into your desired layout. This method is particularly useful when you want to create text that stands out or needs to be positioned in a specific way.
Experimenting with different text box styles and rotations can add a visually appealing element to your documents, making them more engaging and professional. Remember to save your document frequently to preserve your rotated text box and its content, ensuring that your work is not lost in case of any unexpected interruptions.
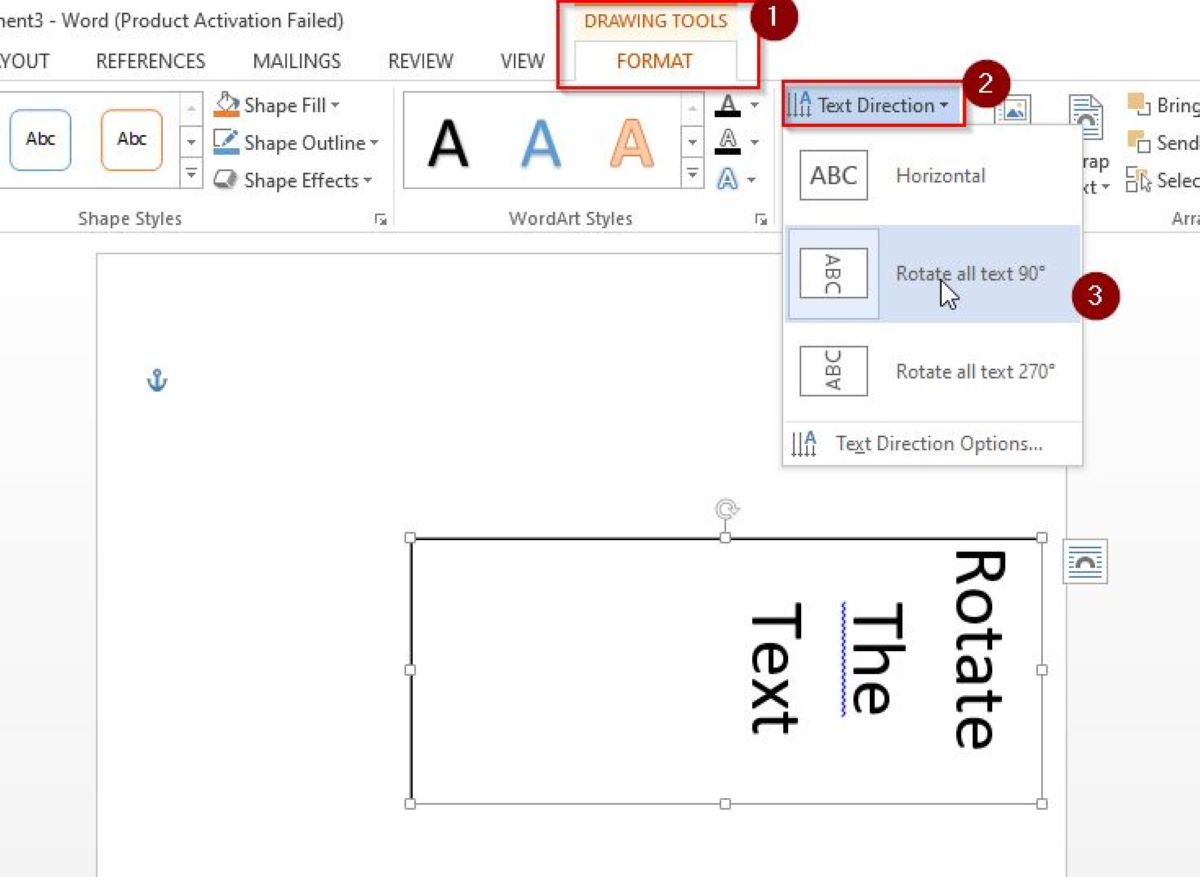
Method 2: Rotating Text using Text Direction
Another method you can use to rotate text in Microsoft Word is by adjusting the text direction. This method allows you to change the orientation of the entire paragraph or selected text within a document. Here’s how you can rotate text using the text direction feature in Word:
- Select the text that you want to rotate.
- Go to the “Home” tab and locate the “Paragraph” group.
- Click on the small arrow at the bottom right corner of the “Paragraph” group to open the “Paragraph” dialog box.
- In the “Indents and Spacing” tab, you will find the “Text Direction” section.
- Choose the desired text direction from the available options, such as “Rotate all text 90 degrees,” “Rotate all text 270 degrees,” or “Rotate all text 180 degrees.”
- Click “OK” to apply the text direction changes.
By adjusting the text direction, you can achieve various rotation effects for your text. This method is particularly useful when you want to rotate an entire paragraph or block of text, rather than individual words or phrases. It allows you to quickly change the orientation without the need for additional elements like text boxes.
With the text direction feature, you have the flexibility to create vertical headings, align text in a specific direction, or add a unique touch to your document’s layout. Keep in mind that changing the text direction affects the selected text globally, so ensure that it fits harmoniously within your document’s overall design.
Experiment with different text directions to find the orientation that best suits your needs. Whether you’re working on a report, presentation, or any other type of document, using the text direction feature provides you with additional options for presenting your text in a visually appealing and organized way.
Method 3: Rotating Text using Rotate Text Tool
Microsoft Word offers a handy feature called the “Rotate Text” tool, which allows you to easily rotate individual words or selected text within a document. This method gives you precise control over rotating text without the need for text boxes or adjustments to the text direction. Here’s how you can use the “Rotate Text” tool to rotate text in Word:
- Select the word or text that you want to rotate.
- Go to the “Format” tab, and in the “Text Effects” group, click on the small arrow to open the “Text Effects” menu.
- In the menu, click on “Transform,” and then select the desired rotation option from the various presets available.
- Alternatively, click on “More Rotation Options” at the bottom of the menu to open the “Format Text Effects” pane, where you can customize the rotation angle and other settings.
- Adjust the rotation angle or other parameters as needed, and click “OK” to apply the changes.
The “Rotate Text” tool provides a quick and efficient way to rotate text within your document. It offers various preset rotation options such as vertical, diagonal, or custom angles, allowing you to achieve the desired text orientation while maintaining the document’s readability and professional appearance.
This method is particularly useful when you want to rotate specific words or phrases while keeping the rest of the text in its original orientation. By selectively applying text rotation, you can draw attention to important information, create emphasis, or add a creative touch to your document design.
Experiment with different rotation angles and explore the customization options to find the perfect rotation for your text. The “Rotate Text” tool provides you with a flexible and intuitive way to enhance your document’s visual impact and make your text stand out with effective styling.
Method 4: Rotating Text using Table Cell
If you’re working with tables in Microsoft Word, you can also rotate text within a table cell to achieve a desired orientation. This method allows you to maintain a structured layout while rotating text for better presentation or organization purposes. Here’s how you can rotate text using a table cell in Word:
- Insert a table into your document by going to the “Insert” tab and selecting “Table” from the “Tables” group. Choose the number of rows and columns that suit your needs.
- Click inside the cell where you want to rotate the text.
- Go to the “Layout” tab, located under “Table Tools.”
- In the “Alignment” group, click on the small arrow at the bottom right corner to open the “Table Properties” dialog box.
- In the “Cell” tab, click on the “Options” button, which opens the “Cell Options” dialog box.
- In the “Text” tab of the “Cell Options” dialog box, you will find the “Text direction” section.
- Choose the desired text direction from the available options, such as “Horizontal,” “Rotate all text 90 degrees,” or “Rotate all text 270 degrees.”
- Click “OK” to apply the text rotation to the selected cell.
By rotating text within a table cell, you can effectively present information in a compact and organized manner. This method is especially useful when dealing with data tables, schedules, or any content that requires concise yet vertically oriented text.
Remember that when rotating text within a table cell, the surrounding table structure remains intact, ensuring that your content remains aligned and structured. You can apply this technique to individual cells or multiple cells within a table, allowing for greater flexibility in displaying text in your document.
Play around with different table layouts, cell configurations, and text rotation options to create visually appealing tables that are easy to read and understand. The ability to rotate text within table cells provides you with a versatile tool to design tables that effectively convey your message and enhance the overall presentation of your document.
Method 5: Rotating Text using Text Box in Header/Footer
In Microsoft Word, you can also rotate text by using a text box within the header or footer section of your document. This method allows you to add creative and visually appealing elements to your headers or footers and customize the orientation of the text. Here’s how you can rotate text using a text box in the header or footer of Word:
- Double-click on the header or footer section of your document to activate the header/footer editing mode.
- Go to the “Insert” tab and select “Text Box” from the “Text” group.
- Click and drag to create a text box within the header or footer section.
- Type or paste the text that you want to rotate inside the text box.
- Click on the “Rotation” handle at the top of the text box and drag it left or right to rotate the text to the desired angle.
- Adjust the size and position of the text box to fit within the header or footer area.
Using a text box within the header or footer section allows you to incorporate rotated text in your document’s consistent header or footer layout. This method is particularly useful when you want to include additional information, such as page numbers or document titles, in a rotated orientation that stands out from the main body text.
Keep in mind that when using text boxes in the header or footer, repeated content such as page numbers will remain unchanged and only the text within the text box will rotate. This ensures that important elements like page numbers are still easily readable and aligned correctly.
Experiment with different font styles, colors, and text box formatting options to create appealing headers or footers that grab attention and maintain consistency with the overall document design. Whether you’re preparing a report, proposal, or any other document, incorporating rotated text in the header or footer can enhance the visual appeal and professionalism of your work.
Additional Tips for Rotating Text in Word
While rotating text in Microsoft Word offers you numerous possibilities for creative document design, here are some additional tips to consider for a smooth and effective rotation process:
- Use consistent rotation: To maintain readability and visual coherence, it’s advisable to use consistent rotation angles throughout your document. This ensures a cohesive and professional appearance.
- Group and align rotated text: If you have multiple elements with rotated text, consider grouping them together and aligning them properly. This adds visual unity and streamlines the look of your document.
- Preview the layout: Before finalizing your document, take advantage of the “Print Layout” or “Web Layout” view options to preview how your rotated text appears on the page. This helps you identify any adjustments needed for optimal visibility.
- Keep it readable: When rotating text, ensure that it remains readable. Avoid extreme angles or text sizes that may strain the reader’s eyes. Experiment with different fonts and sizes to find the right balance between style and legibility.
- Resize text boxes carefully: When resizing text boxes, be mindful of the text inside. Enlarging or shrinking the box can affect the spacing and readability of the text. Adjust the box proportionally to maintain a balanced appearance.
- Save as PDF: If you want to preserve the layout and rotation effects of your document, consider saving it as a PDF file. This ensures that the text remains rotated and accurately displayed, regardless of the device or software used to view it.
By following these additional tips, you can optimize the rotation process and ensure that your text appears visually appealing, legible, and consistent throughout your document.
Remember, while rotating text can add flair and creativity to your document, it’s important to strike a balance between aesthetics and readability. Use rotated text strategically to enhance the overall presentation and effectively convey your message to your readers.