
Check for Network Issues
When you experience network connectivity problems on your iPhone, it’s important to first determine if the issue lies with your device or with your network. Before resetting network settings, try these troubleshooting steps to identify any potential network issues:
- 1. Check if other devices are connected: Verify if other devices, such as laptops or other smartphones, are able to connect to the same network. If they are experiencing similar problems, the issue could be with your Wi-Fi network.
- 2. Test other websites or apps: Visit various websites or use different applications on your iPhone to see if the connectivity problem persists across multiple platforms. This will help determine if the issue is specific to a particular app or if it affects your entire network connection.
- 3. Restart your router: Sometimes, the problem may originate from your router. Restarting the device can refresh the network settings and potentially resolve any connection issues. Simply unplug your router, wait for a few seconds, and then plug it back in.
- 4. Check for service outages: Contact your internet service provider (ISP) or check their website for any reported service outages in your area. Sometimes, disruptions in the network infrastructure can cause temporary connectivity problems.
- 5. Update your router firmware: Keeping your router’s firmware up-to-date can ensure that it is compatible with the latest network protocols and technologies. Check the manufacturer’s website for any available firmware updates.
By following these steps, you can pinpoint any potential network issues and determine whether a reset of your iPhone’s network settings is necessary.
Back up your iPhone
Before proceeding with resetting network settings on your iPhone, it’s crucial to create a backup of your device. Resetting network settings can sometimes cause data loss, so it’s important to safeguard your personal information and settings. Here’s how you can back up your iPhone:
- 1. iCloud Backup: The easiest way to back up your iPhone is by using iCloud. Ensure that your iPhone is connected to a stable Wi-Fi network, then go to Settings > [Your Name] > iCloud > iCloud Backup. Tap on “Back Up Now” and wait for the backup process to complete. It’s recommended to keep your iPhone connected to Wi-Fi and power until the backup is finished.
- 2. iTunes Backup: If you prefer to back up your iPhone using your computer, you can use iTunes. Connect your iPhone to your computer and open iTunes (or Finder on macOS Catalina and later). Select your iPhone from the device list, then click on “Back Up Now” under the “Manually Back Up and Restore” section.
Creating a backup ensures that your important data, such as contacts, photos, messages, and app data, are safely stored. In the unfortunate event that something goes wrong during the network settings reset, you can easily restore your iPhone from the backup and regain your data.
Reset Network Settings
If you’ve exhausted all troubleshooting steps and are still experiencing network connectivity issues on your iPhone, resetting the network settings can often resolve the problem. Resetting network settings erases all saved Wi-Fi networks, Bluetooth connections, and VPN settings on your iPhone, so it’s important to note that you will need to reconfigure these settings after the reset. Here’s how you can reset network settings:
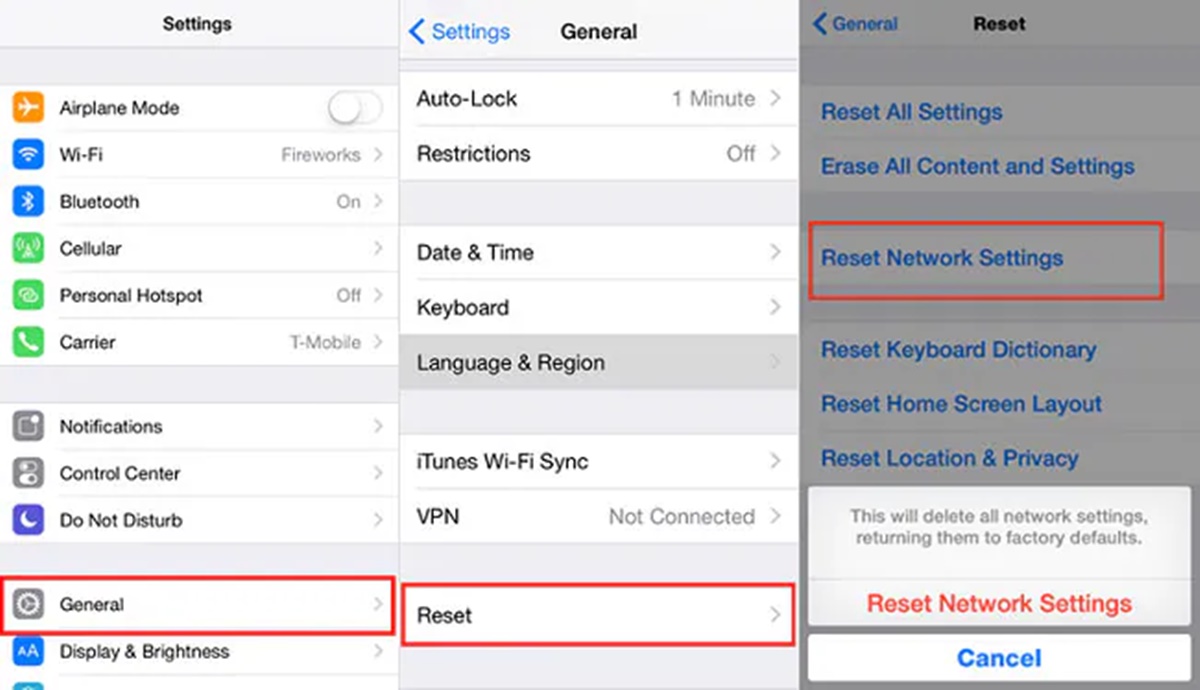
- 1. Open the Settings app on your iPhone and navigate to “General.”
- 2. Scroll down and tap on “Reset.”
- 3. Select “Reset Network Settings.”
- 4. You may be prompted to enter your passcode to confirm the reset.
- 5. Finally, tap on “Reset Network Settings” again to confirm the action.
After the reset, your iPhone will restart, and the network settings will be restored to their default configurations. Any saved Wi-Fi passwords will be erased, so make sure you have them handy to reconnect to your Wi-Fi networks. Additionally, Bluetooth devices will need to be paired again, and VPN settings will need to be reconfigured.
Keep in mind that resetting network settings should only be done as a last resort, as it removes all personalized network settings on your iPhone. If the issue persists after the reset, further troubleshooting may be required, such as contacting your network provider or seeking assistance from Apple Support.
Reconnect to Wi-Fi Network
After resetting the network settings on your iPhone, you’ll need to reconnect to your Wi-Fi networks. Follow these steps to reestablish the Wi-Fi connections:
- 1. Open the Settings app on your iPhone and tap on “Wi-Fi.”
- 2. Make sure that Wi-Fi is turned on by toggling the switch at the top.
- 3. Wait for your iPhone to scan and display the available Wi-Fi networks.
- 4. Tap on the name of your preferred Wi-Fi network.
- 5. If the network is secured with a password, you will be prompted to enter the Wi-Fi password. Type in the password correctly to connect.
- 6. Once connected, your iPhone will remember the network, and it will automatically connect to it whenever it’s in range.
If you have multiple Wi-Fi networks, repeat the above steps for each network you wish to connect. Remember to enter the correct passwords to ensure a successful connection.
If you are still experiencing issues connecting to a specific Wi-Fi network after resetting network settings and re-entering the password, there may be an issue with the network itself. In such cases, you can try restarting your router or contacting your network service provider for assistance.
Ensuring a successful connection to Wi-Fi networks is essential for various activities on your iPhone, such as browsing the internet, downloading apps, and accessing online services. By following the above steps, you can regain seamless Wi-Fi connectivity on your device.
Re-enter Wi-Fi Password
After resetting the network settings on your iPhone, you will need to re-enter the password for each Wi-Fi network you want to connect to. Here’s how you can re-enter the Wi-Fi password:
- 1. Open the Settings app on your iPhone and tap on “Wi-Fi.”
- 2. Make sure Wi-Fi is turned on by toggling the switch at the top.
- 3. Scroll down to the list of available Wi-Fi networks and tap on the name of the network you want to connect to.
- 4. If the network is secured, you will see a prompt to enter the password. Tap on the password field.
- 5. On the keyboard that appears, carefully enter the Wi-Fi password. Pay attention to uppercase and lowercase letters, and any special characters.
- 6. Once you have entered the password, tap “Join” or “Connect” to connect to the network.
It’s important to enter the correct password to establish a successful connection to the Wi-Fi network. Double-check the password before tapping on “Join” or “Connect.” If you’re unsure about the password, you can try asking the network’s owner or checking the Wi-Fi router settings for the correct password.
If you are still unable to connect to the Wi-Fi network even after entering the correct password, there may be other factors affecting the connection. Try restarting your iPhone and the Wi-Fi router, and make sure you are within range of the network. If the problem persists, you may need to contact your network service provider for further assistance.
Re-entering the Wi-Fi password correctly will ensure a secure and stable connection to your preferred network, allowing you to enjoy browsing the internet and using various online services on your iPhone.
Reset Cellular Settings
If you’re facing persistent cellular connectivity issues on your iPhone, resetting the cellular settings can help resolve the problem. Resetting cellular settings can fix various network-related issues, such as problems with cellular data, calls, and messaging. Here’s how you can reset the cellular settings on your iPhone:
- 1. Open the Settings app on your iPhone and tap on “Cellular” or “Mobile Data.”
- 2. Scroll to the bottom and select “Reset Cellular Settings” or “Reset Network Settings.”
- 3. You may be prompted to enter your passcode to confirm the reset.
- 4. Finally, tap on “Reset Settings” to confirm the action.
After the reset, your iPhone will restart and the cellular settings will be restored to their default configurations. Any saved Wi-Fi passwords or Bluetooth connections will not be affected by this reset.
It’s important to note that resetting cellular settings will erase all previously saved network settings, such as cellular data configurations and preferred network settings. Therefore, you might need to reconfigure your cellular data settings, including APN (Access Point Name) settings, after the reset. Contact your network service provider for assistance or consult their website for the correct APN settings for your specific carrier.
If the issue persists after resetting the cellular settings, you may need to contact your carrier’s customer support for further assistance. They can provide troubleshooting steps specific to your network and investigate any potential network or account-related issues.
Resetting cellular settings can often resolve network connectivity issues on your iPhone, ensuring a stable and reliable cellular connection for calls, data usage, and messaging.
Update iOS
Keeping your iPhone’s operating system up to date is essential for maintaining optimal performance and resolving any software-related network issues. Apple regularly releases iOS updates that include bug fixes, security enhancements, and improvements to network connectivity. Here’s how you can update your iOS:
- 1. Connect your iPhone to a stable Wi-Fi network.
- 2. Open the Settings app and tap on “General.”
- 3. Scroll down and select “Software Update.”
- 4. If an update is available, you will see a description of the update along with an “Install Now” button. Tap on “Install Now” to begin the update.
- 5. If prompted, enter your passcode to proceed with the update.
- 6. Make sure your iPhone is connected to a power source or has sufficient battery charge to complete the update.
- 7. Your iPhone will restart during the update process. It may take some time to download and install the update, so be patient and avoid interrupting the process.
- 8. Once the update is complete, your iPhone will restart again, and you’ll be running the latest version of iOS.
Updating your iOS can often resolve network connectivity issues by addressing software bugs or compatibility problems. It’s recommended to always keep your iPhone updated with the latest iOS version.
If you’re unable to update your iOS or if the update doesn’t resolve the network problems, further troubleshooting may be necessary. You can try resetting the network settings or contacting your network service provider for assistance.
By regularly updating your iOS, you can ensure that your iPhone is equipped with the latest enhancements and fixes, providing a seamless and reliable network experience.
Contact your Service Provider
If you have followed all the previous troubleshooting steps and are still experiencing network issues on your iPhone, it’s time to reach out to your service provider for further assistance. Your service provider can help diagnose and address network-related problems that may be affecting your device. Here’s what you can do:
- 1. Locate your service provider’s contact information: Find the customer support number or website for your service provider. This information is usually available on your service provider’s official website or on your billing statement.
- 2. Contact customer support: Call your service provider’s customer support number and explain the network issue you are facing. Be prepared to provide details about the specific problem, when it started, and any troubleshooting steps you have already taken.
- 3. Follow the instructions: The customer support representative will guide you through further troubleshooting steps specific to your service provider. They may also check for any outages or known issues in your area.
- 4. Provide necessary information: When speaking to the customer support representative, be ready to provide your account details, phone number, and any other relevant information they may request to assist with troubleshooting.
- 5. Request a service visit: If the network issue persists and cannot be resolved over the phone, request a service visit from your service provider’s technician. They can inspect your device and the network infrastructure to identify and fix any underlying issues.
Remember to note down the customer support representative’s name, any reference numbers, and the details of the troubleshooting steps discussed. This can be useful if you need to follow up or escalate the issue later.
By contacting your service provider, you can ensure that all possible network-related factors are considered and addressed. They have the expertise and resources to assist you in resolving complex network issues and ensuring your iPhone can connect seamlessly.