
Identify the Symptoms of Internet Security Infection
Dealing with an Internet Security infection can be a frustrating experience. These malicious programs often disguise themselves as legitimate antivirus software, tricking unsuspecting users into believing they are protected while they wreak havoc on their systems. To effectively remove Internet Security from your computer, you first need to identify the symptoms of its presence. Here are some common signs that indicate your system may be infected:
- Pop-up alerts: One of the most noticeable symptoms of an Internet Security infection is the constant barrage of pop-up alerts and warning messages alerting you to nonexistent threats on your computer. These alerts are designed to scare you into purchasing the full version of the fake antivirus software.
- Browser hijacking: Internet Security infections often take control of your web browser, redirecting you to malicious websites or displaying unwanted ads. If your homepage has changed without your consent or you are frequently redirected to unfamiliar websites, it may be a sign of infection.
- Slow performance: Another common symptom of an Internet Security infection is decreased system performance. If your computer has started to run noticeably slower, experiences frequent crashes or freezes, or takes longer to open programs and files, it could be due to the presence of malware.
- Disabled security software: A typical characteristic of Internet Security infections is that they disable legitimate antivirus or anti-malware software on your computer. If you notice that your antivirus program is no longer functioning or that you are unable to update it, it may be a sign that your system is compromised.
- Unwanted changes to settings: Internet Security infections often make unauthorized changes to your system settings, including firewall rules, proxy settings, and DNS configurations. If you find that your internet connection settings have been altered without your permission, it could indicate a malware infection.
By recognizing these symptoms, you can take appropriate actions to remove Internet Security from your computer and prevent further damage. Remember, being proactive in identifying and addressing these infections is crucial to maintaining the security and stability of your system.
Use an Antivirus or Anti-Malware Software to Scan for Infections
Once you have identified the symptoms of an Internet Security infection on your system, it is essential to take immediate action to remove the malware. Using an antivirus or anti-malware software is an effective way to scan for and eliminate these infections. Follow these steps to scan your computer:
- Choose a reputable antivirus software: Start by selecting a reliable antivirus or anti-malware program. There are many options available, both free and paid. Research and choose one that has a good reputation and regularly updates its virus definitions to detect the latest threats.
- Download and install the software: Visit the official website of the antivirus software you selected and download the installation file. Once the download is complete, run the setup file and follow the on-screen instructions to install the software on your computer.
- Update the virus definitions: After installation, it is crucial to update the antivirus software to ensure it has the latest virus definitions. These definitions enable the software to detect and remove the most recent malware threats. Most antivirus programs have an automatic update feature, but you can also manually update the definitions by navigating to the software’s settings or preferences menu.
- Perform a full system scan: Once the software is up to date, initiate a full system scan. This type of scan thoroughly examines all files and folders on your computer for any signs of malware infection. The scan may take some time, depending on the size of your hard drive and the number of files stored on it. It is recommended to close any unnecessary programs or files running in the background to speed up the scanning process.
- Review scan results and quarantine or remove infections: After the scan is complete, the antivirus software will present a list of detected infections. Carefully review the results and select the appropriate action for each infected file or piece of malware. Most antivirus programs allow you to quarantine or delete the infected files. Quarantining isolates the infected files, preventing them from causing further harm, while deletion permanently removes the malware from your system.
Regularly running scans with your chosen antivirus software is crucial to maintaining a secure computer. Remember to keep your antivirus software up to date and consider scheduling automatic scans to ensure your system remains protected from future infections.
Disable Internet Security from the Task Manager
If you are unable to remove Internet Security through conventional means or if it keeps interfering with your attempts to remove it, you may need to disable it from the Task Manager. The Task Manager is a built-in utility in Windows that allows you to view and manage running processes on your computer. Follow these steps to disable Internet Security:
- Open the Task Manager: To access the Task Manager, press the Ctrl + Shift + Esc keys simultaneously on your keyboard. Alternatively, you can right-click on the taskbar and select “Task Manager” from the context menu.
- Navigate to the “Processes” tab: In the Task Manager window, click on the “Processes” tab. Here, you will find a list of all the processes currently running on your computer.
- Locate the Internet Security process: Look for any processes related to Internet Security in the list. These processes may have names similar to the name of the fake antivirus software or the company that created it. Be cautious not to confuse legitimate antivirus software processes with the malware.
- Select and disable the process: Once you have identified the Internet Security process, select it by clicking on it. Next, click on the “End Task” or “End Process” button, usually located in the bottom-right corner of the Task Manager window. This will effectively terminate the malicious process and disable Internet Security.
Disabling the Internet Security process from the Task Manager should temporarily stop the malware from running on your system. However, keep in mind that this is only a temporary solution and does not permanently remove the infection. It is recommended to proceed with further removal steps, such as uninstalling the software from the Control Panel and using an antivirus scan to completely remove the malware from your computer.
Uninstall Internet Security from the Control Panel
To fully remove Internet Security from your computer, it is important to uninstall the malware from the Control Panel. Many fake antivirus software programs leave traces behind even after you terminate their processes, so uninstalling them is an essential step. Here’s how you can uninstall Internet Security:
- Open the Control Panel: To access the Control Panel, click on the “Start” menu and search for “Control Panel”. Click on it to open the Control Panel window.
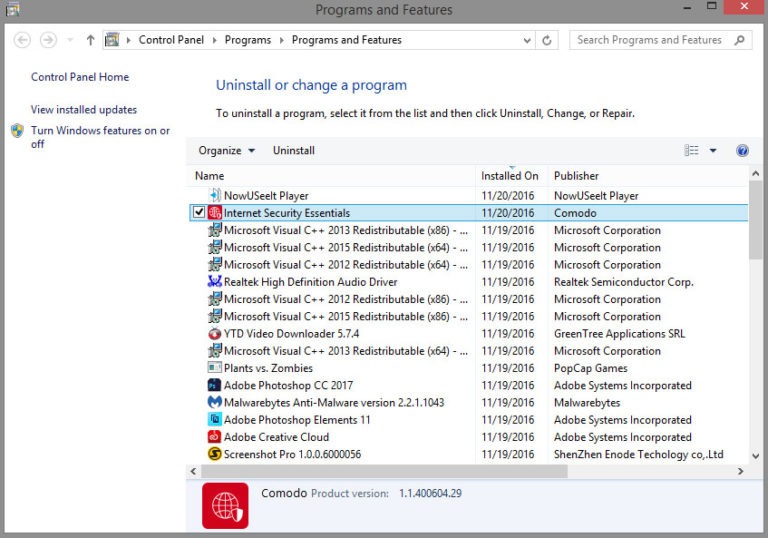
- Navigate to the “Programs and Features” or “Uninstall a Program” section: Depending on your version of Windows, look for either “Programs and Features” or “Uninstall a Program” in the Control Panel.
- Find Internet Security in the list: In the “Programs and Features” or “Uninstall a Program” section, you will see a list of all the installed programs on your computer. Scroll through the list and look for any entries related to Internet Security or any other suspicious antivirus software.
- Select and uninstall the program: Once you have located Internet Security or the related program, click on it to select it, then click on the “Uninstall” or “Remove” button. Follow the on-screen prompts to complete the uninstallation process.
- Follow additional instructions if prompted: Some fake antivirus software may require additional steps to uninstall completely. If you encounter any prompts or instructions during the uninstallation process, carefully follow them to ensure the malware is fully removed.
After successfully uninstalling Internet Security from the Control Panel, it is recommended to restart your computer to complete the removal process. However, keep in mind that uninstalling from the Control Panel may not remove all the associated files and registry entries. To ensure a thorough removal, it is advisable to use additional methods, such as scanning your computer with a reliable antivirus software and manually deleting any leftover files or folders associated with Internet Security.
Remove Internet Security from the Registry Editor
The Registry Editor is a powerful tool in Windows that allows you to view and edit the system’s registry database. Removing Internet Security from the registry can help eliminate any leftover traces and entries associated with the malware. However, it’s important to exercise caution when working with the registry, as making incorrect changes can have adverse effects on your system. Follow these steps to remove Internet Security from the Registry Editor:
- Open the Registry Editor: To access the Registry Editor, press the Windows key + R on your keyboard to open the Run dialog box. Type “regedit” in the box and hit Enter, or click on the “OK” button.
- Navigate to the appropriate registry keys: In the Registry Editor, navigate through the registry keys to find the entries related to Internet Security. The keys associated with malware may have names that resemble the name of the fake antivirus software or the company behind it. Be cautious not to modify or delete any legitimate registry entries.
- Delete the Internet Security registry keys: Once you have identified the suspicious registry keys, right-click on each key and select “Delete”. Confirm the deletion when prompted. It is best to start with the specific registry keys associated with Internet Security before moving on to other related keys.
- Perform a search for leftover registry entries: After deleting the specific Internet Security registry keys, you can perform a search in the Registry Editor to find any remaining entries. Click on “Edit” in the top menu and select “Find”. Enter keywords such as “Internet Security” or the name of the malware to search for related entries. Delete any additional entries you find that are associated with the fake antivirus software.
As a precautionary measure, it’s recommended to back up your registry before making any changes. This allows you to revert back to the original state if any issues arise during the removal process.
It’s important to note that modifying the registry can be risky, as any incorrect changes can cause system instability or other serious problems. If you’re uncomfortable working with the Registry Editor or unsure of what to delete, it’s advisable to seek assistance from a knowledgeable professional or rely on reliable antivirus software to complete the removal process.
Remove Internet Security Files and Folders from the File System
While uninstalling Internet Security from the Control Panel and removing its entries from the registry are important steps in the removal process, it’s also crucial to manually delete any remaining files and folders associated with the malware. These files can continue to cause issues and potentially reinstall the malicious software. Follow these steps to remove Internet Security files and folders from your file system:
- Terminate any related processes: Before proceeding, ensure that there are no active processes related to Internet Security running in the background. Use the Task Manager as mentioned earlier to end any suspicious processes.
- Locate the Internet Security installation folder: Navigate to the location where Internet Security was installed on your computer. This is typically in the “Program Files” or “Program Files (x86)” directory. Look for a folder with a name similar to the fake antivirus software or the company associated with it.
- Delete the Internet Security folder: Once you have located the Internet Security folder, right-click on it and select “Delete”. Confirm the deletion when prompted. This will remove the main folder containing the malware’s files and subfolders.
- Search for additional files and folders: Even after deleting the main Internet Security folder, there may still be residual files and folders scattered throughout your file system. Perform a search using the Windows search function and enter keywords related to Internet Security. Delete any remaining files or folders that are associated with the malware.
- Empty the Recycle Bin: After deleting the Internet Security files and folders, empty the Recycle Bin to permanently remove them from your computer.
It’s important to note that malware can sometimes disguise itself by using random filenames or hiding in system directories. Be vigilant when removing files and double-check that you are deleting the correct ones associated with Internet Security. If you are uncertain or want to ensure a thorough cleanup, consider using reliable antivirus software to scan your computer and remove any remaining traces of the malware.
By following these steps, you can effectively remove Internet Security files and folders from your file system, reducing the risk of reinstallation and potential harm to your computer.
Delete Internet Security Extensions and Add-ons from Web Browsers
Internet Security infections often come bundled with malicious browser extensions or add-ons that can track your browsing activities, display unwanted ads, or redirect you to suspicious websites. Removing these extensions and add-ons from your web browsers is essential to fully eradicate the malware. Here’s how you can delete Internet Security extensions and add-ons from popular web browsers:
- Google Chrome:
- Open Google Chrome and click on the three-dot menu icon in the top-right corner of the browser window.
- Select “More Tools” and then click on “Extensions”.
- Locate any suspicious extensions related to Internet Security and click on the trash bin icon next to them to remove them.
- Mozilla Firefox:
- Launch Mozilla Firefox and click on the three-bar menu icon in the top-right corner of the browser window.
- Select “Add-ons” from the dropdown menu.
- In the Add-ons Manager tab, click on “Extensions” in the left-hand sidebar.
- Look for any suspicious extensions associated with Internet Security and click on the “Remove” button next to them.
- Microsoft Edge:
- Open Microsoft Edge and click on the three-dot menu icon in the top-right corner.
- Select “Extensions” from the menu.
- Find any suspicious extensions related to Internet Security and click on the “Remove” button below them.
- Apple Safari:
- Launch Safari and click on “Safari” in the top menu bar.
- Select “Preferences” and go to the “Extensions” tab.
- Identify any suspicious extensions associated with Internet Security and click on the “Uninstall” button next to them.
Remember to remove all suspicious extensions or add-ons that you believe are associated with Internet Security. It’s also a good practice to review all installed extensions and remove any that you do not recognize or no longer use.
After removing the extensions, it is recommended to clear your browser cookies and cache to ensure any remaining traces of the malware are eliminated. Additionally, consider resetting your browsers to their default settings to undo any changes made by the malware.
By following these steps, you can effectively delete Internet Security extensions and add-ons from your web browsers, minimizing the risk of continued interference and enhancing your browsing security.
Reset Web Browsers to Default Settings to Remove Internet Security Components
To completely remove any remaining Internet Security components and restore your web browsers to their default state, it is recommended to perform a reset. Resetting your browsers eliminates any changes made by the malware and restores settings to their original configuration. Here’s how you can reset popular web browsers:
- Google Chrome:
- Open Google Chrome and click on the three-dot menu icon in the top-right corner.
- Go to “Settings” and scroll to the bottom to expand the advanced settings.
- Click on “Restore settings to their original defaults” under the “Reset and clean up” section.
- Confirm the reset by clicking on the “Reset settings” button.
- Mozilla Firefox:
- Launch Mozilla Firefox and click on the three-bar menu icon in the top-right corner.
- Select “Help” and then click on “Troubleshooting Information”.
- In the “Troubleshooting Information” tab, click on the “Refresh Firefox” button.
- Confirm the reset by clicking on the “Refresh Firefox” button in the prompt.
- Microsoft Edge:
- Open Microsoft Edge and click on the three-dot menu icon in the top-right corner.
- Select “Settings” and scroll down to the “Clear browsing data” section.
- Click on the “Choose what to clear” button.
- Select the checkboxes for “Browsing history”, “Cookies and saved website data”, and “Cached data and files”.
- Click on the “Clear” button to reset Microsoft Edge.
- Apple Safari:
- Launch Safari and click on “Safari” in the top menu bar.
- Select “Clear History” and choose the desired time range.
- Click on “Clear History” to reset Safari.
Resetting your web browser will remove any malicious extensions, unwanted search engine changes, and other customization made by Internet Security. However, it’s important to note that resetting your browser will also remove your saved passwords, bookmarks, and other personalized settings. Therefore, ensure that you have backed up any important data before proceeding with the reset.
After resetting your browsers, it’s advisable to run a full system scan with reputable antivirus software to ensure that all remnants of Internet Security have been removed from your computer.
By following these steps to reset your web browsers, you can effectively eliminate Internet Security components and restore your browsers to their default, secure state.
Scan for Leftover Files and Registries Using an Antivirus Software
Even after manually removing the visible traces of Internet Security, there may still be leftover files and registry entries hidden within your system. To ensure a thorough cleanup, it is recommended to perform a comprehensive scan using reputable antivirus software. Here’s how you can scan for leftover files and registries:
- Choose a reliable antivirus software: Select a reputable antivirus program that offers robust scanning capabilities and frequent updates to detect and remove the latest malware threats.
- Ensure the antivirus software is up to date: Before initiating the scan, make sure your antivirus software is fully up to date. This ensures that it has the latest virus definitions to effectively detect and remove any remnants of Internet Security.
- Open the antivirus software: Launch the antivirus program and navigate to the scanning options or settings.
- Select the scanning type: Choose the appropriate scanning option based on your antivirus software. Most programs offer different scanning types such as quick scan, full scan, or custom scan. For a thorough cleanup, it is recommended to perform a full system scan.
- Initiate the scan: Start the scan and allow the antivirus software to thoroughly examine your system for any leftover files, folders, and registry entries associated with Internet Security.
- Review and quarantine/delete any detected threats: After the scan is complete, the antivirus software will provide a report of the detected threats. Carefully review the report and select the appropriate action to quarantine or delete the identified remnants of Internet Security. Quarantining isolates the infected files, preventing them from causing further harm, while deletion permanently removes them from your system.
It’s important to note that the time required for a full system scan may vary depending on the size of your hard drive, the number of files stored, and the speed of your computer. It is advisable to close any unnecessary programs or files running in the background to expedite the scanning process.
Regularly scanning your computer with an antivirus software is vital to maintaining a secure system. By detecting and removing any leftover files and registries associated with Internet Security, you can significantly reduce the risk of reinfection and protect your computer from further malware threats.
Install a Reliable Antivirus Software to Prevent Future Infections
Protecting your computer from future malware infections is crucial to maintaining its security and stability. One of the most effective ways to prevent future infections is by installing and regularly updating a reliable antivirus software. Here are the steps to install and utilize antivirus software effectively:
- Choose a reputable antivirus software: Research and select a reputable antivirus software that offers comprehensive protection against a wide range of malware threats. Look for software that has positive reviews, regular updates, and a user-friendly interface.
- Download and install the antivirus software: Visit the official website of the chosen antivirus software and download the installation file. Run the setup file and follow the on-screen instructions to install the software on your computer.
- Update the antivirus software: After installation, ensure that the antivirus software is up to date. Most antivirus programs have automatic updates enabled by default, but it’s a good practice to verify and adjust the settings if necessary. Regular updates provide your computer with the latest virus definitions, ensuring it can effectively detect and protect against new and emerging threats.
- Configure the antivirus software: Take some time to familiarize yourself with the features and settings of the antivirus software. Customize the scanning options, real-time protection settings, and any additional security features offered to suit your specific needs.
- Perform regular scans: Schedule regular scans of your computer to identify and remove any potential malware threats. Most antivirus software programs offer options for quick scans, full system scans, and custom scans. Perform regular scans to keep your system protected and minimize the risk of infections.
- Exercise caution online: While antivirus software provides essential protection, it’s important to remain cautious when browsing the internet and downloading files. Avoid clicking on suspicious links, downloading files from untrusted sources, and opening email attachments from unknown senders. Exercise common sense and be vigilant to avoid potential threats altogether.
- Keep the software up to date: Stay proactive by regularly updating both your operating system and antivirus software. Operating system updates often include critical security patches, and antivirus software updates ensure ongoing protection against new threats.
By installing a reliable antivirus software, keeping it up to date, and practicing safe browsing habits, you can significantly reduce the risk of future malware infections. Remember that no antivirus software is foolproof, so it’s essential to remain cautious and practice good cybersecurity habits to protect your computer.