
Reasons to Remove Internet Security from Your PC
If you’re considering removing Internet Security software from your PC, you’re not alone. While the software is designed to protect your computer from various online threats, there are a few reasons why you might want to consider removing it. Here are some common reasons why users decide to uninstall Internet Security:
- Performance Issues: Some Internet Security software can significantly impact your PC’s performance, causing it to run slower and causing delays in accessing files and applications. This can be frustrating, especially if you rely on your computer for work or other important tasks.
- High System Resource Usage: Certain Internet Security programs consume a substantial amount of system resources, leading to high CPU and memory usage. This can result in your computer feeling sluggish and less responsive.
- Conflicting Software: In some cases, Internet Security software can conflict with other applications installed on your PC, causing compatibility issues that can disrupt the smooth functioning of your computer. Removing the software can help resolve these conflicts.
- Subscription Costs: Many Internet Security software programs require an annual subscription fee. If you’re looking to reduce your expenses or switch to a different cybersecurity solution, uninstalling the current software can make financial sense.
- False Positives: Internet Security software can sometimes flag legitimate programs or files as potential threats, leading to false positive alerts. Constant false positives can be annoying and may lead users to consider removing the software altogether.
While Internet Security software plays an essential role in protecting your computer from online threats, it’s essential to evaluate whether the software you’re using is meeting your needs effectively. If you’re experiencing performance issues, high resource usage, compatibility problems, subscription costs, or constantly dealing with false positives, it may be time to consider removing your current Internet Security software.
Check for Malware or Viruses
Before removing Internet Security software from your PC, it’s crucial to ensure that your system is free from malware or viruses. Removing the software without running a thorough scan could leave your computer vulnerable to potential threats. Here are the steps to check for malware or viruses:
- Update Your Antivirus Software: If you have a separate antivirus program installed, make sure it’s up to date with the latest virus definitions. This will ensure that the scan is comprehensive and effective.
- Perform a Full System Scan: Open your antivirus software and start a full system scan. This will scan all files, folders, and applications on your PC for any signs of malware or viruses. Allow the scan to complete, as it may take some time depending on the size of your hard drive and the number of files on your system.
- Quarantine or Remove Detected Threats: Once the scan is complete, your antivirus software will display a list of any detected threats. Take appropriate action by quarantining or removing the malicious files. Follow the guidelines provided by your antivirus software for the precise steps to take.
- Perform Additional Scans: To ensure thoroughness, it’s recommended to perform scans with other reputable antivirus or anti-malware programs. Some malicious files may go undetected by a single program, so using multiple tools can increase the chances of identifying hidden threats.
- Monitor for Persistent Issues: After removing any detected malware or viruses, keep an eye on your system for any signs of ongoing issues. Watch for unusual behavior, slow performance, frequent crashes, or any other suspicious activities. If you notice any problems, it may be necessary to seek professional help to further diagnose and resolve the issue.
By checking for malware or viruses before removing Internet Security software, you can ensure that your computer is clean and ready for the transition to a different cybersecurity solution. This step is crucial in maintaining the security and integrity of your PC.
Uninstall Internet Security Software
If you’ve decided to remove your current Internet Security software from your PC, you’ll need to follow a few simple steps to complete the uninstallation process. Here’s a guide on how to uninstall Internet Security software:
- Access Control Panel: Open the Control Panel on your PC. You can do this by clicking the Start menu and searching for “Control Panel.” Select it from the search results.
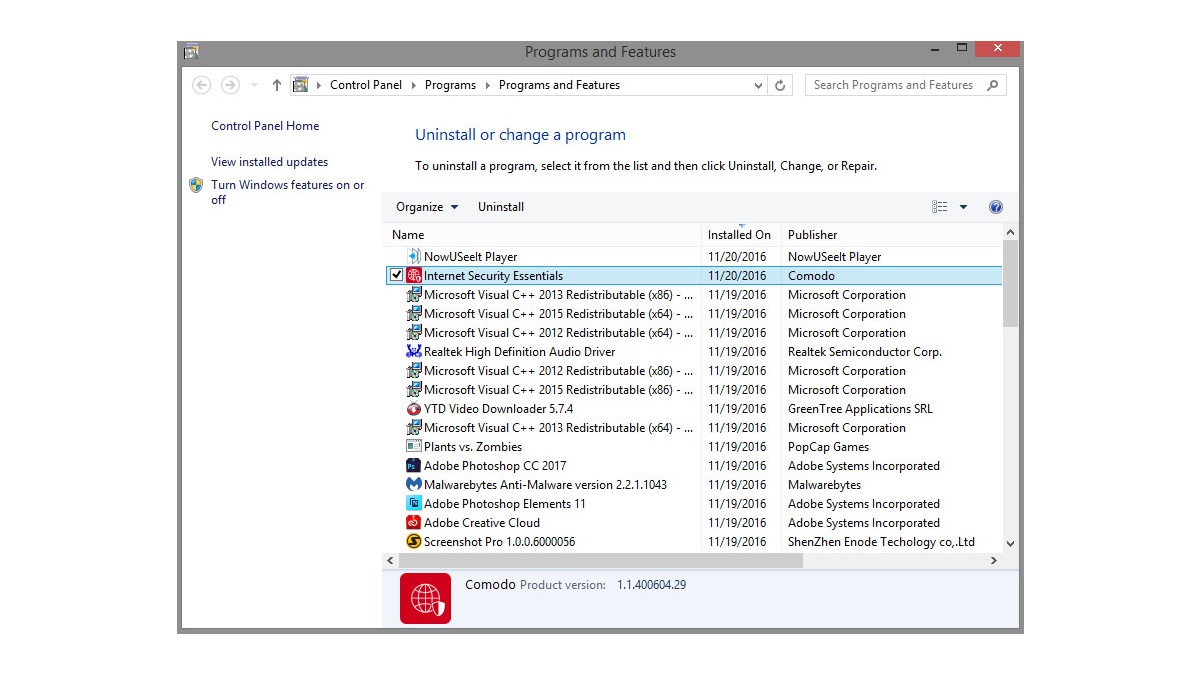
- Open Programs and Features: In the Control Panel, locate the “Programs” or “Programs and Features” option. Click on it to open the list of installed programs on your PC.
- Find the Internet Security Software: Scroll through the list of installed programs and locate your Internet Security software. It may be listed under its specific name or the name of the software company. Once you find it, click on it to select it.
- Click Uninstall: With the Internet Security software selected, click on the “Uninstall” or “Remove” button. Follow any prompts or instructions that appear on the screen to initiate the uninstallation process.
- Complete the Uninstallation: Allow the uninstallation process to run its course. It may take a few minutes to complete, depending on the size of the software and your system’s speed. Once finished, you may be prompted to restart your PC. Follow the prompts accordingly.
- Verify the Uninstallation: After your PC restarts, double-check that the Internet Security software has been successfully removed. Navigate back to the list of installed programs in the Control Panel and ensure that it is no longer listed.
By following these steps, you can effectively uninstall the Internet Security software from your PC. Keep in mind that some software may require additional steps or specific uninstallation tools provided by the software company. Refer to the software’s documentation or the company’s website for any specific instructions pertaining to the uninstallation process.
Once the Internet Security software is uninstalled, you can proceed with installing an alternative cybersecurity solution or explore other ways to keep your PC protected from online threats.
Disable Internet Security Startup Programs
After uninstalling Internet Security software from your PC, it’s important to ensure that any associated startup programs or services are disabled. This will prevent them from running automatically when you start your computer. Disabling these startup programs can help optimize your system’s performance and prevent any potential conflicts with other security software. Here’s how you can disable Internet Security startup programs:
- Open Task Manager: Right-click on the taskbar at the bottom of your screen and select “Task Manager” from the context menu. Alternatively, you can press “Ctrl + Shift + Esc” on your keyboard to open Task Manager directly.
- Switch to the Startup Tab: In the Task Manager window, click on the “Startup” tab. This will display a list of programs that launch during startup.
- Locate Internet Security Programs: Look for any entries related to the previously installed Internet Security software. These entries may be labeled with the software’s name or the name of the software company.
- Disable the Programs: Right-click on each Internet Security entry and select “Disable” from the context menu. This will prevent the programs from starting up automatically during system boot.
- Review Other Startup Programs: While you’re in the Startup tab, you may want to review the other programs listed and disable any unnecessary ones. This can help improve your computer’s startup time and overall performance.
- Restart Your Computer: After disabling the Internet Security startup programs, it’s recommended to restart your PC. This will ensure that all changes take effect.
Disabling Internet Security startup programs is essential to avoid any potential conflicts and ensure a smooth operation of your PC. However, keep in mind that disabling these programs does not compromise the overall security of your computer, as long as you have alternative security measures in place.
By following these steps, you can effectively disable Internet Security startup programs and optimize your computer’s performance without compromising its security. Remember to regularly review your startup programs and disable any unnecessary ones to maintain a well-performing system.
Remove Internet Security Registry Entries
When uninstalling Internet Security software from your PC, it’s important to not only remove the program files but also any associated registry entries. The registry is a centralized database that stores crucial information about your system and installed software. Removing leftover registry entries left behind by Internet Security software can help ensure a clean and optimized system. Here’s how you can remove Internet Security registry entries:
- Open Registry Editor: Press the Windows key + R on your keyboard to open the Run dialog box. Type “regedit” into the field and press Enter. This will open the Registry Editor.
- Backup Registry (Optional): Before making any changes to the registry, it’s wise to create a backup. This allows you to restore the registry to its previous state if anything goes wrong. To create a backup, click on “File” in the Registry Editor menu and select “Export.” Choose a location to save the backup file and give it a name.
- Navigate to the Internet Security Entries: In the Registry Editor, navigate to the following location:
HKEY_LOCAL_MACHINE\SOFTWARE. Look for any entries related to the Internet Security software you uninstalled. These entries may be labeled with the software’s name or the name of the software company. - Delete the Entries: Right-click on each Internet Security entry and select “Delete” from the context menu. Confirm the deletion when prompted. Be cautious while deleting registry entries, as deleting the wrong ones can cause system instability.
- Repeat for User-Specific Entries (Optional): If there are any Internet Security entries under
HKEY_CURRENT_USER\SOFTWARE, navigate to that location and delete them as well. - Restart Your Computer: Once you have finished deleting the Internet Security registry entries, it’s recommended to restart your computer. This will help ensure that any changes made to the registry take effect.
Removing Internet Security registry entries is an important step in thoroughly uninstalling the software and ensuring a clean system. However, it’s crucial to exercise caution while working with the registry. Make sure to back it up before making any changes and only delete entries related to the specific Internet Security software you uninstalled.
By following these steps, you can effectively remove Internet Security registry entries and maintain the integrity of your system. Remember to proceed with care and always create a backup of the registry before making any modifications.
Delete Leftover Files and Folders
When you uninstall Internet Security software from your PC, there may be leftover files and folders that were not removed during the uninstallation process. These remnants can take up valuable storage space and potentially interfere with the functioning of your computer. It’s important to identify and delete these files and folders to ensure a clean and optimized system. Here’s how you can delete leftover files and folders:
- Search for Program Files: Open File Explorer by pressing the Windows key + E on your keyboard. Navigate to the main drive where the Internet Security software was installed, usually the C: drive. Look for a folder with the name of the Internet Security software or the software company. Delete this folder to remove any leftover program files.
- Check Common File Locations: Some Internet Security software might store additional files or folders in common system locations, such as the “ProgramData” or “AppData” folders. To access these folders, type the folder name into the File Explorer address bar and press Enter. Look for any remaining files or folders related to the Internet Security software and delete them.
- Empty the Recycle Bin: After deleting the leftover files and folders, it’s important to empty the Recycle Bin to permanently remove them from your system. Right-click on the Recycle Bin icon on your desktop and select “Empty Recycle Bin.” Confirm the action when prompted.
- Use a File Cleanup Tool (Optional): If you want to thoroughly clean your system and ensure that no leftover files or folders are left behind, you can use a third-party file cleanup tool. These tools scan your system for unnecessary files and provide an easy way to delete them. ccleaner is a popular tool that you might consider using.
- Restart Your Computer: Once you have completed the deletion of leftover files and folders, it’s recommended to restart your computer. This helps ensure that any temporary files or system changes are fully applied.
By following these steps, you can effectively delete the leftover files and folders from your previous Internet Security software installation. This will help free up disk space and ensure a clean and optimized system. Remember to exercise caution while deleting files and always double-check that you are deleting the correct files and folders, and not any essential system files.
Restart Your PC
After making changes to your PC, such as uninstalling Internet Security software or deleting leftover files and folders, it’s important to restart your computer. Restarting your PC can help ensure that any system changes take effect and that your computer operates smoothly. Here are a few reasons why restarting your PC is beneficial:
- Apply System Changes: Restarting your PC allows any system changes, such as uninstalling software or removing files, to be fully applied. This ensures that your computer operates with the updated configuration and settings.
- Resolve System Errors: Restarting your computer can help resolve minor system errors or glitches that may be impacting its performance. By restarting, you give your PC a fresh start and allow it to clear any temporary issues that may be causing problems.
- Free Up System Resources: When you restart your PC, it clears the computer’s memory and releases any resources that may have been tied up by running processes or programs. This can help improve your system’s performance and responsiveness.
- Refresh Network Connections: If you’ve made changes to your network settings or have been encountering connectivity issues, restarting your computer can reset your network connections. This can be especially useful if you’re experiencing difficulties connecting to the internet or other network devices.
- Update System Software: Restarting your PC after installing system updates allows those updates to be fully applied. It gives your computer the opportunity to install any pending updates and ensures that your system remains secure and up to date.
Restarting your PC is a simple yet effective measure to improve its performance and resolve any issues that may arise after making changes. It’s a best practice to regularly restart your computer, especially after significant modifications or updates.
By restarting your PC, you can ensure that any changes made to your system take effect, resolve system errors, free up system resources, refresh network connections, and allow for the installation of software updates. Take the time to restart your computer after making changes to maintain its optimal performance and stability.
Install a Different Internet Security Software
If you have removed your previous Internet Security software and are looking to maintain protection for your PC, installing a different Internet Security software is a crucial step. With numerous options available in the market, choosing the right software that meets your needs and provides comprehensive protection is essential. Here’s how you can go about installing a different Internet Security software:
- Research and Choose: Take the time to research and compare different Internet Security software options. Consider factors such as the software’s features, reputation, user reviews, and pricing. Look for a software package that offers reliable protection against various online threats, including viruses, malware, phishing, and ransomware.
- Download the Software: Once you have chosen the Internet Security software that suits your requirements, visit the software provider’s official website. Look for the download or purchase section and follow the prompts to download the software. Ensure that you download the correct version for your operating system.
- Run the Installer: Locate the downloaded software file on your PC and double-click on it to run the installer. Follow the instructions provided by the software’s installation wizard. Typically, you will need to agree to the terms and conditions and select any desired customization options.
- Complete the Installation: Allow the installation to proceed, as it may take a few minutes to complete. The installer will create necessary program files, configure settings, and install any required components for the Internet Security software.
- Activate and Configure: Once the installation is finished, you may be prompted to activate the software using a license key or subscription details. Follow the provided instructions to activate your Internet Security software. After activation, configure the settings according to your preferences, including scanning schedules, real-time protection, and any additional features you want to enable.
- Update the Software: After installation, it’s crucial to update your Internet Security software to ensure that it has the latest virus definitions and security patches. Most software programs have an automatic update feature, but you can also manually check for updates within the software’s settings or preferences.
By installing a different Internet Security software, you can continue to protect your PC from various online threats. It’s important to choose a reputable and reliable software package and regularly update it to ensure optimal protection.
Remember to uninstall any conflicting security software before installing the new Internet Security software to avoid any compatibility issues. Keep in mind that each Internet Security software may have its own interface and features, so take some time to familiarize yourself with the new software and adjust settings based on your preferences and needs.
Keep Your PC Protected Without Internet SecurityIf you have decided not to install another Internet Security software on your PC, it’s crucial to explore alternative methods to keep your system protected from online threats. While Internet Security software offers comprehensive protection, there are still measures you can take to safeguard your computer. Here are some ways to keep your PC protected without Internet Security:
- Enable Windows Defender: Windows operating systems come with built-in antivirus protection called Windows Defender. Ensure that it is enabled and up to date. You can access Windows Defender by searching for it in the Windows search bar and following the prompts to scan your system regularly.
- Keep Your Operating System Updated: Regularly update your operating system to ensure you have the latest security patches and fixes. Enable automatic updates or manually check for updates. Patching vulnerabilities in your operating system helps protect against potential threats.
- Use a Firewall: Windows also provides a built-in firewall that monitors incoming and outgoing network traffic. Ensure that it is active and properly configured. A firewall helps block unauthorized access to your system and provides an additional layer of protection.
- Practice Safe Browsing Habits: Be cautious when browsing the internet and avoid clicking on suspicious links or downloading files from untrusted sources. Regularly update your web browsers and use browser extensions that block malicious websites and phishing attempts.
- Be Wary of Email Attachments: Exercise caution when opening email attachments, especially if they come from unknown or suspicious senders. Avoid opening attachments that you weren’t expecting or that seem unusual. Cybercriminals often use email attachments to spread malware.
- Be Mindful of Downloaded Files: Before opening downloaded files, scan them with a reliable antivirus or online virus scanner. This helps detect any potential threats before they can harm your system. Avoid downloading files from untrusted sources whenever possible.
- Use Strong and Unique Passwords: Create strong and unique passwords for your online accounts. This helps prevent unauthorized access to your accounts and protects your personal information. Consider using a password manager to securely store your passwords.
- Regularly Back Up Your Data: Implement a regular backup strategy to protect your data from loss or ransomware attacks. Use external hard drives, cloud storage, or backup software to keep copies of your important files and documents in a separate location.
While Internet Security software provides comprehensive protection, implementing these measures can help keep your PC safe without relying solely on it. Remember to stay vigilant, keep your software up to date, and exercise safe browsing habits to maintain a secure computing environment.
It’s important to note that while these measures enhance your PC’s security, using a dedicated Internet Security software remains the most comprehensive and recommended approach for protecting your computer from online threats.