
What is Reset This PC?
Reset This PC is a useful feature in Windows 10 that allows you to restore your computer to its original factory settings or to re-install a fresh copy of Windows. It is a valuable tool if you are experiencing performance issues, have encountered persistent errors, or simply want to start over with a clean slate. When you reset your PC, it removes all of your personal files and applications, giving you a fresh start without any of your customizations or installed programs.
Resetting your PC can be done in several ways, depending on your needs and preferences. You have the option to reset and keep your files, reset and remove everything, or reset and keep certain files while removing others. This flexibility allows you to choose the level of reset that suits your requirements.
It’s important to note that resetting your PC is different from simply restarting or shutting down your computer. Resetting your PC re-installs Windows, essentially wiping your hard drive and giving you a clean installation. This means that any files, applications, or personalization settings that are not backed up will be permanently lost.
Reset This PC is a powerful tool that can help you troubleshoot and resolve various issues, such as software conflicts, malware infections, or system instability. It can also be useful if you plan to sell your computer or pass it on to someone else, as it ensures that all personal data and settings are removed.
In the following sections, we will explore the different types of resets you can perform, as well as the steps to reset your PC on Windows 10. It’s important to understand the different options available to you, as they can have a significant impact on the data and applications that will be affected during the reset process.
Types of Reset
Reset This PC offers different options for resetting your computer, depending on your needs and preferences. Let’s explore the various types of resets you can perform:
Resetting without losing your files
This type of reset allows you to keep your personal files, such as documents, photos, and videos, while removing all installed applications and settings. It is a useful option when you want to start fresh with a clean system but still want to retain your important files.
Resetting and removing everything
If you want to completely wipe your computer and start over from scratch, this is the option for you. It removes all your personal files, apps, and settings, restoring your PC to its original factory state. It is recommended to backup your important files before choosing this option, as everything will be permanently deleted.
Resetting and keeping certain files
This type of reset allows you to specify which folders or files you want to keep while removing everything else. It gives you more control over the reset process and is helpful when you have specific files or folders that you want to retain while getting rid of the rest.
Resetting and removing selected folders only
If you only want to remove specific folders and their contents, this option lets you do that. You can choose the folders you want to get rid of while keeping the rest of your files intact. It’s a convenient choice when you want to clean up your system by removing unnecessary folders without affecting the rest of your files.
These different types of resets provide flexibility and cater to a variety of use cases. Depending on your specific requirements, you can choose the most suitable reset option to achieve your desired outcome. It’s important to carefully consider the type of reset before proceeding, as it will impact the data and applications on your computer.
Resetting without losing your files
One of the options available when using Reset This PC is the ability to reset your computer without losing your personal files. This can be a convenient choice if you want to start fresh with a clean system while preserving your important documents, photos, and videos.
When you select the “Keep my files” option during the reset process, Windows 10 will remove all installed applications and settings, but your personal files will remain untouched. This means that after the reset, you will still have access to your documents, pictures, music, and other files stored on your computer.
Resetting your PC without losing your files is especially useful when you want to resolve performance or stability issues that may be caused by conflicting software or system errors. It allows you to start with a clean system without the need to manually back up and restore your personal files.
To perform a reset without losing your files, follow these steps:
- Open the “Settings” app on your Windows 10 computer.
- Click on “Update & Security.”
- Select “Recovery” from the left-hand menu.
- Under the “Reset this PC” section, click on “Get started.”
- Choose the “Keep my files” option.
- Follow the on-screen instructions to complete the reset process.
It’s important to note that while your personal files will be preserved, any installed applications and system settings will be removed. After the reset, you will need to reinstall your applications and reconfigure your preferences.
Before initiating a reset, ensure that you have a backup of your important files, as unexpected issues during the reset process can lead to data loss. You can back up your files to an external storage device or use cloud storage services to securely store your files.
Resetting your PC without losing your files can be an effective way to refresh your system and resolve software-related issues. It provides a balance between starting afresh and preserving your important files, making it a popular choice for many Windows 10 users.
Resetting and removing everything
Sometimes, you may find yourself in a situation where you want to completely wipe your computer and start over from scratch. In such cases, the “Remove everything” option in Reset This PC comes in handy. Choosing this option will remove all your personal files, installed applications, and settings, giving you a clean slate to work with.
It’s important to note that when you select the “Remove everything” option, all your personal files, including documents, photos, videos, and music, will be permanently deleted. Therefore, it is crucial to back up any files that you want to keep before proceeding with the reset to avoid losing important data.
To perform a reset and remove everything from your PC, follow these steps:
- Open the “Settings” app on your Windows 10 computer.
- Click on “Update & Security.”
- Select “Recovery” from the left-hand menu.
- Under the “Reset this PC” section, click on “Get started.”
- Choose the “Remove everything” option.
- Follow the on-screen instructions to complete the reset process.
It’s worth mentioning that the reset process may take some time to complete, depending on the speed of your computer and the amount of data being removed. Once the reset is finished, your computer will be restored to its original factory state, just like when you first purchased it.
Resetting and removing everything is a drastic action that should be used with caution. It is recommended to exhaust other troubleshooting methods before resorting to this option. However, it can be immensely useful when you want to completely wipe your computer and start fresh, whether it’s to resolve persistent issues, prepare for selling or donating your device, or simply to have a clean environment to work with.
After completing the reset, you will need to reinstall your applications and configure your settings from scratch. Take this opportunity to only install the necessary programs and set up your preferences in a way that suits your needs.
Remember, resetting and removing everything should only be done after careful consideration, as it permanently deletes all your personal files. Make sure to back up your important data beforehand to prevent any irreversible loss.
Resetting and keeping certain files
If you want to perform a reset on your computer but still want to retain specific files or folders, the “Keep my files” option in Reset This PC is the ideal choice for you. This option allows you to reset your PC while preserving selected files, giving you a fresh start with the convenience of keeping your important data.
When you choose the “Keep my files” option, Windows 10 will remove all installed applications and settings, but your personal files will remain intact. This means that after the reset, you will still have access to the files and folders that you chose to keep, while everything else will be removed.
To perform a reset and keep certain files, follow these steps:
- Open the “Settings” app on your Windows 10 computer.
- Click on “Update & Security.”
- Select “Recovery” from the left-hand menu.
- Under the “Reset this PC” section, click on “Get started.”
- Choose the “Keep my files” option.
- Follow the on-screen instructions to complete the reset process.
During the reset process, you will be prompted to choose the specific files and folders that you want to retain. You can select individual files or entire folders to ensure that the important data is preserved while everything else is removed.
It’s important to note that although your selected files will be kept, any installed applications and system settings will be removed. After the reset, you will need to reinstall your applications and configure your settings to match your preferences.
Before initiating the reset and keeping certain files, it is always wise to back up your important data as unexpected issues during the reset process can lead to data loss. Backing up your files to an external storage device or utilizing cloud storage services ensures that your data is safe and can be easily restored if needed.
Resetting and keeping certain files provides a balanced approach to starting fresh while retaining the important data that you need. It is a useful option when you want to remove unwanted applications and settings while ensuring that your cherished documents, photos, and other important files remain accessible on your computer.
Resetting and removing selected folders only
If you have specific folders on your computer that you want to remove without affecting the rest of your files, the “Reset This PC” feature offers an option to do just that. By choosing the “Remove selected folders” option, you can perform a reset while targeting and eliminating specific folders, providing you with a customized reset experience.
This option is especially useful when you want to clean up your system by removing unnecessary or unwanted folders that may be taking up valuable storage space or causing clutter. By selecting specific folders for removal, you can effectively declutter your system while preserving the rest of your files and settings.
To perform a reset and remove selected folders, follow these steps:
- Open the “Settings” app on your Windows 10 computer.
- Click on “Update & Security.”
- Select “Recovery” from the left-hand menu.
- Under the “Reset this PC” section, click on “Get started.”
- Choose the “Remove selected folders” option.
- Select the folders you want to remove.
- Follow the on-screen instructions to complete the reset process.
During the reset process, you will be presented with a list of folders on your computer. From this list, you can choose the specific folders that you want to remove. Once the reset is complete, the selected folders and their contents will be permanently deleted, while the rest of your files, applications, and settings will remain intact.
It’s important to exercise caution when selecting folders for removal to avoid inadvertently deleting important data. Make sure to carefully review the list and double-check that you have selected the correct folders before proceeding with the reset.
Before initiating the reset and removing selected folders, it is recommended to back up any important data present within those folders. This ensures that you have a copy of any files that may be inadvertently removed during the reset process.
Resetting and removing selected folders only provides you with greater control over the reset process, allowing you to tailor the reset according to your needs. By removing specific folders, you can eliminate unnecessary or unwanted data, effectively decluttering your system and freeing up storage space without affecting the rest of your files and settings.
How to Reset This PC on Windows 10
Resetting your PC on Windows 10 is a straightforward process that can be done through the Settings app. Here is a step-by-step guide on how to reset your PC:
Step 1: Open the Settings
Click on the “Start” menu and select the “Settings” gear icon located above the “Power” options. Alternatively, you can press the Windows key + I to open the Settings app directly.
Step 2: Click on Update & Security
In the Settings app, click on “Update & Security” from the available options.
Step 3: Select Recovery
In the left-hand menu of the Update & Security section, select the “Recovery” option.
Step 4: Click on Get started
Under the “Reset this PC” section, click on the “Get started” button. This will initiate the reset process.
Step 5: Choose an option
You will be presented with three options:
- Keep my files: This option will reset your PC while keeping your personal files intact.
- Remove everything: This option will completely remove all personal files, applications, and settings from your PC.
- Restore factory settings: This option will remove all personal files, applications, and settings, restoring your PC to its original factory state.
Select the desired option based on your requirements.
Step 6: Follow the on-screen instructions
Once you have chosen the reset option, follow the on-screen instructions to proceed with the reset process. You may be asked to confirm your selection and make additional choices depending on the option you selected.
During the reset process, it’s important to ensure that your computer is connected to a stable power source and that you have a stable internet connection. This will help prevent any interruptions that could potentially cause issues during the reset.
After the reset is complete, your PC will reboot and you will be presented with a fresh installation of Windows 10. You will need to go through the initial setup process, including signing in with your Microsoft account, choosing your region and language preferences, and customizing your settings according to your needs.
It’s important to note that resetting your PC will remove all installed applications and settings, so it’s recommended to make a backup of any important files and take note of any applications or settings that you want to reinstall or reconfigure after the reset.
Resetting This PC on Windows 10 is a useful tool to resolve issues and start fresh with a clean system. Understanding the steps involved in the process can help you perform a reset confidently and effectively.
Step 1: Open the Settings
To initiate the process of resetting your PC on Windows 10, the first step is to open the Settings app. The Settings app provides access to various system settings and options, including the ability to reset your PC. Here’s how you can open the Settings app:
Method 1: Click on the “Start” menu icon located at the bottom-left corner of your screen. From the Start menu, select the “Settings” gear icon, which is located just above the “Power” options. Clicking on the Settings icon will open the Settings app.
Method 2: Use the keyboard shortcut by pressing the Windows key + I simultaneously. This keyboard shortcut allows you to directly open the Settings app without going through the Start menu.
Upon opening the Settings app, you will be greeted with a user-friendly interface organized into different categories, making it easy to navigate and find the settings you need. The Settings app is designed to give you granular control over various aspects of your Windows 10 system, including personalization, updates, privacy, and more. It is the central location where you can access and modify numerous settings to customize your PC according to your preferences.
It’s worth noting that the Settings app replaces the older Control Panel interface present in previous versions of Windows. While some settings might still be found in the Control Panel, many new features and settings are now exclusively available in the Settings app. Therefore, it is recommended to become familiar with the layout and navigation of the Settings app for a better user experience.
By opening the Settings app, you have taken the first step towards resetting your PC on Windows 10. From here, you can proceed to the next steps, which involve accessing the necessary sections and options within the Settings app to initiate the reset process. Make sure to follow the subsequent steps carefully, as they will guide you through the remaining stages of resetting your PC and help you achieve the desired outcome.
Remember to back up any important files and take note of any specific settings or applications that you want to reinstall or reconfigure after the reset. It’s always a good practice to have a backup of your important data before making any significant changes to your system.
Opening the Settings app is the initial step towards resetting your PC on Windows 10, allowing you to access the necessary options to begin the reset process in the following steps. Now that you know how to open the Settings app, you can proceed to the next step and continue with resetting your PC.
Step 2: Click on Update & Security
After opening the Settings app in Windows 10, the next step in resetting your PC is to navigate to the “Update & Security” section. This section contains various options and settings related to updates, security, and recovery. Here’s how you can locate and access the Update & Security section:
1. Once you have the Settings app open, you will see different categories listed. Look for the category labeled “Update & Security” and click on it.
2. Alternatively, you can use the search bar at the top of the Settings app. Type in “Update & Security” and select the corresponding result that appears in the search results. This will directly take you to the Update & Security section.
Upon clicking on the Update & Security section, you will be presented with a range of options related to updating Windows, managing security settings, and handling recovery options. This section is crucial for performing a PC reset as it contains the necessary tools and options needed to initiate the reset process.
With every major Windows 10 update, Microsoft has introduced new features and enhancements to the Update & Security section. Some of the key options you may find within this section include Windows Update, Windows Security, Backup, Recovery, and Activation. These options enable you to keep your system up to date, protect it from security threats, create backup copies of your important files, and recover your system in case of issues.
When resetting your PC, the Update & Security section plays a crucial role as it provides access to the Recovery options that allow you to initiate the reset process. It is here that you will find the necessary information and settings to proceed with resetting your PC and choose the appropriate reset option based on your requirements.
It is always a good practice to explore the Update & Security section and familiarize yourself with the available options. This will not only help you with the PC reset process but also enable you to take advantage of the other features and tools available to ensure your system is up to date and secure.
Now that you have clicked on the Update & Security section, you are one step closer to resetting your PC on Windows 10. In the next step, we will delve further into the Recovery options within this section and proceed with the reset process. Stay tuned!
Step 3: Select Recovery
After accessing the Update & Security section in the Settings app on your Windows 10 computer, the next step in resetting your PC is to navigate to the “Recovery” section. This section provides various options and tools related to recovery, including the ability to reset your PC. Here’s how you can select the Recovery section:
1. Within the Update & Security section, you will find a sidebar on the left-hand side. Scroll down the sidebar and locate the “Recovery” option. Click on it to access the Recovery settings.
2. Alternatively, you can use the search bar at the top of the Settings app. Type in “Recovery” and select the corresponding result that appears in the search results. This will directly take you to the Recovery section.
Upon selecting the Recovery section, you will find a range of options and tools related to recovering your system, including the option to reset your PC. This section allows you to choose the appropriate recovery option depending on your specific needs, whether it’s troubleshooting issues, restoring your system to a previous state, or performing a complete reset.
The Recovery section provides valuable tools such as the ability to reset your PC, advanced startup options, and the option to revert to a previous build of Windows. However, for the purpose of resetting your PC, we will primarily focus on the reset options available within this section.
By reaching the Recovery section, you are one step closer to initiating the reset process on your Windows 10 PC. In the next step, we will explore the available reset options within the Recovery section and guide you on how to proceed with resetting your PC. Stay with us!
It’s worth mentioning that the Recovery section is an essential part of the Settings app that allows you to troubleshoot issues and perform necessary actions to restore and reset your PC. Familiarizing yourself with the available options in this section will not only assist you in the reset process but also enable you to navigate through various recovery tools and options offered by Windows 10.
Now that you have selected the Recovery section, let’s move on to the next step and delve into the available reset options within this section to reset your PC effectively.
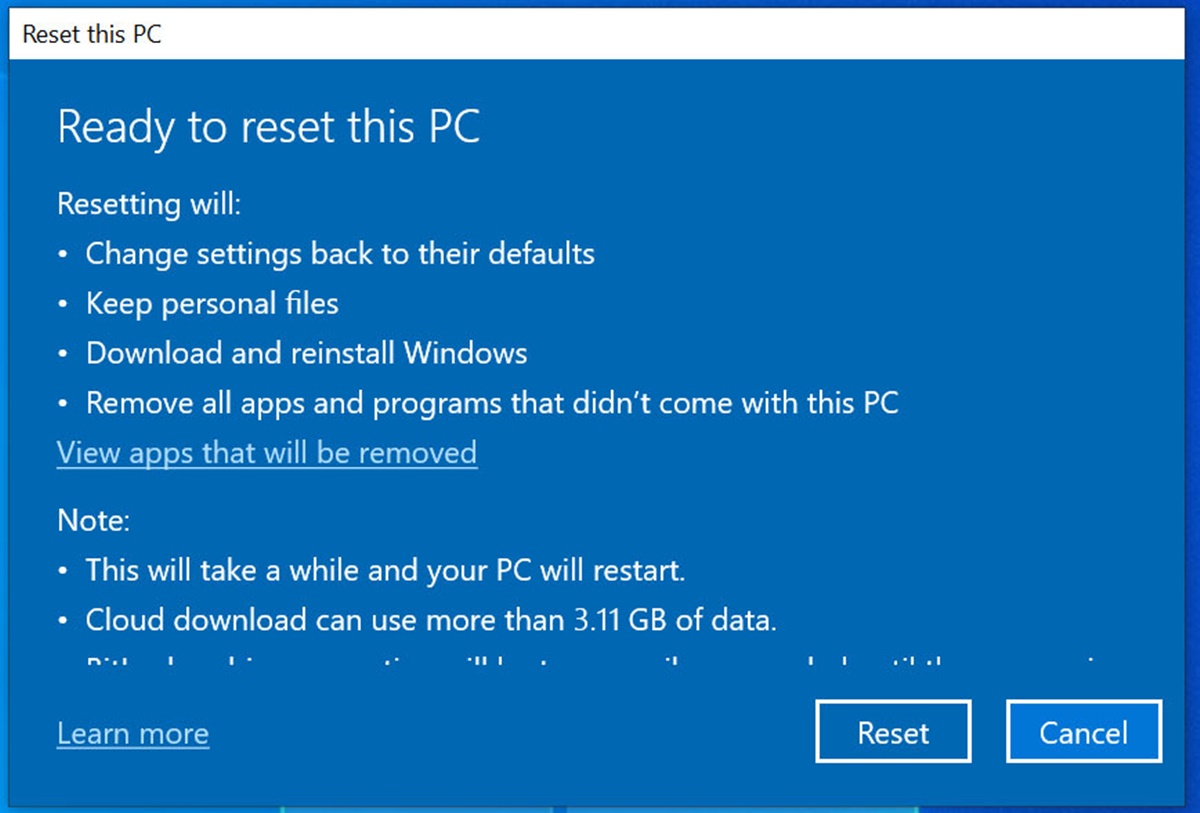
Step 4: Click on Get started
Once you have accessed the Recovery section within the Update & Security settings in the Windows 10 Settings app, the next step in resetting your PC is to click on the “Get started” button. This button initiates the reset process and allows you to choose the appropriate reset option based on your preferences. Here’s how you can proceed:
1. Within the Recovery section, you will find a subsection labeled “Reset this PC.” Underneath this subsection, you will see the “Get started” button. Click on this button to begin the reset process.
2. Upon clicking the “Get started” button, a pop-up window will appear, presenting you with different reset options to choose from. These options include keeping your files, removing everything, or restoring your PC to its original factory settings.
3. Carefully analyze your requirements and determine the appropriate reset option for your needs. It’s essential to consider whether you want to retain your personal files, remove all files and applications, or restore your PC to its original state without any personalized settings or files.
4. Once you have made your decision, click on the corresponding option to proceed with the reset process. If you choose to keep your files, Windows 10 will remove all installed applications and settings but retain your personal files. If you choose to remove everything, all personal files, applications, and settings will be permanently deleted. And if you choose to restore factory settings, your PC will be reset to its original state as it was when you first acquired it.
5. After selecting the desired reset option, a confirmation message will appear, informing you about the consequences of your choice. Make sure to read the message carefully and understand that the reset process is irreversible, and you may lose data if you haven’t backed up your files.
6. Once you have understood and accepted the consequences, click on the “Next” or “Confirm” button to proceed with the reset process.
By clicking on the “Get started” button, you have taken the crucial step of initiating the reset process on your Windows 10 PC. In the following steps, you will be guided through the remaining stages of the reset process, where you will confirm your choice, follow on-screen instructions, and wait for the reset process to complete.
It’s important to note that the time required to complete the reset process may vary depending on your computer’s specifications and the selected reset option. Be patient and ensure that your computer is connected to a stable power source throughout the reset process to avoid any interruptions.
Now that you have clicked on the “Get started” button, let’s proceed with the next step and choose your preferred reset option to reset your PC effectively.
Step 5: Choose an option (Keep my files, Remove everything, or Restore factory settings)
After clicking on the “Get started” button in the Recovery section of the Windows 10 Settings app, the next step in resetting your PC is to choose the appropriate reset option that best aligns with your requirements. When presented with different options, carefully consider your needs and select one of the following options: “Keep my files,” “Remove everything,” or “Restore factory settings.” Here’s a closer look at each option:
Keep my files:
This option allows you to reset your PC while retaining your personal files, such as documents, pictures, videos, and music. The reset will remove all installed applications and settings but leave your files intact. It is a suitable choice when you want a fresh start with a clean system while preserving your important data.
Remove everything:
Choosing this option means that all personal files, applications, and settings will be permanently deleted from your PC. It provides a complete wipe of your system, returning it to a state similar to when you first acquired it. This option should be exercised with caution as it will result in the loss of all files and require you to reinstall applications and set up your preferences from scratch.
Restore factory settings:
This option resets your PC to its original factory state, removing all personal files, applications, and settings. It brings your computer back to the condition it was in when you first purchased it. You may consider this option when preparing to sell or donate your device or if you want a completely clean system without any personalizations or customizations.
Take your time and carefully evaluate your needs before making a decision. Think about whether you want to keep your files, perform a complete wipe, or restore your PC to its factory settings. Ensure that you have backed up any important files before proceeding with a reset, as the process is irreversible and can result in the permanent loss of data.
By choosing the reset option that suits your needs, you are taking a critical step towards achieving your desired outcome. Once you have made your decision, click on the corresponding option to confirm your choice and proceed with the reset process.
Remember, the specific labels or wording of the options may vary slightly depending on your Windows 10 version or any updates applied to your system. However, the underlying concept of the options and their functionality remains the same.
Now that you have selected your preferred reset option, let’s move on to the next step and follow the on-screen instructions to complete the reset process effectively.
Step 6: Follow the on-screen instructions
Upon selecting your desired reset option in the Recovery section of the Windows 10 Settings app, the next step in resetting your PC is to follow the on-screen instructions provided by the system. These instructions will guide you through the remaining stages of the reset process and help you complete the process successfully. Here’s how you can proceed:
1. After choosing your reset option, a confirmation message will appear, informing you about the consequences of your choice. Read the message carefully and make sure you understand that the reset process is irreversible, and you may lose data if you haven’t backed up your files.
2. Once you have read and understood the confirmation message, click on the “Next” or “Confirm” button to proceed. This action will initiate the reset process on your Windows 10 PC.
3. Follow any additional on-screen prompts or instructions that may appear. These instructions may include confirming your choice again, selecting your preferred language, keyboard layout, or time zone, and agreeing to the license terms.
4. Depending on the reset option you chose, the system may ask for further instructions. For example, if you selected the “Remove everything” option, you may be prompted to choose whether you want to fully clean the drive or keep your personal files.
5. Once you have provided the necessary instructions and confirmed your preferences, the reset process will begin. Your PC will begin to reset, which involves removing the selected files, restoring factory settings, or performing the other chosen actions according to your selected reset option.
6. During the reset process, it’s important to be patient and allow the system sufficient time to complete the task. The length of time required may vary depending on the speed and specifications of your computer, as well as the size of the data being processed.
7. Once the reset process is finished, your PC will restart and present you with a fresh installation of Windows 10. You will need to go through the initial setup process, including signing in with your Microsoft account, choosing your preferences, and customizing your settings according to your needs.
By following the on-screen instructions, you will ensure that you proceed with the reset process correctly and smoothly. It’s important to pay attention to the details and provide any necessary input when prompted.
After completing the reset process, take the time to reinstall any necessary applications, restore your files from a backup if needed, and configure your system settings to your preferences.
Now that you have familiarized yourself with the steps to follow, it’s time to reset your PC by following the on-screen instructions presented to you. Remember to have patience, as the reset process may take some time.
Tips for a Successful Reset
Resetting your PC can be a powerful tool to resolve issues, clean up your system, or start fresh. To ensure a successful reset process and minimize any potential complications, consider the following tips:
Backup your files before resetting:
Before proceeding with the reset, it’s crucial to make a backup of your important files. This ensures that you have a copy of your valuable data in case of any unforeseen issues or data loss during the reset process. You can store your files on an external storage device or utilize cloud storage services for added security.
Ensure you have a stable internet connection:
Having a stable and reliable internet connection during the reset process is essential. Some reset options may require internet access to download necessary files or updates. It also ensures a smoother experience when reinstalling applications or updating your system after the reset is complete.
Update your device drivers after resetting:
After completing the reset, it’s recommended to update your device drivers to ensure optimal performance and compatibility. You can do this by manually installing the latest drivers or using built-in Windows tools like Device Manager or Windows Update to update your drivers automatically.
Take note of your installed applications:
Before resetting your PC, make a list of the applications you currently have installed. This will help you remember which applications you need to reinstall after the reset. It’s also a good opportunity to evaluate and determine which applications are necessary, removing any unnecessary ones and ensuring a clean and streamlined system.
Consider resetting your browser settings:
During the reset process, you may also want to reset your browser settings. This can help resolve any issues caused by conflicting extensions, settings, or cached data. Resetting your browser can provide a fresh and enhanced browsing experience after the reset is complete.
Update your security software:
After resetting your PC, it’s essential to update your security software to ensure you have the latest protection against malware and other threats. Update your antivirus software, enable Windows Defender, or install a reliable security suite to safeguard your system from potential risks.
By following these tips, you can have a successful reset experience and set a solid foundation for your refreshed system. Remember to be patient and allow the reset process to complete without interruptions. After the reset, take the opportunity to reconfigure your system and customize it to your liking.
Resetting your PC can provide a clean and optimized environment, giving you a fresh start. With these tips in mind, you can confidently navigate the reset process and enjoy the benefits of a revitalized Windows 10 experience.
Backup your files before resetting
Before proceeding with a PC reset, it is crucial to take the necessary precautions to safeguard your important files and data. Creating a backup ensures that you have a copy of your valuable information to fall back on in the event of any unexpected issues or data loss during the reset process. Here’s why backing up your files is essential and how you can do it effectively:
1. Protect against data loss: While resetting your PC can be an effective way to resolve issues and start fresh, it involves removing all installed applications, settings, and personal files. Without a backup, there is a risk of permanently losing your documents, photos, videos, and other important data during the reset process.
2. Choose a backup method: There are several options for backing up your files. One method is to manually copy your important files to an external storage device, such as a USB flash drive or an external hard drive. You can also utilize cloud storage services, such as Google Drive or Dropbox, to store your files securely online.
3. Prioritize your important files: Determine which files are crucial to back up and focus on those. Examples of important files include personal documents, photos, videos, music, and any other files that hold sentimental or critical value. Take the time to organize and identify the files you want to protect.
4. Use backup software: Consider using specialized backup software that can automatically create a backup of all your important files. These software tools often offer features like scheduled backups and incremental backups, making it easier to consistently and efficiently protect your data.
5. Check the integrity of your backup: After creating a backup, take a moment to verify its integrity. Ensure that the backup contains all the files you expected, and double-check that they can be accessed and opened without any issues. This step provides peace of mind that your backup is reliable and complete.
6. Store your backup securely: It is crucial to store your backup in a safe and secure location. For physical backups, keep them in a secure place, away from potential hazards like water, fire, or theft. If using cloud storage, choose a reputable provider that employs strong security measures to protect your data.
7. Keep multiple copies: To further minimize the risk of data loss, consider keeping multiple copies of your backup. This could include having backups in different locations or on separate storage devices. Having redundant copies provides an extra layer of protection against any unforeseen circumstances or hardware failures.
By backing up your files before resetting your PC, you can ensure the safety and preservation of your important data. Taking the time to create a backup copy provides peace of mind and allows you to confidently proceed with the reset process, knowing that your files are protected and can be restored if needed.
Ensure you have a stable internet connection during the reset process
Having a stable and reliable internet connection is crucial when performing a PC reset. A stable internet connection ensures a smooth and uninterrupted reset process, allowing you to download necessary files, install updates, and complete the reset successfully. Here’s why a stable internet connection is important and how you can ensure its stability during the reset process:
Why is a stable internet connection important?
1. Downloading necessary files: Depending on the reset option you choose, your computer may need to download specific files or updates during the reset process. An unstable internet connection can result in interrupted downloads, leading to incomplete installations and potential issues with the reset.
2. Installing updates: During the reset process, your computer may need to install updates to ensure the latest versions of Windows and other software are installed. A stable internet connection allows for the smooth and timely installation of these updates, ensuring your system is up to date and secure.
3. Reliable connectivity during the reset: A stable internet connection helps maintain a consistent connection to the servers and services required for the reset. It reduces the likelihood of connection drops, errors, or delays that can disrupt the reset process and potentially lead to an unsuccessful reset.
How to ensure a stable internet connection during the reset process:
1. Use a wired connection: Whenever possible, connect your computer directly to the modem or router using an Ethernet cable. Wired connections tend to be more stable than Wi-Fi connections, providing a more reliable and consistent internet connection during the reset process.
2. Check your network hardware: Ensure that your modem, router, and other networking equipment are in good working condition. Check for any loose connections or physical damage that may impact the stability of your internet connection. Consider restarting your modem and router to refresh the connectivity.
3. Minimize interference: If you’re using a Wi-Fi connection, reduce potential sources of interference. Keep your computer within the range of your router, avoid placing obstacles between your computer and the router, and minimize interference from other devices operating on the same frequency band. This can help maintain a stable Wi-Fi connection during the reset.
4. Consider bandwidth limitations: If you have limited bandwidth or are on a metered internet connection, be mindful of any potential limits. Large downloads or updates during the reset process can consume significant bandwidth. If necessary, schedule the reset at a time when it will have minimal impact on your internet usage restrictions.
5. Optimize your Wi-Fi signal: If you’re using a Wi-Fi connection, improve your signal strength by positioning your router in a central location, away from interference, and adjusting its settings for optimal performance. Additionally, consider using Wi-Fi range extenders or mesh network systems to extend the range and coverage of your Wi-Fi signal.
6. Test your internet connection: Before starting the reset process, perform a speed test or general internet connectivity test to ensure that your internet connection is stable and operating at an acceptable speed. This can help identify potential issues in advance and allow you to address them before proceeding with the reset.
By ensuring a stable internet connection during the reset process, you can minimize the likelihood of interruptions, errors, and incomplete installations. A stable connection helps ensure that the reset process completes successfully, allowing you to enjoy a properly reset and functioning Windows system.
Update your device drivers after resetting
After performing a PC reset, it’s essential to update your device drivers to ensure optimal performance and compatibility with your hardware. Device drivers act as intermediaries between your hardware devices and the operating system, allowing them to communicate effectively. Here’s why updating your device drivers is important and how you can do it after resetting your PC:
Why is updating device drivers important?
1. Improved performance: Updated device drivers often come with performance enhancements and bug fixes, resulting in improved overall system performance. Outdated drivers can lead to compatibility issues, decreased performance, and even system instability. Updating your drivers helps ensure that your devices are utilizing the latest features and advancements.
2. Enhanced compatibility: Operating system updates may introduce changes that require corresponding driver updates. Updating your drivers helps maintain compatibility, ensuring that your devices function correctly with the latest version of the operating system.
3. Fixes to known issues: Driver updates often address reported issues and bugs, providing fixes that help resolve problems associated with specific hardware devices. Updating your drivers helps ensure a smoother and more reliable experience with your hardware, eliminating potential crashes, errors, or malfunctions.
How to update device drivers after resetting:
1. Use Windows Update: The Windows Update feature in Windows 10 can automatically search for and install the latest driver updates for your devices. Ensure that your PC is connected to the internet, go to Settings > Update & Security > Windows Update, and click on “Check for updates.” Windows will scan for available updates, including device driver updates, and install them accordingly.
2. Manufacturer’s website: Visit the website of the device manufacturer and navigate to their support or driver downloads section. Locate the drivers corresponding to your hardware devices and download the latest versions. Install the downloaded drivers by following the manufacturer’s provided instructions. This method ensures that you have access to the most up-to-date drivers specifically tailored for your hardware.
3. Use driver update software: There are third-party tools available that can help automate the process of updating device drivers. These software solutions scan your system, identify outdated drivers, and provide the option to download and install the latest versions. Examples include Driver Booster, Driver Easy, and Snappy Driver Installer.
4. Device Manager: The Device Manager in Windows allows you to manually update device drivers. Right-click on the Start button, select Device Manager, and expand the categories to locate the specific devices for which you want to update the drivers. Right-click on the device, select “Update driver,” and choose the desired update method – either automatically search for updated drivers or browse your computer for downloaded drivers.
It’s worth noting that some hardware devices, such as graphics cards or printers, may have their dedicated software utilities that include driver update functionalities. Check the documentation or support resources provided by the hardware manufacturer to determine the best method for updating the drivers for those specific devices.
By updating your device drivers after resetting your PC, you can ensure that your hardware devices function optimally, software and hardware remain compatible, and you benefit from the latest enhancements and bug fixes. Regularly checking and updating your device drivers is an important step in maintaining system performance and stability.
Common Issues and Troubleshooting
Performing a PC reset can sometimes encounter issues that may affect the smooth execution of the process. Understanding common issues and having troubleshooting steps in place can help you overcome any potential obstacles. Here are some common issues that can occur during a PC reset and steps to troubleshoot them:
Reset This PC taking too long:
If the reset process is taking longer than expected, it may indicate a problem. In such cases, it is best to allow the process to continue for some time as it may require additional time for larger data sets. However, if there is no progress after an extended period, consider restarting your computer and attempting the reset process again.
Resetting gets stuck at a certain percentage:
If the reset process gets stuck at a specific percentage for an extended period, it may indicate a stalled operation. In this situation, try restarting your computer using the power button and initiating the reset process again. If the problem persists, consider seeking assistance from technical support or contacting Microsoft’s support services.
Error messages during the reset process:
During a PC reset, you may encounter error messages that can hinder the process. Common error messages include “There was a problem resetting your PC” or “Could not find recovery environment.” To troubleshoot these errors, start by ensuring that you have a stable internet connection and that your system meets the necessary requirements for the reset process. If the problem persists, consult Microsoft’s official support documentation or contact support for assistance.
Data loss during the reset process:
While rare, data loss can occur during a PC reset. To mitigate this risk, it is crucial to back up your important files before initiating the reset process. Create a backup on an external storage device or utilize cloud storage services to ensure that your valuable data is preserved. If data loss occurs despite precautions, consider reaching out to data recovery specialists for assistance.
Unable to reinstall applications after the reset:
After resetting your PC, you may encounter difficulties reinstalling your applications. Ensure that you have proper installation files or access to necessary product keys for your applications. Visit the official websites of software manufacturers to download the latest versions of your applications. If any license or activation issues arise, reach out to the respective software providers for assistance.
Hardware device driver compatibility issues:
After a PC reset, some hardware devices may experience compatibility issues with the default drivers installed by Windows. To resolve this, update your device drivers using Windows Update, download the latest drivers from the manufacturer’s website, or utilize third-party driver update tools. These steps will help ensure that your hardware devices are functioning optimally.
In case of persistent issues or complex problems during the reset process, it is advisable to seek assistance from technical support. Microsoft’s official support documentation and forums can provide valuable insights, and contacting Microsoft Support ensures expert guidance tailored to your specific scenario.
Being aware of common issues and having troubleshooting steps at hand can help you navigate the reset process with more confidence. Remember to back up your important data, ensure a stable internet connection, and follow the recommended troubleshooting steps to overcome any obstacles you may encounter.
Reset This PC taking too long
During a PC reset, it is not uncommon for the process to take longer than anticipated, especially when dealing with larger amounts of data. However, in some cases, an extended duration may indicate a potential problem. Here’s what you can do if your PC reset is taking too long:
Wait patiently:
First and foremost, it’s important to exercise patience during the reset process. Depending on the size of your data and the complexity of the reset option chosen, the process can take a significant amount of time. Large amounts of data or a slower computer may prolong the reset procedure. Allow the process to continue and avoid interrupting it prematurely.
Ensure appropriate conditions:
Check that your computer meets the system requirements for the reset process. Low system resources or slow hardware components can contribute to an extended reset time. Closing unnecessary programs and processes before initiating the reset can help allocate more resources to speed up the process.
Restart your computer:
If the reset process appears to be stuck or frozen, consider restarting your computer. Use the power button to perform a restart and then initiate the reset process again. This can resolve temporary issues and ensure a smoother reset experience. However, it’s important to ensure that your computer is not in the middle of a critical update or undergoing any important operations before restarting.
Check for error messages or progress indicators:
Monitor your computer for any error messages or progress indicators. Sometimes, the reset process may appear to stall at a specific percentage, but it could still be working in the background. If there are no error messages and the progress indicator is steadily increasing, it’s an indication that the reset is still progressing. In such cases, it’s advisable to exercise patience and allow the process to continue.
Seek technical support:
If the reset process remains unresponsive or shows no progress even after waiting for an extended period, it may indicate a more significant issue. Reach out to technical support for assistance, whether it be Windows support or the manufacturer of your device. They can provide specific guidance tailored to your situation and help troubleshoot any underlying problems.
Remember, the duration of the reset process can vary based on factors such as the size of your data, the chosen reset option, and the speed of your computer. While it’s important to be vigilant, remain patient and give the process ample time to complete. By following these steps, you can ensure a smooth and successful PC reset experience.
Resetting gets stuck at a certain percentage
During a PC reset, it can be concerning if the process appears to get stuck at a specific percentage. While this can be frustrating, there are steps you can take to address this issue. Here’s what you can do if your PC reset gets stuck at a certain percentage:
Wait and be patient:
In some cases, the reset process may appear to stall at a specific percentage. However, it might be still working in the background. It is essential to exercise patience and wait for some time to see if the reset process continues. Depending on the size of your data and the complexity of the reset option chosen, it may take longer to progress beyond a certain point.
Verify if it’s truly stuck:
While waiting, check for any signs of progress such as blinking lights on your computer or any low-level activity indicators. If there are signs that the computer is still working, it’s likely that the reset process is ongoing. However, if there are no indicators of activity and the progress remains unchanged for an extended period, it may indicate a problem.
Restart your computer:
If the reset process appears to be truly stuck or frozen, try restarting your computer. Use the power button to perform a restart and then initiate the reset process again. Restarting your computer can help resolve temporary issues that may have caused the reset process to stall.
Ensure sufficient power and resources:
Ensure that your computer is connected to a stable power source during the reset process. Power constraints or a low battery level can impact the reset process and cause it to stall. In addition, close any unnecessary programs or processes before initiating the reset to allocate more system resources to the reset process.
Seek technical support:
If the reset process remains stuck at a specific percentage despite trying the above steps, it may indicate a more significant issue that requires technical assistance. Reach out to technical support, such as Windows support or the manufacturer of your device, for further guidance and troubleshooting. They can provide specific instructions based on your situation and help resolve the issue.
It’s important to remember that the reset process can take time, especially for larger data sets or complex reset options. However, if the reset process remains stuck and there are no signs of progress, it may indicate an underlying problem. By following these steps and seeking technical support if necessary, you can address the issue and ensure a successful PC reset.
Error messages during the reset process
During a PC reset, you may encounter error messages that can disrupt the process and potentially cause frustration. While encountering an error message can be disheartening, there are steps you can take to troubleshoot and address the issue. Here’s what you can do if you encounter error messages during the reset process:
Read and understand the error message:
Take the time to carefully read and understand the error message displayed on your screen. The error message may provide valuable information about the issue at hand, such as a specific error code, description, or a recommended solution. Understanding the exact nature of the error can guide you towards the appropriate troubleshooting steps.
Check for common solutions:
In some cases, error messages during the reset process have common resolutions. Doing a quick internet search with the specific error message may lead you to forums or support articles where others have encountered similar issues. Look for any recommended solutions or workarounds provided by other users or Microsoft support.
Restart your computer:
A simple restart can sometimes resolve temporary issues that trigger the error message. Use the power button to restart your computer, and then initiate the reset process again. Restarting your computer can help clear any temporary system glitches that might have caused the error, allowing you to proceed with the reset process.
Check your internet connection:
Ensure that your computer has a stable internet connection during the reset process. Some error messages may be related to network connectivity issues. Check that your internet connection is reliable and properly set up. Consider restarting your modem and router, or connecting to a different network, if necessary.
Recovery media or installation disk:
If you have a recovery media or installation disk specific to your computer or operating system, you can use it to troubleshoot certain error messages. Follow the instructions provided with the media or disk to access advanced troubleshooting options or repair tools that may help resolve the issue.
Seek technical support:
If the error message persists or you are unsure of the appropriate course of action, seeking technical support is highly recommended. Contact Microsoft support or consult the manufacturer of your device for assistance. They can provide specific guidance tailored to your situation and help troubleshoot and resolve the issue.
By following these steps, you can navigate through error messages encountered during the reset process. Although encountering an error can be frustrating, understanding the issue and taking appropriate steps for troubleshooting can help resolve the problem and ensure a successful PC reset.