
Checking System Requirements
Before uninstalling ESET Internet Security, it’s important to ensure that your system meets the necessary requirements. This will help prevent any compatibility issues and ensure a smooth uninstallation process. Here are the system requirements you should check:
- Operating System: Verify that your operating system is compatible with the version of ESET Internet Security you are using. ESET generally supports major operating systems such as Windows, macOS, and Linux.
- Processor: Check if your system’s processor meets the minimum requirements specified by ESET. This information can usually be found on their official website or product documentation.
- RAM: Ensure that your computer has enough memory (RAM) to accommodate the uninstallation process. Insufficient RAM may lead to performance issues during the uninstallation process.
- Free Disk Space: Make sure that you have enough free disk space to uninstall ESET Internet Security. The program files and associated data can take up a significant amount of space. Delete any unnecessary files or applications to free up storage if needed.
- Internet Connection: ESET Internet Security may require an active internet connection to complete the uninstallation process. Ensure that your internet connection is stable and reliable.
Before proceeding with the uninstallation, it is crucial to verify that your system meets these requirements. This will help prevent any potential issues and ensure a successful removal of ESET Internet Security from your computer. If you encounter any difficulty in meeting these requirements, it is recommended to seek assistance from ESET’s support team for further guidance.
Disabling Real-time Protection
Prior to uninstalling ESET Internet Security, it is important to disable the program’s real-time protection feature. Real-time protection actively scans your computer for potential threats in real-time, and having it enabled during the uninstallation process may interfere with the process or cause unnecessary interruptions. Here’s how to disable real-time protection in ESET Internet Security:
- Open ESET Internet Security: Locate the ESET Internet Security application on your computer and open it. The program can usually be found in the system tray or in the list of installed applications in the Start menu.
- Access the Setup section: Once the program is open, look for the “Setup” or “Settings” option. It is typically represented by a gear icon and can usually be found at the bottom of the main program window.
- Disable Real-time Protection: In the Setup section, navigate to the “Real-time Protection” or “Real-time Scan” settings. Here, you will find an option to turn off real-time protection. Click on the toggle switch or checkbox to disable it.
- Confirm the Changes: After disabling real-time protection, you may be prompted to confirm your changes. Verify that the protection has been successfully turned off before proceeding with the uninstallation process.
Disabling real-time protection ensures that ESET Internet Security does not interfere with the uninstallation process and allows for a smoother removal of the program from your system. Once the uninstallation is complete, it is recommended to re-enable real-time protection or consider installing an alternative antivirus solution to continue protecting your computer from potential threats.
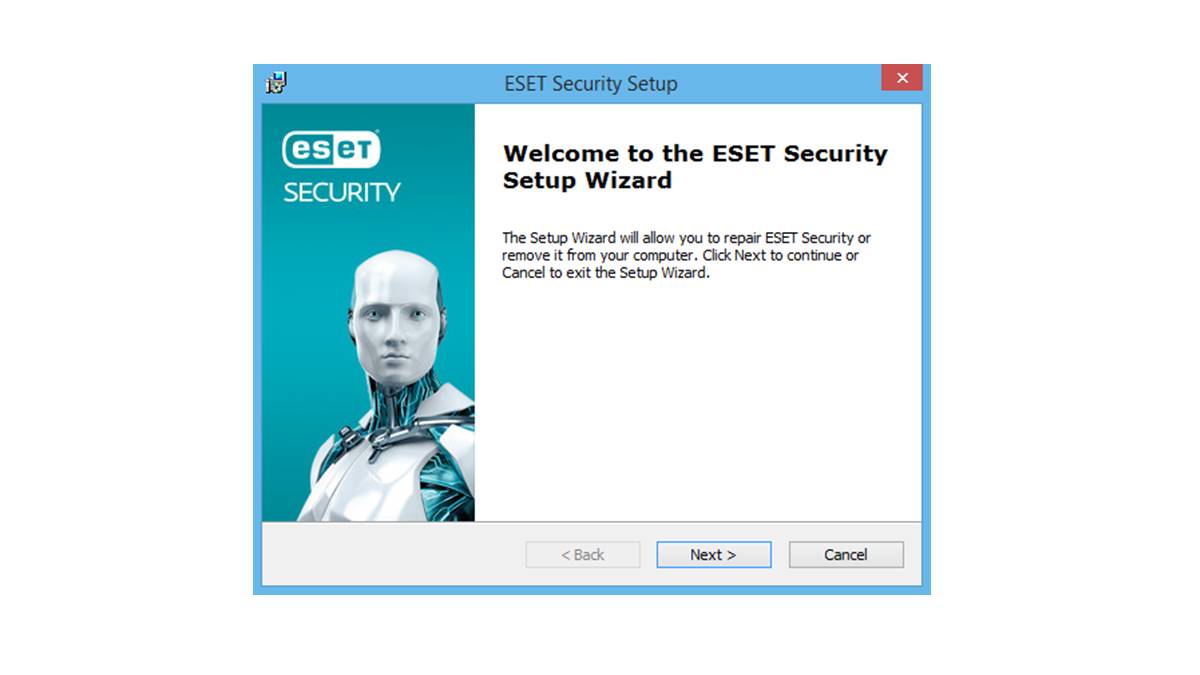
Using the Uninstallation Wizard
The ESET Internet Security software provides an uninstallation wizard that simplifies the process of removing the program from your computer. The uninstallation wizard ensures that all the associated files and components are properly removed. Follow these steps to use the uninstallation wizard:
- Open the Uninstallation Wizard: Locate the ESET Internet Security application on your computer and open it. The program can usually be found in the system tray or in the list of installed applications in the Start menu. Once the program is open, navigate to the “Help and Support” or “Tools” section where you will find the Uninstallation Wizard.
- Initiate the Uninstallation Process: In the Uninstallation Wizard, click on the “Uninstall” or “Remove” button to start the process. You may be prompted to enter your administrator password to proceed with the uninstallation.
- Follow the Prompts: The wizard will guide you through the uninstallation process, providing prompts and options along the way. Read the instructions carefully and select the appropriate options as per your preference.
- Confirm the Uninstallation: Once you have followed all the prompts, the wizard will ask you to confirm the uninstallation. Review the summary of the components that will be removed and click on the “Uninstall” or “Confirm” button to continue.
- Wait for the Uninstallation to Complete: Sit back and wait for the uninstallation process to complete. This may take a few moments, depending on the speed and performance of your computer.
- Restart your Computer: After the uninstallation is finished, it is recommended to restart your computer to ensure that all the changes are applied accordingly.
The uninstallation wizard provided by ESET Internet Security streamlines the process of removing the program from your computer. Following these steps will help ensure a successful and thorough uninstallation, removing all traces of ESET Internet Security from your system.
Manually Uninstalling ESET Internet Security
If you encounter any issues or prefer to take a hands-on approach, you can manually uninstall ESET Internet Security from your computer. Here are the steps to manually uninstall the program:
- Open the Control Panel: Click on the Start menu and search for “Control Panel.” Open the Control Panel application from the search results.
- Access the Programs and Features: In the Control Panel, locate the “Programs” or “Programs and Features” section. Open it to view a list of all installed applications on your computer.
- Find ESET Internet Security: Scroll through the list of installed programs and locate “ESET Internet Security.” Click on it to select the program.
- Initiate the Uninstallation: Once ESET Internet Security is selected, click on the “Uninstall” or “Remove” button at the top of the program list. Follow any on-screen prompts or instructions to proceed with the uninstallation.
- Confirm the Uninstallation: You may be prompted to confirm the uninstallation of ESET Internet Security. Review the information and click on the “Yes” or “Uninstall” button to confirm.
- Follow the Uninstallation Process: The uninstallation process will begin, removing ESET Internet Security from your computer. Wait for the process to complete.
- Remove Leftover Files and Registries: After the uninstallation process is finished, it is recommended to manually delete any leftover files and registries associated with ESET Internet Security. To do this, navigate to the installation directory (usually located in the “Program Files” or “Program Files (x86)” folder) and delete any remaining ESET folders or files. Additionally, you can use a registry cleaner tool to scan and remove any ESET-related entries from your Windows registry.
- Restart your Computer: To ensure that all the changes are applied and any remaining traces are removed, restart your computer after manually uninstalling ESET Internet Security.
By following these steps, you can manually uninstall ESET Internet Security from your computer. However, please note that manually uninstalling the program may require more technical knowledge and can be time-consuming compared to using the uninstallation wizard provided by ESET.
Removing Leftover Files and Registries
After uninstalling ESET Internet Security using the provided uninstallation wizard or manually, there may still be leftover files and registries on your computer. These remnants can take up valuable disk space and potentially cause conflicts with other programs. It is important to remove them to ensure a clean uninstallation. Follow these steps to remove leftover files and registries:
- Delete Program Files: Navigate to the installation directory of ESET Internet Security. Typically, it is located in the “Program Files” or “Program Files (x86)” folder. Delete any remaining ESET folders or files.
- Clean Temporary Files: Clearing temporary files can help remove any remnants left by ESET Internet Security. Press the Windows key + R on your keyboard to open the Run dialog box. Type “%temp%” (without quotes) and press Enter. This will open the Temp folder. Select all the files and folders in the Temp folder and press Shift + Delete to permanently remove them.
- Remove Registry Entries: Caution: Modifying the Windows Registry can cause system issues if not done correctly. It is highly recommended to create a backup of the registry before making any changes. Press the Windows key + R to open the Run dialog box. Type “regedit” (without quotes) and press Enter to open the Registry Editor. Navigate to the following locations and delete any ESET-related entries:
- HKEY_CURRENT_USER\Software\
- HKEY_LOCAL_MACHINE\SOFTWARE\
- HKEY_LOCAL_MACHINE\SOFTWARE\WOW6432Node\
- Empty the Recycle Bin: Once you have deleted the leftover files and removed the registry entries, empty the Recycle Bin to permanently delete them from your computer.
By following these steps, you can remove the leftover files and registries associated with ESET Internet Security. This will ensure a complete and thorough uninstallation of the program, freeing up disk space and avoiding any potential conflicts with other software on your computer. Remember to exercise caution when modifying the Windows Registry and always make a backup before making any changes.
Restarting Your Computer
After successfully uninstalling ESET Internet Security and removing any leftover files and registries, it is highly recommended to restart your computer. Restarting your computer helps ensure that all the changes made during the uninstallation process are applied and any remaining components are fully cleared from the system. Here’s why restarting your computer is important:
Completing the Removal Process: Restarting your computer allows the operating system to finalize the removal of ESET Internet Security and any associated processes or services that may have been running in the background. It ensures that there are no lingering components of the program left behind.
Refreshing System Settings: Restarting your computer helps reset various system settings that may have been modified by ESET Internet Security. This ensures that your computer operates in its default state and prevents any conflicts with other installed programs or system functions.
Optimizing Performance: By restarting your computer, you allow the operating system to clear out temporary files and refresh system resources, leading to improved performance. It can also resolve any memory or processing issues that may have occurred during the uninstallation process.
Preventing Software Interference: Restarting your computer helps prevent any potential interference between ESET Internet Security and other security software or utilities on your computer. Some security programs may require a restart to fully remove any conflicts or incompatibilities that could arise.
After the restart, your computer should be free of any remnants of ESET Internet Security, and you can proceed with using your computer as usual. It is also a good opportunity to consider installing a new antivirus program or reactivating any previously disabled security software to ensure continuous protection against potential threats.
Verifying Successful Uninstallation
Once you have completed the uninstallation process of ESET Internet Security, it is important to verify that the program has been successfully removed from your computer. Here are a few steps to help you confirm the successful uninstallation:
- Check the Program List: Open the Control Panel and navigate to the “Programs” or “Programs and Features” section. Look for ESET Internet Security in the list of installed programs. If it no longer appears in the list, it indicates that the uninstallation was successful.
- Search for Program Files: Open the file explorer and navigate to the installation directory where ESET Internet Security was previously installed (usually in the “Program Files” or “Program Files (x86)” folder). Verify that there are no remaining ESET folders or files.
- Check the System Tray: Look at the system tray (bottom-right corner of the desktop) and ensure that there are no ESET-related icons present. If you no longer see any ESET icons, it indicates that the program has been successfully removed.
- Restart your Computer (optional): Although not always necessary, restarting your computer can help ensure that any pending changes or processes related to the uninstallation have been completed. After the restart, repeat the above steps to confirm the successful removal of ESET Internet Security.
If, after following these steps, you no longer find any traces of ESET Internet Security on your computer, it is safe to say that the uninstallation was successful. However, if you still come across any remnants of the program or experience any issues, it is recommended to reach out to ESET’s support team for further assistance. They can provide guidance on how to resolve any residual issues and ensure a clean removal of ESET Internet Security from your system.