
Choosing the Right Uniden Bearcat Scanner
When it comes to choosing the right Uniden Bearcat scanner, it’s essential to consider your specific needs and requirements. Uniden offers a wide range of scanners, each with its own features and capabilities. Here are some factors to consider when selecting the right scanner for you:
1. Frequency Coverage: Look for a scanner that covers the frequency bands you are interested in monitoring. Whether it’s police, fire, emergency services, or aviation, make sure the scanner you choose can receive those frequencies.
2. Channels and Memories: Determine how many channels and memories you need. If you plan to monitor a large number of frequencies, opt for a scanner with a higher channel capacity.
3. Digital Capabilities: Consider whether you need a scanner that can receive digital signals, such as APCO P25 digital or DMR (Digital Mobile Radio) transmissions. If so, choose a scanner that supports these digital modes.
4. Location and Portability: Think about where you will primarily use the scanner. If you need a portable option, look for a handheld scanner that is compact and lightweight. If you plan to use it at home, a desktop scanner with better reception may be more suitable.
5. Features and Functions: Research the additional features and functions offered by different models. Some scanners offer weather alerts, GPS capabilities, recording options, and trunking capabilities. Determine which features are important to you.
6. Price: Set a budget for your scanner purchase. Consider the price range of different models and choose one that offers the best value for your money.
By considering these factors, you can select the right Uniden Bearcat scanner that matches your specific needs and provides the features you require. Remember to research and read reviews to make an informed decision. With the right scanner in hand, you can enjoy monitoring the frequencies of interest to you.
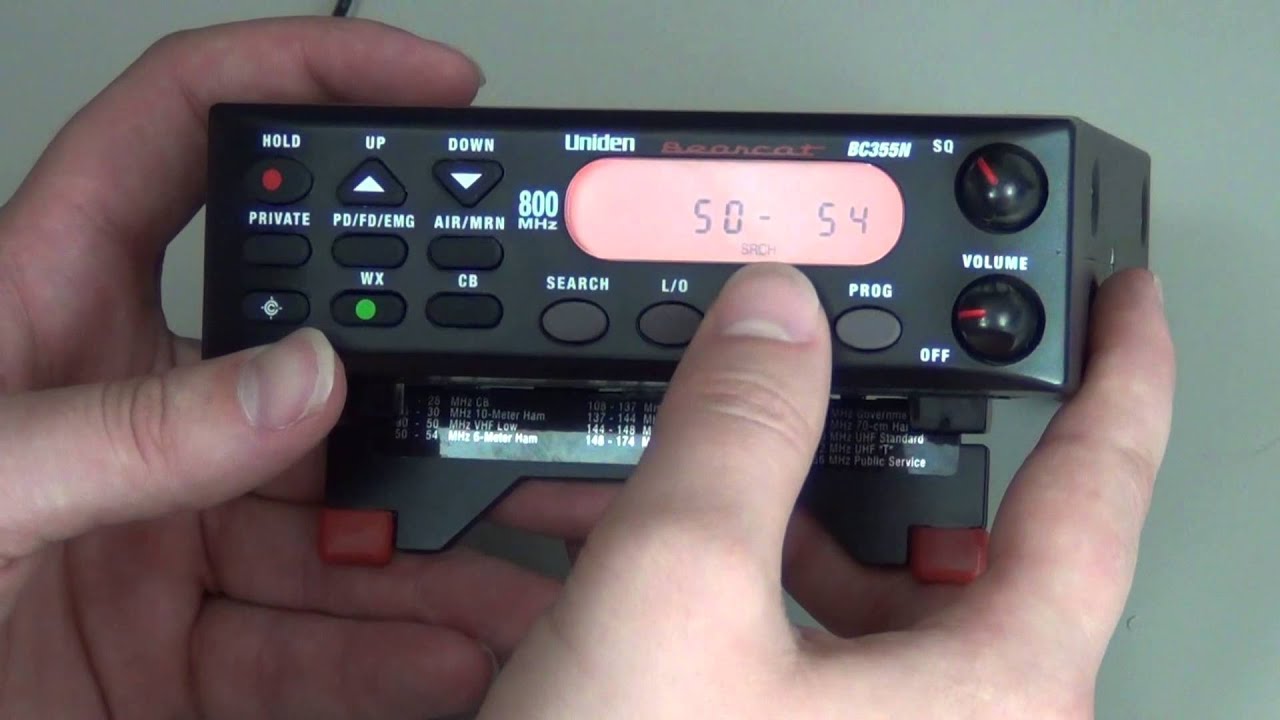
Understanding the Scanner’s Features and Buttons
Before you start using your Uniden Bearcat scanner, it’s important to familiarize yourself with its various features and buttons. Understanding how the scanner works will allow you to navigate its functions and customize it to suit your preferences. Here are some key features and buttons you should be aware of:
1. Power Button: This button turns the scanner on and off. Press and hold it for a few seconds to power the scanner on or off.
2. Display Screen: The scanner’s display screen shows important information such as frequency, channel name, signal strength, and other relevant details. Pay attention to this screen as it provides real-time updates.
3. Navigation Buttons: These buttons allow you to navigate through different menus and options. Use the up and down arrows to scroll through channels or frequencies, and the left and right arrows to move across different settings.
4. Function Button: The function button is usually labeled as “FUNC” or “F.” Pressing this button in combination with another key allows you to access additional functions or settings. Refer to the scanner’s manual to find out the specific combinations.
5. Scan Button: The scan button initiates the scanning process. When pressed, the scanner starts scanning through programmed channels or frequencies to monitor activity.
6. Manual Button: This button allows you to manually enter a frequency or channel number to listen to. Simply press the manual button, enter the desired frequency using the keypad, and press enter or scan to start monitoring.
7. Volume Knob: Adjust the volume of your scanner using the dedicated volume knob. Rotate it clockwise to increase the volume and counterclockwise to decrease it.
8. Squelch Control: The squelch control helps eliminate background noise when not receiving a signal. Adjust this control to a comfortable level where you can hear transmissions clearly without unnecessary noise.
9. Banks and Groups: Some scanners allow you to organize channels into banks and groups, making it easier to locate and monitor specific frequencies. Refer to the scanner’s manual on how to set up and use this feature.
10. Programmable Buttons: Depending on the model, your scanner may have programmable buttons that can be customized to perform specific functions, such as toggling through scan lists or activating alerts.
By understanding these features and buttons, you will be able to navigate your Uniden Bearcat scanner with ease. Take the time to familiarize yourself with the scanner’s manual and experiment with different settings to fully utilize its capabilities. Happy scanning!
Setting Up the Scanner for First-Time Use
When you first get your Uniden Bearcat scanner, it’s important to set it up correctly for optimal performance. Follow these steps to ensure a smooth and successful setup:
1. Unboxing and Inspection: Start by carefully unboxing the scanner and inspecting it for any physical damage. Check that all the included accessories, such as the antenna and power adapter, are present.
2. Installing the Antenna: Attach the included antenna to the scanner by screwing it onto the designated antenna connector. Make sure it is securely attached to ensure good reception.
3. Connecting the Power: Plug in the power adapter to the scanner’s power jack and connect the other end to a power outlet. Ensure that you are using the correct power adapter for your specific model.
4. Powering on the Scanner: Press and hold the power button for a few seconds until the scanner turns on. You will see the display screen light up, indicating that it is ready for use.
5. Language and Location Settings: The scanner may prompt you to select a language and set your location. Follow the on-screen instructions to choose the appropriate settings for your region.
6. Setting the Date and Time: Next, you will need to set the date and time on your scanner. This is important for accurate timestamping of recorded events. Access the settings menu and navigate to the clock settings to input the current date and time.
7. Selecting a Scan Mode: Choose the desired scan mode for your scanner. You can set it to scan specific channels, search for active frequencies, or utilize pre-programmed scan lists. Refer to the scanner’s manual for instructions on selecting the appropriate scan mode.
8. Programming Channels: If you already have specific channels or frequencies you want to monitor, you can begin programming them into the scanner. Use the keypad to enter the frequency or channel number and save it to the desired location.
9. Adjusting Settings: Take the time to explore the scanner’s settings menu and customize it to your preferences. You can adjust the volume, squelch, backlight, and other settings based on your needs.
10. Testing and Fine-Tuning: Once you have completed the initial setup, perform a test scan to ensure that the scanner is receiving signals correctly. If necessary, fine-tune settings such as squelch or antenna positioning for improved reception.
By following these steps, you can set up your Uniden Bearcat scanner for first-time use. Remember to consult the scanner’s manual for specific instructions and additional features that may be available. Enjoy exploring and monitoring the frequencies that interest you!
Programming Channels into the Scanner
Programming channels into your Uniden Bearcat scanner allows you to easily access and monitor your desired frequencies. Here’s a step-by-step guide on how to program channels into your scanner:
1. Selecting a Channel: Choose an empty channel slot on your scanner where you want to store a new frequency or channel.
2. Manual Entry Method: If you know the specific frequency you want to program, use the manual entry method. Press the manual button on your scanner, enter the frequency using the keypad, and press enter or save to store it in the selected channel slot.
3. Searching for Frequencies: Some scanners have a search feature that allows you to automatically scan for active frequencies in a certain range. Activate the search function and let the scanner search for frequencies. When it finds an active frequency, you can save it to a channel slot.
4. Memory Banks: Consider organizing channels into memory banks for easier navigation. Memory banks group channels by category, such as police, fire, or weather. Assign channels to specific memory banks during the programming process.
5. Alpha Tagging: Assigning alpha tags to channels helps you easily identify the type of activity or location associated with each channel. Use the scanner’s keypad to enter a short descriptive name for each channel. For example, you can enter “Police” for a channel programmed with local police frequencies.
6. Duplicate Channels: Avoid programming duplicate channels that could waste memory space. Before storing a new frequency, check if it’s already programmed in another channel slot. If it is, consider deleting or replacing the duplicate channel.
7. Editing and Deleting Channels: If you need to make changes to a programmed channel, such as editing the frequency or changing the alpha tag, access the edit menu on your scanner. You can also delete unwanted channels to free up memory space.
8. Software Programming: For more advanced programming options, you can use software applications provided by Uniden or third-party developers. These applications allow you to program channels, set up scan lists, and manage other settings using your computer. Refer to the scanner’s manual for compatibility and instructions on using software programming.
9. Testing and Organization: After programming channels, perform a test scan to ensure that the programmed frequencies are receiving signals properly. Consider organizing channels into scan lists for easier scanning and switching between groups of channels.
10. Regular Updates: It’s important to regularly update and maintain your channel programming. Frequencies may change or new channels may be added over time. Keep your scanner up to date by checking for database updates or subscribing to online resources that provide frequency updates for your area.
By following these steps, you can effectively program channels into your Uniden Bearcat scanner. Take your time to organize and customize your channels according to your preferences. Enjoy the convenience of easily accessing and monitoring the frequencies that interest you!
Programming Frequencies Using the Menu System
The menu system on your Uniden Bearcat scanner provides a convenient and intuitive way to program frequencies and customize various settings. Here’s a step-by-step guide on how to program frequencies using the menu system:
1. Accessing the Menu: Press the menu button on your scanner to enter the menu mode. The menu button is usually labeled as “MENU” or represented by a symbol.
2. Navigating the Menu: Use the navigation buttons on your scanner to scroll through the available menu options. Press the up and down arrows to move between menu items and the left and right arrows to navigate within a specific menu item.
3. Selecting a Menu Option: Once you have highlighted a desired menu option, press the select or enter button to enter that specific menu. The select or enter button is typically labeled as “SEL” or “ENTER”.
4. Frequency Input: In the menu for programming frequencies, you will usually find an option to input or edit frequencies. Use the keypad on your scanner to enter the desired frequency. Some scanners allow you to directly input the frequency, while others may require you to navigate using the arrow buttons.
5. Saving the Frequency: After entering the frequency, select the option to save the frequency to a specific channel or memory location. You may need to choose an empty channel slot or overwrite an existing channel.
6. Setting Parameters: Depending on your scanner model, you may have the option to set additional parameters for the programmed frequency. This can include adjusting the modulation type, tone settings, delay settings, and other specific settings that apply to the frequency you are programming.
7. Alpha Tagging: If your scanner supports alpha tagging, you can assign a name to the programmed frequency for easy identification. Use the alphanumeric keypad to enter a short descriptive name, such as “Police” or “Fire,” to associate with the frequency.
8. Scanning and Monitoring: Once you have programmed the desired frequencies, exit the menu system and enter the scanning mode to start monitoring. You can select scan lists or enable different scanning modes to monitor the programmed frequencies.
9. Editing and Deleting Frequencies: If you need to make changes to a programmed frequency, access the menu system again and locate the respective menu option for editing or deleting frequencies. This allows you to modify or remove frequencies as needed.
10. Referencing the Manual: For specific instructions and detailed menu options related to your scanner model, refer to the scanner’s manual. It provides comprehensive information on menu navigation, programming procedures, and additional features available through the menu system.
By utilizing the menu system on your Uniden Bearcat scanner, you can program frequencies with ease and customize settings according to your preferences. Take the time to explore and familiarize yourself with the different menu options, as they offer a wide range of functionalities to enhance your scanning experience.
Programming Frequencies Using the Software Application
Programming frequencies into your Uniden Bearcat scanner can be made easier and more efficient by using software applications. These applications provide advanced programming capabilities and allow you to customize settings with ease. Here’s how you can program frequencies using the software application:
1. Downloading and Installing the Software: Start by downloading the software application provided by Uniden or third-party developers. Install the software on your computer following the provided instructions.
2. Connecting the Scanner: Connect your Uniden Bearcat scanner to your computer using a USB cable. Ensure that the scanner is turned on and in programming mode.
3. Opening the Software: Launch the software application on your computer. The software will detect the connected scanner and establish a connection.
4. Importing Frequencies: Use the software’s import feature to load frequency lists or databases into the application. You can find these frequency lists online or create your own based on your specific monitoring interests.
5. Creating Scan Lists: Organize the imported frequencies into scan lists. Scan lists allow you to group channels based on specific categories, such as police, fire, or weather. Assign the frequencies to the appropriate scan lists for easy access.
6. Customizing Channels: Within the software application, you can customize each channel’s settings. This includes assigning alpha tags, adjusting modulation types, adding tone codes, and configuring other parameters specific to each programmed frequency.
7. Uploading Frequencies to the Scanner: Once you have finished programming and customizing frequencies in the software, upload the programmed frequencies to your Uniden Bearcat scanner. The software will transfer the frequency information directly to the scanner.
8. Organizing Channels on the Scanner: After the upload process, access the scanner’s menu system to organize the uploaded frequencies into appropriate channel slots or memory banks. This step ensures that the programmed frequencies are easily accessible for scanning and monitoring.
9. Updating and Editing Frequencies: As new frequencies or changes occur in your monitoring area, make use of the software application to update and edit your programmed frequencies. This allows you to keep your scanner up to date with the latest information.
10. Saving and Backing Up: Finally, make sure to save your programmed frequencies and settings within the software application. Regularly create backups of your programming database to safeguard your customized settings in case of data loss or system failure.
By utilizing software applications, you can streamline the frequency programming process for your Uniden Bearcat scanner. Take advantage of the advanced features offered by the software to efficiently manage and customize your scanner’s programming. Refer to the software’s user guide or documentation for detailed instructions on using the application’s specific features and functionality.
Organizing and Managing Scan Lists
Scan lists provide a convenient way to organize and manage the frequencies programmed into your Uniden Bearcat scanner. By grouping channels into scan lists, you can easily access and monitor specific categories of frequencies. Here’s how you can effectively organize and manage your scan lists:
1. Planning Your Scan Lists: Before creating scan lists, have a clear idea of how you want to categorize your frequencies. Common categories include police, fire, emergency services, weather, aviation, and more. Think about your monitoring interests and create scan lists that align with those categories.
2. Accessing the Scan List Menu: Enter the scanner’s menu system and locate the scan list menu option. This is where you can create, edit, and manage your scan lists. Follow the menu navigation instructions provided in your scanner’s manual to access this menu.
3. Creating a New Scan List: In the scan list menu, choose the option to create a new scan list. Give the scan list a descriptive name that represents the category of frequencies it will contain. For example, you can name a scan list “Police” or “Fire Departments.”
4. Adding Channels to Scan Lists: Once you have created a scan list, you can start adding channels to it. Select the scan list and choose the option to add channels. Navigate through your programmed frequencies and choose the channels that belong to the respective category. Repeat this process until you have added all the desired channels to the scan list.
5. Deleting or Editing Channels in Scan Lists: If you need to make changes to a channel within a scan list, access the edit menu for that scan list. You can then delete or edit individual channels within the scan list. This allows you to keep the scan list updated with the most relevant frequencies.
6. Reordering Scan Lists: Some scanners allow you to change the order of the scan lists. This can be useful if you want to prioritize certain categories or frequencies over others. Access the scan list menu and choose the option to reorder the lists. Follow the instructions to rearrange the scan lists in the desired order.
7. Customizing Scan List Settings: Depending on your scanner model, you may have the option to customize settings for each scan list. This can include configuring scan delay times, setting priority channels, enabling or disabling specific scan lists, and more. Take advantage of these settings to fine-tune the scanning experience.
8. Testing and Monitoring Scan Lists: After organizing the frequencies into scan lists, exit the menu system and enter the scanning mode. Select the scan list you wish to monitor, and the scanner will scan through the channels within that list. Use this mode to test the scan lists and ensure that all the desired frequencies are being monitored.
9. Modifying Scan Lists as Needed: Over time, you may find the need to modify your scan lists. This can include adding new channels, removing inactive frequencies, or creating new scan lists for different categories. Regularly review and update your scan lists to keep them current and relevant to your monitoring needs.
10. Expanding Scan List Capacity: If your scanner has limited scan list capacity, and you find yourself running out of space, consider upgrading to a higher-end model or optimizing your existing scan lists to make room for additional frequencies.
By organizing and managing your scan lists effectively, you can streamline the scanning process on your Uniden Bearcat scanner. Customizing scan lists based on specific categories improves the efficiency of monitoring and allows you to focus on the frequencies that are most important to you.
Setting Up Alert Notifications and Alarms
Setting up alert notifications and alarms on your Uniden Bearcat scanner allows you to stay informed about important events or activities without constant monitoring. Here’s how you can configure alert notifications and alarms on your scanner:
1. Accessing the Menu: Enter the scanner’s menu system and navigate to the alert settings or alarms menu. The menu option for alerts or alarms may vary depending on your specific scanner model.
2. Selecting the Alert Type: Choose the type of alert you want to configure. Some common alert types include tone alerts, channel alerts, weather alerts, and priority alerts. Each type of alert serves a different purpose and triggers a notification based on specific criteria.
3. Tone Alert Configuration: If your scanner supports tone alerts, you can program specific tone codes to be alerted when certain frequencies become active. Configure the tone settings in the alert menu, including selecting the desired tone type and inputting the appropriate tone frequencies.
4. Channel Alert Configuration: Channel alerts notify you when there is activity on a specific channel or frequency. Select the desired channel from your programmed frequencies and enable the channel alert for that particular channel.
5. Weather Alert Configuration: If your scanner is capable of receiving weather alerts, access the weather alert settings in the menu. Enable the alert feature and choose the specific weather channels or warnings you want to be alerted about.
6. Priority Alert Configuration: Priority alerts notify you when there is critical activity on any channel. Typically, a priority alert overrides the scanning process and immediately alerts you when a higher-priority frequency becomes active.
7. Selecting Alert Methods: Determine how you want to be alerted when an event occurs. Options may include audio alerts, visual indicators, vibration notifications, or a combination of these. Select the preferred alert methods in the menu settings.
8. Adjusting Alert Thresholds: Fine-tune the alert thresholds to ensure that you’re only alerted for significant events. For example, you can set the squelch level at which an alert should be triggered, or adjust the signal strength threshold for channel alerts.
9. Testing Alert Settings: After configuring your alert notifications and alarms, perform a test to ensure they are functioning correctly. Activate the alert feature or manually transmit a tone to verify that the scanner properly detects and alerts you for the specified events.
10. Customizing Alert Behavior: Depending on your scanner model, you may have the option to further customize the behavior of alert notifications. This can include features such as adjustable alert tones, alert duration, repeat settings, and more. Explore the options available in the alert settings menu to tailor the behavior to your preferences.
By setting up alert notifications and alarms on your Uniden Bearcat scanner, you can stay informed about important events or activities even when you’re not actively monitoring. Carefully configure the alert settings to ensure you’re notified for the specific frequencies or events that matter to you.
Using the Scanner’s Search Function
The search function on your Uniden Bearcat scanner allows you to explore and discover new frequencies without programming specific channels. This feature is particularly useful when you are unsure about the exact frequencies to monitor or when traveling to new areas. Here’s how to use the search function effectively:
1. Accessing the Search Function: Enter the scanner’s menu system and locate the search function option. It may be labeled as “Search” or “Scan Search” in the menu. Select this option to activate the search mode.
2. Selecting the Search Range: Choose the frequency range you want to search. Your scanner may provide predefined search ranges, such as police, fire, aviation, or you can manually enter a custom frequency range.
3. Configuring Search Settings: Adjust the search settings based on your preferences. You can choose the step size, which determines how finely the scanner searches through the selected frequency range. A smaller step size provides a more detailed search but takes longer to complete.
4. Initiating the Search: Start the search by selecting the “Start” or “Scan” option in the search menu. The scanner will begin scanning through the selected frequency range, looking for active frequencies.
5. Monitoring Search Hits: When the scanner detects an active frequency, it will pause on that frequency and allow you to monitor the transmission. Take note of any interesting frequencies or channels that you come across during the search process.
6. Storing Frequencies: If you come across a frequency that you want to keep for future monitoring, use the scanner’s storage options. You can save the found frequency to a temporary memory slot or create a new channel to program it permanently.
7. Adjusting Search Parameters: While the search is in progress, you can adjust the search parameters on the fly. This includes expanding or narrowing the frequency range, changing the step size, or modifying other search settings to refine your search results.
8. Searching in Different Areas: The search function is particularly useful when traveling to different areas. Instead of programming specific local frequencies, activate the search function to scan for frequencies unique to that area. You may discover interesting channels and services that you were not aware of before.
9. Tracking and Logging Frequencies: If your scanner supports frequency logging or tracking, you can use these features in conjunction with the search function. Logging allows you to record and review the frequencies you come across during the search process, making it easier to identify and monitor them later.
10. Experimenting and Discovering: The search function is an excellent opportunity to explore and discover new frequencies. Spend time experimenting with different search ranges and settings to uncover hidden channels or unique services in your area or while on the go.
By utilizing the search function on your Uniden Bearcat scanner, you can expand your scanning horizons and discover new frequencies of interest. Take advantage of this feature to explore different frequency ranges, find hidden gems, and enhance your overall scanning experience.
Updating Firmware and Database on the Scanner
Regularly updating the firmware and database on your Uniden Bearcat scanner ensures that you have access to the latest features, improvements, and current frequency information. Here is a step-by-step guide on how to update the firmware and database on your scanner:
1. Checking for Updates: Visit the Uniden website or the manufacturer’s support page to check for available firmware and database updates for your scanner model. Download the latest updates to your computer.
2. Connecting the Scanner: Connect your Uniden Bearcat scanner to your computer using a USB cable. Ensure that the scanner is turned on and in programming mode.
3. Installing Firmware Updates: Install the downloaded firmware update file on your computer. Follow the provided instructions to initiate the firmware update process. This process may vary depending on your specific scanner model and the firmware update procedure provided by Uniden.
4. Following Firmware Update Instructions: Pay close attention to any specific instructions or requirements provided by Uniden during the firmware update process. These instructions may include putting the scanner into a special update mode or following additional prompts on the scanner’s display.
5. Database Update Procedure: If a database update is available, similarly install the downloaded update file on your computer. Follow the instructions provided by Uniden for updating the scanner’s frequency database. This may involve using specific software applications provided by Uniden or following manual update instructions.
6. Disconnecting the Scanner: Once the firmware and database updates have been successfully installed, disconnect the scanner from the computer. Ensure that the update process has completed and that any necessary restarts or reboots have been performed.
7. Verifying the Updates: After the update process is complete and the scanner is disconnected, verify that the firmware and database updates were successful. Check the scanner’s firmware version and confirm that the database reflects the most recent information for your region.
8. Exploring New Features: Take the time to explore any new features or improvements introduced by the firmware update. Familiarize yourself with any changes to the scanner’s user interface and experiment with new functionalities that may enhance your scanning experience.
9. Customizing Settings: After updating the firmware and database, review your personalized scanner settings. Some firmware updates may reset certain settings to their default values. Customize the settings to your preferences, including display options, alert notifications, channel priorities, and any other configurable options.
10. Regular Update Schedule: Maintain a regular update schedule to ensure that your Uniden Bearcat scanner remains up to date. Check for firmware and database updates periodically, especially if you notice new frequencies or changes occurring in your monitoring area.
By updating the firmware and database on your Uniden Bearcat scanner, you can take advantage of the latest features and ensure that you have accurate and current frequency information. Keeping your scanner up to date enhances its performance and allows you to stay connected to the frequencies that matter to you.
Troubleshooting Common Issues with the Scanner
While the Uniden Bearcat scanner is a reliable device, you may encounter some common issues from time to time. Knowing how to troubleshoot these issues can help you resolve them quickly and effectively. Here are some common issues and troubleshooting steps:
1. No Power: If your scanner is not powering on, check that the power adapter is securely connected to both the scanner and the power outlet. Ensure that the power source is functioning or try using a different power adapter. If the issue persists, it may indicate a problem with the scanner’s internal power circuitry.
2. Weak Signal or No Reception: If you are experiencing weak signal or no reception, make sure that the scanner’s antenna is properly attached and extended. If you are indoors, try repositioning the scanner or using an external antenna for better reception. Additionally, ensure that you have programmed the correct frequencies and scan lists for your location.
3. Interference or Noise: Interference and noise can affect the quality of transmissions. Adjust the squelch control to eliminate background noise while still maintaining clear reception. If you are experiencing specific interference, such as from nearby electronic devices, try moving the scanner or shielding it to reduce the interference.
4. Programming Errors: If you’re encountering errors while programming frequencies, double-check that you are entering the frequencies correctly, including decimal points and leading zeros. Make sure that you have selected the appropriate modulation type and other necessary parameters for each programmed channel. Additionally, ensure that there are no duplicate frequencies programmed in different channel slots.
5. Scanner Freezing or Locking Up: If your scanner becomes unresponsive or freezes, try resetting it by removing and reinserting the batteries or disconnecting and reconnecting the power source. Additionally, check for any firmware updates that may address known freezing issues. If the problem persists, it may indicate a hardware issue that requires further troubleshooting or repair.
6. Display or Keypad Issues: If you’re experiencing display or keypad issues, such as flickering screens or unresponsive buttons, check for any debris or dust that may be affecting the contacts. Clean the display screen and keypad gently with a soft, lint-free cloth. If the problem persists, it may require professional repair or replacement of the affected components.
7. Error Messages: If you receive error messages on your scanner, refer to the scanner’s manual or the manufacturer’s support resources. Error messages often indicate specific issues or violations that may need further troubleshooting or corrective actions.
8. Scanner Not Scanning Properly: If the scanner is not scanning through programmed channels or scan lists correctly, check that you have selected the appropriate scan mode and enabled the desired scan lists. Verify that the programmed frequencies are active and within range. Also, ensure that you have set the correct scan delay and priority settings.
9. Battery Drain: If your scanner’s batteries drain quickly, check that you are using high-quality, fresh batteries. If using rechargeable batteries, ensure they are fully charged. Adjust the scanner’s settings to optimize battery life, such as reducing the backlight brightness or enabling power-saving features. If the battery drain persists, it may indicate a hardware issue or a problem with the scanner’s power circuitry.
10. Consulting Support: If you have tried troubleshooting steps and the problem persists, don’t hesitate to contact Uniden customer support or consult online forums and communities for assistance. Provide them with specific details about the issue you are facing, any error messages received, and the steps you have already taken to troubleshoot.
By following these troubleshooting steps, you can resolve common issues that may arise with your Uniden Bearcat scanner. Remember to consult the scanner’s manual and utilize the manufacturer’s support resources for additional guidance in troubleshooting and resolving more complex issues.
Tips and Tricks for Using the Uniden Bearcat Scanner
Using the Uniden Bearcat scanner can be an exciting and rewarding experience. Here are some tips and tricks to help you make the most out of your scanner:
1. Familiarize Yourself with the Manual: Take the time to thoroughly read the scanner’s manual. It contains valuable information on features, programming instructions, troubleshooting, and other helpful details specific to your scanner model.
2. Join Online Scanner Communities: Connect with other scanner enthusiasts by joining online forums and communities. These groups are a great resource for learning new tips, exchanging information, and discovering interesting frequencies and scanner-related news.
3. Experiment with Different Antennas: Consider investing in different types of antennas to improve reception. External antennas, such as a discone or yagi antenna, can provide better range and reception quality, especially if you have a fixed base station setup.
4. Use Pre-Programmed Frequency Lists: Many online resources offer pre-programmed frequency lists for different areas, such as local police and fire frequencies. Take advantage of these resources to quickly program important frequencies into your scanner.
5. Set Up Priority Channels: Designate priority channels for critical frequencies, such as emergency services or important public safety agencies. This ensures that you don’t miss any critical transmissions, even when other channels are being scanned.
6. Utilize Alpha Tags: Alpha tags allow you to assign custom names to your channels, making it easier to identify specific frequencies at a glance. Take advantage of this feature to organize and categorize your programmed frequencies effectively.
7. Follow Scanner Etiquette: When monitoring sensitive frequencies, ensure that you follow scanner etiquette and local laws. Respect privacy concerns and use your scanner responsibly. Avoid sharing sensitive information or interfering with active emergency or law enforcement activities.
8. Explore Different Scan Modes: Take the time to understand the various scan modes available on your scanner. Experiment with different scan options, such as priority scan, weather scan, or custom scan lists, to tailor your scanning experience to specific needs and interests.
9. Take Note of Transmission Patterns: Monitor frequencies regularly to identify common transmission patterns. Note the busiest times of the day or week for specific frequencies or agencies. This knowledge can help you plan your monitoring sessions accordingly.
10. Regularly Update Firmware and Frequencies: Stay up to date by regularly checking for firmware updates and database updates. Keeping your scanner’s firmware current ensures that you have access to the latest features and performance enhancements. Updating frequencies ensures that you have the most accurate and up-to-date information.
By incorporating these tips and tricks into your scanning routine, you can enhance your overall experience with the Uniden Bearcat scanner. Enjoy the world of radio monitoring and make the most out of your scanner with these helpful suggestions.